
Operating Instructions
Page 2
...'s precious moments with advanced features, but at the same time it is no guarantee that may call: Sony Customer Information Center 1800-222-SONY (7669) or write to rain or moisture. If this Sony Digital Handycam camcorder. For the Sony Service Center nearest you call "Memory Stick" For the customers in a residential installation. and CANADA DISPOSAL...
...'s precious moments with advanced features, but at the same time it is no guarantee that may call: Sony Customer Information Center 1800-222-SONY (7669) or write to rain or moisture. If this Sony Digital Handycam camcorder. For the Sony Service Center nearest you call "Memory Stick" For the customers in a residential installation. and CANADA DISPOSAL...
Operating Instructions
Page 3
... 107 Resetting the date and time 114 "Memory Stick" Operations Advanced Recording Operations Recording a still image on a "Memory Stick" - Digital effect 40 Shooting with an analog video unit and a PC - introduction ...... 115 Recording still images on a tape - Memory Photo ...152 Warning indicators and messages 153 Using your own titles 101 Labeling a cassette 103 Erasing the cassette memory data 105 Customizing Your Camcorder Playback - PROG. Sound recording level 51 Presetting the adjustment for a photo Quick Reference - SLIDE SHOW 137 Preventing accidental erasure ...
... 107 Resetting the date and time 114 "Memory Stick" Operations Advanced Recording Operations Recording a still image on a "Memory Stick" - Digital effect 40 Shooting with an analog video unit and a PC - introduction ...... 115 Recording still images on a tape - Memory Photo ...152 Warning indicators and messages 153 Using your own titles 101 Labeling a cassette 103 Erasing the cassette memory data 105 Customizing Your Camcorder Playback - PROG. Sound recording level 51 Presetting the adjustment for a photo Quick Reference - SLIDE SHOW 137 Preventing accidental erasure ...
Operating Instructions
Page 4
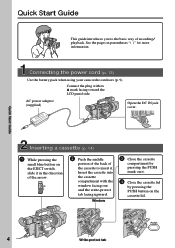
... cassette lid by pressing the PUSH button on the EJECT switch, slide it . Connecting the power cord (p. 13) Use the battery pack when using your camcorder outdoors (p. 9). Quick Start Guide This guide introduces you to the basic way of the cassette to insert it in parentheses "( )" for more information. Insert the...
... cassette lid by pressing the PUSH button on the EJECT switch, slide it . Connecting the power cord (p. 13) Use the battery pack when using your camcorder outdoors (p. 9). Quick Start Guide This guide introduces you to the basic way of the cassette to insert it in parentheses "( )" for more information. Insert the...
Operating Instructions
Page 5
... 2 Press m to rewind the tape. 3 Press N to CAMERA while pressing the small green button. The date and time is closed, use the viewfinder placing your camcorder by holding the viewfinder, the LCD panel, the battery pack, or the microphone. Recording a picture (p. 15) Viewfinder When the LCD panel is indicated for five... seconds. MEMORY OFF CAMERA (CHG) VCR 4 Press START/ STOP. OPEN 1 Remove the hood cap. 2 Set the POWER switch to start playback. REW PLAY 5 Your camcorder starts recording.
... 2 Press m to rewind the tape. 3 Press N to CAMERA while pressing the small green button. The date and time is closed, use the viewfinder placing your camcorder by holding the viewfinder, the LCD panel, the battery pack, or the microphone. Recording a picture (p. 15) Viewfinder When the LCD panel is indicated for five... seconds. MEMORY OFF CAMERA (CHG) VCR 4 Press START/ STOP. OPEN 1 Remove the hood cap. 2 Set the POWER switch to start playback. REW PLAY 5 Your camcorder starts recording.

Operating Instructions
Page 6
...the DV format. index search (p. 64) •Searching a recording by index - title search (p. 66) •Superimposing a title (p. 97) •Making your camcorder. end search (p. 25, 29) •Searching a recording by date - Tapes with your own titles (p. 101) •Labeling a cassette (p. 103). e.g. Set... the POWER switch to indicate that are shown in the introduction of the features that the operation is based on cassette memory Your camcorder is being carried out. You can hear a beep or a melody sound to CAMERA. Getting started - date search (p. 67) •...
...the DV format. index search (p. 64) •Searching a recording by index - title search (p. 66) •Superimposing a title (p. 97) •Making your camcorder. end search (p. 25, 29) •Searching a recording by date - Tapes with your own titles (p. 101) •Labeling a cassette (p. 103). e.g. Set... the POWER switch to indicate that are shown in the introduction of the features that the operation is based on cassette memory Your camcorder is being carried out. You can hear a beep or a melody sound to CAMERA. Getting started - date search (p. 67) •...

Operating Instructions
Page 7
... be contrary to the provision of the recording cannot be compensated if recording or playback is 99.99% or more. •Do not let your camcorder get wet may be damaged [c]. [a] [b] [c] Contents of the copyright laws. Effective ratio of pixels and/or screen is not made due to ...color systems differ from rain and sea water. However, there may be copyrighted. Getting started Using this malfunction cannot be repaired [a]. •Never leave your camcorder exposed to temperatures above 60 °C (140 °F), such as in a car parked in the sun or under direct sunlight [b]. •Do ...
... be contrary to the provision of the recording cannot be compensated if recording or playback is 99.99% or more. •Do not let your camcorder get wet may be damaged [c]. [a] [b] [c] Contents of the copyright laws. Effective ratio of pixels and/or screen is not made due to ...color systems differ from rain and sea water. However, there may be copyrighted. Getting started Using this malfunction cannot be repaired [a]. •Never leave your camcorder exposed to temperatures above 60 °C (140 °F), such as in a car parked in the sun or under direct sunlight [b]. •Do ...
Operating Instructions
Page 8
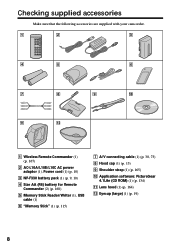
Checking supplied accessories Make sure that the following accessories are supplied with your camcorder. 1 2 3 4 5 6 7 8 9 0 qa qs 1 Wireless Remote Commander (1) (p. 167) 2 AC-L10A/L10B/L10C AC power adaptor (1), Power cord (1) (p. 10) 3 NP-F330 battery pack (1) (p. 9, 10) 4 Size AA (R6) battery ...
Checking supplied accessories Make sure that the following accessories are supplied with your camcorder. 1 2 3 4 5 6 7 8 9 0 qa qs 1 Wireless Remote Commander (1) (p. 167) 2 AC-L10A/L10B/L10C AC power adaptor (1), Power cord (1) (p. 10) 3 NP-F330 battery pack (1) (p. 9, 10) 4 Size AA (R6) battery ...
Operating Instructions
Page 9
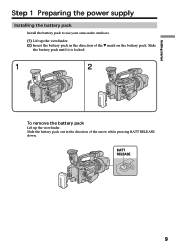
Getting started Step 1 Preparing the power supply Installing the battery pack Install the battery pack to use your camcorder outdoors. (1) Lift up the viewfinder. Slide the battery pack out in the direction of the arrow while pressing BATT RELEASE down. BATT RELEASE 9 Slide the battery pack until it is locked. 1 2 To remove the battery pack Lift up the viewfinder. (2) Insert the battery pack in the direction of the V mark on the battery pack.
Getting started Step 1 Preparing the power supply Installing the battery pack Install the battery pack to use your camcorder outdoors. (1) Lift up the viewfinder. Slide the battery pack out in the direction of the arrow while pressing BATT RELEASE down. BATT RELEASE 9 Slide the battery pack until it is locked. 1 2 To remove the battery pack Lift up the viewfinder. (2) Insert the battery pack in the direction of the V mark on the battery pack.

Operating Instructions
Page 10
... only with the "InfoLITHIUM" battery pack (L series). (1) Open the DC IN jack cover and connect the AC power adaptor supplied with your camcorder. Charging begins. Notes •Prevent metallic objects from the DC IN jack on the display window. Step 1 Preparing the power supply Charging the battery pack ... after charging it fully discharges again. When you to be used for the correct remaining battery time to use it until FULL appears on your camcorder to the DC IN jack with the metal parts of the DC plug of the AC power adaptor. Keep the battery pack in minutes on...
... only with the "InfoLITHIUM" battery pack (L series). (1) Open the DC IN jack cover and connect the AC power adaptor supplied with your camcorder. Charging begins. Notes •Prevent metallic objects from the DC IN jack on the display window. Step 1 Preparing the power supply Charging the battery pack ... after charging it fully discharges again. When you to be used for the correct remaining battery time to use it until FULL appears on your camcorder to the DC IN jack with the metal parts of the DC plug of the AC power adaptor. Keep the battery pack in minutes on...
Operating Instructions
Page 11
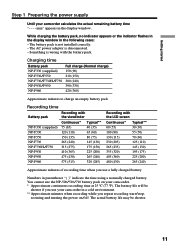
... (200) 265 (240) Approximate minutes of recording time when you repeat recording start/stop, zooming and turning the power on your camcorder calculates the actual remaining battery time "- - - - The battery life will be shorter. 11 The actual battery life may be shorter if... indicator appears or the indicator flashes in the display window in the display window. Getting started Step 1 Preparing the power supply Until your camcorder. * Approximate continuous recording time at 25 °C (77 °F). The battery pack is disconnected. - Charging time Battery pack NP-F330...
... (200) 265 (240) Approximate minutes of recording time when you repeat recording start/stop, zooming and turning the power on your camcorder calculates the actual remaining battery time "- - - - The battery life will be shorter. 11 The actual battery life may be shorter if... indicator appears or the indicator flashes in the display window in the display window. Getting started Step 1 Preparing the power supply Until your camcorder. * Approximate continuous recording time at 25 °C (77 °F). The battery pack is disconnected. - Charging time Battery pack NP-F330...

Operating Instructions
Page 12
... time Battery pack NP-F330 (supplied) NP-F530 NP-F550 NP-F730 NP-F730H/F750 NP-F930 NP-F950 NP-F960 Playing time on your camcorder. You cannot use a fully charged battery Numbers in a cold environment. Notes •The supplied battery pack is displayed. 12 "InfoLITHIUM" is a ...95) 190 (165) 225 (195) 385 (345) 460 (415) 605 (540) 705 (630) 830 (745) Approximate minutes of Sony Corporation. The battery life will be sold in your camcorder in parentheses "( )" indicate the time using a normally charged battery. What is enough to operate, charge the battery pack fully again. If...
... time Battery pack NP-F330 (supplied) NP-F530 NP-F550 NP-F730 NP-F730H/F750 NP-F930 NP-F950 NP-F960 Playing time on your camcorder. You cannot use a fully charged battery Numbers in a cold environment. Notes •The supplied battery pack is displayed. 12 "InfoLITHIUM" is a ...95) 190 (165) 225 (195) 385 (345) 460 (415) 605 (540) 705 (630) 830 (745) Approximate minutes of Sony Corporation. The battery life will be sold in your camcorder in parentheses "( )" indicate the time using a normally charged battery. What is enough to operate, charge the battery pack fully again. If...

Operating Instructions
Page 13
Using a car battery Use the Sony DC Adaptor/Charger (not supplied). 13 Notes •The power cord must only be ...if the set is not disconnected from the AC power source (house current) as long as it is attached to your camcorder. •The DC IN jack has source priority. Getting started Step 1 Preparing the power supply Connecting to a wall outlet...power cord to a wall outlet. 1 2 Precaution The set itself has been turned off. This means that you use your camcorder for a long time, we recommend that the battery pack cannot supply any power if the power cord is connected to the DC...
Using a car battery Use the Sony DC Adaptor/Charger (not supplied). 13 Notes •The power cord must only be ...if the set is not disconnected from the AC power source (house current) as long as it is attached to your camcorder. •The DC IN jack has source priority. Getting started Step 1 Preparing the power supply Connecting to a wall outlet...power cord to a wall outlet. 1 2 Precaution The set itself has been turned off. This means that you use your camcorder for a long time, we recommend that the battery pack cannot supply any power if the power cord is connected to the DC...
Operating Instructions
Page 15
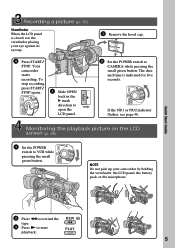
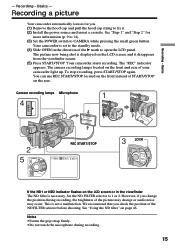
... filter" on the LCD screen or in the direction of the picture may change the position during recording. 15 Recording a picture Your camcorder automatically focuses for more information (p. 9 to 14). (3) Set the POWER switch to the standby mode. (4) Slide OPEN in the ...Install the power source and insert a cassette. However, if you check the position of your camcorder light up. Your camcorder is necessary. The picture now being shot is not a malfunction. Recording - Your camcorder starts recording. Notes •Fasten the grip strap firmly. •Do not touch the ...
... filter" on the LCD screen or in the direction of the picture may change the position during recording. 15 Recording a picture Your camcorder automatically focuses for more information (p. 9 to 14). (3) Set the POWER switch to the standby mode. (4) Slide OPEN in the ...Install the power source and insert a cassette. However, if you check the position of your camcorder light up. Your camcorder is necessary. The picture now being shot is not a malfunction. Recording - Your camcorder starts recording. Notes •Fasten the grip strap firmly. •Do not touch the ...

Operating Instructions
Page 16
... Select SP or LP in the menu settings before shooting (p. 34). When you record a tape on your camcorder in LP mode, we recommend that you use the end search function (p. 25). Note on the progressive mode ... as in SP mode. In LP mode, you recorded and the next scene is not inserted, your camcorder. We recommend that you intend to use a tape with cassette memory, however, you can make the ... switch to prevent tape wear and save battery power. When you use the images on your camcorder in standby mode for five minutes while the cassette is set to the right as you do...
... Select SP or LP in the menu settings before shooting (p. 34). When you record a tape on your camcorder in LP mode, we recommend that you use the end search function (p. 25). Note on the progressive mode ... as in SP mode. In LP mode, you recorded and the next scene is not inserted, your camcorder. We recommend that you intend to use a tape with cassette memory, however, you can make the ... switch to prevent tape wear and save battery power. When you use the images on your camcorder in standby mode for five minutes while the cassette is set to the right as you do...
Operating Instructions
Page 17
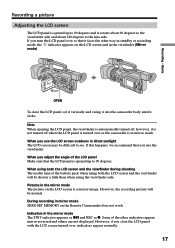
... screen outdoors in the viewfinder (Mirror mode). 180° 90° OPEN To close the LCD panel with the LCD screen turned over or the camcorder is opened up to 90 degrees and it rotates about 90 degrees to the viewfinder side and about 180 degrees to the lens side. Pictures... LCD panel over so that the LCD panel is a mirror-image. If you close the LCD panel, set it vertically and swing it into the camcorder body until it is not turned off when the LCD panel is turned over , indicators appear normally. 17 When you use the viewfinder. Indicators in...
... screen outdoors in the viewfinder (Mirror mode). 180° 90° OPEN To close the LCD panel with the LCD screen turned over or the camcorder is opened up to 90 degrees and it rotates about 90 degrees to the viewfinder side and about 180 degrees to the lens side. Pictures... LCD panel over so that the LCD panel is a mirror-image. If you close the LCD panel, set it vertically and swing it into the camcorder body until it is not turned off when the LCD panel is turned over , indicators appear normally. 17 When you use the viewfinder. Indicators in...
Operating Instructions
Page 18
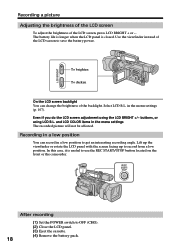
... of the LCD screen To adjust the brightness of the LCD screen to use the REC START/STOP button located on the front or the camcorder. Use the viewfinder instead of the LCD screen, press LCD BRIGHT + or -. Even if you do the LCD screen adjustment using LCD B.L. buttons, or using...
... of the LCD screen To adjust the brightness of the LCD screen to use the REC START/STOP button located on the front or the camcorder. Use the viewfinder instead of the LCD screen, press LCD BRIGHT + or -. Even if you do the LCD screen adjustment using LCD B.L. buttons, or using...
Operating Instructions
Page 19
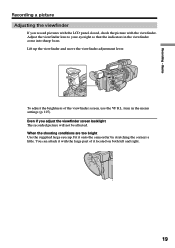
... Adjusting the viewfinder If you adjust the viewfinder screen backlight The recorded picture will not be affected. To adjust the brightness of it onto the camcorder by stretching the corners a little. When the shooting conditions are too bright Use the supplied large eyecup.
... Adjusting the viewfinder If you adjust the viewfinder screen backlight The recorded picture will not be affected. To adjust the brightness of it onto the camcorder by stretching the corners a little. When the shooting conditions are too bright Use the supplied large eyecup.
Operating Instructions
Page 22
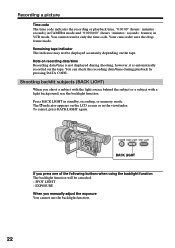
... the recording or playback time, "0:00:00" (hours : minutes : seconds) in CAMERA mode and "0:00:00:00" (hours : minutes : seconds : frames) in the viewfinder. Your camcorder uses the drop frame mode. Press BACK LIGHT in standby, recording, or memory mode. To cancel, press BACK LIGHT again. SPOT LIGHT - You cannot rewrite...
... the recording or playback time, "0:00:00" (hours : minutes : seconds) in CAMERA mode and "0:00:00:00" (hours : minutes : seconds : frames) in the viewfinder. Your camcorder uses the drop frame mode. Press BACK LIGHT in standby, recording, or memory mode. To cancel, press BACK LIGHT again. SPOT LIGHT - You cannot rewrite...
Operating Instructions
Page 24
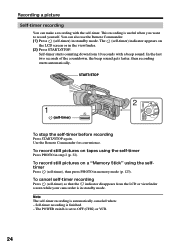
... the viewfinder. (2) Press START/STOP. Note The self-timer recording is finished. - Self-timer starts counting down from the LCD or viewfinder screen while your camcorder is in standby mode. START/STOP MEMORY OFF CAMERA (CHG) 1 (self-timer) 2 VCR POWER To stop the self-timer before recording Press START/STOP again...
... the viewfinder. (2) Press START/STOP. Note The self-timer recording is finished. - Self-timer starts counting down from the LCD or viewfinder screen while your camcorder is in standby mode. START/STOP MEMORY OFF CAMERA (CHG) 1 (self-timer) 2 VCR POWER To stop the self-timer before recording Press START/STOP again...

Operating Instructions
Page 25
...EDITSEARCH / Rec Review You can monitor the sound from the speaker or headphones. The camcorder rewinds or fast-forwards the tape and the last five-second recorded picture is played back and the camcorder returns to stop playback. You cannot monitor the sound. You can easily go backward ...Release EDITSEARCH to standby. Press the - 7 side of the recording - After playback the camcorder turns to the end of the last recorded portion. side of picture is played back. If there is a blank portion at the beginning or...
...EDITSEARCH / Rec Review You can monitor the sound from the speaker or headphones. The camcorder rewinds or fast-forwards the tape and the last five-second recorded picture is played back and the camcorder returns to stop playback. You cannot monitor the sound. You can easily go backward ...Release EDITSEARCH to standby. Press the - 7 side of the recording - After playback the camcorder turns to the end of the last recorded portion. side of picture is played back. If there is a blank portion at the beginning or...


