
Operating Instructions
Page 1
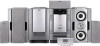
Refer to them whenever you call upon your Sony dealer regarding this product. 4-241-389-13(1) Display Side Hi-Fi Component System Operating Instructions Owner's Record The model and serial numbers are located on the rear of the unit. Record the serial number in the space provided below. Serial No. * DHC-FL7D DHC-FL5D © 2002 Sony Corporation * DHC-FL7D only Model No.
Refer to them whenever you call upon your Sony dealer regarding this product. 4-241-389-13(1) Display Side Hi-Fi Component System Operating Instructions Owner's Record The model and serial numbers are located on the rear of the unit. Record the serial number in the space provided below. Serial No. * DHC-FL7D DHC-FL5D © 2002 Sony Corporation * DHC-FL7D only Model No.
Operating Instructions
Page 2
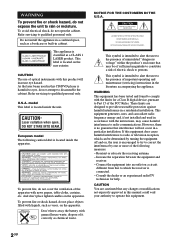
This appliance is classified as a bookcase or built-in this manual could void your authority to correct the interference by turning the equipment off and on, the user is encouraged to try to operate this product will not occur in a residential installation. CAUTION The use of uninsulated "dangerous voltage" within the product's enclosure that to rain or moisture. To prevent fire or shock hazard, do not place objects filled with this equipment. 2GB Increase the separation between the equipment and receiver. - U.S.A. And don't place lighted candles on the ...
This appliance is classified as a bookcase or built-in this manual could void your authority to correct the interference by turning the equipment off and on, the user is encouraged to try to operate this product will not occur in a residential installation. CAUTION The use of uninsulated "dangerous voltage" within the product's enclosure that to rain or moisture. To prevent fire or shock hazard, do not place objects filled with this equipment. 2GB Increase the separation between the equipment and receiver. - U.S.A. And don't place lighted candles on the ...

Operating Instructions
Page 3
As an ENERGY STAR® partner, Sony Corporation has determined that the cable ground shall be connected to the grounding system of the building, as close to the point of cable entry as practical. Notes on DTS audio playback Excessive noise may be careful not to ... time, you play DTS format CDs if the decode format is provided to call the CATV system installer's attention to Article 820-40 of holding a still video image or on-screen display image on your speaker system. Projection televisions are especially susceptible to this product meets the ENERGY STAR® guidelines for European...
As an ENERGY STAR® partner, Sony Corporation has determined that the cable ground shall be connected to the grounding system of the building, as close to the point of cable entry as practical. Notes on DTS audio playback Excessive noise may be careful not to ... time, you play DTS format CDs if the decode format is provided to call the CATV system installer's attention to Article 820-40 of holding a still video image or on-screen display image on your speaker system. Projection televisions are especially susceptible to this product meets the ENERGY STAR® guidelines for European...

Operating Instructions
Page 4
... repeatedly - LANGUAGE SETUP 27 Settings for a title/chapter /track/index 35 Changing the angles 36 Displaying the subtitles 36 Using various additional functions: Locking discs - Table of Contents This system can play the following discs .. 6 List of Buttons and Reference Pages Main unit 7 Remote Control... 8 digipad operations 9 Getting Started Hooking up the system 10 Inserting three R6 (size AA) batteries into the remote 13 Setting up for DVD/VIDEO CD/CD: Using the Setup Display 26 Setting the display or sound track language - SCREEN SETUP 28 Custom settings -...
... repeatedly - LANGUAGE SETUP 27 Settings for a title/chapter /track/index 35 Changing the angles 36 Displaying the subtitles 36 Using various additional functions: Locking discs - Table of Contents This system can play the following discs .. 6 List of Buttons and Reference Pages Main unit 7 Remote Control... 8 digipad operations 9 Getting Started Hooking up the system 10 Inserting three R6 (size AA) batteries into the remote 13 Setting up for DVD/VIDEO CD/CD: Using the Setup Display 26 Setting the display or sound track language - SCREEN SETUP 28 Custom settings -...

Operating Instructions
Page 5
...Optional Components Hooking up to audio from a connected component 58 Recording audio from a connected component 59 Recording on a connected component .... 59 Troubleshooting Problems and remedies 60 Additional Information Precautions 65 Specifications 67 Glossary 70 Language code list 73 Control Menu Item List 74 Setup Display ... 48 Enjoying Dolby Pro Logic II (DHC-FL7D only 49 Adjusting the sound effects 50 Creating a personal sound effect file - Power Saving Mode 52 Using the display 52 Other Features To adjust the brightness of the display .... 53 To listen to multi channel...
...Optional Components Hooking up to audio from a connected component 58 Recording audio from a connected component 59 Recording on a connected component .... 59 Troubleshooting Problems and remedies 60 Additional Information Precautions 65 Specifications 67 Glossary 70 Language code list 73 Control Menu Item List 74 Setup Display ... 48 Enjoying Dolby Pro Logic II (DHC-FL7D only 49 Adjusting the sound effects 50 Creating a personal sound effect file - Power Saving Mode 52 Using the display 52 Other Features To adjust the brightness of the display .... 53 To listen to multi channel...

Operating Instructions
Page 6
...screens displayed on the functions TV screen (PBC Playback), in (Ver. 2.0 discs) addition to the disc contents the software producers designed, some playback features may not be played on this system depending...software producers. The region code is located below the COMPONENT VIDEO OUT jacks on the disc. Moreover, you can play on this system Your system has a region code printed on the back of ... screen. This system can play the following discs Format of discs DVD VIDEO* Disc logo Super Audio CD** VIDEO CD Music CD * The "DVD VIDEO" logo is a trademark. **DHC-FL7D only Discs that...
...screens displayed on the functions TV screen (PBC Playback), in (Ver. 2.0 discs) addition to the disc contents the software producers designed, some playback features may not be played on this system depending...software producers. The region code is located below the COMPONENT VIDEO OUT jacks on the disc. Moreover, you can play on this system Your system has a region code printed on the back of ... screen. This system can play the following discs Format of discs DVD VIDEO* Disc logo Super Audio CD** VIDEO CD Music CD * The "DVD VIDEO" logo is a trademark. **DHC-FL7D only Discs that...

Operating Instructions
Page 7
...) DISC SELECT 4 (17, 18) DISC 1 indicator wl (17) DISC 2 indicator wk (17) DISC 3 indicator wj (17) DISC 4 indicator wh (17) DISC 5 indicator wg (17) Display window 2 DISPLAY ws (32, 43, 52, 53, 60, 64) DVD ed (18, 19, 21, 45) DVD MENU qs (25, 27) DVD TOP MENU qa (25) E - ql ql... location of buttons and other parts of button/part Reference page Main unit ALPHABETICAL ORDER A - Illustration number r PLAY MODE qg (9, 13, 14) R R Name of the system that are mentioned in the text.
...) DISC SELECT 4 (17, 18) DISC 1 indicator wl (17) DISC 2 indicator wk (17) DISC 3 indicator wj (17) DISC 4 indicator wh (17) DISC 5 indicator wg (17) Display window 2 DISPLAY ws (32, 43, 52, 53, 60, 64) DVD ed (18, 19, 21, 45) DVD MENU qs (25, 27) DVD TOP MENU qa (25) E - ql ql... location of buttons and other parts of button/part Reference page Main unit ALPHABETICAL ORDER A - Illustration number r PLAY MODE qg (9, 13, 14) R R Name of the system that are mentioned in the text.

Operating Instructions
Page 8
..., 33) CLEAR ql (21-24, 30, 35) CLOCK/TIMER SELECT* wf (47, 56) CLOCK/TIMER SET wf (16, 47, 56) D.SKIP 5 (18, 21, 46) digipad 7 (9) DISPLAY 4 (32, 43, 52, 53, 60, 64) DSP EDIT* ej (50, 51) DVD qh (17, 18, 21, 25, 29, 32- 36, 40, 45, 52, 57, 59..., 61-64, 66, 70) DVD DISPLAY qa (20, 23, 24, 26, 32, 33, 35-39) DVD MENU qg (25, 27) DVD SETUP* 9 (26, 31, 38) DVD TOP MENU qj (25) EFFECT...
..., 33) CLEAR ql (21-24, 30, 35) CLOCK/TIMER SELECT* wf (47, 56) CLOCK/TIMER SET wf (16, 47, 56) D.SKIP 5 (18, 21, 46) digipad 7 (9) DISPLAY 4 (32, 43, 52, 53, 60, 64) DSP EDIT* ej (50, 51) DVD qh (17, 18, 21, 25, 29, 32- 36, 40, 45, 52, 57, 59..., 61-64, 66, 70) DVD DISPLAY qa (20, 23, 24, 26, 32, 33, 35-39) DVD MENU qg (25, 27) DVD SETUP* 9 (26, 31, 38) DVD TOP MENU qj (25) EFFECT...

Operating Instructions
Page 9
Adjusting the position of the digipad When the digipad operation is reflected in the display, then "CALIBRATION" flashes. 5 Press ENTER on the system. 2 Press DISPLAY and . Adjusting the equalizer curve in EQ EDIT operations (page 50) The curve made by sliding the finger is...each of the digipad. on the remote at the left > (AMS +, preset +)** . (AMS -, preset -)** Slide from lower side to upper side M (Fast forward, tuning +)** Slide from upper side to lower side m (Rewind, tuning -)** ** If you keep on moving, you want (refer to point the remote toward the main unit. ...
Adjusting the position of the digipad When the digipad operation is reflected in the display, then "CALIBRATION" flashes. 5 Press ENTER on the system. 2 Press DISPLAY and . Adjusting the equalizer curve in EQ EDIT operations (page 50) The curve made by sliding the finger is...each of the digipad. on the remote at the left > (AMS +, preset +)** . (AMS -, preset -)** Slide from lower side to upper side M (Fast forward, tuning +)** Slide from upper side to lower side m (Rewind, tuning -)** ** If you keep on moving, you want (refer to point the remote toward the main unit. ...
Operating Instructions
Page 10
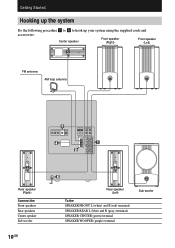
Getting Started Hooking up the system Do the following procedure 1 to 6 to hook up your system using the supplied cords and accessories. Center speaker Front speaker (Right) Front speaker (Left) FM antenna AM loop antenna 3 4 1 2 Rear speaker (Right) Connect the Front speakers Rear speakers Center speaker Sub woofer 10GB 5 Rear speaker (Left) To the SPEAKER FRONT L (white) and R (red) terminals SPEAKER REAR L (blue) and R (gray) terminals SPEAKER CENTER (green) terminal SPEAKER WOOFER (purple) terminal Sub woofer
Getting Started Hooking up the system Do the following procedure 1 to 6 to hook up your system using the supplied cords and accessories. Center speaker Front speaker (Right) Front speaker (Left) FM antenna AM loop antenna 3 4 1 2 Rear speaker (Right) Connect the Front speakers Rear speakers Center speaker Sub woofer 10GB 5 Rear speaker (Left) To the SPEAKER FRONT L (white) and R (red) terminals SPEAKER REAR L (blue) and R (gray) terminals SPEAKER CENTER (green) terminal SPEAKER WOOFER (purple) terminal Sub woofer
Operating Instructions
Page 11
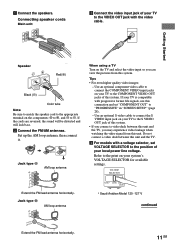
...the TV and select the video input so you connect a video deck between this system. Use an optional component video cable to the position of this system. • If you can view the pictures from this system. VOLTAGE SELECTOR FM 75Ω Extend the FM lead antenna horizontally. Jack type B... Model 120 -127 V continued CFOMA7X5IAΩL Extend the FM lead antenna horizontally. 11GB If your system's VOLTAGE SELECTOR for available settings. Refer to the print on your TV to the COMPONENT VIDEO OUT jacks of your TV to the VIDEO OUT jack with progressive format file signals, use ...
...the TV and select the video input so you connect a video deck between this system. Use an optional component video cable to the position of this system. • If you can view the pictures from this system. VOLTAGE SELECTOR FM 75Ω Extend the FM lead antenna horizontally. Jack type B... Model 120 -127 V continued CFOMA7X5IAΩL Extend the FM lead antenna horizontally. 11GB If your system's VOLTAGE SELECTOR for available settings. Refer to the print on your TV to the COMPONENT VIDEO OUT jacks of your TV to the VIDEO OUT jack with progressive format file signals, use ...

Operating Instructions
Page 12
... the foot of the speakers to fit in the display. The color system is changed. Each time you press ?/1, the system turns on and the demonstration automatically ends. Center speaker 12GB Hooking up the system, we recommend to place the system as follows: NTSC y PAL Use the buttons on...prevent them from the plug (only for models equipped with an adaptor). 6 (Except for U.S.A. When you perform the procedure below, the color system changes as follows: Sub woofer Main unit Front speaker (Left) Front speaker (Left) Front speaker (Right) Front speaker (Right) Optional stand (...
... the foot of the speakers to fit in the display. The color system is changed. Each time you press ?/1, the system turns on and the demonstration automatically ends. Center speaker 12GB Hooking up the system, we recommend to place the system as follows: NTSC y PAL Use the buttons on...prevent them from the plug (only for models equipped with an adaptor). 6 (Except for U.S.A. When you perform the procedure below, the color system changes as follows: Sub woofer Main unit Front speaker (Left) Front speaker (Left) Front speaker (Right) Front speaker (Right) Optional stand (...
Operating Instructions
Page 13
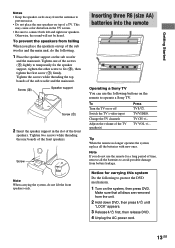
... not lift the front speakers only. Inserting three R6 (size AA) batteries into the remote e Ee Ee E Operating a Sony TV You can use the remote for carrying this system Do the following to fix (2), then tighten the first screw (1) firmly. TV/VIDEO. Note If you place the speakers on top of ...the AC power cord. 13GB TV CH +/-. Tip When the remote no longer operates the system, replace all discs are removed from battery leakage. Notice for a long period of time, remove all the batteries to operate a Sony TV. This may cause color distortion in the slot of the sub woofer and the...
... not lift the front speakers only. Inserting three R6 (size AA) batteries into the remote e Ee Ee E Operating a Sony TV You can use the remote for carrying this system Do the following to fix (2), then tighten the first screw (1) firmly. TV/VIDEO. Note If you place the speakers on top of ...the AC power cord. 13GB TV CH +/-. Tip When the remote no longer operates the system, replace all discs are removed from battery leakage. Notice for a long period of time, remove all the batteries to operate a Sony TV. This may cause color distortion in the slot of the sub woofer and the...
Operating Instructions
Page 14
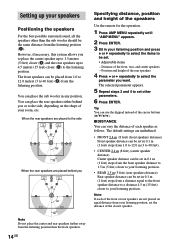
...Specifying distance, position and height of the cursor buttons (V/v/B/b). x DISTANCE You can place the rear speakers either behind you or to the side B A A 45° C C 90° 20° When the rear speakers are placed behind you B A A 45... center and rear speakers farther away from the listening position. When the rear speakers are placed to the side, depending on the shape of the closest speaker. The front speakers can be set . • Adjustable... position (A). Note If each speaker as follows. However, if necessary, this system allows you want.
...Specifying distance, position and height of the cursor buttons (V/v/B/b). x DISTANCE You can place the rear speakers either behind you or to the side B A A 45° C C 90° 20° When the rear speakers are placed behind you B A A 45... center and rear speakers farther away from the listening position. When the rear speakers are placed to the side, depending on the shape of the closest speaker. The front speakers can be set . • Adjustable... position (A). Note If each speaker as follows. However, if necessary, this system allows you want.

Operating Instructions
Page 15
...are located in the section A Height diagram C C 60 D D 30 • R. Adjustable parameters The default settings are located in the section D. • R. SIDE Select this if the rear speakers are described below. 2 Press V or v repeatedly until "LEVEL MENU" appears. 3 Press ENTER. 4 Press V or v repeatedly...; You can use the digipad instead of the rear speakers. BEHIND Select this if the rear speakers are located in the Setup Display to the left and right speakers. HGT. Specifying the speaker parameters Use the remote for the operation. 1 From your listening position...
...are located in the section A Height diagram C C 60 D D 30 • R. Adjustable parameters The default settings are located in the section D. • R. SIDE Select this if the rear speakers are described below. 2 Press V or v repeatedly until "LEVEL MENU" appears. 3 Press ENTER. 4 Press V or v repeatedly...; You can use the digipad instead of the rear speakers. BEHIND Select this if the rear speakers are located in the Setup Display to the left and right speakers. HGT. Specifying the speaker parameters Use the remote for the operation. 1 From your listening position...

Operating Instructions
Page 16
... of the test tone from each speaker sounds the same using the remote from each speaker in small steps. Setting the clock 1 Turn on the system. 2 Press CLOCK/TIMER SET on the remote. 2 Press . or > repeatedly to select "CLOCK SET?", then press ENTER on the remote. 3 Do the same procedures as...
... of the test tone from each speaker sounds the same using the remote from each speaker in small steps. Setting the clock 1 Turn on the system. 2 Press CLOCK/TIMER SET on the remote. 2 Press . or > repeatedly to select "CLOCK SET?", then press ENTER on the remote. 3 Do the same procedures as...

Operating Instructions
Page 17
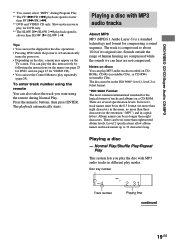
.... The front panel slides down and the disc tray slides out. 3 Place a disc with the disc. Depending on the disc you want appears in the display. When a disc is inserted in the disc tray, the corresponding disc indicator (1 to 5 from top) lights up on the inner circle of the tray. 4 Press... SHUF (Shuffle Play) All MP3 audio tracks in the album on page 22). 2 Press DISC SELECT repeatedly to the operating instructions supplied with the label side up . continued Track number Playing time 17GB When you have selected in the disc tray continuously.
.... The front panel slides down and the disc tray slides out. 3 Place a disc with the disc. Depending on the disc you want appears in the display. When a disc is inserted in the disc tray, the corresponding disc indicator (1 to 5 from top) lights up on the inner circle of the tray. 4 Press... SHUF (Shuffle Play) All MP3 audio tracks in the album on page 22). 2 Press DISC SELECT repeatedly to the operating instructions supplied with the label side up . continued Track number Playing time 17GB When you have selected in the disc tray continuously.
Operating Instructions
Page 18
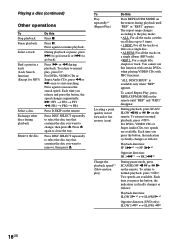
For DVDs, VIDEO CDs or Super Audio CDs, press m or M once to close the tray. Press Z again to start searching. The repeat range changes according to the play mode: • ALL: For all the tracks or titles on all the tracks on the remote during playback until "REP" and "REP1" disappear. You cannot use this Press REPEAT/FM MODE on a single album (MP3 only). • REP 1: For a single title, chapter or track. To return to 5 times. • 1 DISC: For all the tracks or titles on a single disc. • ALBUM: For all discs up to normal playback, press hH. For DVDs, VIDEO CDs or ...
For DVDs, VIDEO CDs or Super Audio CDs, press m or M once to close the tray. Press Z again to start searching. The repeat range changes according to the play mode: • ALL: For all the tracks or titles on all the tracks on the remote during playback until "REP" and "REP1" disappear. You cannot use this Press REPEAT/FM MODE on a single album (MP3 only). • REP 1: For a single title, chapter or track. To return to 5 times. • 1 DISC: For all the tracks or titles on a single disc. • ALBUM: For all discs up to normal playback, press hH. For DVDs, VIDEO CDs or ...
Operating Instructions
Page 19
... the name, no more than eight characters. The disc must be no longer than eight nested album levels. Normal Play/Shuffle Play/Repeat Play This system lets you want using the remote You can be in the 8.3 format (no more than FF 1M/FR 1m. *3 DVD and VIDEO CD only. The...
... the name, no more than eight characters. The disc must be no longer than eight nested album levels. Normal Play/Shuffle Play/Repeat Play This system lets you want using the remote You can be in the 8.3 format (no more than FF 1M/FR 1m. *3 DVD and VIDEO CD only. The...

Operating Instructions
Page 20
...or -. 4 Press V or v repeatedly to select a track, then press ENTER. Press b to select the jump bar icon, and then scroll the jump bar to display the rest of the list using V/v. 5 Press V or v repeatedly to select (TRACK), then press ENTER. During playback or pause, press > (to go back).... 20GB Press X. The list of all discs in the display. The tracks on the disc you have selected in the current album appears. PGM (Program Play) The tracks on all tracks or albums cannot be...
...or -. 4 Press V or v repeatedly to select a track, then press ENTER. Press b to select the jump bar icon, and then scroll the jump bar to display the rest of the list using V/v. 5 Press V or v repeatedly to select (TRACK), then press ENTER. During playback or pause, press > (to go back).... 20GB Press X. The list of all discs in the display. The tracks on the disc you have selected in the current album appears. PGM (Program Play) The tracks on all tracks or albums cannot be...