
Handbook
Page 1
Table of Contents Digital Photo Frame Handbook 4-295-278-12(1) Let's Use Enjoying More Troubleshooting Index DPF-HD1000/HD800/HD700
Table of Contents Digital Photo Frame Handbook 4-295-278-12(1) Let's Use Enjoying More Troubleshooting Index DPF-HD1000/HD800/HD700

Handbook
Page 2
Notes on the remote control and the photo frame, it from the AC outlet immediately. Recorded content not guaranteed Sony shall assume no responsibility for any way. • Images may trail across on the LCD screen in actual use or malfunction of other materials except ...'s Use Enjoying More Troubleshooting Read this before using Notes on the LCD screen. When using extremely high-precision technology, and over 99.99% of the DPF-HD700 unless noted otherwise. Backup recommendations To avoid potential risk of data loss caused by use . • Not all models of the digital photo...
Notes on the remote control and the photo frame, it from the AC outlet immediately. Recorded content not guaranteed Sony shall assume no responsibility for any way. • Images may trail across on the LCD screen in actual use or malfunction of other materials except ...'s Use Enjoying More Troubleshooting Read this before using Notes on the LCD screen. When using extremely high-precision technology, and over 99.99% of the DPF-HD700 unless noted otherwise. Backup recommendations To avoid potential risk of data loss caused by use . • Not all models of the digital photo...
Handbook
Page 3
... Identifying the parts 4 Compatible Memory Card/USB memory 6 Preparation: 1 Checking included items 8 Preparation: 2 Attaching the stand 9 Preparation: 3 Turning on the photo frame 11 Preparation: 4 Setting up the photo frame 13 Enjoying a slideshow 14 Changing the view mode 16 Playing a movie 20 Saving images in your photo... frame (import 21 Specifying the playback memory 23 Enjoying More Playing a slideshow with background music 24 Adjusting image size and orientation 27 Registering...
... Identifying the parts 4 Compatible Memory Card/USB memory 6 Preparation: 1 Checking included items 8 Preparation: 2 Attaching the stand 9 Preparation: 3 Turning on the photo frame 11 Preparation: 4 Setting up the photo frame 13 Enjoying a slideshow 14 Changing the view mode 16 Playing a movie 20 Saving images in your photo... frame (import 21 Specifying the playback memory 23 Enjoying More Playing a slideshow with background music 24 Adjusting image size and orientation 27 Registering...

Handbook
Page 5
... button (page 23) F VIEW MODE buttons SLIDESHOW button (page 16) CLOCK button (page 16) SINGLE button (page 16) INDEX button (page 16) G 1 (on the photo frame. Index 5GB Pull out the protective sheet before use the remote control Point the top end of Contents Let's Use Enjoying More Troubleshooting The supplied...
... button (page 23) F VIEW MODE buttons SLIDESHOW button (page 16) CLOCK button (page 16) SINGLE button (page 16) INDEX button (page 16) G 1 (on the photo frame. Index 5GB Pull out the protective sheet before use the remote control Point the top end of Contents Let's Use Enjoying More Troubleshooting The supplied...

Handbook
Page 6
... Duo" or SD memory card) or USB memory removed from a digital camera or equivalent, into the photo frame. Table of Contents Compatible Memory Card/USB memory You can view images only by the photo frame Adaptor • "Memory Stick Duo" (Not compatible/Compatible with "MagicGate") • "Memory Stick PRO Duo" • "Memory...
... Duo" or SD memory card) or USB memory removed from a digital camera or equivalent, into the photo frame. Table of Contents Compatible Memory Card/USB memory You can view images only by the photo frame Adaptor • "Memory Stick Duo" (Not compatible/Compatible with "MagicGate") • "Memory Stick PRO Duo" • "Memory...
Handbook
Page 7
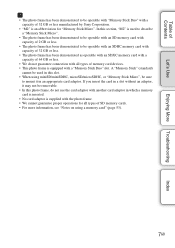
Table of Contents Let's Use Enjoying More Troubleshooting • The photo frame has been demonstrated to mount it may not be removable. • In this photo frame, do not guarantee connection with all types of 32 GB or less manufactured by Sony Corporation. • "M2" is supplied with a "Memory Stick Duo" slot. If you...
Table of Contents Let's Use Enjoying More Troubleshooting • The photo frame has been demonstrated to mount it may not be removable. • In this photo frame, do not guarantee connection with all types of 32 GB or less manufactured by Sony Corporation. • "M2" is supplied with a "Memory Stick Duo" slot. If you...

Handbook
Page 8
Table of Contents Let's Use Enjoying More Troubleshooting Preparation: 1 Checking included items Make sure that the following items are included. • Digital photo frame (1) • Remote control (1) • Stand (1) • AC adaptor (1) • Operating Instructions (1) • CD-ROM (Digital Photo Frame Handbook) (1) • Warranty (1) (In some regions, the warranty is not packaged together.) 8GB Index
Table of Contents Let's Use Enjoying More Troubleshooting Preparation: 1 Checking included items Make sure that the following items are included. • Digital photo frame (1) • Remote control (1) • Stand (1) • AC adaptor (1) • Operating Instructions (1) • CD-ROM (Digital Photo Frame Handbook) (1) • Warranty (1) (In some regions, the warranty is not packaged together.) 8GB Index
Handbook
Page 9
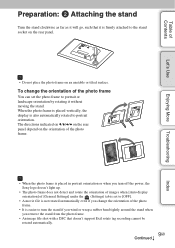
... rear panel. • Do not place the photo frame on the orientation of the photo frame. • When the photo frame is placed in portrait orientation or when you turn off the power, the Sony logo doesn't light up. • The photo frame does not detect and rotate the orientation of images when... [Auto display orientation] of [General Settings] under the (Settings) tab is set the photo frame to portrait orientation. To change the orientation of ...
... rear panel. • Do not place the photo frame on the orientation of the photo frame. • When the photo frame is placed in portrait orientation or when you turn off the power, the Sony logo doesn't light up. • The photo frame does not detect and rotate the orientation of images when... [Auto display orientation] of [General Settings] under the (Settings) tab is set the photo frame to portrait orientation. To change the orientation of ...

Handbook
Page 10
... on a wall, it may fall if you hang the photo frame on a wall. • Connect the DC cable of the AC adaptor to drop it with the remote commander. Then plug the AC adaptor into the wall outlet. • Sony takes no responsibility for any accidents or damage caused by fitting... the screw head to operate it . 10GB Table of Contents Let's Use To hang the photo frame on a wall 1 Prepare commercially available screws suitable for the holes on...
... on a wall, it may fall if you hang the photo frame on a wall. • Connect the DC cable of the AC adaptor to drop it with the remote commander. Then plug the AC adaptor into the wall outlet. • Sony takes no responsibility for any accidents or damage caused by fitting... the screw head to operate it . 10GB Table of Contents Let's Use To hang the photo frame on a wall 1 Prepare commercially available screws suitable for the holes on...
Handbook
Page 11
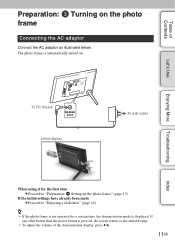
... on . Table of the demonstration display, press v/V. 11GB Index If any other button than the power button is automatically turned on the photo frame Connecting the AC adaptor Connect the AC adaptor as illustrated below. If the initial settings have already been made c Proceed to "Preparation: 4 ...Setting up the photo frame" (page 13). Let's Use Enjoying More Troubleshooting To DC IN jack Initial display To wall outlet When using it for the first time ...
... on . Table of the demonstration display, press v/V. 11GB Index If any other button than the power button is automatically turned on the photo frame Connecting the AC adaptor Connect the AC adaptor as illustrated below. If the initial settings have already been made c Proceed to "Preparation: 4 ...Setting up the photo frame" (page 13). Let's Use Enjoying More Troubleshooting To DC IN jack Initial display To wall outlet When using it for the first time ...
Handbook
Page 12
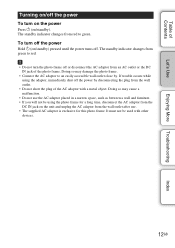
... used with a metal object. It must not be using the adaptor, immediately shut off the power by . Table of the photo frame. If trouble occurs while using the photo frame for a long time, disconnect the AC adaptor from the DC IN jack on the unit and unplug the AC adaptor from the... from an AC outlet or the DC IN jack of Contents Let's Use Enjoying More Troubleshooting Turning on /standby). Doing so may damage the photo frame. • Connect the AC adaptor to an easily accessible wall outlet close by disconnecting the plug from red to red. • Do not turn on...
... used with a metal object. It must not be using the adaptor, immediately shut off the power by . Table of the photo frame. If trouble occurs while using the photo frame for a long time, disconnect the AC adaptor from the DC IN jack on the unit and unplug the AC adaptor from the... from an AC outlet or the DC IN jack of Contents Let's Use Enjoying More Troubleshooting Turning on /standby). Doing so may damage the photo frame. • Connect the AC adaptor to an easily accessible wall outlet close by disconnecting the plug from red to red. • Do not turn on...
Handbook
Page 13
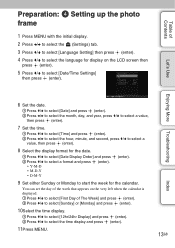
... the week that appears on the very left when the calendar is displayed. 1 Press v/V to select [First Day of Contents Preparation: 4 Setting up the photo frame 1 Press MENU with the initial display. 2 Press B/b to select the (Settings) tab. 3 Press v/V to select [Language Setting] then press (enter). 4 Press v/V to select the language...
... the week that appears on the very left when the calendar is displayed. 1 Press v/V to select [First Day of Contents Preparation: 4 Setting up the photo frame 1 Press MENU with the initial display. 2 Press B/b to select the (Settings) tab. 3 Press v/V to select [Language Setting] then press (enter). 4 Press v/V to select the language...
Handbook
Page 15
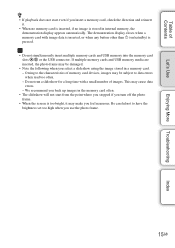
...The demonstration display closes when a memory card with a small number of images. If multiple memory cards and USB memory media are inserted, the photo frame may be damaged. • Note the following when you feel nauseous. We recommend you back up images in a memory card. - Table of Contents... Let's Use Enjoying More Troubleshooting • If playback does not start from the point where you stopped if you turn off the photo frame. • When the screen is pressed. • Do not simultaneously insert multiple memory cards and USB memory into the memory card slots...
...The demonstration display closes when a memory card with a small number of images. If multiple memory cards and USB memory media are inserted, the photo frame may be damaged. • Note the following when you feel nauseous. We recommend you back up images in a memory card. - Table of Contents... Let's Use Enjoying More Troubleshooting • If playback does not start from the point where you stopped if you turn off the photo frame. • When the screen is pressed. • Do not simultaneously insert multiple memory cards and USB memory into the memory card slots...
Handbook
Page 16
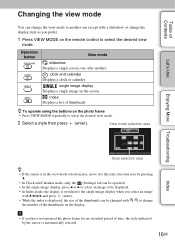
... as you prefer. 1 Press VIEW MODE on the remote control to select the desired view mode. single image display Displays a single image on the photo frame • Press VIEW MODE repeatedly to select the desired view mode. 2 Select a style then press (enter). index Displays a list of thumbnails To operate using ... image to be changed with a slideshow or change the number of the thumbnails on the display. • If you have not operated the photo frame for an extended period of time, the style indicated by the cursor is displayed, the size of the thumbnails can change the view mode to...
... as you prefer. 1 Press VIEW MODE on the remote control to select the desired view mode. single image display Displays a single image on the photo frame • Press VIEW MODE repeatedly to select the desired view mode. 2 Select a style then press (enter). index Displays a list of thumbnails To operate using ... image to be changed with a slideshow or change the number of the thumbnails on the display. • If you have not operated the photo frame for an extended period of time, the style indicated by the cursor is displayed, the size of the thumbnails can change the view mode to...

Handbook
Page 17
... can set the display interval, effect, listing order, color effect or display mode when you select the Slideshow display. For a movie file, only the first frame of the images may not be displayed completely with the date and time when it was taken. See "Slideshow Settings" (page 39). • Some of...
... can set the display interval, effect, listing order, color effect or display mode when you select the Slideshow display. For a movie file, only the first frame of the images may not be displayed completely with the date and time when it was taken. See "Slideshow Settings" (page 39). • Some of...
Handbook
Page 19
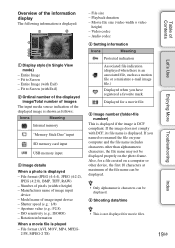
...) - Shutter speed (e.g.: 1/8) - Playback duration - Entire Image (with DCF, its file name is played - Number of image input device - Also, for a file created on the photo frame. File size - ISO sensitivity (e.g.: ISO800) -
...) - Shutter speed (e.g.: 1/8) - Playback duration - Entire Image (with DCF, its file name is played - Number of image input device - Also, for a file created on the photo frame. File size - ISO sensitivity (e.g.: ISO800) -

Handbook
Page 20
...Press (enter). playback When you want to play the following types of movie file: - Play the divided files one by one. • Dropped frames may occur, depending on the types of data or the transmission speed of the memory card. • Some of the movie files may not ... smoothly, depending on the type of data. • For details on the movie file, fast forward/backward playback may not be available with the photo frame. • You cannot play . 3 Press (enter). Table of Contents Let's Use Enjoying More Troubleshooting Playing a movie 1 Press . 2 Select a movie file you press point....
...Press (enter). playback When you want to play the following types of movie file: - Play the divided files one by one. • Dropped frames may occur, depending on the types of data or the transmission speed of the memory card. • Some of the movie files may not ... smoothly, depending on the type of data. • For details on the movie file, fast forward/backward playback may not be available with the photo frame. • You cannot play . 3 Press (enter). Table of Contents Let's Use Enjoying More Troubleshooting Playing a movie 1 Press . 2 Select a movie file you press point....
Handbook
Page 21
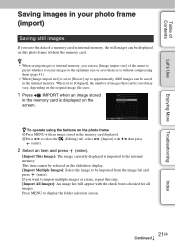
...up to approximately 4000 images can be saved in the internal memory. Table of Contents Let's Use Enjoying More Troubleshooting Saving images in your photo frame (import) Saving still images If you can use [Image import size] of the menu to preset whether to resize images to the optimum size ...or save them (page 41). • When [Image import size] is imported to the internal memory. To operate using the buttons on the photo frame 1Press MENU with an image stored in the memory card displayed. 2Press B/b to select the (Editing) tab, select B/b, [Import] with the check boxes checked...
...up to approximately 4000 images can be saved in the internal memory. Table of Contents Let's Use Enjoying More Troubleshooting Saving images in your photo frame (import) Saving still images If you can use [Image import size] of the menu to preset whether to resize images to the optimum size ...or save them (page 41). • When [Image import size] is imported to the internal memory. To operate using the buttons on the photo frame 1Press MENU with an image stored in the memory card displayed. 2Press B/b to select the (Editing) tab, select B/b, [Import] with the check boxes checked...
Handbook
Page 22
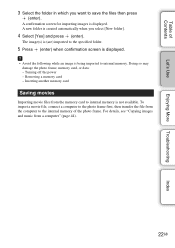
... from the memory card to internal memory is being imported to internal memory. To import a movie file, connect a computer to the photo frame first, then transfer the file from the computer to the internal memory of Contents Let's Use Enjoying More Troubleshooting 3 Select the folder in... which you select [New folder]. 4 Select [Yes] and press (enter). Doing so may damage the photo frame, memory card, or data: - The image(s) is (are) imported to save the files then press (enter). Inserting another memory card Saving movies Importing...
... from the memory card to internal memory is being imported to internal memory. To import a movie file, connect a computer to the photo frame first, then transfer the file from the computer to the internal memory of Contents Let's Use Enjoying More Troubleshooting 3 Select the folder in... which you select [New folder]. 4 Select [Yes] and press (enter). Doing so may damage the photo frame, memory card, or data: - The image(s) is (are) imported to save the files then press (enter). Inserting another memory card Saving movies Importing...
Handbook
Page 23
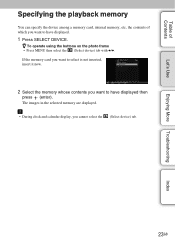
To operate using the buttons on the photo frame • Press MENU then select the (Select device) tab with B/b. If the memory card you want to select is not inserted, insert it now. 2 Select ...
To operate using the buttons on the photo frame • Press MENU then select the (Select device) tab with B/b. If the memory card you want to select is not inserted, insert it now. 2 Select ...


