Digital Photo Frame Handbook
Page 1
4-259-442-12 (2) Before operation Digital Photo Frame DPF-D1020/D1010 DPF-D820/D810 DPF-D720/D710/D700 DPF-A710/A700 Basic operations Advanced operations Using with a computer Error messages Troubleshooting Additional information Digital Photo Frame Handbook © 2010 Sony Corporation
4-259-442-12 (2) Before operation Digital Photo Frame DPF-D1020/D1010 DPF-D820/D810 DPF-D720/D710/D700 DPF-A710/A700 Basic operations Advanced operations Using with a computer Error messages Troubleshooting Additional information Digital Photo Frame Handbook © 2010 Sony Corporation
Digital Photo Frame Handbook
Page 2
... control (except for DPF-A700/ D700) ...9 Basic operations Preparing the remote control (except for DPF-A700/D700) ...10 Turning the photo frame on ...11 Setting the current time ...12 Inserting a memory card ...13 Changing the display ...14 Slideshow display ...16 Clock and Calendar display ...17 Single view ...
... control (except for DPF-A700/ D700) ...9 Basic operations Preparing the remote control (except for DPF-A700/D700) ...10 Turning the photo frame on ...11 Setting the current time ...12 Inserting a memory card ...13 Changing the display ...14 Slideshow display ...16 Clock and Calendar display ...17 Single view ...
Digital Photo Frame Handbook
Page 4
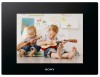
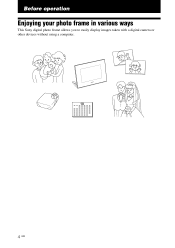
Before operation Enjoying your photo frame in various ways This Sony digital photo frame allows you to easily display images taken with a digital camera or other devices without using a computer. 4 GB
Before operation Enjoying your photo frame in various ways This Sony digital photo frame allows you to easily display images taken with a digital camera or other devices without using a computer. 4 GB
Digital Photo Frame Handbook
Page 6
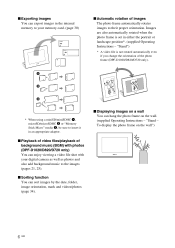
... or landscape position*. (supplied Operating Instructions - "Stand - x Displaying images on a wall You can hang the photo frame on the wall") x Playback of video files/playback of background music (BGM) with photos (DPF-D1020/D820/D720 only) You can enjoy viewing a video file shot with your memory card. (page 30...) x Automatic rotation of the photo frame (DPF-D1020/D820/D720 only). * When using a miniSD/miniSDHC 1, microSD/microSDHC 2 or "Memory Stick Micro" media 3, be sure to insert it in...
... or landscape position*. (supplied Operating Instructions - "Stand - x Displaying images on a wall You can hang the photo frame on the wall") x Playback of video files/playback of background music (BGM) with photos (DPF-D1020/D820/D720 only) You can enjoy viewing a video file shot with your memory card. (page 30...) x Automatic rotation of the photo frame (DPF-D1020/D820/D720 only). * When using a miniSD/miniSDHC 1, microSD/microSDHC 2 or "Memory Stick Micro" media 3, be sure to insert it in...
Digital Photo Frame Handbook
Page 7
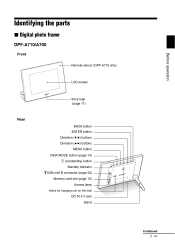
Identifying the parts x Digital photo frame DPF-A710/A700 Front Remote sensor (DPF-A710 only) Before operation LCD screen Sony logo (page 11) Rear BACK button ENTER button Direction (v/V) buttons Direction (B/b) buttons MENU button VIEW MODE button (page 14) 1 (on/standby) button Standby Indicator USB mini B connector (page 43) Memory card slot (page 13) Access lamp Holes for hanging unit on the wall DC IN 5 V jack Stand Continued 7 GB
Identifying the parts x Digital photo frame DPF-A710/A700 Front Remote sensor (DPF-A710 only) Before operation LCD screen Sony logo (page 11) Rear BACK button ENTER button Direction (v/V) buttons Direction (B/b) buttons MENU button VIEW MODE button (page 14) 1 (on/standby) button Standby Indicator USB mini B connector (page 43) Memory card slot (page 13) Access lamp Holes for hanging unit on the wall DC IN 5 V jack Stand Continued 7 GB
Digital Photo Frame Handbook
Page 9
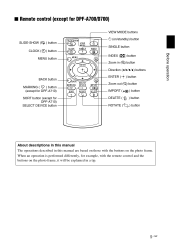
...INDEX ( ) button Zoom in ( ) button Direction (B/b/v/V) buttons BACK button MARKING ( ) button (except for DPF-A710) SORT button (except for example, with the buttons on the photo frame, it will be explained in this manual are based on those with the remote control and the buttons on the... photo frame. When an operation is performed differently, for DPF-A710) SELECT DEVICE button ENTER ( ) button Zoom out ( ) button IMPORT ( DELETE ( ROTATE ( ) button ) button ) button About ...
...INDEX ( ) button Zoom in ( ) button Direction (B/b/v/V) buttons BACK button MARKING ( ) button (except for DPF-A710) SORT button (except for example, with the buttons on the photo frame, it will be explained in this manual are based on those with the remote control and the buttons on the... photo frame. When an operation is performed differently, for DPF-A710) SELECT DEVICE button ENTER ( ) button Zoom out ( ) button IMPORT ( DELETE ( ROTATE ( ) button ) button ) button About ...
Digital Photo Frame Handbook
Page 10
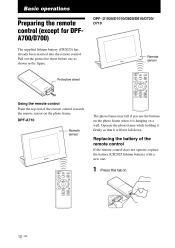
...out the protective sheet before use the buttons on the photo frame when it will not fall if you use as shown in . 10 GB DPF- Operate the photo frame while holding it firmly so that it is hanging on the photo frame. Replacing the battery of the remote control towards the ...remote sensor on a wall. DPF-A710 Remote sensor The photo frame may fall down. Basic operations Preparing the remote control...
...out the protective sheet before use the buttons on the photo frame when it will not fall if you use as shown in . 10 GB DPF- Operate the photo frame while holding it firmly so that it is hanging on the photo frame. Replacing the battery of the remote control towards the ...remote sensor on a wall. DPF-A710 Remote sensor The photo frame may fall down. Basic operations Preparing the remote control...
Digital Photo Frame Handbook
Page 11
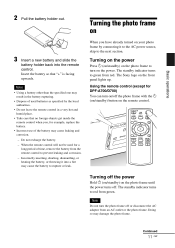
... to turn the photo frame off the power Hold 1 (on/standby) on the remote control. The standby indicator turns to green from green. The Sony logo on the power. Turning on the power Press 1 (on/standby) on the photo frame to rupture or leak. Turning the photo frame on When you ..., for a long period of the battery may damage the photo frame. 2 Pull the battery holder out.
... to turn the photo frame off the power Hold 1 (on/standby) on the remote control. The standby indicator turns to green from green. The Sony logo on the power. Turning on the power Press 1 (on/standby) on the photo frame to rupture or leak. Turning the photo frame on When you ..., for a long period of the battery may damage the photo frame. 2 Pull the battery holder out.

Digital Photo Frame Handbook
Page 12
...] and press ENTER. 2 Press B/b to select hour, minute and second, press v/V to select the (Settings) tab. If the photo frame is not operated for the calendar. Operations in an initial state When the photo frame is turned on without a memory card inserted, the initial display below appears on the very left when the calendar...
...] and press ENTER. 2 Press B/b to select hour, minute and second, press v/V to select the (Settings) tab. If the photo frame is not operated for the calendar. Operations in an initial state When the photo frame is turned on without a memory card inserted, the initial display below appears on the very left when the calendar...
Digital Photo Frame Handbook
Page 13
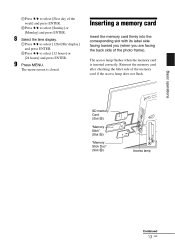
.... Basic operations SD memory Card (Slot A) "Memory Stick" (Slot A) "Memory Stick Duo" (Slot B) Access lamp Continued 13 GB 1 Press v/V to select [First day of the photo frame). Reinsert the memory card after checking the label side of the memory card if the access lamp does not flash. [Monday] and press ENTER. 8 Select...
.... Basic operations SD memory Card (Slot A) "Memory Stick" (Slot A) "Memory Stick Duo" (Slot B) Access lamp Continued 13 GB 1 Press v/V to select [First day of the photo frame). Reinsert the memory card after checking the label side of the memory card if the access lamp does not flash. [Monday] and press ENTER. 8 Select...
Digital Photo Frame Handbook
Page 14
.... Notes • The slot is both a "Memory Stick" standard and Duo size compatible slot, so you switch off the power while they are inserted, the photo frame will not work properly.
.... Notes • The slot is both a "Memory Stick" standard and Duo size compatible slot, so you switch off the power while they are inserted, the photo frame will not work properly.
Digital Photo Frame Handbook
Page 15
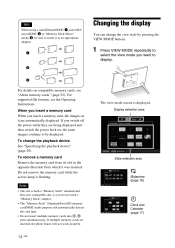
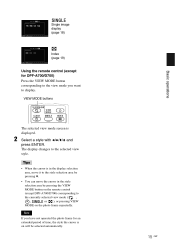
... the style selection area by pressing v. • You can move the cursor in the style selection area by pressing the VIEW MODE button on the photo frame repeatedly. The display changes to the currently selected view mode ( , , or ), or pressing VIEW MODE on the remote control (except DPF-A700/D700) corresponding to... 19) Using the remote control (except for DPF-A700/D700) Press the VIEW MODE button corresponding to the view mode you have not operated the photo frame for an extended period of time, the style the cursor is displayed. 2 Select a style with B/b/v/V and press ENTER.
... the style selection area by pressing v. • You can move the cursor in the style selection area by pressing the VIEW MODE button on the photo frame repeatedly. The display changes to the currently selected view mode ( , , or ), or pressing VIEW MODE on the remote control (except DPF-A700/D700) corresponding to... 19) Using the remote control (except for DPF-A700/D700) Press the VIEW MODE button corresponding to the view mode you have not operated the photo frame for an extended period of time, the style the cursor is displayed. 2 Select a style with B/b/v/V and press ENTER.
Digital Photo Frame Handbook
Page 16
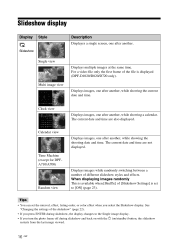
...you select the Slideshow display. When displaying images randomly This is set the interval, effect, listing order, or color effect when you turn the photo frame off during slideshow, the display changes to [ON] (page 23). Slideshow display Display Style Description Displayes a single screen, one after another ..., while showing the shooting date and time. For a video file only the first frame of the slideshow" (page 22). • If you press ENTER during slideshow and back on with the 1 (on/standby) button, the ...
...you select the Slideshow display. When displaying images randomly This is set the interval, effect, listing order, or color effect when you turn the photo frame off during slideshow, the display changes to [ON] (page 23). Slideshow display Display Style Description Displayes a single screen, one after another ..., while showing the shooting date and time. For a video file only the first frame of the slideshow" (page 22). • If you press ENTER during slideshow and back on with the 1 (on/standby) button, the ...
Digital Photo Frame Handbook
Page 20
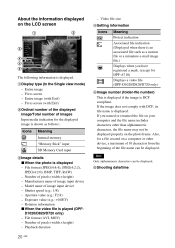
... only) The following information is shown as a motion file or a miniature e-mail image file.) Displays when you named or renamed the file on the photo frame. File format (JPEG(4:4:4), JPEG(4:2:2), JPEG(4:2:0), BMP, TIFF, RAW) - Model name of pixels (width × height) - Number of image input device...displayed on a computer or other than alphanumeric characters, the file name may not be displayed. 6 Shooting date/time x When the photo is DCF compliant. Icons Meaning Internal memory "Memory Stick" input SD Memory Card input 3 Image details This is displayed if the image...
... only) The following information is shown as a motion file or a miniature e-mail image file.) Displays when you named or renamed the file on the photo frame. File format (JPEG(4:4:4), JPEG(4:2:2), JPEG(4:2:0), BMP, TIFF, RAW) - Model name of pixels (width × height) - Number of image input device...displayed on a computer or other than alphanumeric characters, the file name may not be displayed. 6 Shooting date/time x When the photo is DCF compliant. Icons Meaning Internal memory "Memory Stick" input SD Memory Card input 3 Image details This is displayed if the image...
Digital Photo Frame Handbook
Page 21
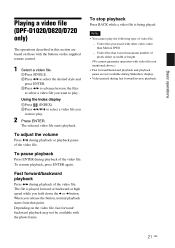
... playback and playback pause are based on those with the buttons on the video file, fast forward/ backward playback may not be available with the photo frame. 21 GB The file is being played. To adjust the volume Press v/V during playback of pixels either in this section are not available during Slideshow...
... playback and playback pause are based on those with the buttons on the video file, fast forward/ backward playback may not be available with the photo frame. 21 GB The file is being played. To adjust the volume Press v/V during playback of pixels either in this section are not available during Slideshow...

Digital Photo Frame Handbook
Page 22
... (Slideshow) in the display selection area. (Slideshow) Display selection area VIEW MODE on the photo frame repeatedly. This may be selected. • The slideshow starts from the first image if you turn off the photo frame, or if you back up images on the slideshow styles. Press B/b to select [Slideshow ..., images may cause data error. - See the tables on the next page for details on the memory card often. • When the photo frame is in the display selection area, move the cursor in gray and cannot be subject to the characteristics of images. Do not run a slideshow...
... (Slideshow) in the display selection area. (Slideshow) Display selection area VIEW MODE on the photo frame repeatedly. This may be selected. • The slideshow starts from the first image if you turn off the photo frame, or if you back up images on the slideshow styles. Press B/b to select [Slideshow ..., images may cause data error. - See the tables on the next page for details on the memory card often. • When the photo frame is in the display selection area, move the cursor in gray and cannot be subject to the characteristics of images. Do not run a slideshow...
Digital Photo Frame Handbook
Page 23
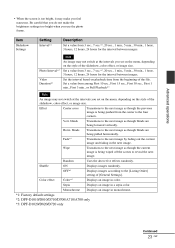
...-D1010/D810/D710/D700/A710/A700 only *3: DPF-D1020/D820/D720 only Continued 23 GB Be careful that you do not make you use the photo frame. Transitions to the [Listing Order] setting of the slideshow, color effect, or image size. Transitions to the next image as though blinds are ... fading out the current image and fading in monochrome. Uses the above five effects randomly. Set the interval based on the style of the file. Photo Interval*3 Video Duration*3 Set a value from the beginning of the slideshow, color effect, or image size. Displays an image in the next image. &#...
...-D1010/D810/D710/D700/A710/A700 only *3: DPF-D1020/D820/D720 only Continued 23 GB Be careful that you do not make you use the photo frame. Transitions to the [Listing Order] setting of the slideshow, color effect, or image size. Transitions to the next image as though blinds are ... fading out the current image and fading in monochrome. Uses the above five effects randomly. Set the interval based on the style of the file. Photo Interval*3 Video Duration*3 Set a value from the beginning of the slideshow, color effect, or image size. Displays an image in the next image. &#...
Digital Photo Frame Handbook
Page 25
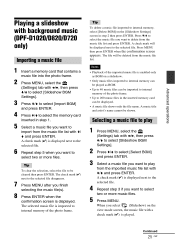
...will be deleted from the music file list and press ENTER. Notes 1 2 3 4 5 Insert a memory card that contains a music file into the photo frame. Press v/V to select the memory card inserted in step 2 then press ENTER. Advanced operations Selecting a music file to play from the music file list with... of the imported music file is enabled only as BGM. • Up to 40 music files can be imported to internal memory of the photo frame. The selected music file is played. Playing a slideshow with background music (DPF-D1020/D820/D720 only) Importing a music file Tip To delete...
...will be deleted from the music file list and press ENTER. Notes 1 2 3 4 5 Insert a memory card that contains a music file into the photo frame. Press v/V to select the memory card inserted in step 2 then press ENTER. Advanced operations Selecting a music file to play from the music file list with... of the imported music file is enabled only as BGM. • Up to 40 music files can be imported to internal memory of the photo frame. The selected music file is played. Playing a slideshow with background music (DPF-D1020/D820/D720 only) Importing a music file Tip To delete...
Digital Photo Frame Handbook
Page 27
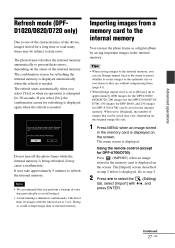
...] or when no operation is attempted for refreshing the internal memory is displayed automatically when the refresh is displayed. Do not turn off the photo frame while the internal memory is displayed. Importing images from a memory card to 3 sec. The [Import] screen described in internal memory. 2... characteristics of the device, images stored for a long time or read many times may be subject to refresh the internal memory. The photo frame refreshes the internal memory automatically to select the (Editing) tab, select [Import] with the interval set to [Resize], up to step...
...] or when no operation is attempted for refreshing the internal memory is displayed automatically when the refresh is displayed. Do not turn off the photo frame while the internal memory is displayed. Importing images from a memory card to 3 sec. The [Import] screen described in internal memory. 2... characteristics of the device, images stored for a long time or read many times may be subject to refresh the internal memory. The photo frame refreshes the internal memory automatically to select the (Editing) tab, select [Import] with the interval set to [Resize], up to step...
Digital Photo Frame Handbook
Page 29
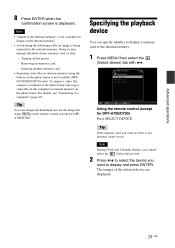
Turning off the power - To import a video file, connect a computer to the photo frame and copy a video file on the photo frame. Tip You can specify whether to display a memory card or the internal memory. 1 Press MENU then select the (Select device) tab with B/b. Note ... change the thumbnail size for images in the internal memory. • Avoid doing the following while an image is displayed. Doing so may damage the photo frame, memory card, or data: - 8 Press ENTER when the confirmation screen is being imported to the internal memory. The images of the selected device ...
Turning off the power - To import a video file, connect a computer to the photo frame and copy a video file on the photo frame. Tip You can specify whether to display a memory card or the internal memory. 1 Press MENU then select the (Select device) tab with B/b. Note ... change the thumbnail size for images in the internal memory. • Avoid doing the following while an image is displayed. Doing so may damage the photo frame, memory card, or data: - 8 Press ENTER when the confirmation screen is being imported to the internal memory. The images of the selected device ...


