
Instruction Manual
Page 1
Printed on a computer Printing images Printed in Japan Digital Single Lens Reflex Camera Instruction Manual DSLR-A200 © 2008 Sony Corporation 3-277-950-11 (1) Preparing the camera Before your operation Shooting images Using the shooting function Using the viewing function Changing your setup Viewing images on 70% or more recycled paper using VOC (Volatile Organic Compound)-free vegetable oil based ink. Additional information on this product and answers to frequently asked questions can be found at our Customer Support Website.
Printed on a computer Printing images Printed in Japan Digital Single Lens Reflex Camera Instruction Manual DSLR-A200 © 2008 Sony Corporation 3-277-950-11 (1) Preparing the camera Before your operation Shooting images Using the shooting function Using the viewing function Changing your setup Viewing images on 70% or more recycled paper using VOC (Volatile Organic Compound)-free vegetable oil based ink. Additional information on this product and answers to frequently asked questions can be found at our Customer Support Website.

Instruction Manual
Page 8
...extremely high-precision technology so over 99.99% of the pixels are not actual images shot using your camera No compensation for effective use. Notes on the LCD monitor and lens • The LCD monitor is not a malfunction. Black, white, red, blue and green points &#...videotapes, and other medium. When you must place the camera under direct sunlight, attach the lens cap. • Images may be contrary to direct sunlight. Notes on using this camera. Unauthorized recording of your camera or a memory card, etc. When the camera warms up ) data to a malfunction of such ...
...extremely high-precision technology so over 99.99% of the pixels are not actual images shot using your camera No compensation for effective use. Notes on the LCD monitor and lens • The LCD monitor is not a malfunction. Black, white, red, blue and green points &#...videotapes, and other medium. When you must place the camera under direct sunlight, attach the lens cap. • Images may be contrary to direct sunlight. Notes on using this camera. Unauthorized recording of your camera or a memory card, etc. When the camera warms up ) data to a malfunction of such ...

Instruction Manual
Page 9
...Shooting images IMPORTANT SAFEGUARDS 3 Read this first 5 Notes on using your camera 8 Checking the accessories supplied 13 Preparing the battery pack 14 Attaching a lens 19 Inserting a memory card 21 Preparing the camera 25 Using the accessories supplied 27 Checking the number of recordable images ... button ... 43 The functions selected by the (Drive) button 43 Functions selected by the MENU button 43 Shooting an image without camera shake 45 Correct posture 45 Using the Super SteadyShot function 46 Using a tripod 47 / Shooting with the automatic setting 48 Shooting with...
...Shooting images IMPORTANT SAFEGUARDS 3 Read this first 5 Notes on using your camera 8 Checking the accessories supplied 13 Preparing the battery pack 14 Attaching a lens 19 Inserting a memory card 21 Preparing the camera 25 Using the accessories supplied 27 Checking the number of recordable images ... button ... 43 The functions selected by the (Drive) button 43 Functions selected by the MENU button 43 Shooting an image without camera shake 45 Correct posture 45 Using the Super SteadyShot function 46 Using a tripod 47 / Shooting with the automatic setting 48 Shooting with...

Instruction Manual
Page 19
... not use force when attaching a lens. For attaching, refer to prevent unnecessary light from the lens. 2 Mount the lens by aligning the orange index marks on the lens and camera. Preparing the camera Attaching a lens 1 Remove the body cap from the camera and the rear cap from affecting your images. Lens hood Using a lens hood is recommended to the operating...
... not use force when attaching a lens. For attaching, refer to prevent unnecessary light from the lens. 2 Mount the lens by aligning the orange index marks on the lens and camera. Preparing the camera Attaching a lens 1 Remove the body cap from the camera and the rear cap from affecting your images. Lens hood Using a lens hood is recommended to the operating...
Instruction Manual
Page 20
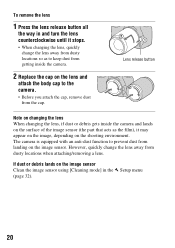
... dusty locations so as the film), it may appear on the image, depending on the shooting environment. Lens release button Note on changing the lens When changing the lens, if dust or debris gets inside the camera and lands on the surface of the image sensor (the part that acts as to keep dust... from getting inside the camera. 2 Replace the cap on the lens and attach the body cap to prevent dust from landing on the image sensor. The camera is equipped with an anti-dust function to the camera. • Before you attach the cap, remove dust from the...
... dusty locations so as the film), it may appear on the image, depending on the shooting environment. Lens release button Note on changing the lens When changing the lens, if dust or debris gets inside the camera and lands on the surface of the image sensor (the part that acts as to keep dust... from getting inside the camera. 2 Replace the cap on the lens and attach the body cap to prevent dust from landing on the image sensor. The camera is equipped with an anti-dust function to the camera. • Before you attach the cap, remove dust from the...

Instruction Manual
Page 31
...• Do not touch the inside of dust that sticks to clean the inside of the camera, such as lens contacts, or the mirror. Turn the camera to the outside. Preparing the camera Cleaning Cleaning the LCD monitor Wipe the screen surface with a dry cloth. Since dust on ..., such as thinner, benzine, alcohol, disposable cloths, insect repellent, sunscreen or insecticide, etc. • Do not touch the camera with lens cleaning solution. In case of the camera. Do not use the following as they may affect the autofocus system, blow away dust using a commercially available blower.
...• Do not touch the inside of dust that sticks to clean the inside of the camera, such as lens contacts, or the mirror. Turn the camera to the outside. Preparing the camera Cleaning Cleaning the LCD monitor Wipe the screen surface with a dry cloth. Since dust on ..., such as thinner, benzine, alcohol, disposable cloths, insect repellent, sunscreen or insecticide, etc. • Do not touch the camera with lens cleaning solution. In case of the camera. Do not use the following as they may affect the autofocus system, blow away dust using a commercially available blower.
Instruction Manual
Page 33
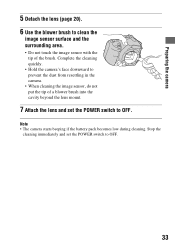
...; When cleaning the image sensor, do not put the tip of the brush. Note • The camera starts beeping if the battery pack becomes low during cleaning. Preparing the camera 5 Detach the lens (page 20). 6 Use the blower brush to clean the image sensor surface and the surrounding area. •...; Do not touch the image sensor with the tip of a blower brush into the cavity beyond the lens mount. 7 Attach the lens and set the POWER...
...; When cleaning the image sensor, do not put the tip of the brush. Note • The camera starts beeping if the battery pack becomes low during cleaning. Preparing the camera 5 Detach the lens (page 20). 6 Use the blower brush to clean the image sensor surface and the surrounding area. •...; Do not touch the image sensor with the tip of a blower brush into the cavity beyond the lens mount. 7 Attach the lens and set the POWER...
Instruction Manual
Page 34
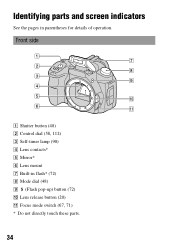
Before your operation Identifying parts and screen indicators See the pages in flash* (72) H Mode dial (48) I (Flash pop-up) button (72) J Lens release button (20) K Focus mode switch (67, 71) * Do not directly touch these parts. 34 Front side A Shutter button (48) B Control dial (58, 112) C Self-timer lamp (90) D Lens contacts* E Mirror* F Lens mount G Built-in parentheses for details of operation.
Before your operation Identifying parts and screen indicators See the pages in flash* (72) H Mode dial (48) I (Flash pop-up) button (72) J Lens release button (20) K Focus mode switch (67, 71) * Do not directly touch these parts. 34 Front side A Shutter button (48) B Control dial (58, 112) C Self-timer lamp (90) D Lens contacts* E Mirror* F Lens mount G Built-in parentheses for details of operation.
Instruction Manual
Page 45
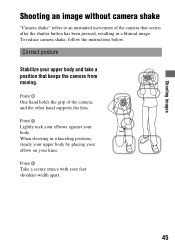
... 2 Lightly tuck your elbows against your feet shoulder-width apart. 45 Point 1 One hand holds the grip of the camera that keeps the camera from moving. When shooting in a blurred image. To reduce camera shake, follow the instructions below. Point 3 Take a secure stance with your body. Shooting images Shooting images Shooting an image...
... 2 Lightly tuck your elbows against your feet shoulder-width apart. 45 Point 1 One hand holds the grip of the camera that keeps the camera from moving. When shooting in a blurred image. To reduce camera shake, follow the instructions below. Point 3 Take a secure stance with your body. Shooting images Shooting images Shooting an image...

Instruction Manual
Page 47
...shutter speeds, which are typically used in night-time shooting. • Shooting a close subject, such as in macro shooting. • Shooting with a telescopic lens. • Shooting a moving subject. Shooting images Note • The Super SteadyShot function may not work optimally when the power has just been turned on ...• When using a tripod, deactivate the Super SteadyShot function. 47 Using a tripod In the following cases, we recommend that you mount the camera on , when the subject has just entered the area, or when the shutter button has been pressed all the way down slowly.
...shutter speeds, which are typically used in night-time shooting. • Shooting a close subject, such as in macro shooting. • Shooting with a telescopic lens. • Shooting a moving subject. Shooting images Note • The Super SteadyShot function may not work optimally when the power has just been turned on ...• When using a tripod, deactivate the Super SteadyShot function. 47 Using a tripod In the following cases, we recommend that you mount the camera on , when the subject has just entered the area, or when the shutter button has been pressed all the way down slowly.

Instruction Manual
Page 48
... of a flash is restricted. 1 Set the mode dial to or (Flash Off). Focus area 3 Place the desired subject within the focus area. • If the (Camera shake warning) indicator flashes, set the switch to ON to easily shoot any subject under any conditions. or 2 Hold the... camera and look into focus (Eye-Start AF, page 69). Select when shooting in a location where the use a tripod. (Camera shake warning) indicator 4 When using a zoom lens, turn the zoom ring, then decide on your shot. The subject inside the...
... of a flash is restricted. 1 Set the mode dial to or (Flash Off). Focus area 3 Place the desired subject within the focus area. • If the (Camera shake warning) indicator flashes, set the switch to ON to easily shoot any subject under any conditions. or 2 Hold the... camera and look into focus (Eye-Start AF, page 69). Select when shooting in a location where the use a tripod. (Camera shake warning) indicator 4 When using a zoom lens, turn the zoom ring, then decide on your shot. The subject inside the...
Instruction Manual
Page 50
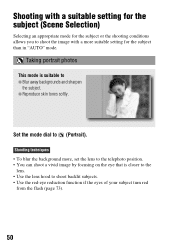
Taking portrait photos This mode is closer to the lens. • Use the lens hood to shoot backlit subjects. • Use the red-eye reduction function if the eyes of your subject turn red from the flash (page 73). ... • To blur the background more suitable setting for the subject or the shooting conditions allows you to shoot the image with a more , set the lens to the telephoto position. • You can shoot a vivid image by focusing on the eye that is suitable to (Portrait). Shooting with a suitable setting for...
Taking portrait photos This mode is closer to the lens. • Use the lens hood to shoot backlit subjects. • Use the red-eye reduction function if the eyes of your subject turn red from the flash (page 73). ... • To blur the background more suitable setting for the subject or the shooting conditions allows you to shoot the image with a more , set the lens to the telephoto position. • You can shoot a vivid image by focusing on the eye that is suitable to (Portrait). Shooting with a suitable setting for...
Instruction Manual
Page 51
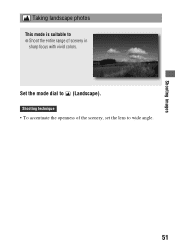
Shooting images Taking landscape photos This mode is suitable to z Shoot the entire range of the scenery, set the lens to (Landscape). Shooting technique • To accentuate the openness of scenery in sharp focus with vivid colors. Set the mode dial to wide angle. 51
Shooting images Taking landscape photos This mode is suitable to z Shoot the entire range of the scenery, set the lens to (Landscape). Shooting technique • To accentuate the openness of scenery in sharp focus with vivid colors. Set the mode dial to wide angle. 51
Instruction Manual
Page 52
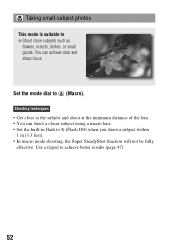
You can shoot a closer subject using a macro lens. • Set the built-in flash to (Flash Off) when you shoot a subject within 1 m (3.3 feet). • In macro mode shooting, the Super SteadyShot function will ... a tripod to (Macro). Taking small-subject photos This mode is suitable to z Shoot close to the subject and shoot at the minimum distance of the lens. • You can achieve clear and sharp focus. Set the mode dial to achieve better results (page 47). 52 Shooting techniques • Get close subjects...
You can shoot a closer subject using a macro lens. • Set the built-in flash to (Flash Off) when you shoot a subject within 1 m (3.3 feet). • In macro mode shooting, the Super SteadyShot function will ... a tripod to (Macro). Taking small-subject photos This mode is suitable to z Shoot close to the subject and shoot at the minimum distance of the lens. • You can achieve clear and sharp focus. Set the mode dial to achieve better results (page 47). 52 Shooting techniques • Get close subjects...

Instruction Manual
Page 56
... exposure and enjoy various photo expressions by the amount of exposure Amount of low high exposure When using a faster shutter speed, the camera opens the shutter for the camera to take a brighter picture, you can open ) and aperture (the range that is in at one time. The brightness of... by opening the aperture to shoot the ephemeral shape of focus. Shooting an image the way you want it (Exposure mode) With a single lens reflex camera, you can accentuate a flower by the shutter speed and aperture is called "exposure." For example, you can use of the effects you can...
... exposure and enjoy various photo expressions by the amount of exposure Amount of low high exposure When using a faster shutter speed, the camera opens the shutter for the camera to take a brighter picture, you can open ) and aperture (the range that is in at one time. The brightness of... by opening the aperture to shoot the ephemeral shape of focus. Shooting an image the way you want it (Exposure mode) With a single lens reflex camera, you can accentuate a flower by the shutter speed and aperture is called "exposure." For example, you can use of the effects you can...
Instruction Manual
Page 60
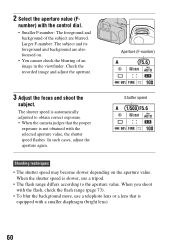
... value. Check the recorded image and adjust the aperture. When the shutter speed is slower, use a telephoto lens or a lens that the proper exposure is equipped with a smaller diaphragm (bright lens). 60 When you shoot with the flash, check the flash range (page 73). • To blur the... background more, use a tripod. • The flash range differs according to obtain correct exposure. • When the camera judges that is not obtained with ...
... value. Check the recorded image and adjust the aperture. When the shutter speed is slower, use a telephoto lens or a lens that the proper exposure is equipped with a smaller diaphragm (bright lens). 60 When you shoot with the flash, check the flash range (page 73). • To blur the... background more, use a tripod. • The flash range differs according to obtain correct exposure. • When the camera judges that is not obtained with ...

Instruction Manual
Page 68
... on the top of the camera shows the location of the camera that is hard to the position of the horizontal line. * The image sensor is closer than the minimum shooting distance of a building. • A subject that acts as the facade of the attached lens, the focus cannot be confirmed.... Note • If the subject is the part of the image sensor*. Ready to shoot. Make sure you measure the exact distance between the subject and the camera. 68
... on the top of the camera shows the location of the camera that is hard to the position of the horizontal line. * The image sensor is closer than the minimum shooting distance of a building. • A subject that acts as the facade of the attached lens, the focus cannot be confirmed.... Note • If the subject is the part of the image sensor*. Ready to shoot. Make sure you measure the exact distance between the subject and the camera. 68

Instruction Manual
Page 71
... (page 26). 71 When the Wide AF area is used, the center area is used, and when the Local AF area is used . • The camera resets the focal length to (infinity) when the POWER switch is confirmed. Focusing ring Notes • In the case of a subject that is selected with... the controller is used , the area that can adjust the focus manually. 1 Set the focus mode switch to MF. 2 Rotate the focusing ring of the lens to ON. • When using a tele converter, etc., rotation of the focusing ring may not be focused in autofocus mode, the z indicator lights up in...
... (page 26). 71 When the Wide AF area is used, the center area is used, and when the Local AF area is used . • The camera resets the focal length to (infinity) when the POWER switch is confirmed. Focusing ring Notes • In the case of a subject that is selected with... the controller is used , the area that can adjust the focus manually. 1 Set the focus mode switch to MF. 2 Rotate the focusing ring of the lens to ON. • When using a tele converter, etc., rotation of the focusing ring may not be focused in autofocus mode, the z indicator lights up in...

Instruction Manual
Page 72
... be fired to help easily focus a subject (AF illuminator). (Flash charging) indicator Shooting techniques • The lens or lens hood may block the light of the flash and a shadow may appear on the image. Remove the lens hood. • Shoot the subject at a distance of 1 m (3.3 feet) or greater. When shooting into... pop up if the amount of light is insufficient or the subject is ready to fire. • When you can use the flash to prevent camera shake. Flashing: The flash is completed, shoot the subject. Lit: The flash has been charged and is backlit. Using the flash In a dark ...
... be fired to help easily focus a subject (AF illuminator). (Flash charging) indicator Shooting techniques • The lens or lens hood may block the light of the flash and a shadow may appear on the image. Remove the lens hood. • Shoot the subject at a distance of 1 m (3.3 feet) or greater. When shooting into... pop up if the amount of light is insufficient or the subject is ready to fire. • When you can use the flash to prevent camera shake. Flashing: The flash is completed, shoot the subject. Lit: The flash has been charged and is backlit. Using the flash In a dark ...
Instruction Manual
Page 80
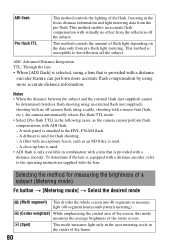
... operating instructions supplied with a distance encoder. ADI: Advanced Distance Integration TTL: Through the lens • When [ADI flash] is selected, using a lens that is provided with a macro twin flash, etc.), the camera automatically selects Pre-flash TTL mode. • Select [Pre-flash TTL] in the following... measures light only in the spot metering circle in the center of the flash, factoring in combination with a lens that is provided with the lens. A close-up lens is used. • ADI flash is only available in the focus distance information and light metering data from pre...
... operating instructions supplied with a distance encoder. ADI: Advanced Distance Integration TTL: Through the lens • When [ADI flash] is selected, using a lens that is provided with a macro twin flash, etc.), the camera automatically selects Pre-flash TTL mode. • Select [Pre-flash TTL] in the following... measures light only in the spot metering circle in the center of the flash, factoring in combination with a lens that is provided with the lens. A close-up lens is used. • ADI flash is only available in the focus distance information and light metering data from pre...


