
Instruction Manual
Page 1
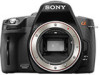
Printed using VOC (Volatile Organic Compound)-free vegetable oil based ink. Additional information on a computer Printing images Digital Single Lens Reflex Camera Instruction Manual DSLR-A390 A-mount ® Preparing the camera Before your operation Shooting images Using the shooting function Using the viewing function Changing your setup Viewing images on this product and answers to frequently asked questions can be found at our Customer Support Website.
Printed using VOC (Volatile Organic Compound)-free vegetable oil based ink. Additional information on a computer Printing images Digital Single Lens Reflex Camera Instruction Manual DSLR-A390 A-mount ® Preparing the camera Before your operation Shooting images Using the shooting function Using the viewing function Changing your setup Viewing images on this product and answers to frequently asked questions can be found at our Customer Support Website.

Instruction Manual
Page 3
...and recycling location nearest you may cause undesired operation. If you have any changes or modifications not expressly approved in this manual could void your used battery pack promptly described the instructions. UL is connected to the following two conditions: (1) This.... Regulatory Information Declaration of the FCC Rules. CAUTION You are recyclable. This Class B digital apparatus complies with Part 15 of Conformity Trade Name: SONY Model No.: DSLR-A390 Responsible Party: Sony Electronics Inc. Telephone No.: 858-942-2230 This device complies with Canadian ICES-003. ...
...and recycling location nearest you may cause undesired operation. If you have any changes or modifications not expressly approved in this manual could void your used battery pack promptly described the instructions. UL is connected to the following two conditions: (1) This.... Regulatory Information Declaration of the FCC Rules. CAUTION You are recyclable. This Class B digital apparatus complies with Part 15 of Conformity Trade Name: SONY Model No.: DSLR-A390 Responsible Party: Sony Electronics Inc. Telephone No.: 858-942-2230 This device complies with Canadian ICES-003. ...

Instruction Manual
Page 7
... up ) data to the provisions of a subject is not a malfunction. The pictures used in this manual The photographs used of the LCD monitor. • Do not expose the camera to a malfunction of pictures in any way. The difference becomes larger in a cold location, the LCD monitor ...compensation for contents of the recording The contents of the recording cannot be different from the image you must place the camera under direct sunlight, attach the lens cap. • Images may be compensated for if recording or playback is manufactured using extremely high-precision technology so over...
... up ) data to the provisions of a subject is not a malfunction. The pictures used in this manual The photographs used of the LCD monitor. • Do not expose the camera to a malfunction of pictures in any way. The difference becomes larger in a cold location, the LCD monitor ...compensation for contents of the recording The contents of the recording cannot be different from the image you must place the camera under direct sunlight, attach the lens cap. • Images may be compensated for if recording or playback is manufactured using extremely high-precision technology so over...

Instruction Manual
Page 8
On the data specifications described in this Instruction Manual The data on performance and specifications is defined under the following conditions, except as described in this Instruction Manual: at an ordinary ambient temperature of 25ºC (77°F), and using a fully charged battery pack. 8
On the data specifications described in this Instruction Manual The data on performance and specifications is defined under the following conditions, except as described in this Instruction Manual: at an ordinary ambient temperature of 25ºC (77°F), and using a fully charged battery pack. 8
Instruction Manual
Page 10
... of the background (Aperture priority 59 Shooting a moving subject with various expressions (Shutter speed priority 61 Shooting with the exposure adjusted manually (Manual exposure 63 Shooting trails with long exposure (BULB 65 Shooting with the viewfinder (OVF 67 Switching to the viewfinder 67 Adjusting the... method to suit the movement of the subject (Autofocus mode 78 Selecting the focus area (AF area 79 Adjusting the focus manually (Manual focus 80 Zooming in in one step 81 Using the flash 82 Performing wireless flash shooting 85 Adjusting the brightness of the image...
... of the background (Aperture priority 59 Shooting a moving subject with various expressions (Shutter speed priority 61 Shooting with the exposure adjusted manually (Manual exposure 63 Shooting trails with long exposure (BULB 65 Shooting with the viewfinder (OVF 67 Switching to the viewfinder 67 Adjusting the... method to suit the movement of the subject (Autofocus mode 78 Selecting the focus area (AF area 79 Adjusting the focus manually (Manual focus 80 Zooming in in one step 81 Using the flash 82 Performing wireless flash shooting 85 Adjusting the brightness of the image...

Instruction Manual
Page 13
... in parentheses indicates the number of pieces. • BC-VH1 Battery charger (1) • Body cap (1) (Attached on the camera) • CD-ROM (Application Software for α camera) (1) • Quick Start Guide (1) • Instruction Manual (This manual) (1) • USB cable (1) • Shoulder strap (1) • Eyepiece cover (1) 13 and Canada) • Rechargeable battery pack NPFH50 (1) •...
... in parentheses indicates the number of pieces. • BC-VH1 Battery charger (1) • Body cap (1) (Attached on the camera) • CD-ROM (Application Software for α camera) (1) • Quick Start Guide (1) • Instruction Manual (This manual) (1) • USB cable (1) • Shoulder strap (1) • Eyepiece cover (1) 13 and Canada) • Rechargeable battery pack NPFH50 (1) •...

Instruction Manual
Page 22
... part Face side ("Memory Stick PRO Duo") Terminal part 3 Select the type of memory card you want to as the "SD memory card" in this camera. Inserting a memory card Only "Memory Stick PRO Duo" media, "Memory Stick PRO-HG Duo" media, SD memory cards and SDHC memory cards can be used... with this camera. A MultiMediaCard cannot be used with this Instruction Manual. 1 Open the memory card cover. 2 Insert "Memory Stick PRO Duo" media or an SD memory card. • Insert the memory card...
... part Face side ("Memory Stick PRO Duo") Terminal part 3 Select the type of memory card you want to as the "SD memory card" in this camera. Inserting a memory card Only "Memory Stick PRO Duo" media, "Memory Stick PRO-HG Duo" media, SD memory cards and SDHC memory cards can be used... with this camera. A MultiMediaCard cannot be used with this Instruction Manual. 1 Open the memory card cover. 2 Insert "Memory Stick PRO Duo" media or an SD memory card. • Insert the memory card...
Instruction Manual
Page 39
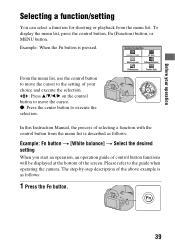
...display the menu list, press the control button, Fn (Function) button, or MENU button. z: Press the center button to the guide when operating the camera. Example: When the Fn button is as follows: Example: Fn button t [White balance] t Select the desired setting When you start an operation, an... operation guide of control button functions will be displayed at the bottom of the screen. Please refer to execute the selection. In this Instruction Manual, the process of selecting a function with the control button from the menu list. The step-by-step description of the above example is...
...display the menu list, press the control button, Fn (Function) button, or MENU button. z: Press the center button to the guide when operating the camera. Example: When the Fn button is as follows: Example: Fn button t [White balance] t Select the desired setting When you start an operation, an... operation guide of control button functions will be displayed at the bottom of the screen. Please refer to execute the selection. In this Instruction Manual, the process of selecting a function with the control button from the menu list. The step-by-step description of the above example is...

Instruction Manual
Page 63
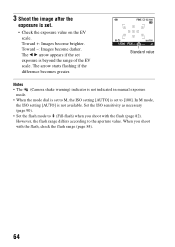
Shooting images 1 Set the mode dial to M. 2 Rotate the control dial to adjust the shutter speed, and while pressing the button, rotate the control dial to adjust the aperture. • You can select the item the control dial adjusts (shutter speed or aperture) with the desired exposure setting by adjusting both the shutter speed and aperture. Shooting with the exposure adjusted manually (Manual exposure) This mode is suitable for z Shooting with [Ctrl dial setup] (page 121). button Aperture (F-number) Shutter speed 63
Shooting images 1 Set the mode dial to M. 2 Rotate the control dial to adjust the shutter speed, and while pressing the button, rotate the control dial to adjust the aperture. • You can select the item the control dial adjusts (shutter speed or aperture) with the desired exposure setting by adjusting both the shutter speed and aperture. Shooting with the exposure adjusted manually (Manual exposure) This mode is suitable for z Shooting with [Ctrl dial setup] (page 121). button Aperture (F-number) Shutter speed 63
Instruction Manual
Page 64
... the EV scale. The arrow starts flashing if the difference becomes greater. Toward +: Images become darker. Standard value Notes • The (Camera shake warning) indicator is not indicated in manual exposure mode. • When the mode dial is set to the aperture value. However, the flash range differs according to M, the ISO...
... the EV scale. The arrow starts flashing if the difference becomes greater. Toward +: Images become darker. Standard value Notes • The (Camera shake warning) indicator is not indicated in manual exposure mode. • When the mode dial is set to the aperture value. However, the flash range differs according to M, the ISO...

Instruction Manual
Page 66
...; Set the focus to press and hold the shutter button for the same amount of the shooting. You cannot do not need to infinity in manual focus mode when shooting fireworks, etc. • Use the wireless Remote Commander (sold separately) (page 101).
...; Set the focus to press and hold the shutter button for the same amount of the shooting. You cannot do not need to infinity in manual focus mode when shooting fireworks, etc. • Use the wireless Remote Commander (sold separately) (page 101).

Instruction Manual
Page 74
... aspect ratio 16:9 (116) Indication Flash compensation (88) Flash charging (82) Wireless flash (85) High-speed sync* Manual focus (80) Focus Shutter speed (61) Aperture (59) EV scale (64, 100) "Shooting unavailable" warning (97) Camera shake warning (45) SteadyShot scale (45) Aspect ratio 16:9 (116) * When using the HVL-F58AM/HVLF42AM Flash...
... aspect ratio 16:9 (116) Indication Flash compensation (88) Flash charging (82) Wireless flash (85) High-speed sync* Manual focus (80) Focus Shutter speed (61) Aperture (59) EV scale (64, 100) "Shooting unavailable" warning (97) Camera shake warning (45) SteadyShot scale (45) Aspect ratio 16:9 (116) * When using the HVL-F58AM/HVLF42AM Flash...
Instruction Manual
Page 75
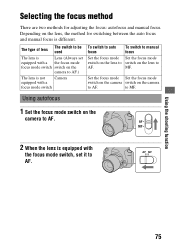
...it to MF. Set the focus mode Set the focus mode switch on the camera switch on the lens to AF. Using autofocus 1 Set the focus mode switch on the lens, the method for adjusting the focus: autofocus and manual focus. to AF. MF. Using the shooting function 75 Using the shooting ... methods for switching between the auto focus and manual focus is equipped with a focus mode switch To switch to auto focus To switch to manual focus Set the focus mode Set the focus mode switch on the lens to switch on the camera to AF. Depending on the camera to AF. 2 When the...
...it to MF. Set the focus mode Set the focus mode switch on the camera switch on the lens to AF. Using autofocus 1 Set the focus mode switch on the lens, the method for adjusting the focus: autofocus and manual focus. to AF. MF. Using the shooting function 75 Using the shooting ... methods for switching between the auto focus and manual focus is equipped with a focus mode switch To switch to auto focus To switch to manual focus Set the focus mode Set the focus mode switch on the lens to switch on the camera to AF. Depending on the camera to AF. 2 When the...

Instruction Manual
Page 76
You cannot release the shutter. In such cases, use the focus lock shooting feature (page 77) or manual focus (page 80). • A subject that is very bright or glittering, such as the sun, the body of an automobile, or the surface of a building. &#...
You cannot release the shutter. In such cases, use the focus lock shooting feature (page 77) or manual focus (page 80). • A subject that is very bright or glittering, such as the sun, the body of an automobile, or the surface of a building. &#...

Instruction Manual
Page 80
... area is used, and when the Local AF area is used, the area that can adjust the focus manually. 1 Set the focus mode switch on the lens to achieve a sharp focus. Adjusting the focus manually (Manual focus) When it is difficult to get the proper focus in autofocus mode, you can be smooth. &#...focus in the viewfinder is not achieved if the diopter is not adjusted properly in viewfinder mode (page 68). • The direct manual focus function is not available on the camera to MF. 3 Rotate the focusing ring of the focusing ring may not be focused in autofocus mode, the z indicator lights up...
... area is used, and when the Local AF area is used, the area that can adjust the focus manually. 1 Set the focus mode switch on the lens to achieve a sharp focus. Adjusting the focus manually (Manual focus) When it is difficult to get the proper focus in autofocus mode, you can be smooth. &#...focus in the viewfinder is not achieved if the diopter is not adjusted properly in viewfinder mode (page 68). • The direct manual focus function is not available on the camera to MF. 3 Rotate the focusing ring of the focusing ring may not be focused in autofocus mode, the z indicator lights up...
Instruction Manual
Page 87
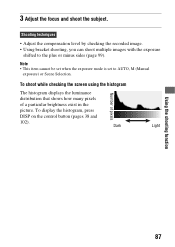
... • Adjust the compensation level by checking the recorded image. • Using bracket shooting, you can shoot multiple images with the exposure shifted to AUTO, M (Manual exposure) or Scene Selection. Note • This item cannot be set when the exposure mode is set to the plus or minus sides (page 99...
... • Adjust the compensation level by checking the recorded image. • Using bracket shooting, you can shoot multiple images with the exposure shifted to AUTO, M (Manual exposure) or Scene Selection. Note • This item cannot be set when the exposure mode is set to the plus or minus sides (page 99...
Instruction Manual
Page 102
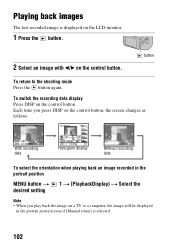
...] t Select the desired setting Note • When you press DISP on a TV or a computer, the image will be displayed in the portrait position even if [Manual rotate] is displayed on the LCD monitor. 1 Press the button. 2 Select an image with b/B on the control button. button To return to the shooting mode...
...] t Select the desired setting Note • When you press DISP on a TV or a computer, the image will be displayed in the portrait position even if [Manual rotate] is displayed on the LCD monitor. 1 Press the button. 2 Select an image with b/B on the control button. button To return to the shooting mode...

Instruction Manual
Page 121
Changing the functions of the control dial Changing the function of the control dial When the recording mode is convenient if you can set the camera so that the adjustable item (the shutter speed or the aperture value) can be selected using only the control dial. It is M (Manual exposure), you select the most commonly-used item when adjusting the exposure. MENU button t 1 t [Ctrl dial setup] t Select the desired setting 121 Changing your setup
Changing the functions of the control dial Changing the function of the control dial When the recording mode is convenient if you can set the camera so that the adjustable item (the shutter speed or the aperture value) can be selected using only the control dial. It is M (Manual exposure), you select the most commonly-used item when adjusting the exposure. MENU button t 1 t [Ctrl dial setup] t Select the desired setting 121 Changing your setup
Instruction Manual
Page 124
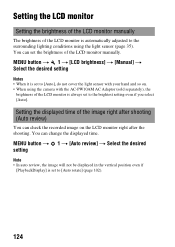
Setting the LCD monitor Setting the brightness of the LCD monitor manually The brightness of the image right after the shooting. MENU button t 1 t [Auto review] t Select the desired setting Note • In auto review, the image will ... setting even if you select [Auto]. You can set to the surrounding lighting conditions using the camera with the AC-PW10AM AC Adaptor (sold separately), the brightness of the LCD monitor manually. MENU button t 1 t [LCD brightness] t [Manual] t Select the desired setting Notes • When it is set the brightness of the LCD monitor...
Setting the LCD monitor Setting the brightness of the LCD monitor manually The brightness of the image right after the shooting. MENU button t 1 t [Auto review] t Select the desired setting Note • In auto review, the image will ... setting even if you select [Auto]. You can set to the surrounding lighting conditions using the camera with the AC-PW10AM AC Adaptor (sold separately), the brightness of the LCD monitor manually. MENU button t 1 t [LCD brightness] t [Manual] t Select the desired setting Notes • When it is set the brightness of the LCD monitor...
Instruction Manual
Page 151
...Sony Corporation. • "PhotoTV HD" is a registered trademark or a trademark of Adobe Systems Incorporated in the United States and/or other countries. • D-Range Optimizer Advanced uses technology provided by Apical Limited. • In addition, system and product names used in all cases in this manual...8226; Intel, Intel Core, MMX, and Pentium are trademarks or registered trademarks of Intel Corporation. • Adobe is a trademark of Sony Corporation. • Microsoft, Windows, and Windows Vista are not used in the United States and/or other countries. • HDMI...
...Sony Corporation. • "PhotoTV HD" is a registered trademark or a trademark of Adobe Systems Incorporated in the United States and/or other countries. • D-Range Optimizer Advanced uses technology provided by Apical Limited. • In addition, system and product names used in all cases in this manual...8226; Intel, Intel Core, MMX, and Pentium are trademarks or registered trademarks of Intel Corporation. • Adobe is a trademark of Sony Corporation. • Microsoft, Windows, and Windows Vista are not used in the United States and/or other countries. • HDMI...


