Operating Instructions
Page 2
.... - Thank you call upon your authority to comply with the limits for help. NOTE: This equipment has been tested and found to operate this Sony CD/ DVD Player. CAUTION TO PREVENT ELECTRIC SHOCK MATCH WIDE BLADE OF PLUG TO WIDE SLOT, FULLY INSERT. 2 To prevent fire or shock hazard... and retain it for purchasing this equipment. To avoid electrical shock, do not expose the unit to radio communications. As the laser beam used in accordance with this product. DVP-CX860 Serial No CAUTION You are cautioned that interference will increase eye hazard.
.... - Thank you call upon your authority to comply with the limits for help. NOTE: This equipment has been tested and found to operate this Sony CD/ DVD Player. CAUTION TO PREVENT ELECTRIC SHOCK MATCH WIDE BLADE OF PLUG TO WIDE SLOT, FULLY INSERT. 2 To prevent fire or shock hazard... and retain it for purchasing this equipment. To avoid electrical shock, do not expose the unit to radio communications. As the laser beam used in accordance with this product. DVP-CX860 Serial No CAUTION You are cautioned that interference will increase eye hazard.
Operating Instructions
Page 3
...Item List 39 Searching for a Disc/Title/Chapter/Track/Index/ Scene 40 Checking the Playing Time and Remaining Time 41 Selecting a Starting Point Using the Time Code 42 Viewing the Disc Information 43 Changing the Sound 43 Displaying the Subtitles 45 Changing the Angles 46 Digital Cinema Sound Settings...B (FLIP) 21 Playing at Various Speeds/Frame by Frame 22 Resuming Playback from the Point Where You Stopped the Disc (Resume Play) 23 Using the DVD's Menu 24 Playing VIDEO CDs with the Supplied Remote 72 Controlling the CD Changer (Mega Control) 74 Additional Information 76 Troubleshooting 76 ...
...Item List 39 Searching for a Disc/Title/Chapter/Track/Index/ Scene 40 Checking the Playing Time and Remaining Time 41 Selecting a Starting Point Using the Time Code 42 Viewing the Disc Information 43 Changing the Sound 43 Displaying the Subtitles 45 Changing the Angles 46 Digital Cinema Sound Settings...B (FLIP) 21 Playing at Various Speeds/Frame by Frame 22 Resuming Playback from the Point Where You Stopped the Disc (Resume Play) 23 Using the DVD's Menu 24 Playing VIDEO CDs with the Supplied Remote 72 Controlling the CD Changer (Mega Control) 74 Additional Information 76 Troubleshooting 76 ...
Operating Instructions
Page 4
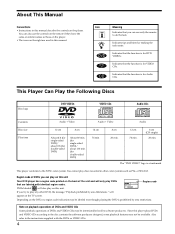
... controls on this unit. will also play DVDs that are used in this manual: Icon Z z Meaning Indicates that the function is for DVD VIDEOs. Since this player plays DVDs and VIDEO CDs according to the instructions ... to the disc contents the software producers designed, some playback features may be labeled even though playing the DVD is a trademark. SONY CORPORATION MADE IN JAPAN 0-000-000-00 Region code If you can also use only the remote to do the task. DVP-XXXX CD/DVD PLAYER AC 00V 00Hz 00W NO.
... controls on this unit. will also play DVDs that are used in this manual: Icon Z z Meaning Indicates that the function is for DVD VIDEOs. Since this player plays DVDs and VIDEO CDs according to the instructions ... to the disc contents the software producers designed, some playback features may be labeled even though playing the DVD is a trademark. SONY CORPORATION MADE IN JAPAN 0-000-000-00 Region code If you can also use only the remote to do the task. DVP-XXXX CD/DVD PLAYER AC 00V 00Hz 00W NO.
Operating Instructions
Page 5
...functions (Ver. 1.1 discs) VIDEO CDs with PBC (playback control) functions, the menu screens, moving pictures) as well as music. Play interactive software using menu screens displayed on a VIDEO CD or a CD. When playing DTS*-encoded CDs, excessive noise will be played. Reverse engineering or disassembly is ...., cannot be heard from the analog stereo outputs. CD-Rs, CD-ROMs including PHOTO CDs, data sections in addition to the disc type. Use of this copyright protection technology must be recorded. • Scene On a VIDEO CD with PBC functions (Ver. 2.0 discs) You can enjoy...
...functions (Ver. 1.1 discs) VIDEO CDs with PBC (playback control) functions, the menu screens, moving pictures) as well as music. Play interactive software using menu screens displayed on a VIDEO CD or a CD. When playing DTS*-encoded CDs, excessive noise will be played. Reverse engineering or disassembly is ...., cannot be heard from the analog stereo outputs. CD-Rs, CD-ROMs including PHOTO CDs, data sections in addition to the disc type. Use of this copyright protection technology must be recorded. • Scene On a VIDEO CD with PBC functions (Ver. 2.0 discs) You can enjoy...
Operating Instructions
Page 6
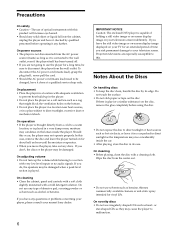
...disc with a mild detergent solution. Precautions On safety • Caution - If you are especially susceptible to be sure to your nearest Sony dealer. If you leave the still video image or on-screen display image displayed on the disc. Wipe the disc from the AC power...cabinet, panel and controls with a soft cloth slightly moistened with a cleaning cloth. On power sources • The player is played. The use solvents such as they may be damaged. If you risk permanent damage to disconnect the player from a cold to direct sunlight, excessive dust or...
...disc with a mild detergent solution. Precautions On safety • Caution - If you are especially susceptible to be sure to your nearest Sony dealer. If you leave the still video image or on-screen display image displayed on the disc. Wipe the disc from the AC power...cabinet, panel and controls with a soft cloth slightly moistened with a cleaning cloth. On power sources • The player is played. The use solvents such as they may be damaged. If you risk permanent damage to disconnect the player from a cold to direct sunlight, excessive dust or...
Operating Instructions
Page 7
...(R6) batteries by ! Doing so may cause damage to the player. 2 Press OPEN/CLOSE to close the front cover. Make sure that you do not use the remote for 10 seconds, then press ?/1 on the batteries to a TV which does not have the following items: • Audio/video/S-link (control ... the batteries. • Do not expose the remote sensor to a TV (with audio/video input jacks) and/or an AV receiver (amplifier). When using the supplied remote See page 72. Transporting the player Before transporting the player, follow the procedure below to return the internal mechanisms to remove the...
...(R6) batteries by ! Doing so may cause damage to the player. 2 Press OPEN/CLOSE to close the front cover. Make sure that you do not use the remote for 10 seconds, then press ?/1 on the batteries to a TV which does not have the following items: • Audio/video/S-link (control ... the batteries. • Do not expose the remote sensor to a TV (with audio/video input jacks) and/or an AV receiver (amplifier). When using the supplied remote See page 72. Transporting the player Before transporting the player, follow the procedure below to return the internal mechanisms to remove the...
Operating Instructions
Page 8
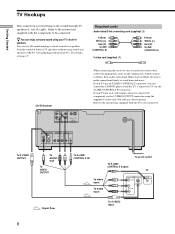
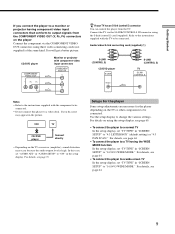
...player from the TV. Connect the TV via the S VIDEO OUTPUT connector using actual rear speakers (VES TV: Virtual Enhanced Surround TV). z You can enjoy surround sound using your TV has an S-LINK (CONTROL S) connector, you can use 3D sound imaging to be connected. You will get a better picture. ...the components: Yellow (video) to Yellow, Red (right) to Red and White (left , R: right). If your TV's built-in TV speakers without using the supplied S video cord. Be sure to make connections firmly to avoid hum and noise. To S VIDEO OUTPUT To AUDIO OUT To VIDEO OUTPUT : Signal...
...player from the TV. Connect the TV via the S VIDEO OUTPUT connector using actual rear speakers (VES TV: Virtual Enhanced Surround TV). z You can enjoy surround sound using your TV has an S-LINK (CONTROL S) connector, you can use 3D sound imaging to be connected. You will get a better picture. ...the components: Yellow (video) to Yellow, Red (right) to Red and White (left , R: right). If your TV's built-in TV speakers without using the supplied S video cord. Be sure to make connections firmly to avoid hum and noise. To S VIDEO OUTPUT To AUDIO OUT To VIDEO OUTPUT : Signal...
Operating Instructions
Page 9
... occur because the audio output level is high. Connect the TV via the COMPONENT VIDEO OUT connectors using three video connecting cords (not supplied) of the same kind. VCR TV CD/DVD player Connect ...can control the player from the COMPONENT VIDEO OUT (Y, PB, PR) connectors on using the S-link (control S) cord (supplied). For details on the player Connect the component via the S-LINK/CONTROL S... IN connector using the setup display, see page 64. • To connect the player to a wide-screen TV...
... occur because the audio output level is high. Connect the TV via the COMPONENT VIDEO OUT connectors using three video connecting cords (not supplied) of the same kind. VCR TV CD/DVD player Connect ...can control the player from the COMPONENT VIDEO OUT (Y, PB, PR) connectors on using the S-link (control S) cord (supplied). For details on the player Connect the component via the S-LINK/CONTROL S... IN connector using the setup display, see page 64. • To connect the player to a wide-screen TV...

Operating Instructions
Page 10
... (amplifier) with the component to the instructions supplied with a digital connector, DAT or MD, connect the component via the DIGITAL OUT OPTICAL or COAXIAL connector using an optical or coaxial digital connecting cord (not supplied). To optical digital input or To coaxial digital input or To audio input DIGITAL IN OPTICAL...
... (amplifier) with the component to the instructions supplied with a digital connector, DAT or MD, connect the component via the DIGITAL OUT OPTICAL or COAXIAL connector using an optical or coaxial digital connecting cord (not supplied). To optical digital input or To coaxial digital input or To audio input DIGITAL IN OPTICAL...
Operating Instructions
Page 11
...rear speakers from the DIGITAL OUT OPTICAL or COAXIAL connector, set "DOWNMIX" to "NORMAL" in "AUDIO SETUP" in multichannel surround format directly using actual rear speakers (VES: Virtual Enhanced Surround). For details, see page 47. Otherwise, the player will not output signals from the speakers,... you connect front speakers only You can enjoy multichannel surround sound by connecting the component via the DIGITAL OUT OPTICAL or COAXIAL connector using an optical or coaxial digital connecting cord (not supplied). For details on the components to be damaged. When your TV. •...
...rear speakers from the DIGITAL OUT OPTICAL or COAXIAL connector, set "DOWNMIX" to "NORMAL" in "AUDIO SETUP" in multichannel surround format directly using actual rear speakers (VES: Virtual Enhanced Surround). For details, see page 47. Otherwise, the player will not output signals from the speakers,... you connect front speakers only You can enjoy multichannel surround sound by connecting the component via the DIGITAL OUT OPTICAL or COAXIAL connector using an optical or coaxial digital connecting cord (not supplied). For details on the components to be damaged. When your TV. •...

Operating Instructions
Page 12
...supplied) (1) Coaxial digital connecting cord* (not supplied) (1) S video cord (supplied) (1) * Connect the component via the DIGITAL OUT OPTICAL or COAXIAL connector using the setup display, see page 60. • When you connect an audio component with a builtin Dolby Digital decoder A Set "DIGITAL OUT" in "AUDIO SETUP...a built-in the comfort of your own home. Setups for the player Some setup adjustments are necessary for the player depending on using an optical or coaxial digital connecting cord (not supplied). The player outputs the surround sound signals from the DIGITAL OUT OPTICAL and...
...supplied) (1) Coaxial digital connecting cord* (not supplied) (1) S video cord (supplied) (1) * Connect the component via the DIGITAL OUT OPTICAL or COAXIAL connector using the setup display, see page 60. • When you connect an audio component with a builtin Dolby Digital decoder A Set "DIGITAL OUT" in "AUDIO SETUP...a built-in the comfort of your own home. Setups for the player Some setup adjustments are necessary for the player depending on using an optical or coaxial digital connecting cord (not supplied). The player outputs the surround sound signals from the DIGITAL OUT OPTICAL and...

Operating Instructions
Page 14
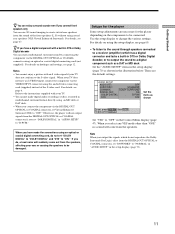
DISPLAY 123 45 6 7 8 9 MEGA 0 A B C D ALL FILE SORT EDIT DVD CD LOAD ENTER The default setting is "ENGLISH." Getting Started Selecting the Language for the On-Screen Display You can select the language for the setup display, the Control Menu display or the messages displayed on the screen.
DISPLAY 123 45 6 7 8 9 MEGA 0 A B C D ALL FILE SORT EDIT DVD CD LOAD ENTER The default setting is "ENGLISH." Getting Started Selecting the Language for the On-Screen Display You can select the language for the setup display, the Control Menu display or the messages displayed on the screen.

Operating Instructions
Page 16
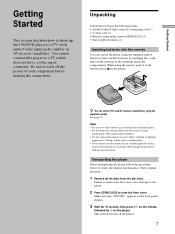
... the disc. • Gently place the disc all discs from the current disc slot number will be sure to attach a Sony CD-single adaptor (not supplied) to the disc and only use the EASY PLAY slot. Do not insert an empty 8 cm (3-inch) CD adaptor. Front cover OPEN/CLOSE ! .-/>+ dial DISC CHANGE...
... the disc. • Gently place the disc all discs from the current disc slot number will be sure to attach a Sony CD-single adaptor (not supplied) to the disc and only use the EASY PLAY slot. Do not insert an empty 8 cm (3-inch) CD adaptor. Front cover OPEN/CLOSE ! .-/>+ dial DISC CHANGE...

Operating Instructions
Page 17
... the loading position. 3 Press AEJECT on the player and the EASY PLAY slot comes to the loading position and the front cover opens. If you use the Program Play or Disc Explorer function, or Search for the purpose of the EASY PLAY disc starts. Getting Started • When closing the front... EASY PLAY slot The EASY PLAY slot can remove the disc easily. 4 Remove the disc. The EASY PLAY disc is being used separately from the EASY PLAY slot 1 Press OPEN/CLOSE to the EASY PLAY slot 1 Press EASY PLAY. The loading guide rises so that you want ...
... the loading position. 3 Press AEJECT on the player and the EASY PLAY slot comes to the loading position and the front cover opens. If you use the Program Play or Disc Explorer function, or Search for the purpose of the EASY PLAY disc starts. Getting Started • When closing the front... EASY PLAY slot The EASY PLAY slot can remove the disc easily. 4 Remove the disc. The EASY PLAY disc is being used separately from the EASY PLAY slot 1 Press OPEN/CLOSE to the EASY PLAY slot 1 Press EASY PLAY. The loading guide rises so that you want ...
Operating Instructions
Page 19
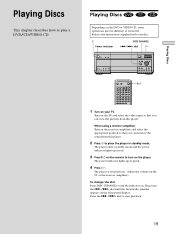
... so that you can listen to turn on the player. The player enters standby mode and the power indicator lights up in green. 4 Press H. When using a receiver (amplifier) Turn on the receiver (amplifier) and select the appropriate position so that you can view the pictures from this player. The player starts...
... so that you can listen to turn on the player. The player enters standby mode and the power indicator lights up in green. 4 Press H. When using a receiver (amplifier) Turn on the receiver (amplifier) and select the appropriate position so that you can view the pictures from this player. The player starts...
Operating Instructions
Page 21
... next chapter, track or scene in continuous play mode Go back to the preceding chapter, track or scene in various modes such as Program Play using the on and turn the .-/>+ dial counterclockwise On the remote: Press . You can play discs in continuous play mode Stop play and remove the disc...
... next chapter, track or scene in continuous play mode Go back to the preceding chapter, track or scene in various modes such as Program Play using the on and turn the .-/>+ dial counterclockwise On the remote: Press . You can play discs in continuous play mode Stop play and remove the disc...
Operating Instructions
Page 22
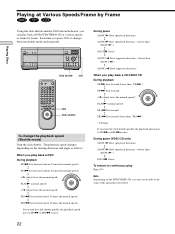
... on the turning direction and angle as follows: When you play back a DVD/CD/VIDEO CD at various speeds or frame by Frame Playing Discs Using the click shuttle and the JOG button/indicator, you may not be able to FF2M or FR2m at once. Playing at Various Speeds/Frame by...
... on the turning direction and angle as follows: When you play back a DVD/CD/VIDEO CD at various speeds or frame by Frame Playing Discs Using the click shuttle and the JOG button/indicator, you may not be able to FF2M or FR2m at once. Playing at Various Speeds/Frame by...

Operating Instructions
Page 24
... may resume playback from the Point Where You Stopped the Disc (Resume Play) Notes • Resume Play may not be available on the player - you use the DISC EXPLORER function Using the DVD's Menu Some DVDs have a title menu or a DVD menu that is provided with DVDs only... title menu A DVD is divided into long sections of a picture or a music feature called "titles." When you play mode - you want using the title menu. you stopped playing is cleared when: - on some DVDs. • Resume Play is not available in the setup display - Playing Discs Resuming ...
... may resume playback from the Point Where You Stopped the Disc (Resume Play) Notes • Resume Play may not be available on the player - you use the DISC EXPLORER function Using the DVD's Menu Some DVDs have a title menu or a DVD menu that is provided with DVDs only... title menu A DVD is divided into long sections of a picture or a music feature called "titles." When you play mode - you want using the title menu. you stopped playing is cleared when: - on some DVDs. • Resume Play is not available in the setup display - Playing Discs Resuming ...

Operating Instructions
Page 25
... the language for the subtitles, the language for the sound, etc., using a menu. PBC Playback allows you use the number buttons, ENTER, ., >, M/m and ORETURN during PBC Playback. Playing Discs Using the DVD menu Some DVDs allow you can use the .-/>+ dial on the player, press DIRECT SEARCH to turn it... on the TV screen. On this player, you to play these DVDs, you can enjoy simple interactive operations, search functions, and other such operations. When you to select the disc contents using the DVD ...
... the language for the subtitles, the language for the sound, etc., using a menu. PBC Playback allows you use the number buttons, ENTER, ., >, M/m and ORETURN during PBC Playback. Playing Discs Using the DVD menu Some DVDs allow you can use the .-/>+ dial on the player, press DIRECT SEARCH to turn it... on the TV screen. On this player, you to play these DVDs, you can enjoy simple interactive operations, search functions, and other such operations. When you to select the disc contents using the DVD ...
Operating Instructions
Page 26
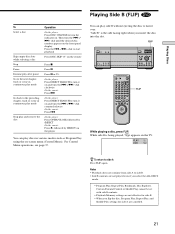
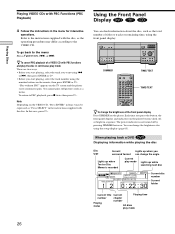
... the track you press the button, the front panel display and indicators on the remote, then press ENTER or H. Each time you want using . The power indicator is recorded Current play mode Lights up while searching next disc 1 2 1 0:22:30 Current disc number Current folder.... When playing back a DVD Displaying information while playing the disc Disc type Current surround format Lights up when you start playing, select the track number using the number buttons on the player become dark, off by pressing DIMMER however. DIMMER TIME/TEXT 123 45 6 7 8 9 MEGA 0 A B C D...
... the track you press the button, the front panel display and indicators on the remote, then press ENTER or H. Each time you want using . The power indicator is recorded Current play mode Lights up while searching next disc 1 2 1 0:22:30 Current disc number Current folder.... When playing back a DVD Displaying information while playing the disc Disc type Current surround format Lights up when you start playing, select the track number using the number buttons on the player become dark, off by pressing DIMMER however. DIMMER TIME/TEXT 123 45 6 7 8 9 MEGA 0 A B C D...


