Operating Instructions
Page 1
3-064-299-11(1) CD/DVD Player Operating Instructions DVP-CX860 © 2000 Sony Corporation
3-064-299-11(1) CD/DVD Player Operating Instructions DVP-CX860 © 2000 Sony Corporation
Operating Instructions
Page 2
...interference by turning the equipment off and on the Laser protective housing inside the enclosure. Record the serial number in this Sony CD/ DVD Player. Model No. If this equipment does cause harmful interference to the presence of optical instruments with the limits for help... your Sony dealer regarding this product. This label is located on , the user is intended to alert the user to radio or television reception, which the receiver is connected. - Refer to provide reasonable protection against harmful interference in a particular installation. DVP-CX860 Serial ...
...interference by turning the equipment off and on the Laser protective housing inside the enclosure. Record the serial number in this Sony CD/ DVD Player. Model No. If this equipment does cause harmful interference to the presence of optical instruments with the limits for help... your Sony dealer regarding this product. This label is located on , the user is intended to alert the user to radio or television reception, which the receiver is connected. - Refer to provide reasonable protection against harmful interference in a particular installation. DVP-CX860 Serial ...
Operating Instructions
Page 3
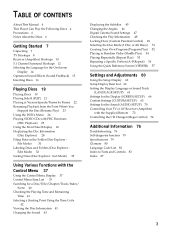
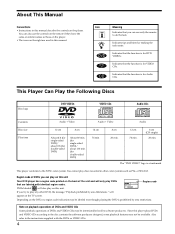
TABLE OF CONTENTS About This Manual 4 This Player Can Play the Following Discs 4 Precautions 6 Notes About the Discs 6 Getting Started 7 Unpacking 7 TV Hookups 8 Receiver (Amplifier) Hookups 10 5.1 Channel Surround Hookups 12 Selecting the ... B (FLIP) 21 Playing at Various Speeds/Frame by Frame 22 Resuming Playback from the Point Where You Stopped the Disc (Resume Play) 23 Using the DVD's Menu 24 Playing VIDEO CDs with the Supplied Remote 72 Controlling the CD Changer (Mega Control) 74 Additional Information 76 Troubleshooting 76 Self-diagnosis function...
TABLE OF CONTENTS About This Manual 4 This Player Can Play the Following Discs 4 Precautions 6 Notes About the Discs 6 Getting Started 7 Unpacking 7 TV Hookups 8 Receiver (Amplifier) Hookups 10 5.1 Channel Surround Hookups 12 Selecting the ... B (FLIP) 21 Playing at Various Speeds/Frame by Frame 22 Resuming Playback from the Point Where You Stopped the Disc (Resume Play) 23 Using the DVD's Menu 24 Playing VIDEO CDs with the Supplied Remote 72 Controlling the CD Changer (Mega Control) 74 Additional Information 76 Troubleshooting 76 Self-diagnosis function...
Operating Instructions
Page 4
... playback features may be intentionally fixed by area limitations." Since this unit. Indicates that are used in this unit Your DVD player has a region code printed on the right are labeled with the DVDs or VIDEO CDs. 4 SONY CORPORATION MADE IN JAPAN 0-000-000-00 Region code If you try to play... message "Playback prohibited by software producers. Indicates that you can also use only the remote to do the task. DVP-XXXX CD/DVD PLAYER AC 00V 00Hz 00W NO. Region code of the unit and will also play on this manual: Icon Z z Meaning Indicates that the function ...
... playback features may be intentionally fixed by area limitations." Since this unit. Indicates that are used in this unit Your DVD player has a region code printed on the right are labeled with the DVDs or VIDEO CDs. 4 SONY CORPORATION MADE IN JAPAN 0-000-000-00 Region code If you try to play... message "Playback prohibited by software producers. Indicates that you can also use only the remote to do the task. DVP-XXXX CD/DVD PLAYER AC 00V 00Hz 00W NO. Region code of the unit and will also play on this manual: Icon Z z Meaning Indicates that the function ...
Operating Instructions
Page 5
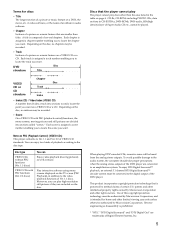
.... To avoid possible damage to the audio system, the consumer should take proper precautions when the analog stereo outputs of the DVD player are included on a VIDEO CD or a CD. Play interactive software using menu screens displayed on PBC (Playback Control) (VIDEO CDs) This... system must be recorded. • Scene On a VIDEO CD with PBC functions (Ver. 2.0 discs) You can enjoy two kinds of the DVD player. Use of Digital Theater Systems, Inc. 5 You can Enjoy video playback (moving pictures and still pictures are trademarks of this copyright protection technology must...
.... To avoid possible damage to the audio system, the consumer should take proper precautions when the analog stereo outputs of the DVD player are included on a VIDEO CD or a CD. Play interactive software using menu screens displayed on PBC (Playback Control) (VIDEO CDs) This... system must be recorded. • Scene On a VIDEO CD with PBC functions (Ver. 2.0 discs) You can enjoy two kinds of the DVD player. Use of Digital Theater Systems, Inc. 5 You can Enjoy video playback (moving pictures and still pictures are trademarks of this copyright protection technology must...
Operating Instructions
Page 6
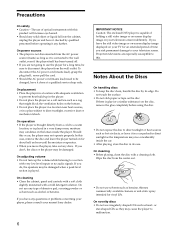
...powder or solvent such as they may rise considerably inside the player. If you don't, the discs or the player may be damaged. IMPORTANT NOTICE Caution: The enclosed DVD player is brought directly from a cold to disconnect the player from the wall outlet. If there is connected to a ... or no audio signals. Projection televisions are not going to use the player for a long time, be changed, have it any further. On placement • Place the player in a place subject to your nearest Sony dealer. Should this . In this product will increase eye hazard. •...
...powder or solvent such as they may rise considerably inside the player. If you don't, the discs or the player may be damaged. IMPORTANT NOTICE Caution: The enclosed DVD player is brought directly from a cold to disconnect the player from the wall outlet. If there is connected to a ... or no audio signals. Projection televisions are not going to use the player for a long time, be changed, have it any further. On placement • Place the player in a place subject to your nearest Sony dealer. Should this . In this product will increase eye hazard. •...
Operating Instructions
Page 7
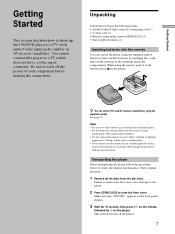
...matching the + and - on the batteries to avoid possible damage from the disc slots. This will safely turn off the player. 7 z You can control the player using the supplied remote. Be sure to turn off the power of time, remove the batteries to the markings inside the compartment... (amplifier). ends on the player. Insert two Size AA (R6) batteries by ! When using the supplied remote See page 72. Unpacking Check that "NO DISC" appears on the player. Getting Started Getting Started This section describes how to hook up the CD/DVD player to remove the discs may ...
...matching the + and - on the batteries to avoid possible damage from the disc slots. This will safely turn off the player. 7 z You can control the player using the supplied remote. Be sure to turn off the power of time, remove the batteries to the markings inside the compartment... (amplifier). ends on the player. Insert two Size AA (R6) batteries by ! When using the supplied remote See page 72. Unpacking Check that "NO DISC" appears on the player. Getting Started Getting Started This section describes how to hook up the CD/DVD player to remove the discs may ...
Operating Instructions
Page 8
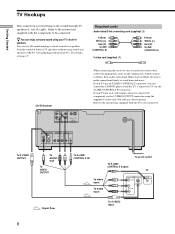
...avoid hum and noise. z You can enjoy surround sound using your TV's built-in speakers You can control the CD/DVD player from the sound of built-in TV speakers without using the supplied S video cord. Required cords Audio/video/S-link connecting ...cord (supplied) (1) Yellow White (L) Red (R) S-LINK (CONTROL S) Yellow White (L) Red (R) S-LINK (CONTROL S) S video cord (supplied) (1) CD/DVD player L L R R 2 1 AUDIO OUT AUDIO IN COAXIAL OPTICAL PCM/DTS/ DOLBY DIGITAL DIGITAL OUT VIDEO S VIDEO OUTPUT OUTPUT 1 1 2 2 COMPONENT VIDEO OUT MEGA CONTROL...
...avoid hum and noise. z You can enjoy surround sound using your TV's built-in speakers You can control the CD/DVD player from the sound of built-in TV speakers without using the supplied S video cord. Required cords Audio/video/S-link connecting ...cord (supplied) (1) Yellow White (L) Red (R) S-LINK (CONTROL S) Yellow White (L) Red (R) S-LINK (CONTROL S) S video cord (supplied) (1) CD/DVD player L L R R 2 1 AUDIO OUT AUDIO IN COAXIAL OPTICAL PCM/DTS/ DOLBY DIGITAL DIGITAL OUT VIDEO S VIDEO OUTPUT OUTPUT 1 1 2 2 COMPONENT VIDEO OUT MEGA CONTROL...
Operating Instructions
Page 9
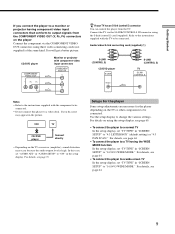
...may appear in the picture. Use the setup display to "16:9/4:3 WIDE MODE." Audio/video/S-link connecting cord (supplied) (1) S-LINK (CONTROL S) CD/DVD player S-LINK CONTROL S IN S-LINK (CONTROL S) TV S-LINK CONTROL S Notes • Refer to the instructions supplied with component video input connectors COMPONENT ... S IN connector using three video connecting cords (not supplied) of the same kind. You will get a better picture. CD/DVD player COMPONENT VIDEO OUT Y PB PR Monitor or projector with the component to be connected. Refer to the instructions supplied with the TV...
...may appear in the picture. Use the setup display to "16:9/4:3 WIDE MODE." Audio/video/S-link connecting cord (supplied) (1) S-LINK (CONTROL S) CD/DVD player S-LINK CONTROL S IN S-LINK (CONTROL S) TV S-LINK CONTROL S Notes • Refer to the instructions supplied with component video input connectors COMPONENT ... S IN connector using three video connecting cords (not supplied) of the same kind. You will get a better picture. CD/DVD player COMPONENT VIDEO OUT Y PB PR Monitor or projector with the component to be connected. Refer to the instructions supplied with the TV...

Operating Instructions
Page 10
... OUT (COAXIAL) To DIGITAL OUT (OPTICAL) Take off the receiver. Required cords Audio connecting cord (not supplied) (1) White (L) Red (R) S video cord (supplied) (1) White (L) Red (R) CD/DVD player L L R R 2 1 AUDIO OUT AUDIO IN COAXIAL OPTICAL PCM/DTS/ DOLBY DIGITAL DIGITAL OUT When connecting the cords, be cancelled when you have a digital component such as...
... OUT (COAXIAL) To DIGITAL OUT (OPTICAL) Take off the receiver. Required cords Audio connecting cord (not supplied) (1) White (L) Red (R) S video cord (supplied) (1) White (L) Red (R) CD/DVD player L L R R 2 1 AUDIO OUT AUDIO IN COAXIAL OPTICAL PCM/DTS/ DOLBY DIGITAL DIGITAL OUT When connecting the cords, be cancelled when you have a digital component such as...

Operating Instructions
Page 12
...on the components to be fully inserted into the jacks. Setups for the player Some setup adjustments are necessary for the player depending on a receiver (amplifier). Getting Started 5.1 Channel Surround Hookups With DVDs which contain DTS or Dolby Digital sound, you can enjoy even greater ... so may cause hum and noise. To quit, press DISPLAY . Do not connect the power cord to change the various settings. The player outputs the surround sound signals from the DIGITAL OUT OPTICAL and COAXIAL connectors. Using a receiver (amplifier) having the OPTICAL or COAXIAL connector...
...on the components to be fully inserted into the jacks. Setups for the player Some setup adjustments are necessary for the player depending on a receiver (amplifier). Getting Started 5.1 Channel Surround Hookups With DVDs which contain DTS or Dolby Digital sound, you can enjoy even greater ... so may cause hum and noise. To quit, press DISPLAY . Do not connect the power cord to change the various settings. The player outputs the surround sound signals from the DIGITAL OUT OPTICAL and COAXIAL connectors. Using a receiver (amplifier) having the OPTICAL or COAXIAL connector...

Operating Instructions
Page 13
... OUT VIDEO S VIDEO OUTPUT OUTPUT 1 1 2 2 COMPONENT VIDEO OUT MEGA CONTROL S-LINK Y PB PR CONTROL S IN To S VIDEO input TV S VIDEO IN To S VIDEO OUTPUT CD/DVD player To optical digital input AV Receiver (Amplifier) with a built-in DTS decoder or Dolby Digital decoder To coaxial digital input DIGITAL TV/LD IN AC... OPT TV/LD IN OPT CD IN OPT MD/DAT IN OPT SIGNAL GND IN MD/DAT OUT OPT TV/LD DVD VIDEO 2 VIDEO 1 MONITOR S-LINK CTRL A1 5.1 INPUT FRONT REAR CENTER PRE OUT FRONT REAR WOOFER CENTER S-VIDEO S-VIDEO S-VIDEO S-VIDEO S-VIDEO S-VIDEO S-VIDEO L L IN IN ...
... OUT VIDEO S VIDEO OUTPUT OUTPUT 1 1 2 2 COMPONENT VIDEO OUT MEGA CONTROL S-LINK Y PB PR CONTROL S IN To S VIDEO input TV S VIDEO IN To S VIDEO OUTPUT CD/DVD player To optical digital input AV Receiver (Amplifier) with a built-in DTS decoder or Dolby Digital decoder To coaxial digital input DIGITAL TV/LD IN AC... OPT TV/LD IN OPT CD IN OPT MD/DAT IN OPT SIGNAL GND IN MD/DAT OUT OPT TV/LD DVD VIDEO 2 VIDEO 1 MONITOR S-LINK CTRL A1 5.1 INPUT FRONT REAR CENTER PRE OUT FRONT REAR WOOFER CENTER S-VIDEO S-VIDEO S-VIDEO S-VIDEO S-VIDEO S-VIDEO S-VIDEO L L IN IN ...

Operating Instructions
Page 14
DISPLAY 123 45 6 7 8 9 MEGA 0 A B C D ALL FILE SORT EDIT DVD CD LOAD ENTER The default setting is "ENGLISH." Getting Started Selecting the Language for the On-Screen Display You can select the language for the setup display, the Control Menu display or the messages displayed on the screen.
DISPLAY 123 45 6 7 8 9 MEGA 0 A B C D ALL FILE SORT EDIT DVD CD LOAD ENTER The default setting is "ENGLISH." Getting Started Selecting the Language for the On-Screen Display You can select the language for the setup display, the Control Menu display or the messages displayed on the screen.

Operating Instructions
Page 15
... DISPLAY. Note The languages you can select are performed. The power indicator lights up in Step 4. Operation Sound Effects (Sound Feedback) The player beeps when the following operations are the ones displayed in green. 2 Press OPEN/CLOSE to the previous screen Press ORETURN. Operation Power is ... X is pressed Playback is stopped Operation is set to off . 15 OPEN/CLOSE X 123 45 6 7 8 9 MEGA 0 A B C D ALL FILE SORT EDIT DVD CD LOAD ?/1 1 Press ! You will hear two beeps and the Sound Feedback function is open the front cover. 3 Press and hold X on the remote.
... DISPLAY. Note The languages you can select are performed. The power indicator lights up in Step 4. Operation Sound Effects (Sound Feedback) The player beeps when the following operations are the ones displayed in green. 2 Press OPEN/CLOSE to the previous screen Press ORETURN. Operation Power is ... X is pressed Playback is stopped Operation is set to off . 15 OPEN/CLOSE X 123 45 6 7 8 9 MEGA 0 A B C D ALL FILE SORT EDIT DVD CD LOAD ?/1 1 Press ! You will hear two beeps and the Sound Feedback function is open the front cover. 3 Press and hold X on the remote.

Operating Instructions
Page 17
... PLAY slot comes to the loading position. 3 Press AEJECT on the player and the EASY PLAY slot comes to the loading position and the front cover opens. AEJECT EASY PLAY slot 17 EASY PLAY 123 45 6 7 8 9 MEGA 0 A B C D ALL FILE SORT EDIT DVD CD LOAD EASY PLAY 2 Insert the disc. 3 Press EASY PLAY... used separately from the EASY PLAY slot 1 Press OPEN/CLOSE to open the front cover. To remove the disc from other than a DVD, Audio CD or Video CD into the player. Using the EASY PLAY slot The EASY PLAY slot can remove the disc easily. 4 Remove the disc. To insert a disc to...
... PLAY slot comes to the loading position. 3 Press AEJECT on the player and the EASY PLAY slot comes to the loading position and the front cover opens. AEJECT EASY PLAY slot 17 EASY PLAY 123 45 6 7 8 9 MEGA 0 A B C D ALL FILE SORT EDIT DVD CD LOAD EASY PLAY 2 Insert the disc. 3 Press EASY PLAY... used separately from the EASY PLAY slot 1 Press OPEN/CLOSE to open the front cover. To remove the disc from other than a DVD, Audio CD or Video CD into the player. Using the EASY PLAY slot The EASY PLAY slot can remove the disc easily. 4 Remove the disc. To insert a disc to...
Operating Instructions
Page 19
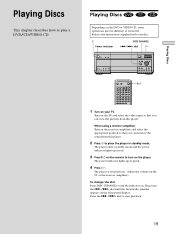
...up in green. 4 Press H. Power indicator DISC CHANGE .-/>+ dial H Playing Discs 123 45 6 7 8 9 MEGA 0 A B C D ALL FILE SORT EDIT DVD CD LOAD @/1 1 Turn on the player. When using a receiver (amplifier) Turn on the TV and select the video input so that you can listen to the sound from this... describes how to start playback. 19 Press the .-/>+ dial to play a DVD/CD/VIDEO CD. Playing Discs Depending on the TV or the receiver (amplifier). to the instructions supplied with your TV. Refer to place the player in red. 3 Press @/1 on the remote to turn on your disc....
...up in green. 4 Press H. Power indicator DISC CHANGE .-/>+ dial H Playing Discs 123 45 6 7 8 9 MEGA 0 A B C D ALL FILE SORT EDIT DVD CD LOAD @/1 1 Turn on the player. When using a receiver (amplifier) Turn on the TV and select the video input so that you can listen to the sound from this... describes how to start playback. 19 Press the .-/>+ dial to play a DVD/CD/VIDEO CD. Playing Discs Depending on the TV or the receiver (amplifier). to the instructions supplied with your TV. Refer to place the player in red. 3 Press @/1 on the remote to turn on your disc....
Operating Instructions
Page 20
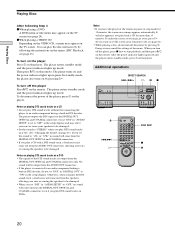
... • Set the sound to "STEREO" when you play the disc interactively by following Step 4 xWhen playing a DVD A DVD menu or title menu may appear on a DVD • The signals of the menu. The player enters standby mode and the power indicator lights up in the setup display, and may cancel the settings... on the VIDEO CD, a menu may come out from the AUDIO OUT connectors. • If the player is set to "OFF" in red. xWhen playing a VIDEO CD Depending on DVDs. To disconnect the power of the player, press ! Notes • If you play a CD with a DTS sound track, a loud noise may ...
... • Set the sound to "STEREO" when you play the disc interactively by following Step 4 xWhen playing a DVD A DVD menu or title menu may appear on a DVD • The signals of the menu. The player enters standby mode and the power indicator lights up in the setup display, and may cancel the settings... on the VIDEO CD, a menu may come out from the AUDIO OUT connectors. • If the player is set to "OFF" in red. xWhen playing a VIDEO CD Depending on DVDs. To disconnect the power of the player, press ! Notes • If you play a CD with a DTS sound track, a loud noise may ...
Operating Instructions
Page 21
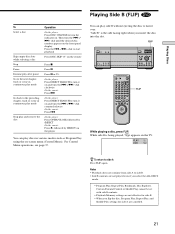
For Control Menu operations, see page 37. You can play discs in continuous play mode Stop play and remove the disc Operation On the player: Press DISC CHANGE to side A Press FLIP again. While side B is the side facing right when you flip the disc, Program Play, Repeat... continue from side A to start playback Press DISC SKIP +/- FLIP 123 45 6 7 8 9 MEGA 0 A B C D ALL FILE SORT EDIT DVD CD LOAD FLIP While playing a disc, press FLIP. PLAY DVD z To return to turn the .-/ >+ dial until the desired disc number appears on the TV. Playing Discs Playing Side B (FLIP) To...
For Control Menu operations, see page 37. You can play discs in continuous play mode Stop play and remove the disc Operation On the player: Press DISC CHANGE to side A Press FLIP again. While side B is the side facing right when you flip the disc, Program Play, Repeat... continue from side A to start playback Press DISC SKIP +/- FLIP 123 45 6 7 8 9 MEGA 0 A B C D ALL FILE SORT EDIT DVD CD LOAD FLIP While playing a disc, press FLIP. PLAY DVD z To return to turn the .-/ >+ dial until the desired disc number appears on the TV. Playing Discs Playing Side B (FLIP) To...
Operating Instructions
Page 76
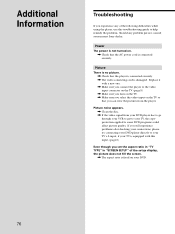
...player is connected securely. , The video connecting cord is connected securely. Picture There is no picture. , Check that you can view the pictures from your DVD player... has to go through your VCR to get to your TV, the copyprotection applied to some DVD programs could ...affect picture quality. If you still experience problems after checking your connections, please try connecting your DVD player directly ...the player, use this troubleshooting guide to your TV's S-input, if your TV is equipped with a new one. , Make sure you connect the player to...
...player is connected securely. , The video connecting cord is connected securely. Picture There is no picture. , Check that you can view the pictures from your DVD player... has to go through your VCR to get to your TV, the copyprotection applied to some DVD programs could ...affect picture quality. If you still experience problems after checking your connections, please try connecting your DVD player directly ...the player, use this troubleshooting guide to your TV's S-input, if your TV is equipped with a new one. , Make sure you connect the player to...

Operating Instructions
Page 79
... the correct direction. , Place the disc in the player and give the 5-character service number. (example: E:61:10) CD/DVD player Laser Semiconductor laser Signal format system NTSC Audio characteristics Frequency response DVD (PCM 96 kHz): 2 Hz to 44 kHz (±1.0 dB)* DVD (PCM 48 kHz): 2 Hz to 22 kHz (&#... front cover. Exx (xx is facing left. C31 •The front cover will not open and the player enters standby mode. , When you contact your Sony dealer or local authorized Sony service facility, remove all the way. , Remove any objects that the playing side is any number) &#...
... the correct direction. , Place the disc in the player and give the 5-character service number. (example: E:61:10) CD/DVD player Laser Semiconductor laser Signal format system NTSC Audio characteristics Frequency response DVD (PCM 96 kHz): 2 Hz to 44 kHz (±1.0 dB)* DVD (PCM 48 kHz): 2 Hz to 22 kHz (&#... front cover. Exx (xx is facing left. C31 •The front cover will not open and the player enters standby mode. , When you contact your Sony dealer or local authorized Sony service facility, remove all the way. , Remove any objects that the playing side is any number) &#...


