

Instructions Manual
Page 6
...This Manual 7 This Player Can Play the Following Discs 8 Index to Parts and Controls 10 Guide to the Control Menu Display 13 Hookups 16 Hooking Up the Player 16 Step 1: Unpacking 16 Step 2: Inserting Batteries Into the Remote 16 Step 3: Connecting the Video Cords/HDMI Cords 17 Step 4:... Connecting the Audio Cords 21 Step 5: Connecting the Power Cord 23 Step 6: Quick Setup 23 Playing Discs 25 Playing Discs 25 Resuming Playback From the Point Where You Stopped the Disc (Multi-disc Resume 27 Using the DVD's Menu 28 Selecting "...
...This Manual 7 This Player Can Play the Following Discs 8 Index to Parts and Controls 10 Guide to the Control Menu Display 13 Hookups 16 Hooking Up the Player 16 Step 1: Unpacking 16 Step 2: Inserting Batteries Into the Remote 16 Step 3: Connecting the Video Cords/HDMI Cords 17 Step 4:... Connecting the Audio Cords 21 Step 5: Connecting the Power Cord 23 Step 6: Quick Setup 23 Playing Discs 25 Playing Discs 25 Resuming Playback From the Point Where You Stopped the Disc (Multi-disc Resume 27 Using the DVD's Menu 28 Selecting "...

Instructions Manual
Page 10
Index to a HDCP (Highbandwidth Digital Content Protection) compliant device with HDMI or DVI (Digital Visual Interface) input. This DVD player incorporates High-Definition Multimedia Interface (HDMI™) technology. HDMI, the HDMI logo and High-Definition Multimedia Interface are trademarks or registered trademarks of HighDefinition ...Lights up when the HDMI OUT jack is based on /standby) button (25) B Disc tray (25) C Front panel display (11) D HDMI* (High-Definition Multimedia Interface) indicator (18, 63, 66, 73) Lights up when the player outputs progressive signals. Rear...
Index to a HDCP (Highbandwidth Digital Content Protection) compliant device with HDMI or DVI (Digital Visual Interface) input. This DVD player incorporates High-Definition Multimedia Interface (HDMI™) technology. HDMI, the HDMI logo and High-Definition Multimedia Interface are trademarks or registered trademarks of HighDefinition ...Lights up when the HDMI OUT jack is based on /standby) button (25) B Disc tray (25) C Front panel display (11) D HDMI* (High-Definition Multimedia Interface) indicator (18, 63, 66, 73) Lights up when the player outputs progressive signals. Rear...

Instructions Manual
Page 17
...on your TV monitor, projector or AV amplifier (receiver) using a video cord. In order to view progressive signal (480p) pictures with HDMI input. Select pattern D when connecting to a TV, projector or AV amplifier (receiver) equipped with a compatible TV, projector or monitor... your TV monitor, projector or AV amplifier (receiver). Select one of the patterns A through D, according to COMPONENT VIDEO OUT HDMI cord (not supplied) (green) (blue) (red) CD/DVD player D IN TV, projector or AV amplifier (receiver) l : Signal flow Component video cord (not supplied) COMPONENT VIDEO IN ...
...on your TV monitor, projector or AV amplifier (receiver) using a video cord. In order to view progressive signal (480p) pictures with HDMI input. Select pattern D when connecting to a TV, projector or AV amplifier (receiver) equipped with a compatible TV, projector or monitor... your TV monitor, projector or AV amplifier (receiver). Select one of the patterns A through D, according to COMPONENT VIDEO OUT HDMI cord (not supplied) (green) (blue) (red) CD/DVD player D IN TV, projector or AV amplifier (receiver) l : Signal flow Component video cord (not supplied) COMPONENT VIDEO IN ...
Instructions Manual
Page 18
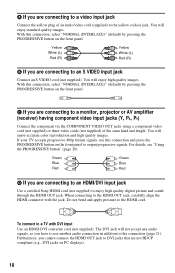
...S VIDEO input jack Connect an S VIDEO cord (not supplied). The DVI jack will enjoy standard quality images. Furthermore, you cannot connect the HDMI OUT jack to this connection, select "NORMAL (INTERLACE)" (default) by pressing the PROGRESSIVE button on PC displays). 18 You will enjoy high ...For details, see "Using the PROGRESSIVE button" (page 20). Green Blue Red Green Blue Red D If you are connecting to an HDMI/DVI input jack Use a certified Sony HDMI cord (not supplied) to a monitor, projector or AV amplifier (receiver) having component video input jacks (Y, PB, PR) Connect the...
...S VIDEO input jack Connect an S VIDEO cord (not supplied). The DVI jack will enjoy standard quality images. Furthermore, you cannot connect the HDMI OUT jack to this connection, select "NORMAL (INTERLACE)" (default) by pressing the PROGRESSIVE button on PC displays). 18 You will enjoy high ...For details, see "Using the PROGRESSIVE button" (page 20). Green Blue Red Green Blue Red D If you are connecting to an HDMI/DVI input jack Use a certified Sony HDMI cord (not supplied) to a monitor, projector or AV amplifier (receiver) having component video input jacks (Y, PB, PR) Connect the...
Instructions Manual
Page 20
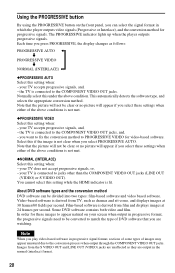
... met. ◆NORMAL (INTERLACE) Select this setting when: - Some DVD software contains both video and film. Images from the S VIDEO OUT and LINE OUT (VIDEO) jacks are output in which the player outputs video signals (Progressive or Interlace), and the conversion method for these... the HDMI indicator is connected to jacks other than the COMPONENT VIDEO OUT jacks (LINE OUT (VIDEO) or S VIDEO OUT). The PROGRESSIVE indicator lights up when the player outputs progressive signals. Normally select this setting when: - About DVD software types and the conversion method DVD software can...
... met. ◆NORMAL (INTERLACE) Select this setting when: - Some DVD software contains both video and film. Images from the S VIDEO OUT and LINE OUT (VIDEO) jacks are output in which the player outputs video signals (Progressive or Interlace), and the conversion method for these... the HDMI indicator is connected to jacks other than the COMPONENT VIDEO OUT jacks (LINE OUT (VIDEO) or S VIDEO OUT). The PROGRESSIVE indicator lights up when the player outputs progressive signals. Normally select this setting when: - About DVD software types and the conversion method DVD software can...

Instructions Manual
Page 21
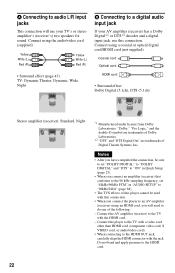
... to LINE OUT L/R (AUDIO) COAXIAL R AUDIO L LINE OUT VIDEO OPTICAL HDMI OUT DIGITAL OUT Y PB PR COMPONENT VIDEO OUT S VIDEO OUT to DIGITAL OUT (COAXIAL or OPTICAL)/HDMI OUT CD/DVD player COAXIAL OPTICAL HDMI OUT DIGITAL OUT or or Optical digital cord (not supplied) Remove jack cap ...before connecting Coaxial digital cord (not supplied) HDMI cord (not supplied) [Speakers] Rear (L) to the input jack...
... to LINE OUT L/R (AUDIO) COAXIAL R AUDIO L LINE OUT VIDEO OPTICAL HDMI OUT DIGITAL OUT Y PB PR COMPONENT VIDEO OUT S VIDEO OUT to DIGITAL OUT (COAXIAL or OPTICAL)/HDMI OUT CD/DVD player COAXIAL OPTICAL HDMI OUT DIGITAL OUT or or Optical digital cord (not supplied) Remove jack cap ...before connecting Coaxial digital cord (not supplied) HDMI cord (not supplied) [Speakers] Rear (L) to the input jack...
Instructions Manual
Page 22
...*1 Manufactured under license from Dolby Laboratories. Connect the player to the TV with a video cord other than HDMI cord (component video cord, S VIDEO cord, or audio/video cord). • When connecting to the HDMI OUT jack, carefully align the HDMI connector with this connection. • When you connect... the player to an AV amplifier (receiver) using an HDMI cord, you connect an amplifier (receiver) that conforms to the 96 kHz...
...*1 Manufactured under license from Dolby Laboratories. Connect the player to the TV with a video cord other than HDMI cord (component video cord, S VIDEO cord, or audio/video cord). • When connecting to the HDMI OUT jack, carefully align the HDMI connector with this connection. • When you connect... the player to an AV amplifier (receiver) using an HDMI cord, you connect an amplifier (receiver) that conforms to the 96 kHz...
Instructions Manual
Page 23
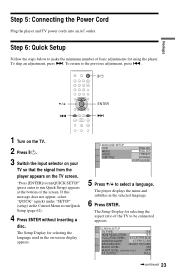
... Quick Setup) appears at the bottom of the TV to select a language. The player displays the menu and subtitles in the on the TV screen. SCREEN SETUP TV TYPE: 16:9 HDMI RESOLUTION: 16:9 YCBCR/RGB (HDMI): 4:3 LETTER BOX SCREEN SAVER: 4:3 PAN SCAN BACKGROUND: JACKET PICTURE BLACK LEVEL: ...select "QUICK" (quick) under "SETUP" (setup) in the Control Menu to run Quick Setup (page 62). 4 Press ENTER without inserting a disc. To skip an adjustment, press >. LANGUAGE SETUP OSD: MENU: AUDIO: SUBTITLE: ENGLISH ENGLISH FRENCH SPANISH PORTUGUESE 5 Press X/x to be connected appears.
... Quick Setup) appears at the bottom of the TV to select a language. The player displays the menu and subtitles in the on the TV screen. SCREEN SETUP TV TYPE: 16:9 HDMI RESOLUTION: 16:9 YCBCR/RGB (HDMI): 4:3 LETTER BOX SCREEN SAVER: 4:3 PAN SCAN BACKGROUND: JACKET PICTURE BLACK LEVEL: ...select "QUICK" (quick) under "SETUP" (setup) in the Control Menu to run Quick Setup (page 62). 4 Press ENTER without inserting a disc. To skip an adjustment, press >. LANGUAGE SETUP OSD: MENU: AUDIO: SUBTITLE: ENGLISH ENGLISH FRENCH SPANISH PORTUGUESE 5 Press X/x to be connected appears.
Instructions Manual
Page 24
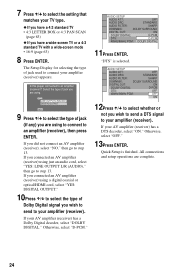
If you connected an AV amplifier (receiver) using a digital coaxial or optical/HDMI cord, select "YES: DIGITAL OUTPUT." 10Press X/x to select the type of jack (if any) you wish to send to an amplifier (receiver), then press ENTER. ... ENTER. If your AV amplifier (receiver) has a Dolby Digital decoder, select "DOLBY DIGITAL." Select the type of jack used to an amplifier (receiver)? Is this player connected to connect your amplifier (receiver). Quick Setup is selected. If you are complete. 24 "DTS" is finished. All connections and setup operations are using...
If you connected an AV amplifier (receiver) using a digital coaxial or optical/HDMI cord, select "YES: DIGITAL OUTPUT." 10Press X/x to select the type of jack (if any) you wish to send to an amplifier (receiver), then press ENTER. ... ENTER. If your AV amplifier (receiver) has a Dolby Digital decoder, select "DOLBY DIGITAL." Select the type of jack used to an amplifier (receiver)? Is this player connected to connect your amplifier (receiver). Quick Setup is selected. If you are complete. 24 "DTS" is finished. All connections and setup operations are using...
Instructions Manual
Page 25
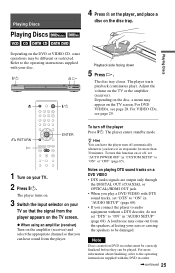
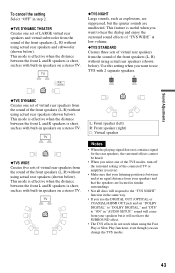
The disc tray closes. The player starts playback (continuous play a DVD VIDEO with DTS sound tracks, set "DTS" to "ON" in "AUDIO SETUP" (page 68). • If you play ). Notes on playing DTS sound tracks on a DVD VIDEO • DTS audio signals are output only through the DIGITAL OUT (COAXIAL or OPTICAL)/HDMI OUT jack. •...
The disc tray closes. The player starts playback (continuous play a DVD VIDEO with DTS sound tracks, set "DTS" to "ON" in "AUDIO SETUP" (page 68). • If you play ). Notes on playing DTS sound tracks on a DVD VIDEO • DTS audio signals are output only through the DIGITAL OUT (COAXIAL or OPTICAL)/HDMI OUT jack. •...
Instructions Manual
Page 41
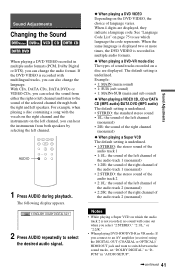
...DVD-R in VR mode: If you connect to an AV amplifier (receiver) using the DIGITAL OUT (COAXIAL or OPTICAL)/ HDMI OUT jack and want to switch between the sound tracks, set "DOLBY DIGITAL" to the sound of the selected channel through both speakers by selecting the left channel. For example, when playing a disc... DIGITAL 3/2.1 2 Press AUDIO repeatedly to see which the audio track 2 is recorded in multiple audio formats. ◆ When playing a DVD-VR mode disc The types of language varies. When 4 digits are displayed. See "Language Code List" on page 75 to select the desired audio signal...
...DVD-R in VR mode: If you connect to an AV amplifier (receiver) using the DIGITAL OUT (COAXIAL or OPTICAL)/ HDMI OUT jack and want to switch between the sound tracks, set "DOLBY DIGITAL" to the sound of the selected channel through both speakers by selecting the left channel. For example, when playing a disc... DIGITAL 3/2.1 2 Press AUDIO repeatedly to see which the audio track 2 is recorded in multiple audio formats. ◆ When playing a DVD-VR mode disc The types of language varies. When 4 digits are displayed. See "Language Code List" on page 75 to select the desired audio signal...
Instructions Manual
Page 42
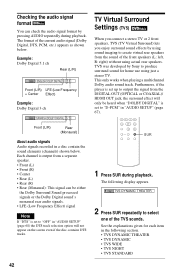
Furthermore, if the player is set up to output the signal from the DIGITAL OUT (OPTICAL or COAXIAL)/ HDMI OUT jack, the surround effect will only be either the Dolby Surround Sound processed signals or the Dolby Digital sound's monaural rear ...Example: Dolby Digital 3 ch 2:SPANISH DOLBY DIGITAL 2 / 1 Front (L/R) Rear (Monaural) About audio signals Audio signals recorded in a disc contain the sound elements (channels) shown below . TVS was developed by Sony to produce surround sound for each item in the following display appears. This only works when playing a multichannel Dolby audio...
Furthermore, if the player is set up to output the signal from the DIGITAL OUT (OPTICAL or COAXIAL)/ HDMI OUT jack, the surround effect will only be either the Dolby Surround Sound processed signals or the Dolby Digital sound's monaural rear ...Example: Dolby Digital 3 ch 2:SPANISH DOLBY DIGITAL 2 / 1 Front (L/R) Rear (Monaural) About audio signals Audio signals recorded in a disc contain the sound elements (channels) shown below . TVS was developed by Sony to produce surround sound for each item in the following display appears. This only works when playing a multichannel Dolby audio...
Instructions Manual
Page 43
... off the surround setting of the connected TV or amplifier (receiver). • Make sure that the speakers are located in similar surroundings. • Not all discs will not have the SURROUND effect. • The TVS effects do not work when using the Fast Play or Slow Play functions, even though you... use the DIGITAL OUT (OPTICAL or COAXIAL)/HDMI OUT jack and set "DOLBY DIGITAL" to "DOLBY DIGITAL," and "DTS" to use TVS with built-in speakers on a stereo TV. This mode is effective...
... off the surround setting of the connected TV or amplifier (receiver). • Make sure that the speakers are located in similar surroundings. • Not all discs will not have the SURROUND effect. • The TVS effects do not work when using the Fast Play or Slow Play functions, even though you... use the DIGITAL OUT (OPTICAL or COAXIAL)/HDMI OUT jack and set "DOLBY DIGITAL" to "DOLBY DIGITAL," and "DTS" to use TVS with built-in speakers on a stereo TV. This mode is effective...
Instructions Manual
Page 49
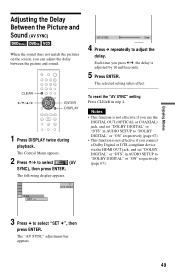
... not match the pictures on the screen, you press C/c, the delay is not effective if you connect a Dolby Digital or DTS-compliant device via the HDMI OUT jack, and set "DOLBY DIGITAL" or "DTS" in AUDIO SETUP to "DOLBY DIGITAL" or "ON" respectively (page 67). • This function is ..."AV SYNC" setting Press CLEAR in AUDIO SETUP to "DOLBY DIGITAL" or "ON" respectively (page 67). 3 Press x to select "SET c", then press ENTER. STOP DVD VIDEO 0 ms SET AV SYNC 0ms 4 Press c repeatedly to select (AV SYNC), then press ENTER. Notes • This function is not effective if you use...
... not match the pictures on the screen, you press C/c, the delay is not effective if you connect a Dolby Digital or DTS-compliant device via the HDMI OUT jack, and set "DOLBY DIGITAL" or "DTS" in AUDIO SETUP to "DOLBY DIGITAL" or "ON" respectively (page 67). • This function is ..."AV SYNC" setting Press CLEAR in AUDIO SETUP to "DOLBY DIGITAL" or "ON" respectively (page 67). 3 Press x to select "SET c", then press ENTER. STOP DVD VIDEO 0 ms SET AV SYNC 0ms 4 Press c repeatedly to select (AV SYNC), then press ENTER. Notes • This function is not effective if you use...

Instructions Manual
Page 61
...: "SCREEN SETUP" Selected item ENTER DISPLAY 1 Press DISPLAY when the player is selected. Note Playback settings stored in stop mode. The options for...SETUP" appear. ( 47 ) STOP DVD VIDEO QUICK CUSTOM RESET QUICK SCREEN SETUP TV TYPE: 16:9 HDMI RESOLUTION: AUTO YCBCR/RGB (HDMI): YCBCR SCREEN SAVER: ON BACKGROUND:... JACKET PICTURE BLACK LEVEL: ON BLACK LEVEL (COMPONENT OUT): OFF 4:3 OUTPUT: FULL Setup items 5 Press X/x to select an item, then press ENTER. The Setup item is in the disc...
...: "SCREEN SETUP" Selected item ENTER DISPLAY 1 Press DISPLAY when the player is selected. Note Playback settings stored in stop mode. The options for...SETUP" appear. ( 47 ) STOP DVD VIDEO QUICK CUSTOM RESET QUICK SCREEN SETUP TV TYPE: 16:9 HDMI RESOLUTION: AUTO YCBCR/RGB (HDMI): YCBCR SCREEN SAVER: ON BACKGROUND:... JACKET PICTURE BLACK LEVEL: ON BLACK LEVEL (COMPONENT OUT): OFF 4:3 OUTPUT: FULL Setup items 5 Press X/x to select an item, then press ENTER. The Setup item is in the disc...
Instructions Manual
Page 62
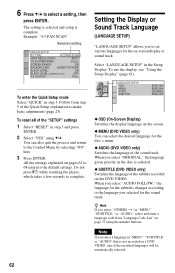
...language in the disc is selected. ◆ SUBTITLE (DVD VIDEO only) Switches the language of the subtitle recorded on pages 62 to 68 return to complete. Example: "4:3 PAN SCAN" Selected setting SCREEN SETUP TV TYPE: 4:3 PAN SCAN HDMI RESOLUTION: AUTO YCBCR/RGB (HDMI): YCBCR SCREEN SAVER...: ON BACKGROUND: JACKET PICTURE BLACK LEVEL: ON BLACK LEVEL (COMPONENT OUT): OFF 4:3 OUTPUT: FULL To enter the Quick Setup mode Select "QUICK" in the Setup Display. Do not press [/1 while resetting the player, which...
...language in the disc is selected. ◆ SUBTITLE (DVD VIDEO only) Switches the language of the subtitle recorded on pages 62 to 68 return to complete. Example: "4:3 PAN SCAN" Selected setting SCREEN SETUP TV TYPE: 4:3 PAN SCAN HDMI RESOLUTION: AUTO YCBCR/RGB (HDMI): YCBCR SCREEN SAVER...: ON BACKGROUND: JACKET PICTURE BLACK LEVEL: ON BLACK LEVEL (COMPONENT OUT): OFF 4:3 OUTPUT: FULL To enter the Quick Setup mode Select "QUICK" in the Setup Display. Do not press [/1 while resetting the player, which...

Instructions Manual
Page 63
... BOX 4:3 PAN SCAN Notes • If the playback picture becomes distorted, set "YCBCR" to "RGB." • If the HDMI OUT jack is connected to your satisfaction, try another option that suits the disc and your TV. Select "SCREEN SETUP" in the Setup Display. SCREEN SETUP TV TYPE: 16... the connected TV cannot accept the resolution, the player automatically adjusts the video signals that do not fit. 16:9 Note Depending on the DVD, "4:3 LETTER BOX" may be selected automatically instead of "4:3 PAN SCAN" or vice versa. ◆ HDMI RESOLUTION Selects the type of video signals output from...
... BOX 4:3 PAN SCAN Notes • If the playback picture becomes distorted, set "YCBCR" to "RGB." • If the HDMI OUT jack is connected to your satisfaction, try another option that suits the disc and your TV. Select "SCREEN SETUP" in the Setup Display. SCREEN SETUP TV TYPE: 16... the connected TV cannot accept the resolution, the player automatically adjusts the video signals that do not fit. 16:9 Note Depending on the DVD, "4:3 LETTER BOX" may be selected automatically instead of "4:3 PAN SCAN" or vice versa. ◆ HDMI RESOLUTION Selects the type of video signals output from...
Instructions Manual
Page 64
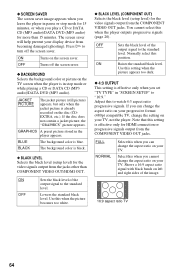
...the picture becomes too white. ◆ BLACK LEVEL (COMPONENT OUT) Selects the black level (setup level) for HDMI connection or progressive signals output from the jacks other than 15 minutes. If the disc does not contain a jacket picture, the "GRAPHICS" picture appears. You cannot select this to watch 4:3 aspect ... this setting is blue. ◆ SCREEN SAVER The screen saver image appears when you leave the player in pause or stop mode or while playing a CD or DATA CD (MP3 audio)/DATA DVD (MP3 audio). BLACK The background color is effective only when you play a CD or DATA CD...
...the picture becomes too white. ◆ BLACK LEVEL (COMPONENT OUT) Selects the black level (setup level) for HDMI connection or progressive signals output from the jacks other than 15 minutes. If the disc does not contain a jacket picture, the "GRAPHICS" picture appears. You cannot select this to watch 4:3 aspect ... this setting is blue. ◆ SCREEN SAVER The screen saver image appears when you leave the player in pause or stop mode or while playing a CD or DATA CD (MP3 audio)/DATA DVD (MP3 audio). BLACK The background color is effective only when you play a CD or DATA CD...
Instructions Manual
Page 65
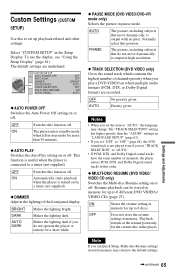
...is useful when the player is turned on or off. Priority given. Playback restarts at the resume point only for up to 6 different DVD VIDEOs/ VIDEO CDs (page 27). CUSTOM SETUP AUTO POWER OFF: AUTO PLAY: DIMMER: PAUSE MODE: TRACK SELECTION: MULTI-DISC RESUME: AUDIO (HDMI): OFF OFF BRIGHT ...AUTO OFF ON AUTO ◆ AUTO POWER OFF Switches the Auto Power Off setting on or off . Resume playback can be stored in memory for the current disc in pause mode. Automatically starts playback when the player is connected to...
...is useful when the player is turned on or off. Priority given. Playback restarts at the resume point only for up to 6 different DVD VIDEOs/ VIDEO CDs (page 27). CUSTOM SETUP AUTO POWER OFF: AUTO PLAY: DIMMER: PAUSE MODE: TRACK SELECTION: MULTI-DISC RESUME: AUDIO (HDMI): OFF OFF BRIGHT ...AUTO OFF ON AUTO ◆ AUTO POWER OFF Switches the Auto Power Off setting on or off . Resume playback can be stored in memory for the current disc in pause mode. Automatically starts playback when the player is connected to...
Instructions Manual
Page 66
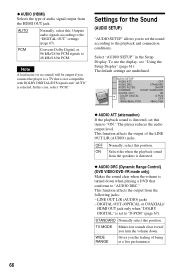
...clear even if you to set this when the playback sound from the speakers is distorted. ◆ AUDIO DRC (Dynamic Range Control) (DVD VIDEO/DVD-VR mode only) Makes the sound clear when the volume is selected. Outputs audio signals according to 48 kHz/16 bit PCM. Note ...will be output if you the feeling of the LINE OUT L/R (AUDIO) jacks. The player reduces the audio output level. LINE OUT L/R (AUDIO) jacks - STANDARD Normally select this case, select "PCM." ◆ AUDIO (HDMI) Selects the type of audio signal output from the following jacks: - In this position....
...clear even if you to set this when the playback sound from the speakers is distorted. ◆ AUDIO DRC (Dynamic Range Control) (DVD VIDEO/DVD-VR mode only) Makes the sound clear when the volume is selected. Outputs audio signals according to 48 kHz/16 bit PCM. Note ...will be output if you the feeling of the LINE OUT L/R (AUDIO) jacks. The player reduces the audio output level. LINE OUT L/R (AUDIO) jacks - STANDARD Normally select this case, select "PCM." ◆ AUDIO (HDMI) Selects the type of audio signal output from the following jacks: - In this position....


