
Operating Instructions
Page 1
3-096-489-11(1) DVD Recorder Operating Instructions RDR-GX355 © 2007 Sony Corporation Operating Instructions US Manual de instrucciones ES
3-096-489-11(1) DVD Recorder Operating Instructions RDR-GX355 © 2007 Sony Corporation Operating Instructions US Manual de instrucciones ES

Operating Instructions
Page 2
... AC, 60 Hz. • The recorder is not disconnected from the AC power source as long as a bookshelf or similar unit. • Do not place the recorder in a location near heat sources, or in a place subject to rain or moisture. RDR-GX355 Serial No CAUTION You are designed to ...radio communications. Record the serial number in this manual could void your Sony dealer regarding this DVD recorder is placed in a very damp room, moisture may be changed only at the...
... AC, 60 Hz. • The recorder is not disconnected from the AC power source as long as a bookshelf or similar unit. • Do not place the recorder in a location near heat sources, or in a place subject to rain or moisture. RDR-GX355 Serial No CAUTION You are designed to ...radio communications. Record the serial number in this manual could void your Sony dealer regarding this DVD recorder is placed in a very damp room, moisture may be changed only at the...

Operating Instructions
Page 4
... discs created on this recorder. Icon +RW -RWVR -RWVideo +R Meaning Functions available for DVD+RWs Functions available for DVD-RWs in VR (Video Recording) mode Functions available for DVD-RWs in video mode Functions available for DVD+Rs -RVR -RVideo DVD RAM Functions available for DVD-Rs in VR (Video Recording) mode Functions available for DVD-Rs in video mode...
... discs created on this recorder. Icon +RW -RWVR -RWVideo +R Meaning Functions available for DVD+RWs Functions available for DVD-RWs in VR (Video Recording) mode Functions available for DVD-RWs in video mode Functions available for DVD+Rs -RVR -RVideo DVD RAM Functions available for DVD-Rs in VR (Video Recording) mode Functions available for DVD-Rs in video mode...

Operating Instructions
Page 6
Table of Contents WARNING 2 Precautions 2 Ways to Use Your DVD Recorder 8 How to Use the On-Screen Menus 10 Hookups and Settings 12 Hooking Up the Recorder 12 Step 1: Unpacking 12 Step 2: Connecting the Cable Box/Satellite Receiver (Tuner 12 Step 3: Connecting to Your TV 15 Step 4: Connecting to ...Cord 20 Step 6: Preparing the Remote 20 Step 7: Easy Setup 23 Connecting a VCR or Similar Device 27 Quick Guide to Disc Types 30 Recordable and Playable Discs 30 Playable Discs 33 Playback 35 Playing Discs 35 Playback Options 36 Playing a Title From the Title List 39 Searching for a...
Table of Contents WARNING 2 Precautions 2 Ways to Use Your DVD Recorder 8 How to Use the On-Screen Menus 10 Hookups and Settings 12 Hooking Up the Recorder 12 Step 1: Unpacking 12 Step 2: Connecting the Cable Box/Satellite Receiver (Tuner 12 Step 3: Connecting to Your TV 15 Step 4: Connecting to ...Cord 20 Step 6: Preparing the Remote 20 Step 7: Easy Setup 23 Connecting a VCR or Similar Device 27 Quick Guide to Disc Types 30 Recordable and Playable Discs 30 Playable Discs 33 Playback 35 Playing Discs 35 Playback Options 36 Playing a Title From the Title List 39 Searching for a...

Operating Instructions
Page 7
... Jack 71 Dubbing From a DV/D8 Format Tape to a DVD 72 Settings and Adjustments 75 Using the Setup Displays 75 Clock Setting (Clock Set 76 Video Settings (Video 77 Audio Settings (Audio 79 Recording and Set Top Box Control Settings (Features 81 Language, Parental ...Control Settings/Factory Settings (Options 83 Easy Setup (Resetting the Recorder 85 Additional Information 86 Troubleshooting 86 Notes About This Recorder 90 Specifications 91 About i.LINK 93 Guide to Parts and Controls 94 Glossary 97 DVD Audio/Subtitle Language 99 Cable Box/Satellite Receiver Brand Code 100 ...
... Jack 71 Dubbing From a DV/D8 Format Tape to a DVD 72 Settings and Adjustments 75 Using the Setup Displays 75 Clock Setting (Clock Set 76 Video Settings (Video 77 Audio Settings (Audio 79 Recording and Set Top Box Control Settings (Features 81 Language, Parental ...Control Settings/Factory Settings (Options 83 Easy Setup (Resetting the Recorder 85 Additional Information 86 Troubleshooting 86 Notes About This Recorder 90 Specifications 91 About i.LINK 93 Guide to Parts and Controls 94 Glossary 97 DVD Audio/Subtitle Language 99 Cable Box/Satellite Receiver Brand Code 100 ...
Operating Instructions
Page 8
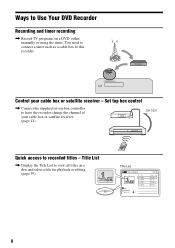
...03 > 00:31:23 > 01:59:00 > 00:58:56 > 8 Set top box control , Connect the supplied set top box controller to have the recorder change the channel of your cable box or satellite receiver - Title List Title List (Original) 1/4 No. You need to connect a tuner such as a cable ...box to recorded titles - Title List , Display the Title List to view all titles on a DVD, either manually or using the timer. Control your cable box or satellite receiver (page 12). Ways to Use Your...
...03 > 00:31:23 > 01:59:00 > 00:58:56 > 8 Set top box control , Connect the supplied set top box controller to have the recorder change the channel of your cable box or satellite receiver - Title List Title List (Original) 1/4 No. You need to connect a tuner such as a cable ...box to recorded titles - Title List , Display the Title List to view all titles on a DVD, either manually or using the timer. Control your cable box or satellite receiver (page 12). Ways to Use Your...

Operating Instructions
Page 9
... Playing JPEG image files or MP3 audio files , You can also play the disc on this recorder (page 41). Shoot Save Play! A list of recordable and playable discs is on a DVD-RW (VR mode) or DVD-R (VR mode), then erase, move or add scenes as you like without changing the original contents... jack and press the ONE TOUCH DUBBING button to dub a DV/D8 format tape over to a DATA CD (CD-RW/CD-R) or DATA DVD (DVD+RW/DVD-RW/ DVD+R/DVD-R) on this recorder (page 41). First, take pictures with a digital camera and save them in JPEG format to a disc (page 71). Creating your own program...
... Playing JPEG image files or MP3 audio files , You can also play the disc on this recorder (page 41). Shoot Save Play! A list of recordable and playable discs is on a DVD-RW (VR mode) or DVD-R (VR mode), then erase, move or add scenes as you like without changing the original contents... jack and press the ONE TOUCH DUBBING button to dub a DV/D8 format tape over to a DATA CD (CD-RW/CD-R) or DATA DVD (DVD+RW/DVD-RW/ DVD+R/DVD-R) on this recorder (page 41). First, take pictures with a digital camera and save them in JPEG format to a disc (page 71). Creating your own program...

Operating Instructions
Page 10
SYSTEM MENU 123 456 789 0 O RETURN M/m/ Once you become familiar with the basic operations, you will find the recorder easy to operate this recorder. How to Use the On-Screen Menus The following three displays are mainly used to use.
SYSTEM MENU 123 456 789 0 O RETURN M/m/ Once you become familiar with the basic operations, you will find the recorder easy to operate this recorder. How to Use the On-Screen Menus The following three displays are mainly used to use.
Operating Instructions
Page 11
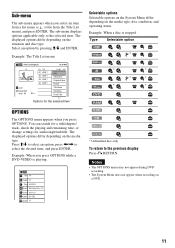
Example: The Title List menu Title List (Original) 1/4 No. The displayed options differ depending on the media type. You can search for a title/chapter/ track, check the playing and remaining time, or change settings for the selected item OPTIONS The OPTIONS menu appears when you select an item from a list menu (e.g., a title from the Title List menu), and press ENTER. Sub-menu The sub-menu appears when you press OPTIONS. Press M/m to the selected item. Select an option by pressing M/m and ENTER. Title 01 LINE 1 02 LINE 1 03 LINE 1 04 LINE 1 T LINE 1 May/02/2007 08:00 ...
Example: The Title List menu Title List (Original) 1/4 No. The displayed options differ depending on the media type. You can search for a title/chapter/ track, check the playing and remaining time, or change settings for the selected item OPTIONS The OPTIONS menu appears when you select an item from a list menu (e.g., a title from the Title List menu), and press ENTER. Sub-menu The sub-menu appears when you press OPTIONS. Press M/m to the selected item. Select an option by pressing M/m and ENTER. Title 01 LINE 1 02 LINE 1 03 LINE 1 04 LINE 1 T LINE 1 May/02/2007 08:00 ...

Operating Instructions
Page 13
...supplied) to antenna input TV Audio/video cord (not supplied) to SET TOP BOX CONTROL SETTOP BOX CONTROL LINE 1 IN VIDEO to LINE 1 IN DVD recorder SETTOP HDMI OUT BOX CONTROL AUDIO OUT COMPONENT VIDEO OUT S VIDEO OUT LINE 1 IN LINE OUT L Y VIDEO VIDEO R PB L PR OPTICAL ...COAXIAL DIGITAL AUDIO OUT R AUDIO AUDIO AUDIO : Signal flow About AV path through The recorder automatically sends the input signal from a cable box or satellite receiver on . When you connect a cable box or satellite receiver to the LINE 1 IN ...
...supplied) to antenna input TV Audio/video cord (not supplied) to SET TOP BOX CONTROL SETTOP BOX CONTROL LINE 1 IN VIDEO to LINE 1 IN DVD recorder SETTOP HDMI OUT BOX CONTROL AUDIO OUT COMPONENT VIDEO OUT S VIDEO OUT LINE 1 IN LINE OUT L Y VIDEO VIDEO R PB L PR OPTICAL ...COAXIAL DIGITAL AUDIO OUT R AUDIO AUDIO AUDIO : Signal flow About AV path through The recorder automatically sends the input signal from a cable box or satellite receiver on . When you connect a cable box or satellite receiver to the LINE 1 IN ...

Operating Instructions
Page 15
...R L (red) (white) VIDEO (yellow) S video cord (not supplied) S VIDEO OUT LINE 1 IN LINE OUT VIDEO VIDEO L (yellow) (white) (red) to S VIDEO OUT DVD recorder SETTOP HDMI OUT BOX CONTROL AUDIO OUT COMPONENT VIDEO OUT S VIDEO OUT LINE 1 IN LINE OUT L Y VIDEO VIDEO R PB L PR OPTICAL COAXIAL DIGITAL AUDIO OUT...to connect the audio cord to LINE OUT (VIDEO/AUDIO L/R) Audio/video cord (supplied) : Signal flow When playing "wide screen" images Some recorded images may not fit your TV screen. To enjoy higher quality images, connect an S video cord (not supplied) instead of the...
...R L (red) (white) VIDEO (yellow) S video cord (not supplied) S VIDEO OUT LINE 1 IN LINE OUT VIDEO VIDEO L (yellow) (white) (red) to S VIDEO OUT DVD recorder SETTOP HDMI OUT BOX CONTROL AUDIO OUT COMPONENT VIDEO OUT S VIDEO OUT LINE 1 IN LINE OUT L Y VIDEO VIDEO R PB L PR OPTICAL COAXIAL DIGITAL AUDIO OUT...to connect the audio cord to LINE OUT (VIDEO/AUDIO L/R) Audio/video cord (supplied) : Signal flow When playing "wide screen" images Some recorded images may not fit your TV screen. To enjoy higher quality images, connect an S video cord (not supplied) instead of the...

Operating Instructions
Page 16
... signals through the HDMI OUT jack. HDMI IN TV or projector to HDMI input HDMI cord (not supplied) to turn off the recorder before connecting an HDMI cord. If your TV has an HDMI input jack Connect the HDMI* OUT jack using a certified HDMI cord (not supplied). The ... connect the HDMI OUT jack to DVI jacks that are trademarks or registered trademarks of HDMI Licensing LLC. Be sure to HDMI OUT HDMI OUT DVD recorder SETTOP HDMI OUT BOX CONTROL AUDIO OUT COMPONENT VIDEO OUT S VIDEO OUT LINE 1 IN LINE OUT L Y VIDEO VIDEO R PB L PR OPTICAL COAXIAL DIGITAL AUDIO OUT...
... signals through the HDMI OUT jack. HDMI IN TV or projector to HDMI input HDMI cord (not supplied) to turn off the recorder before connecting an HDMI cord. If your TV has an HDMI input jack Connect the HDMI* OUT jack using a certified HDMI cord (not supplied). The ... connect the HDMI OUT jack to DVI jacks that are trademarks or registered trademarks of HDMI Licensing LLC. Be sure to HDMI OUT HDMI OUT DVD recorder SETTOP HDMI OUT BOX CONTROL AUDIO OUT COMPONENT VIDEO OUT S VIDEO OUT LINE 1 IN LINE OUT L Y VIDEO VIDEO R PB L PR OPTICAL COAXIAL DIGITAL AUDIO OUT...

Operating Instructions
Page 17
... VIDEO OUT S VIDEO OUT LINE 1 IN LINE OUT L Y VIDEO VIDEO R PB L PR OPTICAL COAXIAL DIGITAL AUDIO OUT R AUDIO AUDIO DVD recorder : Signal flow 17 If your TV has component video input jacks Connect the COMPONENT VIDEO OUT jacks using this connection and then set "Progressive" ...you must use this connection, be sure to connect the audio cord to the LINE OUT (AUDIO L/R) jacks. The "PROGRESSIVE" indicator lights up when the recorder outputs progressive signals. COMPONENT VIDEO IN Y PB PR (green) (blue) (red) TV or projector INPUT L AUDIO R (white) (red) Component video ...
... VIDEO OUT S VIDEO OUT LINE 1 IN LINE OUT L Y VIDEO VIDEO R PB L PR OPTICAL COAXIAL DIGITAL AUDIO OUT R AUDIO AUDIO DVD recorder : Signal flow 17 If your TV has component video input jacks Connect the COMPONENT VIDEO OUT jacks using this connection and then set "Progressive" ...you must use this connection, be sure to connect the audio cord to the LINE OUT (AUDIO L/R) jacks. The "PROGRESSIVE" indicator lights up when the recorder outputs progressive signals. COMPONENT VIDEO IN Y PB PR (green) (blue) (red) TV or projector INPUT L AUDIO R (white) (red) Component video ...
Operating Instructions
Page 18
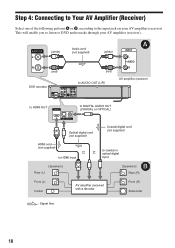
... AV amplifier (receiver) with a decoder Front (R) Subwoofer : Signal flow 18 AUDIO OUT L (white) R (red) Audio cord (not supplied) (white) (red) DVD recorder to AUDIO OUT (L/R) SETTOP HDMI OUT BOX CONTROL AUDIO OUT COMPONENT VIDEO OUT S VIDEO OUT LINE 1 IN LINE OUT L Y VIDEO VIDEO R PB L PR OPTICAL...cord (not supplied) Coaxial digital cord (not supplied) HDMI cord (not supplied) or to HDMI input [Speakers] Rear (L) or to DVD audio tracks through your AV amplifier (receiver). Step 4: Connecting to Your AV Amplifier (Receiver) Select one of the following patterns A or...
... AV amplifier (receiver) with a decoder Front (R) Subwoofer : Signal flow 18 AUDIO OUT L (white) R (red) Audio cord (not supplied) (white) (red) DVD recorder to AUDIO OUT (L/R) SETTOP HDMI OUT BOX CONTROL AUDIO OUT COMPONENT VIDEO OUT S VIDEO OUT LINE 1 IN LINE OUT L Y VIDEO VIDEO R PB L PR OPTICAL...cord (not supplied) Coaxial digital cord (not supplied) HDMI cord (not supplied) or to HDMI input [Speakers] Rear (L) or to DVD audio tracks through your AV amplifier (receiver). Step 4: Connecting to Your AV Amplifier (Receiver) Select one of the following patterns A or...

Operating Instructions
Page 19
..., and that creates virtual speakers from the DIGITAL AUDIO OUT jacks, you cannot switch the bilingual sounds on a DVD-RW (VR mode) or DVD-R (VR mode) by pressing AUDIO. • When you connect the recorder to the TV with the connected components. z Hint For correct speaker location, see the operating instructions supplied with...
..., and that creates virtual speakers from the DIGITAL AUDIO OUT jacks, you cannot switch the bilingual sounds on a DVD-RW (VR mode) or DVD-R (VR mode) by pressing AUDIO. • When you connect the recorder to the TV with the connected components. z Hint For correct speaker location, see the operating instructions supplied with...

Operating Instructions
Page 20
...battery leakage occurs, wipe out any foreign object into an AC outlet. After you connect the power cord, you connect additional equipment to this recorder (page 22). • Use the batteries correctly to strong light, such as direct sunlight or lighting apparatus. Be sure to recharge the...VIDEO L R AUDIO to AC outlet < Notes • If the supplied remote interferes your other Sony DVD recorder or player, change the command mode number for a short while before operating the recorder. Do not use a new battery with bare hands should last about three to connect the power cord...
...battery leakage occurs, wipe out any foreign object into an AC outlet. After you connect the power cord, you connect additional equipment to this recorder (page 22). • Use the batteries correctly to strong light, such as direct sunlight or lighting apparatus. Be sure to recharge the...VIDEO L R AUDIO to AC outlet < Notes • If the supplied remote interferes your other Sony DVD recorder or player, change the command mode number for a short while before operating the recorder. Do not use a new battery with bare hands should last about three to connect the power cord...

Operating Instructions
Page 22
The default command mode setting for this recorder and the supplied remote to one Sony DVD recorder If the supplied remote interferes with your other Sony DVD recorder or player after you have completed "Step 7: Easy Setup." Manufacturer Sampo Samsung Sanyo Scott Sears Sharp Sylvania Teknika Toshiba Wards Yorx... 18 08, 12 03, 08, 14 07, 18 03, 04, 12 12 14, 15 If you have a Sony DVD player or more than one that differs from the other Sony DVD recorder or player, set the command mode number for this recorder and the supplied remote is DVD 3. SYSTEM MENU 123 456 789 0 O RETURN M/m/
The default command mode setting for this recorder and the supplied remote to one Sony DVD recorder If the supplied remote interferes with your other Sony DVD recorder or player after you have completed "Step 7: Easy Setup." Manufacturer Sampo Samsung Sanyo Scott Sears Sharp Sylvania Teknika Toshiba Wards Yorx... 18 08, 12 03, 08, 14 07, 18 03, 04, 12 12 14, 15 If you have a Sony DVD player or more than one that differs from the other Sony DVD recorder or player, set the command mode number for this recorder and the supplied remote is DVD 3. SYSTEM MENU 123 456 789 0 O RETURN M/m/

Operating Instructions
Page 24
... No Disc Easy Setup Select the screen language. See "Cable Box/Satellite Receiver Brand Code" (page 100). 9 Select the recorder's audio/video input ("Line1" or "Line2") that the signal from the recorder appears on your TV screen. Set the day, year, hour, minutes, and AM/PM in the "Setup" display to ...run Easy Setup (page 85). 4 Press ENTER. "Initial setting necessary to operate the DVD recorder will erase all timer settings.) Yes No 6 Select whether or not you want to control your set top box with this message does not appear...
... No Disc Easy Setup Select the screen language. See "Cable Box/Satellite Receiver Brand Code" (page 100). 9 Select the recorder's audio/video input ("Line1" or "Line2") that the signal from the recorder appears on your TV screen. Set the day, year, hour, minutes, and AM/PM in the "Setup" display to ...run Easy Setup (page 85). 4 Press ENTER. "Initial setting necessary to operate the DVD recorder will erase all timer settings.) Yes No 6 Select whether or not you want to control your set top box with this message does not appear...

Operating Instructions
Page 27
...that has a timer function, you can use the Synchro Rec function (page 51). If the equipment has an S video jack, you can connect a second DVD player and record DVDs. You can use an S video cord (not supplied) instead of the yellow (video) plug of this... recorder. S VIDEO OUTPUT VIDEO AUDIO L R S video cord (not supplied) Audio/video cord (not supplied) DVD recorder S VIDEO VIDEO L(MONO) AUDIO R to LINE 2 IN LINE-2 IN S VIDEO VIDEO L(MONO) AUDIO R LINE-2 IN DV IN ONE-TOUCH DUBBING HDMI...
...that has a timer function, you can use the Synchro Rec function (page 51). If the equipment has an S video jack, you can connect a second DVD player and record DVDs. You can use an S video cord (not supplied) instead of the yellow (video) plug of this... recorder. S VIDEO OUTPUT VIDEO AUDIO L R S video cord (not supplied) Audio/video cord (not supplied) DVD recorder S VIDEO VIDEO L(MONO) AUDIO R to LINE 2 IN LINE-2 IN S VIDEO VIDEO L(MONO) AUDIO R LINE-2 IN DV IN ONE-TOUCH DUBBING HDMI...

Operating Instructions
Page 28
... of video cord between the recorder and your TV in the order shown below. DVD recorder VCR TV Be sure to connect your VCR to the input jack of this recorder. Line input 1 VCR DVD recorder TV Line input 2 28 You cannot dub from DVD VIDEOs to this recorder. • Do not connect... the output jack of this recorder to another equipment's input jack with the other equipment's output ...
... of video cord between the recorder and your TV in the order shown below. DVD recorder VCR TV Be sure to connect your VCR to the input jack of this recorder. Line input 1 VCR DVD recorder TV Line input 2 28 You cannot dub from DVD VIDEOs to this recorder. • Do not connect... the output jack of this recorder to another equipment's input jack with the other equipment's output ...


