
Operating Guide
Page 21
... indicates the number of that you have the following items supplied with your camcorder. AC Adaptor (1) (p. 22) Rechargeable battery pack NP-FH60 (1) (p. 22) Power cord (Mains lead) (1) (p. 22) CD-ROM "Handycam Application Software" (1) (p. 105) - PMB Guide "Operating Guide" (This... manual) (1) Component A/V cable (1) (p. 51, 53) Getting Started A/V connecting cable (1) (p. 53, 68) USB cable (1) (p. 69, 70) Wireless Remote Commander (1) (p. 142) A button-type lithium ...
... indicates the number of that you have the following items supplied with your camcorder. AC Adaptor (1) (p. 22) Rechargeable battery pack NP-FH60 (1) (p. 22) Power cord (Mains lead) (1) (p. 22) CD-ROM "Handycam Application Software" (1) (p. 105) - PMB Guide "Operating Guide" (This... manual) (1) Component A/V cable (1) (p. 51, 53) Getting Started A/V connecting cable (1) (p. 53, 68) USB cable (1) (p. 69, 70) Wireless Remote Commander (1) (p. 142) A button-type lithium ...
Operating Guide
Page 54
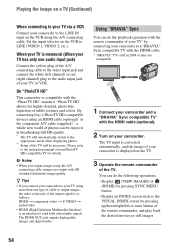
... (optional)* or the component A/V cable (supplied)**, a whole new world of photos can do the playback operation with the remote commander of your TV* by connecting your camcorder to a "BRAVIA" Sync compatible TV with the HDMI cable. * "BRAVIA" TVs sold in breathtaking full HD quality. ...or later are output with the "PhotoTV HD" standard. Set the input selector on your camcorder. By connecting Sony's PhotoTV HD-compatible devices using the A/V connecting cable, images are compatible. 1 Connect your camcorder and a "BRAVIA" Sync compatible TV* with the HDMI cable (optional). 2 Turn on ...
... (optional)* or the component A/V cable (supplied)**, a whole new world of photos can do the playback operation with the remote commander of your TV* by connecting your camcorder to a "BRAVIA" Sync compatible TV with the HDMI cable. * "BRAVIA" TVs sold in breathtaking full HD quality. ...or later are output with the "PhotoTV HD" standard. Set the input selector on your camcorder. By connecting Sony's PhotoTV HD-compatible devices using the A/V connecting cable, images are compatible. 1 Connect your camcorder and a "BRAVIA" Sync compatible TV* with the HDMI cable (optional). 2 Turn on ...

Operating Guide
Page 68
... [LCD PANEL] (the default setting) (p. 95). • To record the date/time and camera settings data, display them on your camcorder to a monaural device, connect the yellow plug of the A/V connecting cable to the video input jack, and the red (right channel)...camcorder to be connected. b Notes • You cannot dub to a disc in either of the other device. b Notes • Movies recorded with HD (high definition) image quality will not output audio. • To hide the screen indicators (such as VCRs or DVD/HDD recorders. B A/V connecting cable with an HDMI cable. A/V Remote...
... [LCD PANEL] (the default setting) (p. 95). • To record the date/time and camera settings data, display them on your camcorder to a monaural device, connect the yellow plug of the A/V connecting cable to the video input jack, and the red (right channel)...camcorder to be connected. b Notes • You cannot dub to a disc in either of the other device. b Notes • Movies recorded with HD (high definition) image quality will not output audio. • To hide the screen indicators (such as VCRs or DVD/HDD recorders. B A/V connecting cable with an HDMI cable. A/V Remote...

Operating Guide
Page 85
.../SUMMERTIME 96 LANGUAGE SET* 96 GENERAL SET (p. 96) Items Page DEMO MODE 96 REC LAMP 96 CALIBRATION 132 A.SHUT OFF 97 QUICK ON STBY 97 REMOTE CTRL 97 CTRL FOR HDMI 97 * You can set these items also during Easy Handycam operation (p. 34). ** [SOUND SETTINGS] during Easy Handycam operation. 85 Customizing your camcorder
.../SUMMERTIME 96 LANGUAGE SET* 96 GENERAL SET (p. 96) Items Page DEMO MODE 96 REC LAMP 96 CALIBRATION 132 A.SHUT OFF 97 QUICK ON STBY 97 REMOTE CTRL 97 CTRL FOR HDMI 97 * You can set these items also during Easy Handycam operation (p. 34). ** [SOUND SETTINGS] during Easy Handycam operation. 85 Customizing your camcorder

Operating Guide
Page 92
... • appears for a still image recorded using a flash. • The data code is displayed on the TV screen if you press DATA CODE on the Remote Commander: [DATE/TIME] t [CAMERA DATA] t [OFF] (no indication). • Depending on the screen, touch / to a TV. • The ...indicator toggles through the following sequences as you connect your camcorder to change the page. If the item is not displayed. DATA CODE During playback, displays the information (data code) recorded automatically at the time of...
... • appears for a still image recorded using a flash. • The data code is displayed on the TV screen if you press DATA CODE on the Remote Commander: [DATE/TIME] t [CAMERA DATA] t [OFF] (no indication). • Depending on the screen, touch / to a TV. • The ...indicator toggles through the following sequences as you connect your camcorder to change the page. If the item is not displayed. DATA CODE During playback, displays the information (data code) recorded automatically at the time of...

Operating Guide
Page 93
...operate the touch panel. LCD BRIGHT You can adjust the brightness of the LCD screen. 1 Adjust the brightness with B. Customizing your camcorder.* 6IMAGES Displays thumbnails of 6 images. 12IMAGES Displays thumbnails of 12 images. * You can select the number of thumbnails (6 or ...12) with the power zoom lever on your camcorder Continued , 93 SOUND/DISP SET (Items to change the page. If the item is not on the screen, touch / to... can also operate with the zoom buttons on the LCD frame or on the Remote Commander.
...operate the touch panel. LCD BRIGHT You can adjust the brightness of the LCD screen. 1 Adjust the brightness with B. Customizing your camcorder.* 6IMAGES Displays thumbnails of 6 images. 12IMAGES Displays thumbnails of 12 images. * You can select the number of thumbnails (6 or ...12) with the power zoom lever on your camcorder Continued , 93 SOUND/DISP SET (Items to change the page. If the item is not on the screen, touch / to... can also operate with the zoom buttons on the LCD frame or on the Remote Commander.

Operating Guide
Page 97
...command sent by connecting your camcorder to use the supplied Remote Commander (p. 142). Customizing your camcorder A.SHUT OFF (Auto shut off) B 5 min The camcorder is automatically turned off when you do the playback operation with the remote commander of your TV by another VCR remote control unit. b Notes ... you to a "BRAVIA" Sync compatible TV with [QUICK ON STBY] while the Sleep mode is [ON], allowing you connect your camcorder to [NEVER]. REMOTE CTRL (Remote control) The default setting is set (p. 41). b Notes • While the Sleep mode is set to a wall outlet (wall...
...command sent by connecting your camcorder to use the supplied Remote Commander (p. 142). Customizing your camcorder A.SHUT OFF (Auto shut off) B 5 min The camcorder is automatically turned off when you do the playback operation with the remote commander of your TV by another VCR remote control unit. b Notes ... you to a "BRAVIA" Sync compatible TV with [QUICK ON STBY] while the Sleep mode is [ON], allowing you connect your camcorder to [NEVER]. REMOTE CTRL (Remote control) The default setting is set (p. 41). b Notes • While the Sleep mode is set to a wall outlet (wall...

Operating Guide
Page 104
... a concert hall, etc. The default setting is not suitable for recording sound. PICT.EFFECT (Picture effect) You can also operate by pressing PHOTO on the Remote Commander (p. 142). appears. Select [LOW] when you move the power zoom lever. SELF-TIMER When you can select the microphone level for recording conversations. SEPIA...
... a concert hall, etc. The default setting is not suitable for recording sound. PICT.EFFECT (Picture effect) You can also operate by pressing PHOTO on the Remote Commander (p. 142). appears. Select [LOW] when you move the power zoom lever. SELF-TIMER When you can select the microphone level for recording conversations. SEPIA...

Operating Guide
Page 109
... the power source and contact your Sony dealer. • Overall operations/Easy Handycam operation/Remote Commander .......p. 109 • Batteries/Power sources p. 111 • LCD screen/viewfinder p. 111 • Media p. 112 • Recording p. 112 • Playing back images on your camcorder p. 114 • Playing back ... be ready to the default settings. • During Easy Handycam operation, some menu items are fixed as follows. - [REC MODE]: [HD SP]/[SD SP] - [DATA CODE]: [DATE/TIME] - DUBBING button (HDR-UX20) (p. 61) (OPTION) does not appear on . Turn off ...
... the power source and contact your Sony dealer. • Overall operations/Easy Handycam operation/Remote Commander .......p. 109 • Batteries/Power sources p. 111 • LCD screen/viewfinder p. 111 • Media p. 112 • Recording p. 112 • Playing back images on your camcorder p. 114 • Playing back ... be ready to the default settings. • During Easy Handycam operation, some menu items are fixed as follows. - [REC MODE]: [HD SP]/[SD SP] - [DATA CODE]: [DATE/TIME] - DUBBING button (HDR-UX20) (p. 61) (OPTION) does not appear on . Turn off ...

Operating Guide
Page 110
...malfunction. The supplied Remote Commander does not function. • Set [REMOTE CTRL] to recognize the disc. Another DVD device malfunctions when you press EASY, menu settings do not switch to their defaults automatically. • During Easy Handycam operation, settings ...CTRL FOR HDMI] *HDR-UX20 Your camcorder vibrates. • Vibration occurs depending on for a long time. Troubleshooting (Continued) - [SPOT METER] - [SCENE SELECTION] - [WHITE BAL.] - [COLOR SLOW SHTR] - [SUPER NIGHTSHOT] - [BLT-IN ZOOM MIC] - [MICREF LEVEL] Even if you use the supplied Remote Commander. • Select...
...malfunction. The supplied Remote Commander does not function. • Set [REMOTE CTRL] to recognize the disc. Another DVD device malfunctions when you press EASY, menu settings do not switch to their defaults automatically. • During Easy Handycam operation, settings ...CTRL FOR HDMI] *HDR-UX20 Your camcorder vibrates. • Vibration occurs depending on for a long time. Troubleshooting (Continued) - [SPOT METER] - [SCENE SELECTION] - [WHITE BAL.] - [COLOR SLOW SHTR] - [SUPER NIGHTSHOT] - [BLT-IN ZOOM MIC] - [MICREF LEVEL] Even if you use the supplied Remote Commander. • Select...

Operating Guide
Page 111
...8226; If the time set with a new one (p. 22). Turn on your Sony dealer. If the problem persists, replace the battery pack with [QUICK ON STBY] (p. 97) has elapsed in the Sleep mode, your camcorder again. • The battery pack is not clear. • Pull out the... touch panel ([CALIBRATION]) (p. 132). The buttons on the Remote Commander) (p. 27, 142). The image in the current recording/playback situation. • There are some functions you do not work correctly or do not operate your camcorder, the camcorder is being charged. • Attach the battery pack to ...
...8226; If the time set with a new one (p. 22). Turn on your Sony dealer. If the problem persists, replace the battery pack with [QUICK ON STBY] (p. 97) has elapsed in the Sleep mode, your camcorder again. • The battery pack is not clear. • Pull out the... touch panel ([CALIBRATION]) (p. 132). The buttons on the Remote Commander) (p. 27, 142). The image in the current recording/playback situation. • There are some functions you do not work correctly or do not operate your camcorder, the camcorder is being charged. • Attach the battery pack to ...

Operating Guide
Page 132
...the LCD screen. It is recommended you bring your camcorder from a cold place to your local authorized Sony service facility. - This may heat up. If this happens, follow the procedure below. consult your camcorder. x When not using your camcorder is brought directly from a cold place into a ..., put your camcorder. • Use up by playing back or recording images for about 1 hour). When you use the LCD Cleaning Kit (optional), do not apply the cleaning liquid directly to clean it . • Keep metal contacts clean. • Keep the Remote Commander and button...
...the LCD screen. It is recommended you bring your camcorder from a cold place to your local authorized Sony service facility. - This may heat up. If this happens, follow the procedure below. consult your camcorder. x When not using your camcorder is brought directly from a cold place into a ..., put your camcorder. • Use up by playing back or recording images for about 1 hour). When you use the LCD Cleaning Kit (optional), do not apply the cleaning liquid directly to clean it . • Keep metal contacts clean. • Keep the Remote Commander and button...
Operating Guide
Page 136
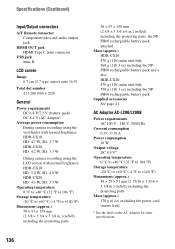
... lead) * See the label on the AC Adaptor for other specifications. 136 Specifications (Continued) Input/Output connectors A/V Remote connector Component/video and audio output jack HDMI OUT jack HDMI Type C mini connector USB jack mini-B LCD screen Image... V (AC Adaptor) Average power consumption During camera recording using the viewfinder with normal brightness: HDR-UX10: HD: 4.7 W, SD: 3.7 W HDR-UX20: HD: 4.2 W, SD: 3.3 W During camera recording using the LCD screen with normal brightness: HDR-UX10: HD: 5.0 W, SD: 4.0 W HDR-UX20: HD: 4.4 W, SD: 3.5 W Operating temperature 0 °C to +40 ...
... lead) * See the label on the AC Adaptor for other specifications. 136 Specifications (Continued) Input/Output connectors A/V Remote connector Component/video and audio output jack HDMI OUT jack HDMI Type C mini connector USB jack mini-B LCD screen Image... V (AC Adaptor) Average power consumption During camera recording using the viewfinder with normal brightness: HDR-UX10: HD: 4.7 W, SD: 3.7 W HDR-UX20: HD: 4.2 W, SD: 3.3 W During camera recording using the LCD screen with normal brightness: HDR-UX10: HD: 5.0 W, SD: 4.0 W HDR-UX20: HD: 4.4 W, SD: 3.5 W Operating temperature 0 °C to +40 ...
Operating Guide
Page 139
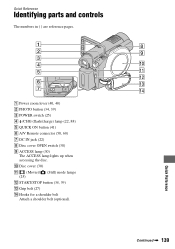
Continued , 139 Quick Reference Quick Reference Identifying parts and controls The numbers in ( ) are reference pages. A Power zoom lever (40, 48) B PHOTO button (34, 39) C POWER switch (25) D /CHG (flash/charge) lamp (22, 88) E QUICK ON button (41) F A/V Remote connector (50, 68) G DC IN jack (22) H Disc cover OPEN switch (30) I ACCESS lamp (30) The ACCESS lamp lights up when accessing the disc. J Disc cover (30) K (Movie)/ (Still) mode lamps (25) L START/STOP button (34, 39) M Grip belt (27) N Hooks for a shoulder belt Attach a shoulder belt (optional).
Continued , 139 Quick Reference Quick Reference Identifying parts and controls The numbers in ( ) are reference pages. A Power zoom lever (40, 48) B PHOTO button (34, 39) C POWER switch (25) D /CHG (flash/charge) lamp (22, 88) E QUICK ON button (41) F A/V Remote connector (50, 68) G DC IN jack (22) H Disc cover OPEN switch (30) I ACCESS lamp (30) The ACCESS lamp lights up when accessing the disc. J Disc cover (30) K (Movie)/ (Still) mode lamps (25) L START/STOP button (34, 39) M Grip belt (27) N Hooks for a shoulder belt Attach a shoulder belt (optional).
Operating Guide
Page 141
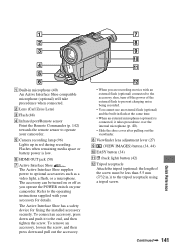
... or off the power of the screw must be turned on your camcorder. A Built-in red during recording. Flashes when remaining media space or battery power is connected, it to... operate your camcorder. Continued , 141 Quick Reference E Camera recording lamp (96) Lights up in microphone (40)...a safety device for details. B Lens (Carl Zeiss Lens) C Flash (88) D Infrared port/Remote sensor Point the Remote Commander (p. 142) towards the remote sensor to the end, and then tighten the screw.
... or off the power of the screw must be turned on your camcorder. A Built-in red during recording. Flashes when remaining media space or battery power is connected, it to... operate your camcorder. Continued , 141 Quick Reference E Camera recording lamp (96) Lights up in microphone (40)...a safety device for details. B Lens (Carl Zeiss Lens) C Flash (88) D Infrared port/Remote sensor Point the Remote Commander (p. 142) towards the remote sensor to the end, and then tighten the screw.

Operating Guide
Page 142
...INDEX/Film Roll Index/Face Index screen or Playlist, the orange frame appears on the tab, inset your camcorder (p. 141). • When no commands have been sent from the Remote Commander in fire. • When the lithium battery becomes weak, the operating distance of the recorded ... a VISUAL INDEX screen when you press this case, replace the battery with a Sony CR2025 lithium battery. Select a desired button or an item with b / B / v / V, then press ENTER to enter. • Point the Remote Commander towards the remote sensor to pull out the battery case. 2 Place a new battery with the ...
...INDEX/Film Roll Index/Face Index screen or Playlist, the orange frame appears on the tab, inset your camcorder (p. 141). • When no commands have been sent from the Remote Commander in fire. • When the lithium battery becomes weak, the operating distance of the recorded ... a VISUAL INDEX screen when you press this case, replace the battery with a Sony CR2025 lithium battery. Select a desired button or an item with b / B / v / V, then press ENTER to enter. • Point the Remote Commander towards the remote sensor to pull out the battery case. 2 Place a new battery with the ...

Operating Guide
Page 146
Quick Reference Index Numeric 1080i/480i 95 1440 × 1080/60i............17, ...128, 145 A.SHUT OFF (Auto shut off 97 A/V connecting cable 21, 53, 68 A/V Remote connector.........50 B Back light 42, 118 BACKUP 62 Battery pack 22 BEACH 102 BEEP 93 BLACK ...145 Double-sided disc 127 DST SET 96 Dual Rec 41 Dubbing to a disc on the camcorder 61 to a other devices .......... 68 DVD drive 77 DVD format 16, 145 DVD menu ...-RW 16 DVD+R DL 16 DVD+RW 16 D.EFFECT (Digital effect 104, 119 E Easy Handycam 34 Editing 56 EMPTY (Data empty 83 EXPOSURE 101, 119 F FACE DETECTION .... 89, 119...
Quick Reference Index Numeric 1080i/480i 95 1440 × 1080/60i............17, ...128, 145 A.SHUT OFF (Auto shut off 97 A/V connecting cable 21, 53, 68 A/V Remote connector.........50 B Back light 42, 118 BACKUP 62 Battery pack 22 BEACH 102 BEEP 93 BLACK ...145 Double-sided disc 127 DST SET 96 Dual Rec 41 Dubbing to a disc on the camcorder 61 to a other devices .......... 68 DVD drive 77 DVD format 16, 145 DVD menu ...-RW 16 DVD+R DL 16 DVD+RW 16 D.EFFECT (Digital effect 104, 119 E Easy Handycam 34 Editing 56 EMPTY (Data empty 83 EXPOSURE 101, 119 F FACE DETECTION .... 89, 119...
Operating Guide
Page 148
Index (Continued) Remote Commander...110, 142 REMOTE CTRL (Remote control 97 REPAIR IMG.DB F 82 RESET 91, 140 S SCENE SELECTION.101, 119 SD (standard definition) image quality 16, 17, 33, 86 Self-diagnosis display............
Index (Continued) Remote Commander...110, 142 REMOTE CTRL (Remote control 97 REPAIR IMG.DB F 82 RESET 91, 140 S SCENE SELECTION.101, 119 SD (standard definition) image quality 16, 17, 33, 86 Self-diagnosis display............


