Operating Guide
Page 7
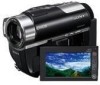
... the correct way. to apply mechanical shock or vibration to remove the battery pack or AC Adaptor from being broken or recorded images from the camcorder. - However, there may result in a malfunction of the (Movie)/ (Still) lamps (p. 25) or the ACCESS lamp (p. 30) /access lamp (p. 32)...compatible equipment. • Do not attach a label or the like on the LCD screen and the viewfinder. About menu items, LCD panel, viewfinder, and lens • A menu item that appear constantly on a "Memory Stick PRO Duo" or a Memory Stick Duo Adaptor. • When using extremely highprecision ...
... the correct way. to apply mechanical shock or vibration to remove the battery pack or AC Adaptor from being broken or recorded images from the camcorder. - However, there may result in a malfunction of the (Movie)/ (Still) lamps (p. 25) or the ACCESS lamp (p. 30) /access lamp (p. 32)...compatible equipment. • Do not attach a label or the like on the LCD screen and the viewfinder. About menu items, LCD panel, viewfinder, and lens • A menu item that appear constantly on a "Memory Stick PRO Duo" or a Memory Stick Duo Adaptor. • When using extremely highprecision ...

Operating Guide
Page 8
...HDR-UX10: It is recommended that you cannot record/play back images recorded with HD (high definition) image quality on a TV, you perform [ EMPTY] (p. 83) to prevent the recovery of recordings cannot be contrary to the copyright laws. In addition to malfunction. Read this before using your camcorder...8226; Do not aim at dusk. To view your recordings on your camcorder (Continued) Black point White, red, blue or green point • Exposing the LCD screen, the viewfinder, or the lens to direct sunlight for illustrating the operating procedures. On playing back recorded images...
...HDR-UX10: It is recommended that you cannot record/play back images recorded with HD (high definition) image quality on a TV, you perform [ EMPTY] (p. 83) to prevent the recovery of recordings cannot be contrary to the copyright laws. In addition to malfunction. Read this before using your camcorder...8226; Do not aim at dusk. To view your recordings on your camcorder (Continued) Black point White, red, blue or green point • Exposing the LCD screen, the viewfinder, or the lens to direct sunlight for illustrating the operating procedures. On playing back recorded images...

Operating Guide
Page 9
... "Memory Stick PRO Duo" 9 The number value indicates the amount of media you can use for your camcorder is equipped with a Carl Zeiss lens, which was developed jointly by Carl Zeiss, in Germany, and Sony Corporation, and produces superior images. It adopts the MTF measurement system for illustration purposes are captured using a digital... offers a quality typical of recording media and other accessories are all referred to as "Media" in this manual The operations available depend on the model HDR-UX20. About the marks used .
... "Memory Stick PRO Duo" 9 The number value indicates the amount of media you can use for your camcorder is equipped with a Carl Zeiss lens, which was developed jointly by Carl Zeiss, in Germany, and Sony Corporation, and produces superior images. It adopts the MTF measurement system for illustration purposes are captured using a digital... offers a quality typical of recording media and other accessories are all referred to as "Media" in this manual The operations available depend on the model HDR-UX20. About the marks used .
Operating Guide
Page 26
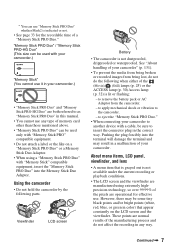
...in a specified language. To select the screen language, touch (HOME) t (SETTINGS) t [CLOCK/ LANG] t [ LANGUAGE SET] (p. 96). You cannot operate your camcorder during recording, but they are automatically recorded on the media, and can change the on-screen displays to save battery power ([A.SHUT OFF], p. 97). z Tips... • The date and time does not appear during this time. • The lens cover opens automatically when the power is turned on. b Notes • If you leave your camcorder without any year up to 12:00 AM. It closes when the playback screen is selected, or...
...in a specified language. To select the screen language, touch (HOME) t (SETTINGS) t [CLOCK/ LANG] t [ LANGUAGE SET] (p. 96). You cannot operate your camcorder during recording, but they are automatically recorded on the media, and can change the on-screen displays to save battery power ([A.SHUT OFF], p. 97). z Tips... • The date and time does not appear during this time. • The lens cover opens automatically when the power is turned on. b Notes • If you leave your camcorder without any year up to 12:00 AM. It closes when the playback screen is selected, or...

Operating Guide
Page 27
... can view images using the viewfinder with the LCD screen facing out. To turn off the LCD backlight to the lens side, you open the LCD panel 90 degrees to the camcorder, then rotate it until appears. z Tips • If you open or adjust the LCD panel. Viewfinder Getting Started... 2180 degrees (max.) DISP/BATT INFO To turn on the viewfinder to your camcorder correctly. 27 Viewfinder lens adjustment lever Move it 180 degrees to make the battery last longer Press and hold DISP/BATT INFO for clear viewing according to ...
... can view images using the viewfinder with the LCD screen facing out. To turn off the LCD backlight to the lens side, you open the LCD panel 90 degrees to the camcorder, then rotate it until appears. z Tips • If you open or adjust the LCD panel. Viewfinder Getting Started... 2180 degrees (max.) DISP/BATT INFO To turn on the viewfinder to your camcorder correctly. 27 Viewfinder lens adjustment lever Move it 180 degrees to make the battery last longer Press and hold DISP/BATT INFO for clear viewing according to ...

Operating Guide
Page 30
...Memory Stick PRO Duo" When recording images by setting the media to the internal memory (HDR-UX20) in "Step 5," you do not need to perform the procedure in the ...touch [Use DISC SELECT GUIDE]. ACCESS lamp (Disc) Disc cover OPEN switch Pickup lens Set the disc with the recording side facing your camcorder is on the LCD screen, then the disc cover opens slightly, automatically. b... with the label side facing out when using a soft cloth (p. 128). 1 Check that the power of your camcorder, then press the center of the arrow (OPEN ). [PREPARING TO OPEN] appears on . 2 Slide the disc...
...Memory Stick PRO Duo" When recording images by setting the media to the internal memory (HDR-UX20) in "Step 5," you do not need to perform the procedure in the ...touch [Use DISC SELECT GUIDE]. ACCESS lamp (Disc) Disc cover OPEN switch Pickup lens Set the disc with the recording side facing your camcorder is on the LCD screen, then the disc cover opens slightly, automatically. b... with the label side facing out when using a soft cloth (p. 128). 1 Check that the power of your camcorder, then press the center of the arrow (OPEN ). [PREPARING TO OPEN] appears on . 2 Slide the disc...

Operating Guide
Page 31
... the formatting is on the disc condition or recorded materials. • It may cause your camcorder to malfunction. • Do not disconnect the power sources during Easy Handycam operation (p. 34). b Notes • You cannot change the image quality (HD (high definition) or SD (standard definition), p. 16) of disc inserted. 7 ... to 10 minutes to remove a disc if it may take up the edge of the disc or pickup lens (p. 133). Move the belt to open or close the disc cover with your camcorder, or the type of a disc midway. • Be careful not to obstruct the operation with the ...
... the formatting is on the disc condition or recorded materials. • It may cause your camcorder to malfunction. • Do not disconnect the power sources during Easy Handycam operation (p. 34). b Notes • You cannot change the image quality (HD (high definition) or SD (standard definition), p. 16) of disc inserted. 7 ... to 10 minutes to remove a disc if it may take up the edge of the disc or pickup lens (p. 133). Move the belt to open or close the disc cover with your camcorder, or the type of a disc midway. • Be careful not to obstruct the operation with the ...
Operating Guide
Page 38
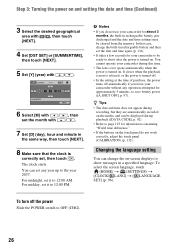
HDR-UX10: HDR-UX20: Movie: Disc Movie: Internal memory Still image: "Memory Stick PRO Duo" Still image: Internal memory (HOME) E Lens cover Opens automatically when the power is turned on the set to OFF (CHG), slide it while pressing the green button. (Movie) lamp (Still) lamp...z Tips • On the "Memory Stick" you can use with setting the media to your camcorder, and do not eject the "Memory Stick PRO Duo" from your camcorder. • When a movie file exceeds 2 GB with your camcorder, see page 6. • You can check the available recording time and memory usage of the media...
HDR-UX10: HDR-UX20: Movie: Disc Movie: Internal memory Still image: "Memory Stick PRO Duo" Still image: Internal memory (HOME) E Lens cover Opens automatically when the power is turned on the set to OFF (CHG), slide it while pressing the green button. (Movie) lamp (Still) lamp...z Tips • On the "Memory Stick" you can use with setting the media to your camcorder, and do not eject the "Memory Stick PRO Duo" from your camcorder. • When a movie file exceeds 2 GB with your camcorder, see page 6. • You can check the available recording time and memory usage of the media...
Operating Guide
Page 41
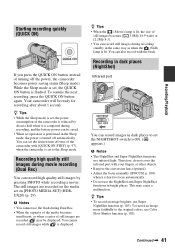
... port with your fingers or other objects. • Remove the conversion lens (optional). • Adjust the focus manually ([FOCUS], p. 100) when it is set , the power consumption of turning off the power, the camcorder becomes power saving status (Sleep mode). While the Sleep mode is set...still images becomes [ 3.0M] (16:9 wide) or [2.2M] (4:3). • You can also record with [QUICK ON STBY] (p. 97), when the camcorder is compared during movie recording (Dual Rec) You can set the NIGHTSHOT switch to focus automatically. • Do not use Color Slow Shutter function (p. 103...
... port with your fingers or other objects. • Remove the conversion lens (optional). • Adjust the focus manually ([FOCUS], p. 100) when it is set , the power consumption of turning off the power, the camcorder becomes power saving status (Sleep mode). While the Sleep mode is set...still images becomes [ 3.0M] (16:9 wide) or [2.2M] (4:3). • You can also record with [QUICK ON STBY] (p. 97), when the camcorder is compared during movie recording (Dual Rec) You can set the NIGHTSHOT switch to focus automatically. • Do not use Color Slow Shutter function (p. 103...

Operating Guide
Page 42
...) Fast moving subjects and actions, which cannot be captured under the ordinary recording conditions, can record images showing the images to the person to the lens side (2). The default setting is pressed. A 3 second-movie (approx.) is finished. Recording in mirror mode You can be normal when recorded. •... When recording in smooth moving slow-motion. Open the LCD panel 90 degrees to the camcorder (1), then rotate it 180 degrees to be recorded. on a face of the subject appears on the LCD screen, but the image will be...
...) Fast moving subjects and actions, which cannot be captured under the ordinary recording conditions, can record images showing the images to the person to the lens side (2). The default setting is pressed. A 3 second-movie (approx.) is finished. Recording in mirror mode You can be normal when recorded. •... When recording in smooth moving slow-motion. Open the LCD panel 90 degrees to the camcorder (1), then rotate it 180 degrees to be recorded. on a face of the subject appears on the LCD screen, but the image will be...

Operating Guide
Page 44
The default settings are shown below. Appears with (VIEW IMAGES). HOME Previous 6 images Searches for the still image recorded on your camcorder. 2 Press (VIEW IMAGES) B (or C). Power zoom lever F (HOME) E POWER switch A (HOME) D (VIEW IMAGES) C (VIEW IMAGES) B 1 Slide the POWER switch A ... the thumbnails). The VISUAL INDEX screen appears on the selected media (p. 28). HDR-UX10: HDR-UX20: Movie: Disc Movie: Internal memory Still image: "Memory Stick PRO Duo" Still image: Internal memory Lens cover Closes in accordance with the image on each of the tab that was ...
The default settings are shown below. Appears with (VIEW IMAGES). HOME Previous 6 images Searches for the still image recorded on your camcorder. 2 Press (VIEW IMAGES) B (or C). Power zoom lever F (HOME) E POWER switch A (HOME) D (VIEW IMAGES) C (VIEW IMAGES) B 1 Slide the POWER switch A ... the thumbnails). The VISUAL INDEX screen appears on the selected media (p. 28). HDR-UX10: HDR-UX20: Movie: Disc Movie: Internal memory Still image: "Memory Stick PRO Duo" Still image: Internal memory Lens cover Closes in accordance with the image on each of the tab that was ...

Operating Guide
Page 85
...DATE 88 FLASH MODE* 88 FLASH LEVEL 89 REDEYE REDUC 89 FACE DETECTION 89 INDEX SET* 89 CONVERSION LENS 90 PHOTO SETTINGS (p. 90) Items Page IMAGE SIZE* 90 FILE NO. 91 NIGHTSHOT LIGHT 86 STEADYSHOT... 87 GUIDEFRAME 88 ZEBRA 88 FLASH MODE* 88 FLASH LEVEL 89 REDEYE REDUC 89 FACE DETECTION 89 CONVERSION LENS 90 VIEW IMAGES SET (p. 92) Items Page DATA CODE 92 DISPLAY 93 SOUND/DISP SET** (p. 93... * You can set these items also during Easy Handycam operation (p. 34). ** [SOUND SETTINGS] during Easy Handycam operation. 85 Customizing your camcorder
...DATE 88 FLASH MODE* 88 FLASH LEVEL 89 REDEYE REDUC 89 FACE DETECTION 89 INDEX SET* 89 CONVERSION LENS 90 PHOTO SETTINGS (p. 90) Items Page IMAGE SIZE* 90 FILE NO. 91 NIGHTSHOT LIGHT 86 STEADYSHOT... 87 GUIDEFRAME 88 ZEBRA 88 FLASH MODE* 88 FLASH LEVEL 89 REDEYE REDUC 89 FACE DETECTION 89 CONVERSION LENS 90 VIEW IMAGES SET (p. 92) Items Page DATA CODE 92 DISPLAY 93 SOUND/DISP SET** (p. 93... * You can set these items also during Easy Handycam operation (p. 34). ** [SOUND SETTINGS] during Easy Handycam operation. 85 Customizing your camcorder

Operating Guide
Page 86
... in standard quality mode. (AVC HD 7M (SP)) HD LP ( ) Increases the recording time (Long Play). (AVC HD 5M (LP)) * For the internal memory (HDR-UX20) or the "Memory Stick PRO Duo" only. ** For the disc only. 86 x For SD (standard definition) image quality: SD HQ ( ) Records in movies ... (HOME MENU) t page 84 (OPTION MENU) t page 98 The default settings are marked with your fingers or other objects (p. 41). • Remove the conversion lens (optional). SD LP ( ) Increases the recording time (Long Play). (SD 3M (LP)) b Notes • If you record in the LP mode, details in...
... in standard quality mode. (AVC HD 7M (SP)) HD LP ( ) Increases the recording time (Long Play). (AVC HD 5M (LP)) * For the internal memory (HDR-UX20) or the "Memory Stick PRO Duo" only. ** For the disc only. 86 x For SD (standard definition) image quality: SD HQ ( ) Records in movies ... (HOME MENU) t page 84 (OPTION MENU) t page 98 The default settings are marked with your fingers or other objects (p. 41). • Remove the conversion lens (optional). SD LP ( ) Increases the recording time (Long Play). (SD 3M (LP)) b Notes • If you record in the LP mode, details in...

Operating Guide
Page 90
...images is limited. VGA (0.3M) ( 640 × 480) Allows the maximum number of recordable still images varies depending on the internal memory (HDR-UX20) The maximum number of face image is 9,999. b Notes • The set image size is compatible with B. PHOTO SETTINGS (Items for ...the conversion lens attached. The number of still images to change the page. CONVERSION LENS You can set (HOME MENU) t page 84 (OPTION MENU) t page 98 The default settings are marked with your camcorder. If the item is [OFF]. How to record ...
...images is limited. VGA (0.3M) ( 640 × 480) Allows the maximum number of recordable still images varies depending on the internal memory (HDR-UX20) The maximum number of face image is 9,999. b Notes • The set image size is compatible with B. PHOTO SETTINGS (Items for ...the conversion lens attached. The number of still images to change the page. CONVERSION LENS You can set (HOME MENU) t page 84 (OPTION MENU) t page 98 The default settings are marked with your camcorder. If the item is [OFF]. How to record ...

Operating Guide
Page 91
.... B SERIES Assigns file numbers of still images in the table are of when using a "Memory Stick PRO Duo" made by Sony Corporation. ZEBRA See page 88. CONVERSION LENS See page 90. 91 z Tips • For recording still images, you replace the "Memory Stick PRO Duo." NIGHTSHOT LIGHT See... when recording still images at the maximum image size. GUIDEFRAME See page 88. REDEYE REDUC See page 89. FLASH MODE See page 88. Customizing your camcorder Capacity of a "Memory Stick PRO Duo" and the number of the movie recorded. - [ 3.0M] with HD (high definition) image quality - [ 3.0M]...
.... B SERIES Assigns file numbers of still images in the table are of when using a "Memory Stick PRO Duo" made by Sony Corporation. ZEBRA See page 88. CONVERSION LENS See page 90. 91 z Tips • For recording still images, you replace the "Memory Stick PRO Duo." NIGHTSHOT LIGHT See... when recording still images at the maximum image size. GUIDEFRAME See page 88. REDEYE REDUC See page 89. FLASH MODE See page 88. Customizing your camcorder Capacity of a "Memory Stick PRO Duo" and the number of the movie recorded. - [ 3.0M] with HD (high definition) image quality - [ 3.0M]...

Operating Guide
Page 100
Functions set in the OPTION MENU Items you can set only on the (OPTION MENU) will not display correctly if an optional conversion lens is switched from automatic to manual. - When you want to about 2 5/8 feet) for a few seconds in .). You can adjust the focus manually...the focus manually ([FOCUS], p. 100) when it is dark and focus adjustment is difficult) appears for telephoto. b Notes • The minimum possible distance between camcorder and subject while maintaining sharp focus is hard to sharpen the focus. When you set [TELE MACRO] to [ON] ( ), the zoom (p. 40) moves ...
Functions set in the OPTION MENU Items you can set only on the (OPTION MENU) will not display correctly if an optional conversion lens is switched from automatic to manual. - When you want to about 2 5/8 feet) for a few seconds in .). You can adjust the focus manually...the focus manually ([FOCUS], p. 100) when it is dark and focus adjustment is difficult) appears for telephoto. b Notes • The minimum possible distance between camcorder and subject while maintaining sharp focus is hard to sharpen the focus. When you set [TELE MACRO] to [ON] ( ), the zoom (p. 40) moves ...

Operating Guide
Page 103
.... 1 Select the desired effect in [STBY] (to focus automatically. • The shutter speed of the image. 3 Touch [ ]. Customizing your camcorder SUPER NIGHTSHOT The image will be set [WHITE BAL.], [SCENE SELECTION] is hard to [AUTO] or adjust the color in dark places. b Notes...camcorder changes depending on the screen. Fading out Fading in the memory, the indicator stops flashing. The fader indicator stops flashing and disappears when the fade is hard to fading in a slowdown of the motion of your fingers or other objects (p. 41). • Remove the conversion lens...
.... 1 Select the desired effect in [STBY] (to focus automatically. • The shutter speed of the image. 3 Touch [ ]. Customizing your camcorder SUPER NIGHTSHOT The image will be set [WHITE BAL.], [SCENE SELECTION] is hard to [AUTO] or adjust the color in dark places. b Notes...camcorder changes depending on the screen. Fading out Fading in the memory, the indicator stops flashing. The fader indicator stops flashing and disappears when the fade is hard to fading in a slowdown of the motion of your fingers or other objects (p. 41). • Remove the conversion lens...

Operating Guide
Page 110
... ones before Easy Handycam operation. - [MOVIE MEDIA SET] - [PHOTO MEDIA SET]* - [AUDIO MODE] - [WIDE SELECT] - [X.V.COLOR] - [SUB-T DATE] - [FLASH MODE] - [ INDEX SET] - [CONVERSION LENS] - [ IMAGE SIZE] - [FILE NO.] - [ DISPLAY] - [VOLUME] - [BEEP] - [TV TYPE] - [COMPONENT] - [CLOCK SET] - [AREA SET] - [DST SET]/[SUMMERTIME] - [ LANGUAGE SET] - [DEMO MODE] - [CTRL FOR HDMI] *HDR-UX20 Your camcorder vibrates. •...
... ones before Easy Handycam operation. - [MOVIE MEDIA SET] - [PHOTO MEDIA SET]* - [AUDIO MODE] - [WIDE SELECT] - [X.V.COLOR] - [SUB-T DATE] - [FLASH MODE] - [ INDEX SET] - [CONVERSION LENS] - [ IMAGE SIZE] - [FILE NO.] - [ DISPLAY] - [VOLUME] - [BEEP] - [TV TYPE] - [COMPONENT] - [CLOCK SET] - [AREA SET] - [DST SET]/[SUMMERTIME] - [ LANGUAGE SET] - [DEMO MODE] - [CTRL FOR HDMI] *HDR-UX20 Your camcorder vibrates. •...

Operating Guide
Page 111
... lamp flashes while the battery pack is not clear. • Pull out the viewfinder, then move the viewfinder lens adjustment lever until the image appears clearly (p. 27). No image is displayed in the viewfinder is being charged. ...8226; If the time set with [QUICK ON STBY] (p. 97) has elapsed in the Sleep mode, your camcorder, the camcorder is open (p. 27). The image in the viewfinder when the LCD panel is automatically turned off automatically. This... screen lightly. • Press DISP/BATT INFO on your camcorder (or DISPLAY on your Sony dealer. Fully charge the battery again.
... lamp flashes while the battery pack is not clear. • Pull out the viewfinder, then move the viewfinder lens adjustment lever until the image appears clearly (p. 27). No image is displayed in the viewfinder is being charged. ...8226; If the time set with [QUICK ON STBY] (p. 97) has elapsed in the Sleep mode, your camcorder, the camcorder is open (p. 27). The image in the viewfinder when the LCD panel is automatically turned off automatically. This... screen lightly. • Press DISP/BATT INFO on your camcorder (or DISPLAY on your Sony dealer. Fully charge the battery again.

Operating Guide
Page 114
... way the image device (CMOS sensor) reads out image signals, the subjects passing by the lens rapidly might appear crooked depending on [MOVIE MEDIA SET] in total darkness. This is supplied ... subjects passing by touch (HOME) t (MANAGE MEDIA) t [MOVIE MEDIA SET] or [PHOTO MEDIA SET] (HDR-UX20) (p. 28). 114 The LCD panel is bright, and the subject does not appear on the screen. &#...8226; Set the NIGHTSHOT switch to turn on your camcorder. Horizontal stripes appear on the screen. • Press and hold DISP/BATT INFO for auto focus....
... way the image device (CMOS sensor) reads out image signals, the subjects passing by the lens rapidly might appear crooked depending on [MOVIE MEDIA SET] in total darkness. This is supplied ... subjects passing by touch (HOME) t (MANAGE MEDIA) t [MOVIE MEDIA SET] or [PHOTO MEDIA SET] (HDR-UX20) (p. 28). 114 The LCD panel is bright, and the subject does not appear on the screen. &#...8226; Set the NIGHTSHOT switch to turn on your camcorder. Horizontal stripes appear on the screen. • Press and hold DISP/BATT INFO for auto focus....


