
Instruction Manual
Page 3
... Do not place the set on the marking label. Continued , 3 Use a cloth lightly dampened with a cloth or other sources, refer to be operated only from battery power, or other materials. - for cleaning the exterior of power source indicated on a bed, sofa, rug, or other ). Ventilation The slots and openings in the...
... Do not place the set on the marking label. Continued , 3 Use a cloth lightly dampened with a cloth or other sources, refer to be operated only from battery power, or other materials. - for cleaning the exterior of power source indicated on a bed, sofa, rug, or other ). Ventilation The slots and openings in the...

Instruction Manual
Page 5
... use of rechargeable batteries, call : Sony Customer Information Center 1-800-222-SONY (7669). Read this before operating your camcorder Before operating the unit, please read this manual thoroughly, and retain it for the FCC related matters only. Use of controls or adjustments or performance of Conformity Trade Name: SONY Model No.: HDR-UX5 Responsible Party:Sony Electronics Inc...
... use of rechargeable batteries, call : Sony Customer Information Center 1-800-222-SONY (7669). Read this before operating your camcorder Before operating the unit, please read this manual thoroughly, and retain it for the FCC related matters only. Use of controls or adjustments or performance of Conformity Trade Name: SONY Model No.: HDR-UX5 Responsible Party:Sony Electronics Inc...

Instruction Manual
Page 6
... must be determined by one or more of recording/ playback, we recommend that to which can use Sony discs or discs with an *(for VIDEO CAMERA) mark for your camcorder You can use Your camcorder is supplied with two kinds of the disc you can be used in your... camcorder. • Using a disc other than above may cause the unsatisfactory recording/playback or you may apply. See www.dtsc.ca.gov/hazardouswaste/perchlorate Perchlorate Material: Lithium battery contains ...
... must be determined by one or more of recording/ playback, we recommend that to which can use Sony discs or discs with an *(for VIDEO CAMERA) mark for your camcorder You can use Your camcorder is supplied with two kinds of the disc you can be used in your... camcorder. • Using a disc other than above may cause the unsatisfactory recording/playback or you may apply. See www.dtsc.ca.gov/hazardouswaste/perchlorate Perchlorate Material: Lithium battery contains ...

Instruction Manual
Page 7
...that is grayed out is not dustproofed, dripproofed or waterproofed. However, there may result in a malfunction of your camcorder. Memory Stick Duo Adaptor Battery • The camcorder is not available under the current recording or playback conditions. • The LCD screen and the viewfinder are manufactured...do not do the following parts. to remove the battery pack or AC Adaptor from being broken or recorded images from the camcorder. - to apply mechanical shock or vibration to the camcorder. • When connecting your camcorder to another device with "Memory Stick PRO" compatible...
...that is grayed out is not dustproofed, dripproofed or waterproofed. However, there may result in a malfunction of your camcorder. Memory Stick Duo Adaptor Battery • The camcorder is not available under the current recording or playback conditions. • The LCD screen and the viewfinder are manufactured...do not do the following parts. to remove the battery pack or AC Adaptor from being broken or recorded images from the camcorder. - to apply mechanical shock or vibration to the camcorder. • When connecting your camcorder to another device with "Memory Stick PRO" compatible...

Instruction Manual
Page 10
...Step 2: Charging the battery pack 21 Step 3: Turning the power on the disc (Formatting 62 Recording additional scenes after finalizing 64 Customizing Your Camcorder What you 26 Step 5: Inserting a disc or a "Memory Stick Duo 27 Recording/Playback Easy Recording/Playback (Easy Handycam 30 Recording the images... the image settings manually with the camera control dial (HDR-UX7 38 Viewing the images 40 Using PB zoom 42 Playing back a series of Contents IMPORTANT SAFEGUARDS ........ 3 Read this before operating your camcorder to VCR or DVD/HDD recorders 53 Printing recorded images...
...Step 2: Charging the battery pack 21 Step 3: Turning the power on the disc (Formatting 62 Recording additional scenes after finalizing 64 Customizing Your Camcorder What you 26 Step 5: Inserting a disc or a "Memory Stick Duo 27 Recording/Playback Easy Recording/Playback (Easy Handycam 30 Recording the images... the image settings manually with the camera control dial (HDR-UX7 38 Viewing the images 40 Using PB zoom 42 Playing back a series of Contents IMPORTANT SAFEGUARDS ........ 3 Read this before operating your camcorder to VCR or DVD/HDD recorders 53 Printing recorded images...

Instruction Manual
Page 11
...Guide 90 Using a Macintosh computer ........ 90 Troubleshooting Troubleshooting 91 Warning indicators and messages 100 Additional Information Using your camcorder abroad ....103 Precautions and maintenance ....105 About the Disc 105 About the AVCHD format 106 About the "Memory Stick 107 About... the "InfoLITHIUM" battery pack 108 About the x.v.Color 109 Handling your camcorder 109 Specifications 112 Quick Reference Identifying parts and controls ......118 Indicators displayed during recording/playback 122 ...
...Guide 90 Using a Macintosh computer ........ 90 Troubleshooting Troubleshooting 91 Warning indicators and messages 100 Additional Information Using your camcorder abroad ....103 Precautions and maintenance ....105 About the Disc 105 About the AVCHD format 106 About the "Memory Stick 107 About... the "InfoLITHIUM" battery pack 108 About the x.v.Color 109 Handling your camcorder 109 Specifications 112 Quick Reference Identifying parts and controls ......118 Indicators displayed during recording/playback 122 ...

Instruction Manual
Page 20
... number in the parentheses indicates the number of that you have the following items supplied with your camcorder. AC Adaptor (1) (p. 21) Rechargeable battery pack NP-FH60 (HDR-UX5), NP-FH70 (HDR-UX7) (1) (p. 21) Power cord (1) (p. 21) CD-ROM "Handycam Application Software" (1) (p. 86) Operating Guide (This manual) (1) Component video cable (1) (p. 44) A/V connecting cable (1) (p. 44, 53) USB cable...
... number in the parentheses indicates the number of that you have the following items supplied with your camcorder. AC Adaptor (1) (p. 21) Rechargeable battery pack NP-FH60 (HDR-UX5), NP-FH70 (HDR-UX7) (1) (p. 21) Power cord (1) (p. 21) CD-ROM "Handycam Application Software" (1) (p. 86) Operating Guide (This manual) (1) Component video cable (1) (p. 44) A/V connecting cable (1) (p. 44, 53) USB cable...

Instruction Manual
Page 21
... Adaptor. The CHG (charge) lamp lights up and charging starts. b Notes • Disconnect the AC Adaptor from the DC IN jack on your camcorder. The CHG (charge) lamp turns off when the battery is fully charged. 5 Disconnect the AC Adaptor from the DC IN jack holding both the... to OFF (CHG) (The default setting). 2 Raise the viewfinder, then attach the battery pack by sliding it in the direction of the arrow until it to your camcorder. Step 2: Charging the battery pack POWER switch Getting Started Battery DC IN jack DC plug Jack cover AC Adaptor CHG (charge) lamp Power cord...
... Adaptor. The CHG (charge) lamp lights up and charging starts. b Notes • Disconnect the AC Adaptor from the DC IN jack on your camcorder. The CHG (charge) lamp turns off when the battery is fully charged. 5 Disconnect the AC Adaptor from the DC IN jack holding both the... to OFF (CHG) (The default setting). 2 Raise the viewfinder, then attach the battery pack by sliding it in the direction of the arrow until it to your camcorder. Step 2: Charging the battery pack POWER switch Getting Started Battery DC IN jack DC plug Jack cover AC Adaptor CHG (charge) lamp Power cord...

Instruction Manual
Page 22
.../BATT INFO again while the information is turned off. To use a fully charged battery pack. Step 2: Charging the battery pack (Continued) To remove the battery pack 1 Slide the POWER switch to OFF (CHG), then press DISP/BATT INFO. HDR-UX5 Battery pack Image quality** NP-FH50 NP-FH60 (supplied) Continuous recording time HD SD... 90 100 Typical recording time* HD SD 30 35 30 35 30 35 35 45 35 50 45 50 Battery pack NP-FH50 NP-FH60 (supplied with HDR-UX5) NP-FH70 (supplied with HDR-UX7) NP-FH100 Charging time 135 135 170 390 Recording time Approximate time (min.) available when you use ...
.../BATT INFO again while the information is turned off. To use a fully charged battery pack. Step 2: Charging the battery pack (Continued) To remove the battery pack 1 Slide the POWER switch to OFF (CHG), then press DISP/BATT INFO. HDR-UX5 Battery pack Image quality** NP-FH50 NP-FH60 (supplied) Continuous recording time HD SD... 90 100 Typical recording time* HD SD 30 35 30 35 30 35 35 45 35 50 45 50 Battery pack NP-FH50 NP-FH60 (supplied with HDR-UX5) NP-FH70 (supplied with HDR-UX7) NP-FH100 Charging time 135 135 170 390 Recording time Approximate time (min.) available when you use ...

Instruction Manual
Page 23
...) lamp/ (Still) lamp (p. 24). • The CHG (charge) lamp flashes during charging, or Battery Info (p. 22) will not be correctly displayed under the following conditions: - Continued , 23 Getting Started HDR-UX5 Battery pack LCD panel opened* LCD panel closed Image quality** HD SD HD SD NP-FH50 90 105 100...580 HDR-UX7 Battery pack Image quality** NP-FH50 NP-FH70 (supplied) NP-FH100 LCD panel opened* HD SD 90 100 195 220 440 500 LCD panel closed . On the battery pack • Before changing the battery pack, slide the POWER switch to the DC IN jack of your camcorder, ...
...) lamp/ (Still) lamp (p. 24). • The CHG (charge) lamp flashes during charging, or Battery Info (p. 22) will not be correctly displayed under the following conditions: - Continued , 23 Getting Started HDR-UX5 Battery pack LCD panel opened* LCD panel closed Image quality** HD SD HD SD NP-FH50 90 105 100...580 HDR-UX7 Battery pack Image quality** NP-FH50 NP-FH70 (supplied) NP-FH100 LCD panel opened* HD SD 90 100 195 220 440 500 LCD panel closed . On the battery pack • Before changing the battery pack, slide the POWER switch to the DC IN jack of your camcorder, ...

Instruction Manual
Page 24
... the POWER switch repeatedly in low temperatures. • The recording and playback time will be shorter when you use your camcorder in the direction of the AC Adaptor or battery terminal with your camcorder is turned off, AC power (house current) is still supplied to it is recommended). • The recording and playback...
... the POWER switch repeatedly in low temperatures. • The recording and playback time will be shorter when you use your camcorder in the direction of the AC Adaptor or battery terminal with your camcorder is turned off, AC power (house current) is still supplied to it is recommended). • The recording and playback...

Instruction Manual
Page 25
... the memory. To select the screen language, touch (SETTINGS) t [CLOCK/ LANG] t [ LANGUAGE SET] (p. 66). You cannot operate your camcorder to be ready to save battery power ([A.SHUT OFF], p. 78). In that the clock is correctly set the date and time again (p. 112). • It takes a few... seconds for your camcorder during playback ([DATA CODE], p. 73). • Refer to page 104 for information concerning "World time difference." •...
... the memory. To select the screen language, touch (SETTINGS) t [CLOCK/ LANG] t [ LANGUAGE SET] (p. 66). You cannot operate your camcorder to be ready to save battery power ([A.SHUT OFF], p. 78). In that the clock is correctly set the date and time again (p. 112). • It takes a few... seconds for your camcorder during playback ([DATA CODE], p. 73). • Refer to page 104 for information concerning "World time difference." •...

Instruction Manual
Page 26
...; Pressing DISP/BATT INFO toggles the screen indicators (such as time code) on or off the LCD backlight to make the battery last longer Press and hold DISP/ BATT INFO for a few seconds until appears. Step 4: Adjusting your camcorder to suit you LCD panel Open the LCD panel 90 degrees to the... camcorder (1), then rotate it to the best angle to record or play (2). 290 degrees (max.) 190 degrees to the camcorder Viewfinder You can view images using the viewfinder to avoid wearing down the battery, or when the image seen on the LCD screen...
...; Pressing DISP/BATT INFO toggles the screen indicators (such as time code) on or off the LCD backlight to make the battery last longer Press and hold DISP/ BATT INFO for a few seconds until appears. Step 4: Adjusting your camcorder to suit you LCD panel Open the LCD panel 90 degrees to the... camcorder (1), then rotate it to the best angle to record or play (2). 290 degrees (max.) 190 degrees to the camcorder Viewfinder You can view images using the viewfinder to avoid wearing down the battery, or when the image seen on the LCD screen...

Instruction Manual
Page 29
... reading/writing data. b Notes • When the access lamp is lit or flashing, your camcorder, turn the power off, eject the "Memory Stick Duo," or remove the battery pack. Getting Started "Memory Stick Duo" You can use only a "Memory Stick Duo" marked with or (p. 107). For details, see page 70. • When...
... reading/writing data. b Notes • When the access lamp is lit or flashing, your camcorder, turn the power off, eject the "Memory Stick Duo," or remove the battery pack. Getting Started "Memory Stick Duo" You can use only a "Memory Stick Duo" marked with or (p. 107). For details, see page 70. • When...
Instruction Manual
Page 33
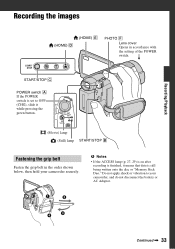
Continued , 33 START/STOP C POWER switch A If the POWER switch is set to your camcorder securely. b Notes • If the ACCESS lamp (p. 27, 29) is on after recording is still being written onto the disc or "Memory Stick Duo." Do ... of the POWER switch. Recording/Playback Recording the images Recording/Playback (HOME) D (HOME) E PHOTO F Lens cover Opens in the order shown below, then hold your camcorder, and do not disconnect the battery or AC Adaptor.
Continued , 33 START/STOP C POWER switch A If the POWER switch is set to your camcorder securely. b Notes • If the ACCESS lamp (p. 27, 29) is on after recording is still being written onto the disc or "Memory Stick Duo." Do ... of the POWER switch. Recording/Playback Recording the images Recording/Playback (HOME) D (HOME) E PHOTO F Lens cover Opens in the order shown below, then hold your camcorder, and do not disconnect the battery or AC Adaptor.

Instruction Manual
Page 36
... be impaired if heat discoloration or dust obscures the lamp. • The flash charge lamp flickers while charging the flash, and remains lit when the battery charge is finished, the color changes to orange. 3 Press START/STOP to 3 frames of still images from the surface of still images becomes: -...setting [REDEYE REDUC] (p. 73). 36 1 Set the POWER switch to (movie), then press START/STOP to 8 feet). • Remove any dust from your camcorder, the flash light does not emit light. When recording is complete. • If you can prevent the redeye by one, and the images are recorded...
... be impaired if heat discoloration or dust obscures the lamp. • The flash charge lamp flickers while charging the flash, and remains lit when the battery charge is finished, the color changes to orange. 3 Press START/STOP to 3 frames of still images from the surface of still images becomes: -...setting [REDEYE REDUC] (p. 73). 36 1 Set the POWER switch to (movie), then press START/STOP to 8 feet). • Remove any dust from your camcorder, the flash light does not emit light. When recording is complete. • If you can prevent the redeye by one, and the images are recorded...

Instruction Manual
Page 49
b Notes • Do not remove the battery pack or the AC Adaptor from the disc, the remaining disc capacity may ... at one time In step 3, touch [ DELETE ALL] t [YES] t [YES] t . z Tips • A movie recorded by your camcorder while editing images. Touch to return to be deleted. Deleting the still images in the "Memory Stick Duo" 1 On the (HOME MENU), touch (OTHERS...movie is set to confirm the still image. It may not increase as much as you delete unnecessary images from your camcorder onto a disc is protected. z Tips • To delete all movies on DVD-RW and DVD+RW discs....
b Notes • Do not remove the battery pack or the AC Adaptor from the disc, the remaining disc capacity may ... at one time In step 3, touch [ DELETE ALL] t [YES] t [YES] t . z Tips • A movie recorded by your camcorder while editing images. Touch to return to be deleted. Deleting the still images in the "Memory Stick Duo" 1 On the (HOME MENU), touch (OTHERS...movie is set to confirm the still image. It may not increase as much as you delete unnecessary images from your camcorder onto a disc is protected. z Tips • To delete all movies on DVD-RW and DVD+RW discs....

Instruction Manual
Page 50
...scenes. b Notes • Movies cannot be divided. Returns to be restored once they are divided. • Do not remove the battery pack or the AC Adaptor from the point where you touch and the actual dividing point, as you cannot divide movies. Play and ...may occur from your camcorder selects the dividing point based on about half-second increments. The movie is not divided in the Playlist. • A slight difference may damage the disc. • You can do this operation only with . Dividing the image b Notes • During Easy Handycam operation, you press ....
...scenes. b Notes • Movies cannot be divided. Returns to be restored once they are divided. • Do not remove the battery pack or the AC Adaptor from the point where you touch and the actual dividing point, as you cannot divide movies. Play and ...may occur from your camcorder selects the dividing point based on about half-second increments. The movie is not divided in the Playlist. • A slight difference may damage the disc. • You can do this operation only with . Dividing the image b Notes • During Easy Handycam operation, you press ....

Instruction Manual
Page 51
... that you edit or delete the scenes in the Playlist In step 2, touch [ ADD ALL] t [YES] t [YES] t . To erase unnecessary scenes from your camcorder. Cancel Easy Handycam operation. 1 On the (HOME MENU), touch (OTHERS) t [PLAYLIST EDIT]. 2 Touch [ ADD]. 3 Touch the scene to be added to play back. b Notes... • Do not remove the battery pack or the AC Adaptor from the Playlist 1 On the (HOME MENU), touch (OTHERS) t [PLAYLIST EDIT]. Press ...
... that you edit or delete the scenes in the Playlist In step 2, touch [ ADD ALL] t [YES] t [YES] t . To erase unnecessary scenes from your camcorder. Cancel Easy Handycam operation. 1 On the (HOME MENU), touch (OTHERS) t [PLAYLIST EDIT]. 2 Touch [ ADD]. 3 Touch the scene to be added to play back. b Notes... • Do not remove the battery pack or the AC Adaptor from the Playlist 1 On the (HOME MENU), touch (OTHERS) t [PLAYLIST EDIT]. Press ...
Instruction Manual
Page 75
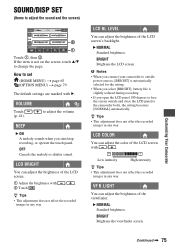
... are marked with B. VOLUME Touch / (p. 41). BRIGHT Brightens the LCD screen. Customizing Your Camcorder Continued , 75 to adjust the volume BEEP B ON A melody sounds when you select [BRIGHT], battery life is not on the screen, touch v/V to change the page. LCD BRIGHT You can ...way. LCD BL LEVEL You can adjust the brightness of the LCD screen's backlight. b Notes • When you connect your camcorder to the camcorder body, the setting becomes [NORMAL] automatically. Low intensity High intensity z Tips • This adjustment does not affect the recorded images...
... are marked with B. VOLUME Touch / (p. 41). BRIGHT Brightens the LCD screen. Customizing Your Camcorder Continued , 75 to adjust the volume BEEP B ON A melody sounds when you select [BRIGHT], battery life is not on the screen, touch v/V to change the page. LCD BRIGHT You can ...way. LCD BL LEVEL You can adjust the brightness of the LCD screen's backlight. b Notes • When you connect your camcorder to the camcorder body, the setting becomes [NORMAL] automatically. Low intensity High intensity z Tips • This adjustment does not affect the recorded images...


