
Instruction Manual
Page 20
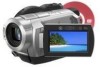
... battery pack NP-FH60 (HDR-UX5), NP-FH70 (HDR-UX7) (1) (p. 21) Power cord (1) (p. 21) CD-ROM "Handycam Application Software" (1) (p. 86) Operating Guide (This manual) (1) Component video cable (1) (p. 44) A/V connecting cable (1) (p. 44, 53) USB cable (1) (p. 54) Wireless Remote Commander (1) (p. 121) ...A button-type lithium battery is already installed. 20 Getting Started Step 1: Checking supplied items Make sure that item supplied. The number in the parentheses indicates the number of that you have the following items supplied with your camcorder...
... battery pack NP-FH60 (HDR-UX5), NP-FH70 (HDR-UX7) (1) (p. 21) Power cord (1) (p. 21) CD-ROM "Handycam Application Software" (1) (p. 86) Operating Guide (This manual) (1) Component video cable (1) (p. 44) A/V connecting cable (1) (p. 44, 53) USB cable (1) (p. 54) Wireless Remote Commander (1) (p. 121) ...A button-type lithium battery is already installed. 20 Getting Started Step 1: Checking supplied items Make sure that item supplied. The number in the parentheses indicates the number of that you have the following items supplied with your camcorder...

Instruction Manual
Page 66
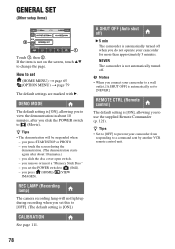
... SET 77 DST SET/SUMMERTIME 77 LANGUAGE SET*2 77 GENERAL SET (p. 78) Items Page DEMO MODE 78 REC LAMP 78 CALIBRATION 111 A.SHUT OFF 78 REMOTE CTRL 78 *1 HDR-UX7 *2 You can set these items also during Easy Handycam operation (p. 30). *3 [SOUND SETTINGS] during Easy...
... SET 77 DST SET/SUMMERTIME 77 LANGUAGE SET*2 77 GENERAL SET (p. 78) Items Page DEMO MODE 78 REC LAMP 78 CALIBRATION 111 A.SHUT OFF 78 REMOTE CTRL 78 *1 HDR-UX7 *2 You can set these items also during Easy Handycam operation (p. 30). *3 [SOUND SETTINGS] during Easy...
Instruction Manual
Page 74
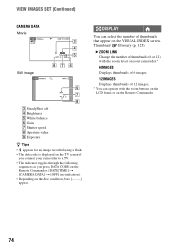
... Tips • appears for an image recorded using a flash. • The data code is displayed on the TV screen if you connect your camcorder.* 6IMAGES Displays thumbnails of 6 images. 12IMAGES Displays thumbnails of thumbnails that appear on the disc condition, bars [--:--:--] appear. 74 VIEW IMAGES SET (... can select the number of 12 images. * You can operate with the zoom lever on your camcorder to a TV. • The indicator toggles through the following sequences as you press DATA CODE on the Remote Commander: [DATE/TIME] t [CAMERA DATA] t [OFF] (no indication). • Depending on...
... Tips • appears for an image recorded using a flash. • The data code is displayed on the TV screen if you connect your camcorder.* 6IMAGES Displays thumbnails of 6 images. 12IMAGES Displays thumbnails of thumbnails that appear on the disc condition, bars [--:--:--] appear. 74 VIEW IMAGES SET (... can select the number of 12 images. * You can operate with the zoom lever on your camcorder to a TV. • The indicator toggles through the following sequences as you press DATA CODE on the Remote Commander: [DATE/TIME] t [CAMERA DATA] t [OFF] (no indication). • Depending on...
Instruction Manual
Page 78
...The default setting is [ON], allowing you to view the demonstration in about 10 minutes.) - z Tips • Set to [OFF] to prevent your camcorder to (Still). - you set this to [NEVER]. GENERAL SET (Other setup items) Touch 1, then 2. you press (HOME)/ (VIEW IMAGES). A....is [ON], allowing you slide the disc cover open switch. - you connect your camcorder from responding to use the supplied Remote Commander (p. 121). you to a command sent by another VCR remote control unit. 78 REMOTE CTRL (Remote control) The default setting is [ON].) CALIBRATION See page 111.
...The default setting is [ON], allowing you to view the demonstration in about 10 minutes.) - z Tips • Set to [OFF] to prevent your camcorder to (Still). - you set this to [NEVER]. GENERAL SET (Other setup items) Touch 1, then 2. you press (HOME)/ (VIEW IMAGES). A....is [ON], allowing you slide the disc cover open switch. - you connect your camcorder from responding to use the supplied Remote Commander (p. 121). you to a command sent by another VCR remote control unit. 78 REMOTE CTRL (Remote control) The default setting is [ON].) CALIBRATION See page 111.
Instruction Manual
Page 85
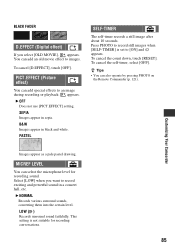
....EFFECT] setting. To cancel the count down, touch [RESET]. MICREF LEVEL You can also operate by pressing PHOTO on the Remote Commander (p. 121). To cancel [D.EFFECT], touch [OFF]. Customizing Your Camcorder Images appear as a pale pastel drawing. You can add special effects to an image during recording or playback. To cancel the...
....EFFECT] setting. To cancel the count down, touch [RESET]. MICREF LEVEL You can also operate by pressing PHOTO on the Remote Commander (p. 121). To cancel [D.EFFECT], touch [OFF]. Customizing Your Camcorder Images appear as a pale pastel drawing. You can add special effects to an image during recording or playback. To cancel the...

Instruction Manual
Page 91
...(p. 38) (HDR-UX7) - Movie recording mode: [SP] - Playback zoom (p. 42) - If the functions still do not work , press the RESET button (p. 119) using your camcorder, use the following buttons/ functions. - Menu settings have changed automatically. • During Easy Handycam operation, most of...and contact your Sony dealer. • Overall operations/Easy Handycam/ Remote Commander p. 91 • Batteries/Power sources p. 92 • LCD screen/viewfinder p. 93 • Discs/"Memory Stick Duo p. 93 • Recording p. 94 • Playing back a disc on your camcorder p. 96 •...
...(p. 38) (HDR-UX7) - Movie recording mode: [SP] - Playback zoom (p. 42) - If the functions still do not work , press the RESET button (p. 119) using your camcorder, use the following buttons/ functions. - Menu settings have changed automatically. • During Easy Handycam operation, most of...and contact your Sony dealer. • Overall operations/Easy Handycam/ Remote Commander p. 91 • Batteries/Power sources p. 92 • LCD screen/viewfinder p. 93 • Discs/"Memory Stick Duo p. 93 • Recording p. 94 • Playing back a disc on your camcorder p. 96 •...

Instruction Manual
Page 92
... and the remote sensor. • Point the remote sensor away from strong light sources such as they were set even during Easy Handycam operation. - [FILE NO.] - [VOLUME] - [TV TYPE] - [ DISPLAY] - [BEEP] - [SUB-T DATE] - [CLOCK SET] - [AREA SET] - [DST SET]/[SUMMERTIME] - [ LANGUAGE SET] - [ IMAGE SIZE] - [WIDE SELECT] - [COMPONENT] - [DEMO MODE] - [DIAL SETTING] (HDR-UX7) - [TIMING...
... and the remote sensor. • Point the remote sensor away from strong light sources such as they were set even during Easy Handycam operation. - [FILE NO.] - [VOLUME] - [TV TYPE] - [ DISPLAY] - [BEEP] - [SUB-T DATE] - [CLOCK SET] - [AREA SET] - [DST SET]/[SUMMERTIME] - [ LANGUAGE SET] - [ IMAGE SIZE] - [WIDE SELECT] - [COMPONENT] - [DEMO MODE] - [DIAL SETTING] (HDR-UX7) - [TIMING...
Instruction Manual
Page 93
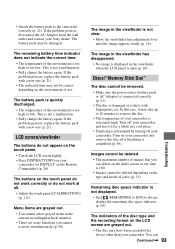
... do not work correctly or do not appear on the touch panel. • Touch the LCD screen lightly. • Press DISP/BATT INFO on the Remote Commander) (p. 26). Menu items are grayed out. • You cannot select grayed items in the viewfinder is not displayed. • Set [ REMAINING] ... the battery pack with fingerprints, etc. If the problem persists, disconnect the AC Adaptor from the wall outlet and contact your camcorder. Turn off your Sony dealer. Images cannot be deleted depending on the type and mode of the disc type and the recording format on the environment of...
... do not work correctly or do not appear on the touch panel. • Touch the LCD screen lightly. • Press DISP/BATT INFO on the Remote Commander) (p. 26). Menu items are grayed out. • You cannot select grayed items in the viewfinder is not displayed. • Set [ REMAINING] ... the battery pack with fingerprints, etc. If the problem persists, disconnect the AC Adaptor from the wall outlet and contact your camcorder. Turn off your Sony dealer. Images cannot be deleted depending on the type and mode of the disc type and the recording format on the environment of...

Instruction Manual
Page 110
...turning it may occur. - Near strong magnetic fields or mechanical vibration. The camcorder may malfunction. Noise may malfunction. If your camcorder gets wet, it on it. • Keep metal contacts clean. • Keep the Remote Commander and button-type battery out of the lens. • Keep the POWER... switch setting to a warm place, moisture may have it checked by a Sony dealer before storing it...
...turning it may occur. - Near strong magnetic fields or mechanical vibration. The camcorder may malfunction. Noise may malfunction. If your camcorder gets wet, it on it. • Keep metal contacts clean. • Keep the Remote Commander and button-type battery out of the lens. • Keep the POWER... switch setting to a warm place, moisture may have it checked by a Sony dealer before storing it...

Instruction Manual
Page 114
... Ω (ohms) HDMI OUT jack Type A (19-pin) Headphone jack (HDR-UX7) Stereo minijack (Ø 3.5 mm) USB jack mini-B MIC input jack (HDR-UX7) Stereo minijack (Ø 3.5 mm) REMOTE jack Stereo mini-minijack (Ø 2.5 mm) LCD screen Image HDR-UX5: 6.9 cm (2.7 type, aspect ratio 16:9) HDR-UX7: 8.8 cm (3.5 type, aspect ratio 16:9) Total dot number 211...
... Ω (ohms) HDMI OUT jack Type A (19-pin) Headphone jack (HDR-UX7) Stereo minijack (Ø 3.5 mm) USB jack mini-B MIC input jack (HDR-UX7) Stereo minijack (Ø 3.5 mm) REMOTE jack Stereo mini-minijack (Ø 2.5 mm) LCD screen Image HDR-UX5: 6.9 cm (2.7 type, aspect ratio 16:9) HDR-UX7: 8.8 cm (3.5 type, aspect ratio 16:9) Total dot number 211...
Instruction Manual
Page 118
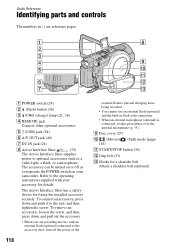
... external flash to prevent charging noise being recorded. • You cannot use an external flash (optional) and the built-in ( ) are recording movies with your camcorder. Refer to the operating instructions supplied with an external flash (optional) connected to the accessory shoe, turn off as a video light, a flash, or a microphone. I Disc... the internal microphone (p. 35). The accessory can be turned on your accessory for details. A POWER switch (24) B (flash) button (36) C /CHG (charge) lamp (21, 36) D REMOTE jack Connect other optional accessories.
... external flash to prevent charging noise being recorded. • You cannot use an external flash (optional) and the built-in ( ) are recording movies with your camcorder. Refer to the operating instructions supplied with an external flash (optional) connected to the accessory shoe, turn off as a video light, a flash, or a microphone. I Disc... the internal microphone (p. 35). The accessory can be turned on your accessory for details. A POWER switch (24) B (flash) button (36) C /CHG (charge) lamp (21, 36) D REMOTE jack Connect other optional accessories.

Instruction Manual
Page 120
...) (8) E MANUAL button (38) (HDR-UX7) F Camera control dial (38) (HDR-UX7) G Power zoom lever (35, 42) H PHOTO button (34) I BACK LIGHT button (37) J NIGHTSHOT switch (37) K Camera recording lamp (33) Lights up in .)) to the tripod receptacle using a tripod screw. 120 M Remote sensor Point the Remote Commander (p. 121) towards the remote sensor to operate your camcorder.
...) (8) E MANUAL button (38) (HDR-UX7) F Camera control dial (38) (HDR-UX7) G Power zoom lever (35, 42) H PHOTO button (34) I BACK LIGHT button (37) J NIGHTSHOT switch (37) K Camera recording lamp (33) Lights up in .)) to the tripod receptacle using a tripod screw. 120 M Remote sensor Point the Remote Commander (p. 121) towards the remote sensor to operate your camcorder.
Instruction Manual
Page 121
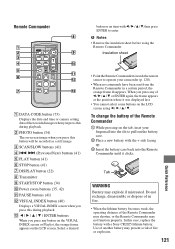
...INDEX screen or Playlist, the orange frame appears on the tab, inset your camcorder (p. 120). • When no commands have been sent from the Remote Commander in fire. • When the lithium battery becomes weak, the operating distance of the Remote Commander 1 While pressing on the LCD screen. C SCAN/SLOW buttons (41... facing up. 3 Insert the battery case back into the slit to pull out the battery case. 2 Place a new battery with a Sony CR2025 lithium battery. Do not recharge, disassemble or dispose of in a certain period, the orange frame disappears. To change the battery of the...
...INDEX screen or Playlist, the orange frame appears on the tab, inset your camcorder (p. 120). • When no commands have been sent from the Remote Commander in fire. • When the lithium battery becomes weak, the operating distance of the Remote Commander 1 While pressing on the LCD screen. C SCAN/SLOW buttons (41... facing up. 3 Insert the battery case back into the slit to pull out the battery case. 2 Place a new battery with a Sony CR2025 lithium battery. Do not recharge, disassemble or dispose of in a certain period, the orange frame disappears. To change the battery of the...

Instruction Manual
Page 127
... 20 Print 54 Protect 102 Q QUALITY 72 R REC LAMP 78 Recording 33 Recording time 22 REDEYE REDUC 70 REMAINING 69 Remaining battery 22 Remote Commander .....92, 121 REMOTE CTRL (Remote control 78 S S VIDEO cable 46 SCENE SELECTION.....82, 99 SD REC MODE 67 Self-diagnosis display.........100 SELF-TIMER 85 SEPIA 85 SETTINGS...
... 20 Print 54 Protect 102 Q QUALITY 72 R REC LAMP 78 Recording 33 Recording time 22 REDEYE REDUC 70 REMAINING 69 Remaining battery 22 Remote Commander .....92, 121 REMOTE CTRL (Remote control 78 S S VIDEO cable 46 SCENE SELECTION.....82, 99 SD REC MODE 67 Self-diagnosis display.........100 SELF-TIMER 85 SEPIA 85 SETTINGS...


