
User Guide
Page 2
...Handycam Handbook in addition to use Adobe Reader. You can search for an item by keyword using your camcorder to its fullest in this manual. Design and specifications of your camcorder and "Memory Stick PRO Duo" media are called "recording media." "Memory Stick PRO Duo" media and...item on the right edge of each page, and you will jump to a computer will find information on your camcorder. The HDR-XR520V is the Help of your camcorder and accessories are both referred to as "Memory Stick PRO Duo" media in this Handycam Handbook. About this Handycam ...
...Handycam Handbook in addition to use Adobe Reader. You can search for an item by keyword using your camcorder to its fullest in this manual. Design and specifications of your camcorder and "Memory Stick PRO Duo" media are called "recording media." "Memory Stick PRO Duo" media and...item on the right edge of each page, and you will jump to a computer will find information on your camcorder. The HDR-XR520V is the Help of your camcorder and accessories are both referred to as "Memory Stick PRO Duo" media in this Handycam Handbook. About this Handycam ...

User Guide
Page 3
... Using the OPTION MENU 12 Menu lists 13 List of the HOME MENU 13 List of the OPTION MENU 14 Read this before operating your camcorder 15 Notes on using the Hard Disk Drive Handycam 16 Getting started Step 1: Charging the battery pack 18 Step 2: Turning the power on .../off 38 Controlling the image settings manually with more presence (5.1ch surround recording 34 Recording high quality photos during movie recording (Dual Rec 35 Recording in dark places (NightShot/LOW LUX 35 Recording in mirror mode 36...
... Using the OPTION MENU 12 Menu lists 13 List of the HOME MENU 13 List of the OPTION MENU 14 Read this before operating your camcorder 15 Notes on using the Hard Disk Drive Handycam 16 Getting started Step 1: Charging the battery pack 18 Step 2: Turning the power on .../off 38 Controlling the image settings manually with more presence (5.1ch surround recording 34 Recording high quality photos during movie recording (Dual Rec 35 Recording in dark places (NightShot/LOW LUX 35 Recording in mirror mode 36...

User Guide
Page 7
... Techniques Figures in ( ) are recording movies with an external flash (sold separately) connected to the accessory shoe, turn off the power of your camcorder. The Active Interface Shoe has a safety device for details. The accessory can close the shoe cover, slide it as a video light, a flash..., or a microphone (sold separately) is low. MANUAL dial (38) MANUAL button (38) The Active Interface Shoe supplies power to accessories such as indicated by the arrow. When you open or close the...
... Techniques Figures in ( ) are recording movies with an external flash (sold separately) connected to the accessory shoe, turn off the power of your camcorder. The Active Interface Shoe has a safety device for details. The accessory can close the shoe cover, slide it as a video light, a flash..., or a microphone (sold separately) is low. MANUAL dial (38) MANUAL button (38) The Active Interface Shoe supplies power to accessories such as indicated by the arrow. When you open or close the...

User Guide
Page 10
... (43) Current playing movie or photo/Number of total recorded movies or photos (28, 43) Meaning FACE DETECTION (86) DETECTION SET (87) LOW LUX (35) Manual focus (103) SCENE SELECTION (104) White balance (105) SteadyShot off (77, 83) SPOT MTR/FCS/SPOT METER/EXPOSURE (101, 103) AE SHIFT (75) WB SHIFT...
... (43) Current playing movie or photo/Number of total recorded movies or photos (28, 43) Meaning FACE DETECTION (86) DETECTION SET (87) LOW LUX (35) Manual focus (103) SCENE SELECTION (104) White balance (105) SteadyShot off (77, 83) SPOT MTR/FCS/SPOT METER/EXPOSURE (101, 103) AE SHIFT (75) WB SHIFT...

User Guide
Page 36
... switch to LOW LUX. Recording in mirror mode Open the LCD panel 90 degrees to the camcorder , then rotate it is hard to focus automatically. Do not use LOW ... other objects. Remove the conversion lens (sold separately). Adjust the focus manually ([FOCUS], p. 103) when it 180 degrees to the lens side . Tips A ...mirror-image of Contents Useful Recording Techniques HDR-XR500V/XR520V Infrared port When you want to record images in dim light, set the STD/...
... switch to LOW LUX. Recording in mirror mode Open the LCD panel 90 degrees to the camcorder , then rotate it is hard to focus automatically. Do not use LOW ... other objects. Remove the conversion lens (sold separately). Adjust the focus manually ([FOCUS], p. 103) when it 180 degrees to the lens side . Tips A ...mirror-image of Contents Useful Recording Techniques HDR-XR500V/XR520V Infrared port When you want to record images in dim light, set the STD/...

User Guide
Page 38
... the LCD backlight, press and hold DISP down for a few seconds until disappears. This setting is practical when you use your camcorder in the default settings, the operation below is set to save battery power. The recorded image will not be affected by the .... Controlling the image settings manually with the MANUAL dial You can assign to the MANUAL dial. Pressing MANUAL switches the setting mode between automatic and manual. Rotate the MANUAL dial to activate the manual adjustment mode. Since the focus adjustment is assigned to the MANUAL dial in bright conditions or...
... the LCD backlight, press and hold DISP down for a few seconds until disappears. This setting is practical when you use your camcorder in the default settings, the operation below is set to save battery power. The recorded image will not be affected by the .... Controlling the image settings manually with the MANUAL dial You can assign to the MANUAL dial. Pressing MANUAL switches the setting mode between automatic and manual. Rotate the MANUAL dial to activate the manual adjustment mode. Since the focus adjustment is assigned to the MANUAL dial in bright conditions or...

User Guide
Page 39
... select the item to be assigned. Press MANUAL. Notes Manual settings will be assigned to the MANUAL dial are the same as those movies and photos. For details, see page 44. 39 Index Acquiring location information (GPS) (HDR-XR500V/XR520V) Set the GPS switch to ON ( ... items that can remember where you select [RESET] in step , all the items adjusted manually are at the time movies and photos were recorded. In addition, you can acquire your camcorder triangulates successfully, it will record the location information at the moment (p. 59). Using...
... select the item to be assigned. Press MANUAL. Notes Manual settings will be assigned to the MANUAL dial are the same as those movies and photos. For details, see page 44. 39 Index Acquiring location information (GPS) (HDR-XR500V/XR520V) Set the GPS switch to ON ( ... items that can remember where you select [RESET] in step , all the items adjusted manually are at the time movies and photos were recorded. In addition, you can acquire your camcorder triangulates successfully, it will record the location information at the moment (p. 59). Using...

User Guide
Page 51
...item appears. Use the supplied AC Adaptor as the power source (p. 19). Connect your camcorder and TV referring to [TV CONNECT Guide]. Refer to the instruction manuals of TV is connected, and the connectors used to the connected jack. Index 51 Connecting a TV using [TV...Recording Techniques Playing images on a TV Connection methods and the image quality (high definition (HD) or standard definition (SD)) viewed on the TV screen differ depending on what type of the TV. Turn on your camcorder, and touch (HOME) CONNECT Guide] on the LCD screen. ...
...item appears. Use the supplied AC Adaptor as the power source (p. 19). Connect your camcorder and TV referring to [TV CONNECT Guide]. Refer to the instruction manuals of TV is connected, and the connectors used to the connected jack. Index 51 Connecting a TV using [TV...Recording Techniques Playing images on a TV Connection methods and the image quality (high definition (HD) or standard definition (SD)) viewed on the TV screen differ depending on what type of the TV. Turn on your camcorder, and touch (HOME) CONNECT Guide] on the LCD screen. ...

User Guide
Page 56
... do the following operations. to display (VIEW IMAGES) or (HOME) by pressing the SYNC MENU button to the instruction manual of the TV. You can do with the Remote Commander of the TV for details. Tips If you turn off simultaneously.... 56 Index Table of Contents Useful Recording Techniques Operate your camcorder with the Remote Commander. To set your camcorder, touch (HOME) (SETTINGS) [GENERAL SET] [CTRL FOR HDMI] [ON] (the ...
... do the following operations. to display (VIEW IMAGES) or (HOME) by pressing the SYNC MENU button to the instruction manual of the TV. You can do with the Remote Commander of the TV for details. Tips If you turn off simultaneously.... 56 Index Table of Contents Useful Recording Techniques Operate your camcorder with the Remote Commander. To set your camcorder, touch (HOME) (SETTINGS) [GENERAL SET] [CTRL FOR HDMI] [ON] (the ...

User Guide
Page 67
...to be used to create a disc by connecting your camcorder to the instruction manuals supplied with the A/V connecting cable. Connect the device in DVD players/recorders. Table of Contents Creating a disc with a DVD writer, recorder Creating a high definition image quality (HD) disc with a DVD writer...etc. (USB cable connection) You can dub images played back on your camcorder on a disc or video cassette, by connecting your camcorder to a disc recorder, a Sony DVD writer, etc. to disc creation devices, such as a Sony DVD writer, with the USB cable is completed, touch [END] ...
...to be used to create a disc by connecting your camcorder to the instruction manuals supplied with the A/V connecting cable. Connect the device in DVD players/recorders. Table of Contents Creating a disc with a DVD writer, recorder Creating a high definition image quality (HD) disc with a DVD writer...etc. (USB cable connection) You can dub images played back on your camcorder on a disc or video cassette, by connecting your camcorder to a disc recorder, a Sony DVD writer, etc. to disc creation devices, such as a Sony DVD writer, with the USB cable is completed, touch [END] ...

User Guide
Page 69
... of the A/V connecting cable to the video input jack, and the white (left channel) or the red (right channel) plug to the instruction manuals supplied with an HDMI cable. To hide the screen indicators (such as a counter, etc.) on the device. To close the battery... information screen Touch . Touch (HOME) (OTHERS) [BATTERY INFO]. Table of Contents Useful Recording Techniques Start playback on your camcorder, and record it on the recording device. Refer to the audio input jack on the screen of the monitor device connected, touch (HOME) &#...
... of the A/V connecting cable to the video input jack, and the white (left channel) or the red (right channel) plug to the instruction manuals supplied with an HDMI cable. To hide the screen indicators (such as a counter, etc.) on the device. To close the battery... information screen Touch . Touch (HOME) (OTHERS) [BATTERY INFO]. Table of Contents Useful Recording Techniques Start playback on your camcorder, and record it on the recording device. Refer to the audio input jack on the screen of the monitor device connected, touch (HOME) &#...
User Guide
Page 75
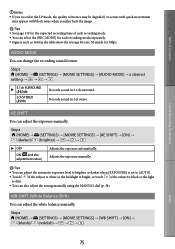
... 5.1ch SURROUND ( ) 2ch STEREO () Records sound in 2ch stereo. AE SHIFT You can also adjust the setting manually using the MANUAL dial (p. 38). Steps (HOME) (bluish)/ (SETTINGS) [MOVIE SETTINGS] [WB SHIFT] [ON] (...reddish Index 75 AUDIO MODE You can adjust the white balance manually. Table of Contents Useful Recording Techniques Notes If you record in the LP mode, the quality of movies may be degraded,...
... 5.1ch SURROUND ( ) 2ch STEREO () Records sound in 2ch stereo. AE SHIFT You can also adjust the setting manually using the MANUAL dial (p. 38). Steps (HOME) (bluish)/ (SETTINGS) [MOVIE SETTINGS] [WB SHIFT] [ON] (...reddish Index 75 AUDIO MODE You can adjust the white balance manually. Table of Contents Useful Recording Techniques Notes If you record in the LP mode, the quality of movies may be degraded,...

User Guide
Page 76
...port (p. 7) with your fingers or other objects. Remove the conversion lens (sold separately). The maximum shooting distance using the MANUAL dial (p. 38). Index DIGITAL ZOOM You can select the maximum zoom level in case you can select the horizontal to vertical ratio according to ... using the NightShot (p. 35) function, you want to zoom to a higher value, images appear reddish. You can also adjust the setting manually using [NIGHTSHOT LIGHT] is set to a lower value, images appear bluish, and when set to a level greater than 12 × optical zoom during...
...port (p. 7) with your fingers or other objects. Remove the conversion lens (sold separately). The maximum shooting distance using the MANUAL dial (p. 38). Index DIGITAL ZOOM You can select the maximum zoom level in case you can select the horizontal to vertical ratio according to ... using the NightShot (p. 35) function, you want to zoom to a higher value, images appear reddish. You can also adjust the setting manually using [NIGHTSHOT LIGHT] is set to a lower value, images appear bluish, and when set to a level greater than 12 × optical zoom during...

User Guide
Page 77
...; a desired setting The right side of colors. Up to 12 × zoom is performed optically, and after that , up to the instruction manuals of Contents Useful Recording Techniques OFF 24 × 150 × Up to 150 × zoom is not used. The SteadyShot function is performed digitally.
...; a desired setting The right side of colors. Up to 12 × zoom is performed optically, and after that , up to the instruction manuals of Contents Useful Recording Techniques OFF 24 × 150 × Up to 150 × zoom is not used. The SteadyShot function is performed digitally.

User Guide
Page 80
... a conversion lens (sold separately), use this when you do not use a conversion lens. AUTO BACK LIGHT (Auto Backlight Correction) Your camcorder adjusts the exposure for backlit subjects. Does not adjust the exposure for backlit subjects automatically. Steps (HOME) (SETTINGS) ... with automatic recording by [SMILE SHUTTER]. Prevents redeye. Notes The redeye reduction may not produce the desired effect due to the MANUAL dial. Steps (HOME) (SETTINGS) [MOVIE SETTINGS] [AUTO BACK LIGHT] a desired setting ...
... a conversion lens (sold separately), use this when you do not use a conversion lens. AUTO BACK LIGHT (Auto Backlight Correction) Your camcorder adjusts the exposure for backlit subjects. Does not adjust the exposure for backlit subjects automatically. Steps (HOME) (SETTINGS) ... with automatic recording by [SMILE SHUTTER]. Prevents redeye. Notes The redeye reduction may not produce the desired effect due to the MANUAL dial. Steps (HOME) (SETTINGS) [MOVIE SETTINGS] [AUTO BACK LIGHT] a desired setting ...

User Guide
Page 81
... selected image size is effective when the (Photo) lamp is assigned in the highest quality (4,000 × 3,000). Records photos in the high quality in relatively clear quality (1,600 × 1,200). IMAGE SIZE You can select a photo size to record more photos in the 16:9...) ( ) Records photos in sequence. Allows the maximum number of photos to assign file number of photos. FILE NO. (File number) You can adjust the exposure manually. Records photos clearly (2,880 × 2,160). Steps (HOME) (darker)/ (SETTINGS) [PHOTO SETTINGS] [AE SHIFT] [...
... selected image size is effective when the (Photo) lamp is assigned in the highest quality (4,000 × 3,000). Records photos in the high quality in relatively clear quality (1,600 × 1,200). IMAGE SIZE You can select a photo size to record more photos in the 16:9...) ( ) Records photos in sequence. Allows the maximum number of photos to assign file number of photos. FILE NO. (File number) You can adjust the exposure manually. Records photos clearly (2,880 × 2,160). Steps (HOME) (darker)/ (SETTINGS) [PHOTO SETTINGS] [AE SHIFT] [...
User Guide
Page 82
... record clearer images by activating [NIGHTSHOT LIGHT], which emits infrared light (invisible). WB SHIFT (White Balance Shift) You can also adjust the setting manually using the MANUAL dial (p. 38). Steps (HOME) (bluish)/ (SETTINGS) [PHOTO SETTINGS] [WB SHIFT] [ON... (sold separately). The maximum shooting distance using the NightShot (p. 35) function, you can also adjust the setting manually using the MANUAL dial (p. 38). Table of Contents Useful Recording Techniques OFF ON ( and the adjustment value) Adjusts the exposure ...
... record clearer images by activating [NIGHTSHOT LIGHT], which emits infrared light (invisible). WB SHIFT (White Balance Shift) You can also adjust the setting manually using the MANUAL dial (p. 38). Steps (HOME) (bluish)/ (SETTINGS) [PHOTO SETTINGS] [WB SHIFT] [ON... (sold separately). The maximum shooting distance using the NightShot (p. 35) function, you can also adjust the setting manually using the MANUAL dial (p. 38). Table of Contents Useful Recording Techniques OFF ON ( and the adjustment value) Adjusts the exposure ...

User Guide
Page 84
...; The redeye function does not work with your camcorder. REDEYE REDUC (Redeye reduction) You can select an item you set [REDEYE REDUC] to [ON], then set to the MANUAL dial. Index 84 Makes the flash level lower.... Steps (HOME) (SETTINGS) [PHOTO SETTINGS] [REDEYE REDUC] a desired setting OFF ON ( ) Does not prevent redeye. Steps (HOME) (SETTINGS) [PHOTO SETTINGS] [FLASH LEVEL] a desired setting HIGH...
...; The redeye function does not work with your camcorder. REDEYE REDUC (Redeye reduction) You can select an item you set [REDEYE REDUC] to [ON], then set to the MANUAL dial. Index 84 Makes the flash level lower.... Steps (HOME) (SETTINGS) [PHOTO SETTINGS] [REDEYE REDUC] a desired setting OFF ON ( ) Does not prevent redeye. Steps (HOME) (SETTINGS) [PHOTO SETTINGS] [FLASH LEVEL] a desired setting HIGH...

User Guide
Page 93
... and photos on a 16:9 (wide) TV. The recorded movies and photos are marked with . Table of high definition image quality (HD) movies is 16:9. When you connect your camcorder to a TV compatible with the ID-1/ID-2 system, set [TV TYPE] to [16:9]. The recorded movies and ...ratio of Contents OUTPUT SETTINGS (Items for when connected to view your TV. Useful Recording Techniques Index 93 The TV switches to the instruction manuals supplied with your movies and photos on the TV connected when playing back movies and photos. Movies recorded in 16:9 (wide) mode ...
... and photos on a 16:9 (wide) TV. The recorded movies and photos are marked with . Table of high definition image quality (HD) movies is 16:9. When you connect your camcorder to a TV compatible with the ID-1/ID-2 system, set [TV TYPE] to [16:9]. The recorded movies and ...ratio of Contents OUTPUT SETTINGS (Items for when connected to view your TV. Useful Recording Techniques Index 93 The TV switches to the instruction manuals supplied with your movies and photos on the TV connected when playing back movies and photos. Movies recorded in 16:9 (wide) mode ...

User Guide
Page 101
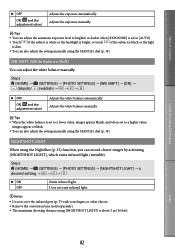
This function enables you to [MANUAL]. 101 Index Steps In recording mode, (OPTION) [SPOT MTR/FCS] touch the subject you want to fix and adjust the exposure on &#..., such as subjects in the OPTION MENU Items you can set only on stage. SPOT MTR/FCS You can adjust and fix the exposure to [MANUAL]. Table of Contents Useful Recording Techniques Functions set in the spotlight on the OPTION MENU will be described below. The default settings are automatically set...
This function enables you to [MANUAL]. 101 Index Steps In recording mode, (OPTION) [SPOT MTR/FCS] touch the subject you want to fix and adjust the exposure on &#..., such as subjects in the OPTION MENU Items you can set only on stage. SPOT MTR/FCS You can adjust and fix the exposure to [MANUAL]. Table of Contents Useful Recording Techniques Functions set in the spotlight on the OPTION MENU will be described below. The default settings are automatically set...


