Operating Instructions
Page 3
When a cart is required when the apparatus has been damaged in Supplement C to qualified service personnel. For the wireless transceiver (EZW-RT10) This transmitter must not be unplugged from the apparatus. 11) Only use caution when moving the cart/apparatus combination to rain ... and more between the radiator and person's body (excluding extremities: hands, wrists, feet and ankles). 3US This equipment should be connected to the grounding system of the building, as close to Article 820-40 of cable entry as it is not disconnected from tip-over. A grounding type plug has two...
When a cart is required when the apparatus has been damaged in Supplement C to qualified service personnel. For the wireless transceiver (EZW-RT10) This transmitter must not be unplugged from the apparatus. 11) Only use caution when moving the cart/apparatus combination to rain ... and more between the radiator and person's body (excluding extremities: hands, wrists, feet and ankles). 3US This equipment should be connected to the grounding system of the building, as close to Article 820-40 of cable entry as it is not disconnected from tip-over. A grounding type plug has two...

Operating Instructions
Page 4
... which allows transmission of the S-AIR products is as follows: • DAV-HDX277WC: Surround amplifier (optional) S-AIR receiver (supplied) • DAV-HDX279W: Surround amplifier (supplied) S-AIR receiver (optional) • DAV-HDX576WF: Surround amplifier (supplied) S-AIR receiver (supplied) The S-AIR product... models. • The default setting is underlined. About the S-AIR function The system is compatible with the system: • Surround amplifier: You can enjoy surround speaker sound wirelessly. • S-AIR receiver: You can be used for illustration purposes. The configuration...
... which allows transmission of the S-AIR products is as follows: • DAV-HDX277WC: Surround amplifier (optional) S-AIR receiver (supplied) • DAV-HDX279W: Surround amplifier (supplied) S-AIR receiver (optional) • DAV-HDX576WF: Surround amplifier (supplied) S-AIR receiver (supplied) The S-AIR product... models. • The default setting is underlined. About the S-AIR function The system is compatible with the system: • Surround amplifier: You can enjoy surround speaker sound wirelessly. • S-AIR receiver: You can be used for illustration purposes. The configuration...

Operating Instructions
Page 5
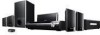
... About This Operating Instructions..........4 About the S-AIR function 4 Playable Discs 6 Getting Started Step 1: Assembling the Speakers 13 Step 2: Positioning the System... 18 Step 3: Connecting the System... 22 Step 4: Setting up the Wireless System 42 Step 5: Performing the Quick Setup 44 Step 6: Enjoying Sound from all the Speakers 47 Sound Adjustment Enjoying Surround Sound by...
... About This Operating Instructions..........4 About the S-AIR function 4 Playable Discs 6 Getting Started Step 1: Assembling the Speakers 13 Step 2: Positioning the System... 18 Step 3: Connecting the System... 22 Step 4: Setting up the Wireless System 42 Step 5: Performing the Quick Setup 44 Step 6: Enjoying Sound from all the Speakers 47 Sound Adjustment Enjoying Surround Sound by...

Operating Instructions
Page 9
Getting Started Getting Started Unpacking DAV-HDX277WC • Front speakers (2) • Center speaker (1) • Surround speakers (2) • Subwoofer (1) • FM wire antenna (aerial) (1) • Foot pads (1 set) or • Speaker cords (6, red/white/ green/gray/blue/purple) • Wireless transceiver for the unit (1) • ...SA10) (1) • R6 (size AA) batteries (2) • AM loop antenna (aerial) (1) • Calibration mic (1) • Wireless transceiver for the S-AIR receiver (AIR-SA10) (1) • Operating Instructions of the S-AIR receiver (AIR-SA10) 9US
Getting Started Getting Started Unpacking DAV-HDX277WC • Front speakers (2) • Center speaker (1) • Surround speakers (2) • Subwoofer (1) • FM wire antenna (aerial) (1) • Foot pads (1 set) or • Speaker cords (6, red/white/ green/gray/blue/purple) • Wireless transceiver for the unit (1) • ...SA10) (1) • R6 (size AA) batteries (2) • AM loop antenna (aerial) (1) • Calibration mic (1) • Wireless transceiver for the S-AIR receiver (AIR-SA10) (1) • Operating Instructions of the S-AIR receiver (AIR-SA10) 9US

Operating Instructions
Page 10
Getting Started DAV-HDX279W • Front speakers (2) • Center speaker (1) • Surround speakers (2) • Subwoofer (1) • FM wire antenna (aerial) (1) • Foot pads (1 set) or •.../purple) • Video cord (1) • Speaker cord cover (1) • Remote commander (remote) (1) • Speaker cord holder (1) • R6 (size AA) batteries (2) • Wireless transceivers (2) • AM loop antenna (aerial) (1) • Calibration mic (1) • DIGITAL MEDIA PORT adapter (TDM-iP10) (1) • Operating Instructions • Speaker and TV connections (...
Getting Started DAV-HDX279W • Front speakers (2) • Center speaker (1) • Surround speakers (2) • Subwoofer (1) • FM wire antenna (aerial) (1) • Foot pads (1 set) or •.../purple) • Video cord (1) • Speaker cord cover (1) • Remote commander (remote) (1) • Speaker cord holder (1) • R6 (size AA) batteries (2) • Wireless transceivers (2) • AM loop antenna (aerial) (1) • Calibration mic (1) • DIGITAL MEDIA PORT adapter (TDM-iP10) (1) • Operating Instructions • Speaker and TV connections (...

Operating Instructions
Page 11
Getting Started DAV-HDX576WF • Front speakers (2) • Remote commander (remote) (1) • Surround amplifier (1) • Center speaker (1) • R6 (size AA) batteries (2) • Calibration mic (1)... • Bases (2) • Mounting plates (2) • AM loop antenna (aerial) (1) • Post covers (2) • FM wire antenna (aerial) (1) • Speaker cord holder (1) • Wireless transceivers for the unit (2) • DIGITAL MEDIA PORT adapter (TDM-iP10) (1) • Operating Instructions • Speaker and TV connections (card) • S-AIR receiver (AIR-SA10...
Getting Started DAV-HDX576WF • Front speakers (2) • Remote commander (remote) (1) • Surround amplifier (1) • Center speaker (1) • R6 (size AA) batteries (2) • Calibration mic (1)... • Bases (2) • Mounting plates (2) • AM loop antenna (aerial) (1) • Post covers (2) • FM wire antenna (aerial) (1) • Speaker cord holder (1) • Wireless transceivers for the unit (2) • DIGITAL MEDIA PORT adapter (TDM-iP10) (1) • Operating Instructions • Speaker and TV connections (card) • S-AIR receiver (AIR-SA10...

Operating Instructions
Page 22
...up the volume of the other components to 6 on the following pages. DAV-HDX277WC 3 DIGITAL MEDIA PORT adapter 3 Portable audio source 3 VCR, digital satellite receiver, or PlayStation, etc. 2 TV 5 Wireless transceiver 4 AM loop antenna (aerial) 4 FM wire antenna (aerial) ... (mains lead) 1 Front speaker (L) 1 Center speaker 5 Wireless transceiver 1 Subwoofer 1 Front speaker (R) 1 Surround speaker (L) S-AIR receiver :Signal flow 1 Surround speaker (R) 22US Getting Started Step 3: Connecting the System See the connection diagram below, and read the additional information from...
...up the volume of the other components to 6 on the following pages. DAV-HDX277WC 3 DIGITAL MEDIA PORT adapter 3 Portable audio source 3 VCR, digital satellite receiver, or PlayStation, etc. 2 TV 5 Wireless transceiver 4 AM loop antenna (aerial) 4 FM wire antenna (aerial) ... (mains lead) 1 Front speaker (L) 1 Center speaker 5 Wireless transceiver 1 Subwoofer 1 Front speaker (R) 1 Surround speaker (L) S-AIR receiver :Signal flow 1 Surround speaker (R) 22US Getting Started Step 3: Connecting the System See the connection diagram below, and read the additional information from...

Operating Instructions
Page 23
Getting Started DAV-HDX279W 3 DIGITAL MEDIA PORT adapter 3 Portable audio source 2 TV 5 Wireless transceiver 3 VCR, digital satellite receiver, or PlayStation, etc. 4 AM loop antenna (aerial) 4 FM wire antenna (aerial) 6 AC power cord (mains lead) 1 Front speaker (L) 1 Center speaker 1 Subwoofer 5 Wireless transceiver 1 Front speaker (R) Surround amplifier 6 AC power cord (mains lead) 1 Surround speaker (L) :Signal flow 1 Surround speaker (R) 23US
Getting Started DAV-HDX279W 3 DIGITAL MEDIA PORT adapter 3 Portable audio source 2 TV 5 Wireless transceiver 3 VCR, digital satellite receiver, or PlayStation, etc. 4 AM loop antenna (aerial) 4 FM wire antenna (aerial) 6 AC power cord (mains lead) 1 Front speaker (L) 1 Center speaker 1 Subwoofer 5 Wireless transceiver 1 Front speaker (R) Surround amplifier 6 AC power cord (mains lead) 1 Surround speaker (L) :Signal flow 1 Surround speaker (R) 23US

Operating Instructions
Page 38
.... For details, refer to insert the wireless transceivers into the S-AIR receiver. Getting Started 5 Inserting the wireless transceiver You can transmit sound from the unit to an S-AIR product, such as a surround amplifier or S-AIR receiver. DAV-HDX277WC Rear panel of the surround amplifier EZW...-RT10 S-AIR ID A B C PAIRING SPEAKER L SURROUND SELECTOR R SURROUND SURROUND BACK EZW-RT10 Wireless transceiver EZW-RT10 Wireless transceiver 38US An S-AIR product is a component that...
.... For details, refer to insert the wireless transceivers into the S-AIR receiver. Getting Started 5 Inserting the wireless transceiver You can transmit sound from the unit to an S-AIR product, such as a surround amplifier or S-AIR receiver. DAV-HDX277WC Rear panel of the surround amplifier EZW...-RT10 S-AIR ID A B C PAIRING SPEAKER L SURROUND SELECTOR R SURROUND SURROUND BACK EZW-RT10 Wireless transceiver EZW-RT10 Wireless transceiver 38US An S-AIR product is a component that...

Operating Instructions
Page 39
...DAV-HDX576WF Rear panel of the unit SPEAKER CENTER SUBWOOFER SPEAKER TV DIGITAL IN COAXIAL OPTICAL FRONT R FRONT L HDMI OUT DMPORT DC5V 0.7A MAX EZW-RT10 COMPONENT VIDEO OUT VIDEO OUT ANTENNA FM AM COAXIAL 75 TV SAT/CABLE Y PB/CB PR/CR R AUDIO IN L R AUDIO IN L Rear panel of the wireless... transceiver. • Insert the wireless transceiver with the S-AIR logo facing up. • Insert the wireless transceiver so that the AC power cord (mains lead) is not connected to the operating instructions ...
...DAV-HDX576WF Rear panel of the unit SPEAKER CENTER SUBWOOFER SPEAKER TV DIGITAL IN COAXIAL OPTICAL FRONT R FRONT L HDMI OUT DMPORT DC5V 0.7A MAX EZW-RT10 COMPONENT VIDEO OUT VIDEO OUT ANTENNA FM AM COAXIAL 75 TV SAT/CABLE Y PB/CB PR/CR R AUDIO IN L R AUDIO IN L Rear panel of the wireless... transceiver. • Insert the wireless transceiver with the S-AIR logo facing up. • Insert the wireless transceiver so that the AC power cord (mains lead) is not connected to the operating instructions ...

Operating Instructions
Page 42
... the surround amplifier. The POWER / ON LINE indicator turns green. Flashes green. Check radio reception, and set up the Wireless System (DAV-HDX279W/DAV-HDX576WF only) To use the multiple S-AIR product You can prevent miss transmission between the S-AIR products by checking the POWER... the unit nor the surround amplifier outputs sound from the unit by using headphones You can enjoy the system's sound in the front panel display. When you use the wireless system, you connect headphones to set the volume again. The surround amplifier turns off . Getting Started Step ...
... the surround amplifier. The POWER / ON LINE indicator turns green. Flashes green. Check radio reception, and set up the Wireless System (DAV-HDX279W/DAV-HDX576WF only) To use the multiple S-AIR product You can prevent miss transmission between the S-AIR products by checking the POWER... the unit nor the surround amplifier outputs sound from the unit by using headphones You can enjoy the system's sound in the front panel display. When you use the wireless system, you connect headphones to set the volume again. The surround amplifier turns off . Getting Started Step ...

Operating Instructions
Page 82
... adapter other than the DIGITAL MEDIA PORT adapter. • Do not connect or disconnect the DIGITAL MEDIA PORT adapter to/from the system, or move the Bluetooth Wireless Audio Adapter closer to the operating instructions of the connected component. Note • Do not connect an adapter other than "A.F.D. In... using either the buttons on the type of DIGITAL MEDIA PORT adapter, you use the system and the Bluetooth Wireless Audio Adapter (such as TDM-BT1, not supplied) at the same time, place the Wireless Network Audio Adapter as far as TDM-NC1, not supplied) at the same time, ...
... adapter other than the DIGITAL MEDIA PORT adapter. • Do not connect or disconnect the DIGITAL MEDIA PORT adapter to/from the system, or move the Bluetooth Wireless Audio Adapter closer to the operating instructions of the connected component. Note • Do not connect an adapter other than "A.F.D. In... using either the buttons on the type of DIGITAL MEDIA PORT adapter, you use the system and the Bluetooth Wireless Audio Adapter (such as TDM-BT1, not supplied) at the same time, place the Wireless Network Audio Adapter as far as TDM-NC1, not supplied) at the same time, ...

Operating Instructions
Page 83
...Press . About S-AIR products There are two types of S-AIR product. • S-AIR main unit (this unit): This is in another room. The system turns on the TV screen. 4 Press X/x to select [CUSTOM], then press . The options for [SETUP] appear. 5 Press X/x to select [SETUP],...(S-AIR receiver) S-AIR main unit S-AIR sub unit (surround amplifier) Establishing sound transmission between S-AIR products. You can enjoy surround speaker sound wirelessly. - You can use environment.) • S-AIR sub unit: This is compatible with the S-AIR function (page 111), which allows sound ...
...Press . About S-AIR products There are two types of S-AIR product. • S-AIR main unit (this unit): This is in another room. The system turns on the TV screen. 4 Press X/x to select [CUSTOM], then press . The options for [SETUP] appear. 5 Press X/x to select [SETUP],...(S-AIR receiver) S-AIR main unit S-AIR sub unit (surround amplifier) Establishing sound transmission between S-AIR products. You can enjoy surround speaker sound wirelessly. - You can use environment.) • S-AIR sub unit: This is compatible with the S-AIR function (page 111), which allows sound ...

Operating Instructions
Page 85
... X, x, ./> S-AIR CH Operation Share the same operations on the model. 4 Press . To enjoy the same function as follows. To control the system from the S-AIR receiver You can select any band for the tuner on the S-AIR receiver. 4 Adjust the volume on the S-AIR receiver. Change ... • The sound of the unit. The setting is not inserted in the unit, you can control the system from the unit. 85US x When "SEPARATE" is set to "OFF" automatically when the wireless transceiver is set The function changes as the unit, select "MAIN UNIT." "MAIN UNIT" t "TUNER FM"...
... X, x, ./> S-AIR CH Operation Share the same operations on the model. 4 Press . To enjoy the same function as follows. To control the system from the S-AIR receiver You can select any band for the tuner on the S-AIR receiver. 4 Adjust the volume on the S-AIR receiver. Change ... • The sound of the unit. The setting is not inserted in the unit, you can control the system from the unit. 85US x When "SEPARATE" is set to "OFF" automatically when the wireless transceiver is set The function changes as the unit, select "MAIN UNIT." "MAIN UNIT" t "TUNER FM"...

Operating Instructions
Page 87
...pairing Select [NO], then press . If you select a new ID (you use multiple wireless systems which sharing the 2.4 GHz band, such as wireless LAN or Bluetooth, the transmission of S-AIR products or other wireless systems may be used. If sound transmission is unstable For the surround amplifier For the S-AIR ...press or c. 3 Press X/x to turn on the surround amplifier and press PAIRING on the display for selecting ID. Note • When the wireless transceiver is canceled. • When you perform the pairing operation between the unit and another S-AIR sub unit Select [YES], then press . ...
...pairing Select [NO], then press . If you select a new ID (you use multiple wireless systems which sharing the 2.4 GHz band, such as wireless LAN or Bluetooth, the transmission of S-AIR products or other wireless systems may be used. If sound transmission is unstable For the surround amplifier For the S-AIR ...press or c. 3 Press X/x to turn on the surround amplifier and press PAIRING on the display for selecting ID. Note • When the wireless transceiver is canceled. • When you perform the pairing operation between the unit and another S-AIR sub unit Select [YES], then press . ...

Operating Instructions
Page 88
• In most cases, you will not need to change this setting. • If "RF CHANGE" is set to the operating instructions of the following channels. - For details, refer to "OFF," transmission between the unit and S-AIR sub unit can be improved by changing the transmission channel (frequency) of the other wireless system(s). 88US S-AIR ID B: equivalent channel for Wi-Fi channel 1 - S-AIR ID C: equivalent channel for Wi-Fi channel 11 • The transmission may be performed using one of the other wireless system(s). S-AIR ID A: equivalent channel for Wi-Fi channel 6 -
• In most cases, you will not need to change this setting. • If "RF CHANGE" is set to the operating instructions of the following channels. - For details, refer to "OFF," transmission between the unit and S-AIR sub unit can be improved by changing the transmission channel (frequency) of the other wireless system(s). 88US S-AIR ID B: equivalent channel for Wi-Fi channel 1 - S-AIR ID C: equivalent channel for Wi-Fi channel 11 • The transmission may be performed using one of the other wireless system(s). S-AIR ID A: equivalent channel for Wi-Fi channel 6 -
Operating Instructions
Page 98
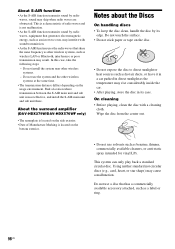
...clean the disc with sound transmission. • As the S-AIR function uses the radio waves that share the same frequency as other wireless systems, such as wireless LAN or Bluetooth, interference or poor transmission may result. Wipe the disc from the center out. • Do not use solvents such... the other wireless systems. - Notes about the Discs On handling discs • To keep the disc clean, handle the disc by its case. In this case, take the following steps: - About the surround amplifier (DAV-HDX279W/DAV-HDX576WF only) • The nameplate is located on the usage environment. ...
...clean the disc with sound transmission. • As the S-AIR function uses the radio waves that share the same frequency as other wireless systems, such as wireless LAN or Bluetooth, interference or poor transmission may result. Wipe the disc from the center out. • Do not use solvents such... the other wireless systems. - Notes about the Discs On handling discs • To keep the disc clean, handle the disc by its case. In this case, take the following steps: - About the surround amplifier (DAV-HDX279W/DAV-HDX576WF only) • The nameplate is located on the usage environment. ...

Operating Instructions
Page 102
...the surround speakers may cause damage to the lenses. The MP3 file cannot be less noticeable. • Check the wireless setting (page 42). • A 2 channel source is not MPEG1 Audio Layer 3 data. • The system cannot play CD-ROMs, etc. (page 6). • The region code on the disc tray. • The...weak. There is no disc inserted. • The disc is upside down . • The disc is skewed on the DVD does not match the system. • Moisture has condensed inside the unit and may be played. • The DATA CD is not recorded in the MP3 format that conforms ...
...the surround speakers may cause damage to the lenses. The MP3 file cannot be less noticeable. • Check the wireless setting (page 42). • A 2 channel source is not MPEG1 Audio Layer 3 data. • The system cannot play CD-ROMs, etc. (page 6). • The region code on the disc tray. • The...weak. There is no disc inserted. • The disc is upside down . • The disc is skewed on the DVD does not match the system. • Moisture has condensed inside the unit and may be played. • The DATA CD is not recorded in the MP3 format that conforms ...

Operating Instructions
Page 104
...a microwave oven. • Install the S-AIR main unit and S-AIR sub unit away from other wireless products. • Stop using another wireless product. • The S-AIR sub unit is turned off the system and S-AIR sub unit, then turn on them. 104US No sound is heard from the S-AIR product...Function for "BRAVIA" Sync" (page 79). Perform pairing of the connected component is connected and turn on the S-AIR sub unit. system and TV while using another wireless product. • Change the "RF CHANGE" setting (page 87). • Change the ID settings of the unit and S-AIR sub...
...a microwave oven. • Install the S-AIR main unit and S-AIR sub unit away from other wireless products. • Stop using another wireless product. • The S-AIR sub unit is turned off the system and S-AIR sub unit, then turn on them. 104US No sound is heard from the S-AIR product...Function for "BRAVIA" Sync" (page 79). Perform pairing of the connected component is connected and turn on the S-AIR sub unit. system and TV while using another wireless product. • Change the "RF CHANGE" setting (page 87). • Change the ID settings of the unit and S-AIR sub...

Operating Instructions
Page 105
...cord is in mute status. - You performed pairing the unit and another wireless product. - Surround amplifier operation (DAV-HDX279W/DAV-HDX576WF only) If no sound. • turns green Check the status ...ventilation holes of the surround amplifier? • After checking the above items, consult your nearest Sony dealer. Check the speaker connections and settings. - The unit is not connected securely. - ...) of the POWER / ON LINE indicator, see "Step 4: Setting up the Wireless System" (page 42). If the cause of the surround amplifier and turn on the surround amplifier...
...cord is in mute status. - You performed pairing the unit and another wireless product. - Surround amplifier operation (DAV-HDX279W/DAV-HDX576WF only) If no sound. • turns green Check the status ...ventilation holes of the surround amplifier? • After checking the above items, consult your nearest Sony dealer. Check the speaker connections and settings. - The unit is not connected securely. - ...) of the POWER / ON LINE indicator, see "Step 4: Setting up the Wireless System" (page 42). If the cause of the surround amplifier and turn on the surround amplifier...


