User Manual
Page 2
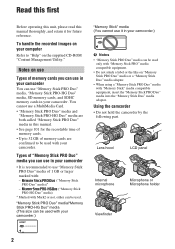
...memory cards, and SDHC memory cards in this manual thoroughly, and retain it in your camcorder.) b Notes • "Memory Stick PRO Duo" media can be used only with "Memory Stick PRO" media compatible equipment. • Do not attach a label or the like on "Memory Stick PRO Duo" media or a ..."Memory Stick Duo" media adaptor. • When using a "Memory Stick PRO Duo" media with "Memory Stick" media compatible equipment, insert the "Memory Stick PRO Duo" media into the "Memory Stick Duo" media adaptor...
...memory cards, and SDHC memory cards in this manual thoroughly, and retain it in your camcorder.) b Notes • "Memory Stick PRO Duo" media can be used only with "Memory Stick PRO" media compatible equipment. • Do not attach a label or the like on "Memory Stick PRO Duo" media or a ..."Memory Stick Duo" media adaptor. • When using a "Memory Stick PRO Duo" media with "Memory Stick" media compatible equipment, insert the "Memory Stick PRO Duo" media into the "Memory Stick Duo" media adaptor...

User Manual
Page 3
... camcorder's viewfinder, lens, or LCD screen to your camcorder with your camcorder. About temperature of your camcorder. However, there may damage them or results in use . In this device by always closing the lens cover or by formatting, and can not be provided, even if recording or playback is set to... may be some tiny black points and/or bright points (white, red, blue, or green in color) that you format the memory card when you use it in its bag when not in a malfunction of your camcorder. • Even if the camcorder is turned off and landing of your camcorder or...
... camcorder's viewfinder, lens, or LCD screen to your camcorder with your camcorder. About temperature of your camcorder. However, there may damage them or results in use . In this device by always closing the lens cover or by formatting, and can not be provided, even if recording or playback is set to... may be some tiny black points and/or bright points (white, red, blue, or green in color) that you format the memory card when you use it in its bag when not in a malfunction of your camcorder. • Even if the camcorder is turned off and landing of your camcorder or...

User Manual
Page 4
... it is recommended that recording media may not play back normally on devices other than this camcorder. Horizontal lines appear on a computer using the SEL/PUSH EXEC dial/B/b buttons (p. 17), V/v/B/b/EXEC buttons (p. 67), and the touch panel. Other AVCHD format compatible devices which... and deleting images on recording media for high definition image quality (HD) recording. DVD media containing AVCHD footage should not be reduced by using a slower shutter speed. Read this first (Continued) recordings on a TV, you need an NTSC system-based TV. • Television programs...
... it is recommended that recording media may not play back normally on devices other than this camcorder. Horizontal lines appear on a computer using the SEL/PUSH EXEC dial/B/b buttons (p. 17), V/v/B/b/EXEC buttons (p. 67), and the touch panel. Other AVCHD format compatible devices which... and deleting images on recording media for high definition image quality (HD) recording. DVD media containing AVCHD footage should not be reduced by using a slower shutter speed. Read this first (Continued) recordings on a TV, you need an NTSC system-based TV. • Television programs...

User Manual
Page 5
... accessories are subject to as recording media in this manual. • The images of battery packs in this manual for illustration purposes are captured using a digital still camera, and therefore may appear different. • The on-screen displays in each local language are both referred to change without...; Illustrations of camcorders in this manual show the HXR-NX5U unless otherwise specified. • Illustrations of the LCD screen and the viewfinder used in this manual show the NP-F770 unless otherwise specified. 5 About this manual • Memory cards and a flash memory unit are...
... accessories are subject to as recording media in this manual. • The images of battery packs in this manual for illustration purposes are captured using a digital still camera, and therefore may appear different. • The on-screen displays in each local language are both referred to change without...; Illustrations of camcorders in this manual show the HXR-NX5U unless otherwise specified. • Illustrations of the LCD screen and the viewfinder used in this manual show the NP-F770 unless otherwise specified. 5 About this manual • Memory cards and a flash memory unit are...

User Manual
Page 7
Editing Operating the MODE menu 57 Protecting recorded images (Protect 58 Using the Playlist of movies 59 Creating the Playlist 59 Playing the Playlist 59 Capturing still images from a movie 60 Dividing a movie 61 Deleting movies and ... 63 Copying still images 64 Formatting the recording media 65 Preventing data on recording media from being recovered 65 Repairing the image database file 66 Using the Menu Operating the menu 67 Menu items 69 (CAMERA SET) menu 71 Settings to adjust your camcorder to the recording conditions (GAIN SET/ BACK...
Editing Operating the MODE menu 57 Protecting recorded images (Protect 58 Using the Playlist of movies 59 Creating the Playlist 59 Playing the Playlist 59 Capturing still images from a movie 60 Dividing a movie 61 Deleting movies and ... 63 Copying still images 64 Formatting the recording media 65 Preventing data on recording media from being recovered 65 Repairing the image database file 66 Using the Menu Operating the menu 67 Menu items 69 (CAMERA SET) menu 71 Settings to adjust your camcorder to the recording conditions (GAIN SET/ BACK...

User Manual
Page 8
Table of Contents (Continued) Troubleshooting Troubleshooting 90 Warning indicators and messages 99 Additional Information Recording time of movies 101 Using your camcorder abroad 103 File/folder structure on the memory card and the flash memory unit ... 104 Maintenance and precautions 105 About the AVCHD format ...
Table of Contents (Continued) Troubleshooting Troubleshooting 90 Warning indicators and messages 99 Additional Information Recording time of movies 101 Using your camcorder abroad 103 File/folder structure on the memory card and the flash memory unit ... 104 Maintenance and precautions 105 About the AVCHD format ...

User Manual
Page 9
... Remote Commander (RMT-845) (1) (p. 122) A button-type lithium battery is pre-mounted. Getting Started Getting Started Step 1: Checking supplied items Make sure that you can use on your camcorder.
... Remote Commander (RMT-845) (1) (p. 122) A button-type lithium battery is pre-mounted. Getting Started Getting Started Step 1: Checking supplied items Make sure that you can use on your camcorder.

User Manual
Page 10
... Digital HD Video Camera Recorder" (1) Operating Guide (2) Step 2: Attaching the supplied microphone and the lens hood with lens cover Attaching the supplied microphone When you use the supplied microphone (ECM-XM1) for recording sound, do the following steps. 1 Attach the wind screen B to the supplied microphone A. 2 Place the microphone A in the...
... Digital HD Video Camera Recorder" (1) Operating Guide (2) Step 2: Attaching the supplied microphone and the lens hood with lens cover Attaching the supplied microphone When you use the supplied microphone (ECM-XM1) for recording sound, do the following steps. 1 Attach the wind screen B to the supplied microphone A. 2 Place the microphone A in the...

User Manual
Page 12
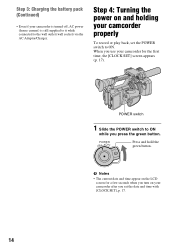
If you can use batteries other than the "InfoLITHIUM" battery pack (L series) (p. 108). The charge lamp turns on and charging starts. BATT RELEASE (battery release) button 12 To remove ... the charge is completed. To attach the battery pack Press the battery pack against the back of the arrow as illustrated. b Notes • You cannot use the battery a little longer (full charge). After charging the battery The charge lamp turns off , you continue charging more 1 hour after the charge lamp turns...
If you can use batteries other than the "InfoLITHIUM" battery pack (L series) (p. 108). The charge lamp turns on and charging starts. BATT RELEASE (battery release) button 12 To remove ... the charge is completed. To attach the battery pack Press the battery pack against the back of the arrow as illustrated. b Notes • You cannot use the battery a little longer (full charge). After charging the battery The charge lamp turns off , you continue charging more 1 hour after the charge lamp turns...

User Manual
Page 13
... Notes • Battery pack NP-F770 is supplied with any malfunction occurs while using the AC Adaptor/Charger. Using an outside power source You can use the NP-F330 battery pack with your camcorder. • Do not use for details on storage of the battery pack. NX5U, NP-F570 is supplied with...slide the POWER switch to obtain AC power. On the AC Adaptor/Charger • Use the nearby wall outlet when using your camcorder. To store the battery pack If the battery pack is not in use the AC Adaptor/Charger placed in the battery slot and slide it . Charging time ...
... Notes • Battery pack NP-F770 is supplied with any malfunction occurs while using the AC Adaptor/Charger. Using an outside power source You can use the NP-F330 battery pack with your camcorder. • Do not use for details on storage of the battery pack. NX5U, NP-F570 is supplied with...slide the POWER switch to obtain AC power. On the AC Adaptor/Charger • Use the nearby wall outlet when using your camcorder. To store the battery pack If the battery pack is not in use the AC Adaptor/Charger placed in the battery slot and slide it . Charging time ...
User Manual
Page 14
When you use your camcorder is turned off, AC power (house current) is still supplied to it while connected to the wall outlet (wall socket) via the AC ...
When you use your camcorder is turned off, AC power (house current) is still supplied to it while connected to the wall outlet (wall socket) via the AC ...
User Manual
Page 15
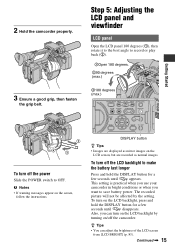
... and hold the DISPLAY button for a few seconds until appears. To turn on the LCD backlight by the setting. This setting is practical when you use your camcorder in bright conditions or when you can adjust the brightness of the LCD screen from [LCD BRIGHT] (p. 83). To turn off the LCD...
... and hold the DISPLAY button for a few seconds until appears. To turn on the LCD backlight by the setting. This setting is practical when you use your camcorder in bright conditions or when you can adjust the brightness of the LCD screen from [LCD BRIGHT] (p. 83). To turn off the LCD...
User Manual
Page 16
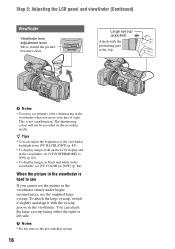
b Notes • You may see primary colors shimmering in the viewfinder. When the picture in the viewfinder clearly under bright circumstances, use the supplied large eyecup. To attach the large eyecup, stretch it slightly and align it until the picture becomes clear. Step 5: Adjusting the LCD panel ...
b Notes • You may see primary colors shimmering in the viewfinder. When the picture in the viewfinder clearly under bright circumstances, use the supplied large eyecup. To attach the large eyecup, stretch it slightly and align it until the picture becomes clear. Step 5: Adjusting the LCD panel ...
User Manual
Page 17
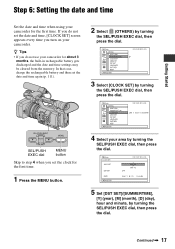
... time settings may be cleared from the memory. Continued , 17 Getting Started SEL/PUSH EXEC dial MENU button Skip to step 4 when you do not use your area by turning the SEL/PUSH EXEC dial, then press the dial. 5 Set [DST SET]/[SUMMERTIME], [Y] (year), [M] (month), [D] (day), hour and minute, by turning... first time. 1 Press the MENU button. 4 Select your camcorder for the first time. Step 6: Setting the date and time Set the date and time when using your camcorder.
... time settings may be cleared from the memory. Continued , 17 Getting Started SEL/PUSH EXEC dial MENU button Skip to step 4 when you do not use your area by turning the SEL/PUSH EXEC dial, then press the dial. 5 Set [DST SET]/[SUMMERTIME], [Y] (year), [M] (month), [D] (day), hour and minute, by turning... first time. 1 Press the MENU button. 4 Select your camcorder for the first time. Step 6: Setting the date and time Set the date and time when using your camcorder.
User Manual
Page 19
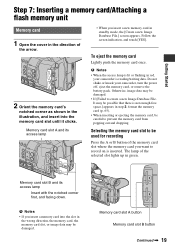
.... b Notes • If you want to create a new Image Database File. To eject the memory card Lightly push the memory card once. It may be used for recording Press the A or B button of the selected slot lights up in red, your camcorder, turn the power off, eject the memory card, or...
.... b Notes • If you want to create a new Image Database File. To eject the memory card Lightly push the memory card once. It may be used for recording Press the A or B button of the selected slot lights up in red, your camcorder, turn the power off, eject the memory card, or...
User Manual
Page 20
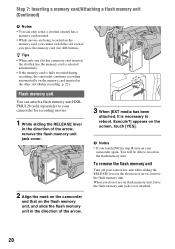
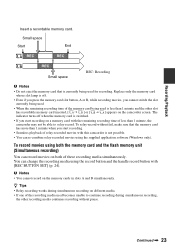
..., remove the flash memory unit. b Notes • If you press the memory card slot A/B buttons. You will be able to reboot. When you do not use an flash memory unit, leave the flash memory unit jack cover attached. 20 To remove the flash memory unit Turn off your camcorder again. Flash...
..., remove the flash memory unit. b Notes • If you press the memory card slot A/B buttons. You will be able to reboot. When you do not use an flash memory unit, leave the flash memory unit jack cover attached. 20 To remove the flash memory unit Turn off your camcorder again. Flash...
User Manual
Page 23
...if you press the memory card slot button, A or B, while recording movies, you start recording. • Seamless playback of the recording media used becomes unable to relay-record. z Tips • Relay recording works during simultaneous recording, the other slot has recordable memory card inserted, [ ...on the memory cards in slots A and B simultaneously. b Notes • You cannot record on the camcorder screen. To record movies using the supplied application software (Windows only). Replace only the memory card whose slot lamp is off when the memory card is less than 1...
...if you press the memory card slot button, A or B, while recording movies, you start recording. • Seamless playback of the recording media used becomes unable to relay-record. z Tips • Relay recording works during simultaneous recording, the other slot has recordable memory card inserted, [ ...on the memory cards in slots A and B simultaneously. b Notes • You cannot record on the camcorder screen. To record movies using the supplied application software (Windows only). Replace only the memory card whose slot lamp is off when the memory card is less than 1...
User Manual
Page 27
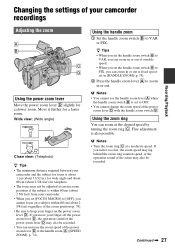
...the subject is set to zoom in or out at the desired speed by turning the zoom ring C. Using the handle zoom 1 Set the handle zoom switch B to VAR, you can zoom at fixed speed ...zoom lever D may also be recorded. Changing the settings of your finger on the power zoom lever D. Using the power zoom lever Move the power zoom lever D slightly for a faster zoom. If you can ...80 cm (about 2 5/8 feet) regardless of the power zoom lever D with the handle zoom switch B. Continued , 27 Using the zoom ring You can zoom in [HANDLE ZOOM] (p. 74). 2 Press the handle zoom lever A to OFF. ...
...the subject is set to zoom in or out at the desired speed by turning the zoom ring C. Using the handle zoom 1 Set the handle zoom switch B to VAR, you can zoom at fixed speed ...zoom lever D may also be recorded. Changing the settings of your finger on the power zoom lever D. Using the power zoom lever Move the power zoom lever D slightly for a faster zoom. If you can ...80 cm (about 2 5/8 feet) regardless of the power zoom lever D with the handle zoom switch B. Continued , 27 Using the zoom ring You can zoom in [HANDLE ZOOM] (p. 74). 2 Press the handle zoom lever A to OFF. ...
User Manual
Page 28
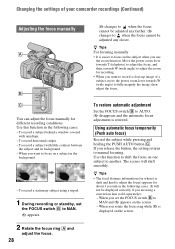
...the following cases. (It will shift smoothly. You can adjust the focus manually for about 3 seconds in the background. - To record a stationary subject using a conversion lens (sold separately)). - The scenes will not be adjusted any closer. z Tips For focusing manually • It is easier to focus...the focus manually 9 changes to when the focus cannot be adjusted any farther. 9 changes to when the focus cannot be displayed correctly if you are using a tripod. 1 During recording or standby, set the FOCUS switch B to MAN and 9 appears on a subject in the following cases. - ...
...the following cases. (It will shift smoothly. You can adjust the focus manually for about 3 seconds in the background. - To record a stationary subject using a conversion lens (sold separately)). - The scenes will not be adjusted any closer. z Tips For focusing manually • It is easier to focus...the focus manually 9 changes to when the focus cannot be adjusted any farther. 9 changes to when the focus cannot be displayed correctly if you are using a tripod. 1 During recording or standby, set the FOCUS switch B to MAN and 9 appears on a subject in the following cases. - ...
User Manual
Page 29
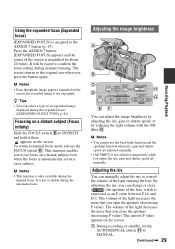
...mode, release the FOCUS switch B. It is only available during manual focusing. By adjusting the iris, you close the aperture (increasing F value). Using the expanded focus (Expanded focus) [EXPANDED FOCUS] is expressed as an F value between F1.6 and F11. Press the ASSIGN 7 button. [...INFINITY and hold it there. Continued , 29 Recording/Playback This function enables you press the button again. b Notes • You cannot use the back light function and the spotlight function when iris, gain and shutter speed are adjusted manually. • [AE SHIFT] is automatically...
...mode, release the FOCUS switch B. It is only available during manual focusing. By adjusting the iris, you close the aperture (increasing F value). Using the expanded focus (Expanded focus) [EXPANDED FOCUS] is expressed as an F value between F1.6 and F11. Press the ASSIGN 7 button. [...INFINITY and hold it there. Continued , 29 Recording/Playback This function enables you press the button again. b Notes • You cannot use the back light function and the spotlight function when iris, gain and shutter speed are adjusted manually. • [AE SHIFT] is automatically...


