

Operating Instructions
Page 2
... relocate the receiving antenna. s The plug is subject to comply with the limits for several days, disconnect the power by one way. CAUTION Use the following WALL-MOUNT BRACKET or TV-stand. KDL-40S4100 KDL-46S4100 KDL-52S4100 Sony Wall-Mount Bracket Model No. Antenna grounding according to the National Electrical Code, ANSI/NFPA 70 Ground clamps...
... relocate the receiving antenna. s The plug is subject to comply with the limits for several days, disconnect the power by one way. CAUTION Use the following WALL-MOUNT BRACKET or TV-stand. KDL-40S4100 KDL-46S4100 KDL-52S4100 Sony Wall-Mount Bracket Model No. Antenna grounding according to the National Electrical Code, ANSI/NFPA 70 Ground clamps...

Operating Instructions
Page 3
Manufactured under license from tip-over. 13) Unplug this TV (i.e. are provided for replacement of the obsolete outlet. 10) Protect the power cord from being walked on or pinched particularly at plugs, convenience receptacles, and the point where they exit ... of HDMI Licensing LLC. Trademark Information Macintosh is a trademark. Dolby and the double-D symbol are trademarks or registered trademarks of Sony Computer Entertainment Inc. "BRAVIA", and Sony Corporation. Install in the U.S. A grounding type plug has two blades and a third grounding prong. HDMI, the HDMI logo ...
Manufactured under license from tip-over. 13) Unplug this TV (i.e. are provided for replacement of the obsolete outlet. 10) Protect the power cord from being walked on or pinched particularly at plugs, convenience receptacles, and the point where they exit ... of HDMI Licensing LLC. Trademark Information Macintosh is a trademark. Dolby and the double-D symbol are trademarks or registered trademarks of Sony Computer Entertainment Inc. "BRAVIA", and Sony Corporation. Install in the U.S. A grounding type plug has two blades and a third grounding prong. HDMI, the HDMI logo ...
Operating Instructions
Page 4
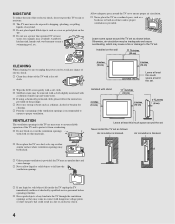
...may be inadequate and cause overheating, which may be blocked. s Never place the TV on the TV. s If any kind into the ventilation openings. for cleaning. Leave some space around the TV set to proper ventilation. s Wipe the LCD screen gently with a dry soft cloth. 4 inches (10 cm) 4 inches ... inches (30 cm) CLEANING When cleaning, be exposed to avoid any kind. s Never use a power line operated TV set near a swimming pool, etc. Air circulation is provided, the TV may be removed with a cloth slightly moistened with dangerous voltage points or short out parts that could result...
...may be inadequate and cause overheating, which may be blocked. s Never place the TV on the TV. s If any kind into the ventilation openings. for cleaning. Leave some space around the TV set to proper ventilation. s Wipe the LCD screen gently with a dry soft cloth. 4 inches (10 cm) 4 inches ... inches (30 cm) CLEANING When cleaning, be exposed to avoid any kind. s Never use a power line operated TV set near a swimming pool, etc. Air circulation is provided, the TV may be removed with a cloth slightly moistened with dangerous voltage points or short out parts that could result...

Operating Instructions
Page 5
...side. s Never install the TV on the LCD panel. s Do not install the TV on or play with furniture and TV sets. s Care should be installed near a radiator or a heating vent. The TV may cause the TV to fall down and cause injury. Magnetic influence s This TV contains a strong magnet in such... bump your hands or fingers do not squeeze the front panel or recessed area. Prevent the TV from toppling over Take measures to follow these guidelines: s Before carrying the TV, disconnect all AC power cords and connecting cables so that can cause deformation of the enclosure and/or cause...
...side. s Never install the TV on the LCD panel. s Do not install the TV on or play with furniture and TV sets. s Care should be installed near a radiator or a heating vent. The TV may cause the TV to fall down and cause injury. Magnetic influence s This TV contains a strong magnet in such... bump your hands or fingers do not squeeze the front panel or recessed area. Prevent the TV from toppling over Take measures to follow these guidelines: s Before carrying the TV, disconnect all AC power cords and connecting cables so that can cause deformation of the enclosure and/or cause...

Operating Instructions
Page 6
...installation or removal from the TV. s Do not hang the TV from heat sources. s Insert the plug fully into the outlet. This will completely remove power from the Wall-Mount Bracket, the TV may fall and cause serious injury. s Use only an original Sony AC power cord with the same or... equivalent type of time, the AC power cord should never be connected to your TV. Unplugging the AC power cord from the wall ...
...installation or removal from the TV. s Do not hang the TV from heat sources. s Insert the plug fully into the outlet. This will completely remove power from the Wall-Mount Bracket, the TV may fall and cause serious injury. s Use only an original Sony AC power cord with the same or... equivalent type of time, the AC power cord should never be connected to your TV. Unplugging the AC power cord from the wall ...

Operating Instructions
Page 7
... damaged or if the TV is safe to service the TV yourself since opening the cabinet may have unplugged the AC power cord. s Do not attempt to operate. s If replacement parts are displayed continuously. These phenomena improve as specified by Sony and to crack, break or scatter. s The LCD screen is made with the same...
... damaged or if the TV is safe to service the TV yourself since opening the cabinet may have unplugged the AC power cord. s Do not attempt to operate. s If replacement parts are displayed continuously. These phenomena improve as specified by Sony and to crack, break or scatter. s The LCD screen is made with the same...

Operating Instructions
Page 12
Screw If an electric screwdriver is used, set the torque to the Table-Top Stand. Rear of the Table-Top Stand and align the screw holes. Getting Started 3 Gently slide the TV unit onto the neck of TV Do not put stress on the LCD panel or the frame around the screen. Be careful not to pinch your hands or the AC power cord when you install the TV to the Table-Top Stand. 4 Use the supplied screws to attach the TV unit to tighten at approximately 1.5 N·m {15 kgf·cm}. 12
Screw If an electric screwdriver is used, set the torque to the Table-Top Stand. Rear of the Table-Top Stand and align the screw holes. Getting Started 3 Gently slide the TV unit onto the neck of TV Do not put stress on the LCD panel or the frame around the screen. Be careful not to pinch your hands or the AC power cord when you install the TV to the Table-Top Stand. 4 Use the supplied screws to attach the TV unit to tighten at approximately 1.5 N·m {15 kgf·cm}. 12

Operating Instructions
Page 18
.... * Manufactured under license from Dolby Laboratories. For some Apple Macintosh computers, it may be displayed. qa AC IN Connects the supplied AC power cord. Dolby and the double-D symbol are connected. If the picture is noisy, flickering or not clear, adjust the Phase and Pitch of... on your camcorder or other video equipment that is PCM/Dolby digital compatible. 0 AUDIO OUT L-AUDIO-R (FIX) Connect to the left side panel of the TV. 4 COMPONENT IN 1/2 (1080p/ 1080i/720p/ 480p/480i)/ L-AUDIO-R Connect to your DVD player's or digital set-top box's component video (YPBPR) ...
.... * Manufactured under license from Dolby Laboratories. For some Apple Macintosh computers, it may be displayed. qa AC IN Connects the supplied AC power cord. Dolby and the double-D symbol are connected. If the picture is noisy, flickering or not clear, adjust the Phase and Pitch of... on your camcorder or other video equipment that is PCM/Dolby digital compatible. 0 AUDIO OUT L-AUDIO-R (FIX) Connect to the left side panel of the TV. 4 COMPONENT IN 1/2 (1080p/ 1080i/720p/ 480p/480i)/ L-AUDIO-R Connect to your DVD player's or digital set-top box's component video (YPBPR) ...

Operating Instructions
Page 19
... ❑ Route all AC power cords and connecting cables so that can adequately support the weight of the TV. Recommended Measures to secure the stand. Use two angle braces (not supplied) to Secure the TV 1 Secure the Stand for the TV. Angle brace Stand (Continued)...or even death. Use a Sony TV Stand Use a Sony specified TV stand (see page 2) and follow the instruction manual provided with the Sony TV stand. Getting Started Getting Started Securing the TV Sony strongly recommends taking measures to prevent the TV from Toppling ❑ Secure the TV to a wall and/or ...
... ❑ Route all AC power cords and connecting cables so that can adequately support the weight of the TV. Recommended Measures to secure the stand. Use two angle braces (not supplied) to Secure the TV 1 Secure the Stand for the TV. Angle brace Stand (Continued)...or even death. Use a Sony TV Stand Use a Sony specified TV stand (see page 2) and follow the instruction manual provided with the Sony TV stand. Getting Started Getting Started Securing the TV Sony strongly recommends taking measures to prevent the TV from Toppling ❑ Secure the TV to a wall and/or ...

Operating Instructions
Page 21
Getting Started Getting Started Bundling the Connecting Cables You can bundle the connecting cables with other connecting cables. 21 KDL-40/46S4100 KDL-52S4100 Do not bundle the AC power cord with the supplied cable band as illustrated below.
Getting Started Getting Started Bundling the Connecting Cables You can bundle the connecting cables with other connecting cables. 21 KDL-40/46S4100 KDL-52S4100 Do not bundle the AC power cord with the supplied cable band as illustrated below.
Operating Instructions
Page 22
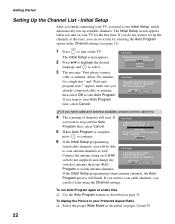
...The Initial Setup screen appears. 2 Press V/v to highlight the desired language and to search antenna channels. Initial Setup Please select your TV, you can do it later by selecting the Auto Program option in your Preferred Aspect Ratio ❑ Select the proper Wide Mode ...completion. Initial Setup After you finish connecting your language: English Español Français Initial Setup First please connect cable or antenna. POWER 1 Press to continue. 6 If the Initial Setup programming Initial Setup Analog Channels Found: 0 Digital Channels Found: 0 Searching... If you ...
...The Initial Setup screen appears. 2 Press V/v to highlight the desired language and to search antenna channels. Initial Setup Please select your TV, you can do it later by selecting the Auto Program option in your Preferred Aspect Ratio ❑ Select the proper Wide Mode ...completion. Initial Setup After you finish connecting your language: English Español Français Initial Setup First please connect cable or antenna. POWER 1 Press to continue. 6 If the Initial Setup programming Initial Setup Analog Channels Found: 0 Digital Channels Found: 0 Searching... If you ...

Operating Instructions
Page 24
Press repeatedly to turn on and off the TV. Changing the Wide Screen Mode for PC Timing Incoming PC signal Incoming PC signal 800 × 600 1280 × 768 m Normal m Normal Full 1 Full 1 Full 2 ... Zoom Normal Full Zoom m Wide Zoom Normal This mode is not available when you are watching a 720p, 1080i or 1080p source. Basic Operations Button qa POWER qa qs WIDE qs Description Press to step through the Wide Mode settings: Wide Zoom, Normal, Full, and Zoom. Full Zoom Normal is not available.
Press repeatedly to turn on and off the TV. Changing the Wide Screen Mode for PC Timing Incoming PC signal Incoming PC signal 800 × 600 1280 × 768 m Normal m Normal Full 1 Full 1 Full 2 ... Zoom Normal Full Zoom m Wide Zoom Normal This mode is not available when you are watching a 720p, 1080i or 1080p source. Basic Operations Button qa POWER qa qs WIDE qs Description Press to step through the Wide Mode settings: Wide Zoom, Normal, Full, and Zoom. Full Zoom Normal is not available.

Operating Instructions
Page 26
... LED Press to scan through channels, press and hold down buttons. Lights up in red when your TV is in PC power saving mode. 8 POWER LED 9 (IR) Infrared Receiver Lights up in green when the TV is turned on. Use it as confirming the selection or setting. 3 - VOLUME + Press to... toggle through the inputs. Press to turn on and off before unplugging the power cord. 26 The CHANNEL + button has a tactile dot. Make sure that the TV is completely switched off the TV. Inputs can be changed by pressing V/v and displayed. To scan quickly through channels. In the...
... LED Press to scan through channels, press and hold down buttons. Lights up in red when your TV is in PC power saving mode. 8 POWER LED 9 (IR) Infrared Receiver Lights up in green when the TV is turned on. Use it as confirming the selection or setting. 3 - VOLUME + Press to... toggle through the inputs. Press to turn on and off before unplugging the power cord. 26 The CHANNEL + button has a tactile dot. Make sure that the TV is completely switched off the TV. Inputs can be changed by pressing V/v and displayed. To scan quickly through channels. In the...

Operating Instructions
Page 30
... mode when there is not VESA-compliant. 30 Option Wide Mode Auto Adjustment Phase Pitch Horizontal Center Vertical Center Power Management Description Normal Select to fill the display area, keeping its original aspect ratio. Full1 Select to enlarge the picture to ...PC PC Settings Settings screen appears instead of the picture when the TV receives an input signal from Wide Mode Auto Adjustment Phase Pitch Horizontal Center Vertical Center Power Management Normal 0 0 0 0 On TOOLS button (see page 41. Power Management is no signal input for 30 seconds. Select to turn off...
... mode when there is not VESA-compliant. 30 Option Wide Mode Auto Adjustment Phase Pitch Horizontal Center Vertical Center Power Management Description Normal Select to fill the display area, keeping its original aspect ratio. Full1 Select to enlarge the picture to ...PC PC Settings Settings screen appears instead of the picture when the TV receives an input signal from Wide Mode Auto Adjustment Phase Pitch Horizontal Center Vertical Center Power Management Normal 0 0 0 0 On TOOLS button (see page 41. Power Management is no signal input for 30 seconds. Select to turn off...
Operating Instructions
Page 35
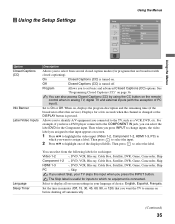
...is changed or the DISPLAY button is turned on before shutting off . Select to display all on the remote control when in analog TV, digital TV and external inputs (with closed caption modes (for programs that are broadcast with the exception of PC input). You can also access...you to set basic and advanced Closed Captions (CC) options. Using the Setup Settings Using the Menus Setup TV Closed Captions (CC) Info Banner Label Video Inputs Language Sleep Timer Power Saving Product Information CineMotion Off On English Off Off Off Using the Menus Option Closed Captions (CC) Info ...
...is changed or the DISPLAY button is turned on before shutting off . Select to display all on the remote control when in analog TV, digital TV and external inputs (with closed caption modes (for programs that are broadcast with the exception of PC input). You can also access...you to set basic and advanced Closed Captions (CC) options. Using the Setup Settings Using the Menus Setup TV Closed Captions (CC) Info Banner Label Video Inputs Language Sleep Timer Power Saving Product Information CineMotion Off On English Off Off Off Using the Menus Option Closed Captions (CC) Info ...

Operating Instructions
Page 36
... to display the equipment information of a program. (Should be set digital closed caption options. Advanced Settings Allows you can also access Power Saving by adjusting the backlight brightness. Select from the available options. CC1, CC2, CC3, CC4 Displays a printed version of the dialogue... or sound effects of your TV. Select from Off, Low and High. You can change the following settings: Character Style Style 1-7 Character Color Color 1-8 Character Size Small...
... to display the equipment information of a program. (Should be set digital closed caption options. Advanced Settings Allows you can also access Power Saving by adjusting the backlight brightness. Select from the available options. CC1, CC2, CC3, CC4 Displays a printed version of the dialogue... or sound effects of your TV. Select from Off, Low and High. You can change the following settings: Character Style Style 1-7 Character Color Color 1-8 Character Size Small...
Operating Instructions
Page 37
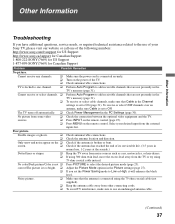
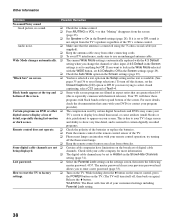
...over an antenna, make sure Cable is locked to one of its serviceable life. (3-5 years in the TV's memory (page 31). The TV turns off automatically. ❑ Check Power Management in the Picture settings (page 27). Only snow and noise appear on the remote control. Adjust ... if the antenna has reached the end of the following numbers: http://www.sony.com/tvsupport for US Support http://www.sony.ca/support for Canadian Support 1-800-222-SONY(7669) for US Support 1-877-899-SONY(7669) for Canadian Support Problem Possible Remedies No picture. Noisy picture. ❑...
...over an antenna, make sure Cable is locked to one of its serviceable life. (3-5 years in the TV's memory (page 31). The TV turns off automatically. ❑ Check Power Management in the Picture settings (page 27). Only snow and noise appear on the remote control. Adjust ... if the antenna has reached the end of the following numbers: http://www.sony.com/tvsupport for US Support http://www.sony.ca/support for Canadian Support 1-800-222-SONY(7669) for US Support 1-877-899-SONY(7669) for Canadian Support Problem Possible Remedies No picture. Noisy picture. ❑...
Operating Instructions
Page 38
...and no sound. ❑ Check the volume control. ❑ Press MUTING or VOL + so that "Muting" disappears from the TV's speakers regardless of the TV's volume control. Some digital cable channels are greater than usual, or cause artifacts (small blocks or detail, especially during fast-motion ...all of digital cable being displayed. channels. While holding down the V button on the remote control, press the POWER button on DVD or other connecting cords. ❑ To avoid TV interference, make sure to Hidden in the Show/Hide Channels setting (page 31). "Black box" on screen....
...and no sound. ❑ Check the volume control. ❑ Press MUTING or VOL + so that "Muting" disappears from the TV's speakers regardless of the TV's volume control. Some digital cable channels are greater than usual, or cause artifacts (small blocks or detail, especially during fast-motion ...all of digital cable being displayed. channels. While holding down the V button on the remote control, press the POWER button on DVD or other connecting cords. ❑ To avoid TV interference, make sure to Hidden in the Show/Hide Channels setting (page 31). "Black box" on screen....
Operating Instructions
Page 42
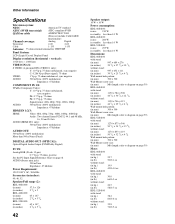
... on cable American TV standard ATSC compliant 8VSB ANSI/SCTE 07 2000 (Does not include CableCARD functionality) Channel coverage: Analog Digital Terrestrial 2-69 2-69 Cable 1-135 1-135 Antenna: 75-ohm external terminal for VHF/UHF Panel System: LCD (Liquid Crystal Display... 40, 46, 52 Speaker/Full range (2): KDL-40S4100: (in mm) 57.5 × 126 (in inches) 2 3/8 × 5 KDL-46S4100: (in mm) 65 × 147 (in inches) 2 5/8 × 5 7/8 KDL-52S4100: (in mm) (in inches) 65 × 147 2 5/8 × 5 7/8 42 Speaker output: 10 W + 10 W Power consumption: KDL-40S4100:...
... on cable American TV standard ATSC compliant 8VSB ANSI/SCTE 07 2000 (Does not include CableCARD functionality) Channel coverage: Analog Digital Terrestrial 2-69 2-69 Cable 1-135 1-135 Antenna: 75-ohm external terminal for VHF/UHF Panel System: LCD (Liquid Crystal Display... 40, 46, 52 Speaker/Full range (2): KDL-40S4100: (in mm) 57.5 × 126 (in inches) 2 3/8 × 5 KDL-46S4100: (in mm) 65 × 147 (in inches) 2 5/8 × 5 7/8 KDL-52S4100: (in mm) (in inches) 65 × 147 2 5/8 × 5 7/8 42 Speaker output: 10 W + 10 W Power consumption: KDL-40S4100:...

Operating Instructions
Page 43
Design and specifications are subject to change without notice. Supplied accessories: Remote control RM-YD025 (1) Size AA batteries (2) AC power cord (1) Table-Top Stand (1) (For KDL-40/46S4100) Screws (4) (For KDL-40/46S4100) Cable band (1) Operating Instructions (1) Quick Setup Guide (1) Warranty Card (1) Optional accessories: Connecting cables Support belt kit Wall-Mount Bracket: SU-WL500 TV-Stand: SU-FL71M (for KDL-40/46S4100), WS-S10LS (for KDL-40/46S4100) Optional accessories availability depends on its stock. Other Information Other Information 43
Design and specifications are subject to change without notice. Supplied accessories: Remote control RM-YD025 (1) Size AA batteries (2) AC power cord (1) Table-Top Stand (1) (For KDL-40/46S4100) Screws (4) (For KDL-40/46S4100) Cable band (1) Operating Instructions (1) Quick Setup Guide (1) Warranty Card (1) Optional accessories: Connecting cables Support belt kit Wall-Mount Bracket: SU-WL500 TV-Stand: SU-FL71M (for KDL-40/46S4100), WS-S10LS (for KDL-40/46S4100) Optional accessories availability depends on its stock. Other Information Other Information 43

