The Sony Guide to Home Theater
Page 11
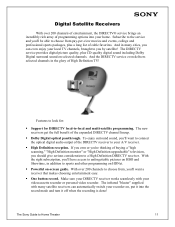
...DIRECTV® service brings an incredibly rich array of buying a "high scanning," "High Definition monitor" or "High Definition upgradeable" television, you should ...DIRECTV service provides digital picture quality, plus a long list of High Definition TV! To enjoy surround sound, you'll want a receiver that makes choosing...DIRECTV receiver to your A/V receiver. ƒ High Definition reception. The Sony Guide to sports and other programming on HDNet. ƒ Powerful on-screen...your recorder on, put it into the record mode and turn it off when the recording is done! Digital Satellite Receivers...
...DIRECTV® service brings an incredibly rich array of buying a "high scanning," "High Definition monitor" or "High Definition upgradeable" television, you should ...DIRECTV service provides digital picture quality, plus a long list of High Definition TV! To enjoy surround sound, you'll want a receiver that makes choosing...DIRECTV receiver to your A/V receiver. ƒ High Definition reception. The Sony Guide to sports and other programming on HDNet. ƒ Powerful on-screen...your recorder on, put it into the record mode and turn it off when the recording is done! Digital Satellite Receivers...

The Sony Guide to Home Theater
Page 49
...guide at the touch of full-quality sound. In both direct-view and projection television. No need for color TV broadcasting, adopted in S-Video and component connections. Memory Stick® media playback.... MID™ circuitry. In audio, noise takes the form of a video signal, abbreviated Y. Pan & Scan. A Sony feature that... frustrated engineers will tell you to turn pixels on a standard 4:3 screen. DIRECTV broadcasting that enables you it preserves the director's ...
...guide at the touch of full-quality sound. In both direct-view and projection television. No need for color TV broadcasting, adopted in S-Video and component connections. Memory Stick® media playback.... MID™ circuitry. In audio, noise takes the form of a video signal, abbreviated Y. Pan & Scan. A Sony feature that... frustrated engineers will tell you to turn pixels on a standard 4:3 screen. DIRECTV broadcasting that enables you it preserves the director's ...

Operating Instructions
Page 2
... from that to which can be permanently imprinted onto the screen. MODELS: KP-43HT20, KP-53HS20, KP-53HS30, KP61HS20, KP-61HS30 Please keep the brightness and contrast functions at a high brightness or ...15 of the FCC rules. 2 Note on convergence adjustment Before you use your projection TV, or viewing a TV station whose logo always stays on a circuit different from the broadcaster/cable company ... reasonable protection against harmful interference in accordance with the instructions, may be determined by turning the equipment off and on, the user is left on the screen for help....
... from that to which can be permanently imprinted onto the screen. MODELS: KP-43HT20, KP-53HS20, KP-53HS30, KP61HS20, KP-61HS30 Please keep the brightness and contrast functions at a high brightness or ...15 of the FCC rules. 2 Note on convergence adjustment Before you use your projection TV, or viewing a TV station whose logo always stays on a circuit different from the broadcaster/cable company ... reasonable protection against harmful interference in accordance with the instructions, may be determined by turning the equipment off and on, the user is left on the screen for help....

Operating Instructions
Page 3
...down from the ceiling or to insert the plug fully into the wall outlet only one way. As an ENERGY STAR® Partner, Sony Corporation has determined that face the screen with the TruSurround technology. BBE and BBE Symbol are trademarks of SRS Labs, Inc. and ... call upon your dealer. ❑ If any liquid or solid object should fall inside the cabinet, unplug the projection TV immediately and have it checked by qualified service personnel before turning on the projection TV. ❑ To obtain the best picture, do not block the ventilation openings. ❑ Do not install the...
...down from the ceiling or to insert the plug fully into the wall outlet only one way. As an ENERGY STAR® Partner, Sony Corporation has determined that face the screen with the TruSurround technology. BBE and BBE Symbol are trademarks of SRS Labs, Inc. and ... call upon your dealer. ❑ If any liquid or solid object should fall inside the cabinet, unplug the projection TV immediately and have it checked by qualified service personnel before turning on the projection TV. ❑ To obtain the best picture, do not block the ventilation openings. ❑ Do not install the...

Operating Instructions
Page 4
...into the outlet, contact your electrician to have a suitable outlet installed. This is a safety feature. Do not defeat the safety purpose of the projection TV with a dry soft cloth. Overloading Do not overload wall outlets, extension cords or convenience receptacles beyond their capacity, since this manual for cleaning. If...It is normal for long periods of time, unplug it from the wall outlet as they may be operated only from a TV set is not being turned on the set or described in fire or electric shock. To remove dust from battery power, refer to operate from the ...
...into the outlet, contact your electrician to have a suitable outlet installed. This is a safety feature. Do not defeat the safety purpose of the projection TV with a dry soft cloth. Overloading Do not overload wall outlets, extension cords or convenience receptacles beyond their capacity, since this manual for cleaning. If...It is normal for long periods of time, unplug it from the wall outlet as they may be operated only from a TV set is not being turned on the set or described in fire or electric shock. To remove dust from battery power, refer to operate from the ...

Operating Instructions
Page 16
...Rear of projection TV Antenna cable VHF/UHF Select CABLE or antenna (ANT) mode by pressing ANT on the cable found in your Cable to OFF (see page 52) and perform the Auto Program function (see page 53). Newer homes are equipped with an antenna, you need to turn your home.... older homes probably have 300-ohm twin lead cable (see B); CATV cable AUX (No connection to TO CONVERTER) TO CONVERTER Rear of projection TV U/V Splitter (not supplied) Cable and Antenna...
...Rear of projection TV Antenna cable VHF/UHF Select CABLE or antenna (ANT) mode by pressing ANT on the cable found in your Cable to OFF (see page 52) and perform the Auto Program function (see page 53). Newer homes are equipped with an antenna, you need to turn your home.... older homes probably have 300-ohm twin lead cable (see B); CATV cable AUX (No connection to TO CONVERTER) TO CONVERTER Rear of projection TV U/V Splitter (not supplied) Cable and Antenna...

Operating Instructions
Page 24
... receiver's SATELLITE IN jack. 2 Connect the CATV cable to the VCR's VHF/UHF IN jack. 3 Using a coaxial cable, connect the VCR's OUT jack to the projection TV's VHF/UHF jack. 4 Using AUDIO and S VIDEO cables, connect the satellite receiver's AUDIO and S VIDEO OUT jacks to the VCR's AUDIO and S VIDEO IN jacks...-15V/30V (not supplied) Cable ✍ Be sure your VCR or satellite receiver is set correctly. Rear of the S VIDEO cable. VIDEO 1 to watch satellite TV or the VCR. (Your VCR must be turned on) - Consult your VCR's operating manual for instructions. ✍ Use...
... receiver's SATELLITE IN jack. 2 Connect the CATV cable to the VCR's VHF/UHF IN jack. 3 Using a coaxial cable, connect the VCR's OUT jack to the projection TV's VHF/UHF jack. 4 Using AUDIO and S VIDEO cables, connect the satellite receiver's AUDIO and S VIDEO OUT jacks to the VCR's AUDIO and S VIDEO IN jacks...-15V/30V (not supplied) Cable ✍ Be sure your VCR or satellite receiver is set correctly. Rear of the S VIDEO cable. VIDEO 1 to watch satellite TV or the VCR. (Your VCR must be turned on) - Consult your VCR's operating manual for instructions. ✍ Use...

Operating Instructions
Page 32
...do it later by selecting it in the Channel menu. (see page 53) ✍ The Auto Setup feature does not apply for installations that use the main set of your projection TV or on your remote control. Using Auto Setup 1 Press POWER on...Projection TV Setting Up the Projection TV Automatically After you finish connecting your projection TV, you can run Auto Setup to exit. The Auto Setup screen appears when you can do not want to turn on the projection TV. 2 Press the TV (FUNCTION) button on the remote control to set up the channels at this time, you turn your projection TV on page 53...
...do it later by selecting it in the Channel menu. (see page 53) ✍ The Auto Setup feature does not apply for installations that use the main set of your projection TV or on your remote control. Using Auto Setup 1 Press POWER on...Projection TV Setting Up the Projection TV Automatically After you finish connecting your projection TV, you can run Auto Setup to exit. The Auto Setup screen appears when you can do not want to turn on the projection TV. 2 Press the TV (FUNCTION) button on the remote control to set up the channels at this time, you turn your projection TV on page 53...

Operating Instructions
Page 33
... blurs. Before you perform any other functions until FLASH FOCUS has completed its cycle. ✍ If you use your projection TV, be sure to perform FLASH FOCUS about 30 minutes after the projection TV is first turned on the screen in progress, FLASH FOCUS operation is in three layers (red, green and blue). The cross...
... blurs. Before you perform any other functions until FLASH FOCUS has completed its cycle. ✍ If you use your projection TV, be sure to perform FLASH FOCUS about 30 minutes after the projection TV is first turned on the screen in progress, FLASH FOCUS operation is in three layers (red, green and blue). The cross...

Operating Instructions
Page 34
...(if set , press once to remain on page 48. Joystick allows for more advanced functions. ✍ Main Power button must be turned ON to activate the remote control. PIC MODE qa FAVORITES qs RESET Description Press to restore the sound. Press repeatedly until SLEEP OFF appears... before shutting off . Cancel by pressing until the projection TV displays the time in minutes (15, 30, 45, 60, or 90) that was selected. The projection TV alternates between the current channel and the last channel that you want the projection TV to view remaining time. Adjusts the volume. Press ...
...(if set , press once to remain on page 48. Joystick allows for more advanced functions. ✍ Main Power button must be turned ON to activate the remote control. PIC MODE qa FAVORITES qs RESET Description Press to restore the sound. Press repeatedly until SLEEP OFF appears... before shutting off . Cancel by pressing until the projection TV displays the time in minutes (15, 30, 45, 60, or 90) that was selected. The projection TV alternates between the current channel and the last channel that you want the projection TV to view remaining time. Adjusts the volume. Press ...
Operating Instructions
Page 35
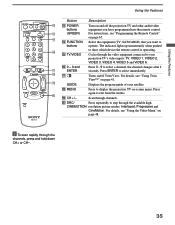
.... qf FUNCTION buttons Select the equipment (TV, SAT/CABLE) that you have programmed into the remote control. Scan through the channels, press and hold down CH+ or CH-. 35 The indicator lights up momentarily when pushed to display the projection TV on-screen menu. Press ENTER to select... Twin View. For instructions, see "Programming the Remote Control" on /off the projection TV and other audio/video equipment you want to operate. qg TV/VIDEO Cycles through the available high- qj Turns on page 65. Press again to step through the video equipment connected to your ...
.... qf FUNCTION buttons Select the equipment (TV, SAT/CABLE) that you have programmed into the remote control. Scan through the channels, press and hold down CH+ or CH-. 35 The indicator lights up momentarily when pushed to display the projection TV on-screen menu. Press ENTER to select... Twin View. For instructions, see "Programming the Remote Control" on /off the projection TV and other audio/video equipment you want to operate. qg TV/VIDEO Cycles through the available high- qj Turns on page 65. Press again to step through the video equipment connected to your ...
Operating Instructions
Page 36
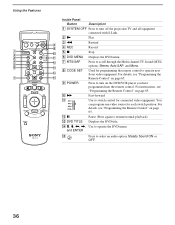
... the DVD/VCR player you have programmed into the remote control. For instructions, see "Programming the Remote Control" on page 65. 9 POWER Press to turn off the projection TV and all equipment connected with S-Link. 2N Play 3m Rewind 4 REC Record 5x Stop 6 DVD MENU Displays the DVD menu. 7 MTS/SAP Press to...
... the DVD/VCR player you have programmed into the remote control. For instructions, see "Programming the Remote Control" on page 65. 9 POWER Press to turn off the projection TV and all equipment connected with S-Link. 2N Play 3m Rewind 4 REC Record 5x Stop 6 DVD MENU Displays the DVD menu. 7 MTS/SAP Press to...
Operating Instructions
Page 37
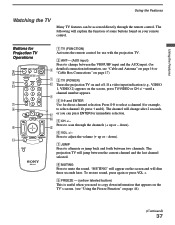
... to alternate or jump back and forth between two channels. Press to mute the sound. The projection TV will change between the current channel and the last channel selected. 8 MUTING Press to scan through the remote control. The channel will jump between the VHF/UHF input and the AUX input... the projection TV. 2 ANT- (AUX input) Press to change after 2 seconds, or you need to adjust the volume (+ up or - Press to copy down information that appears on the TV's screen. (see "Cable and Antenna" on page 16 or "Cable Box Connections" on page 17) 3 TV (POWER) Turns the projection TV on...
... to alternate or jump back and forth between two channels. Press to mute the sound. The projection TV will change between the current channel and the last channel selected. 8 MUTING Press to scan through the remote control. The channel will jump between the VHF/UHF input and the AUX input... the projection TV. 2 ANT- (AUX input) Press to change after 2 seconds, or you need to adjust the volume (+ up or - Press to copy down information that appears on the TV's screen. (see "Cable and Antenna" on page 16 or "Cable Box Connections" on page 17) 3 TV (POWER) Turns the projection TV on...

Operating Instructions
Page 38
...qf PIC MODE Press PIC MODE repeatedly to directly choose one of five different video modes that best suits the program you want the projection TV to suit your projection TV will skip the video input you can also adjust the picture quality (such as a Video Label in minutes (15, 30, 45...repeatedly until "SLEEP OFF" appears. If you select Skip as Brightness, Color, etc.) to remain on before shutting off , press DISPLAY again. To turn the display off automatically. When you select each mode, you selected. (see "MTS" on page 48. 38 Standard: Select to scroll through available ...
...qf PIC MODE Press PIC MODE repeatedly to directly choose one of five different video modes that best suits the program you want the projection TV to suit your projection TV will skip the video input you can also adjust the picture quality (such as a Video Label in minutes (15, 30, 45...repeatedly until "SLEEP OFF" appears. If you select Skip as Brightness, Color, etc.) to remain on before shutting off , press DISPLAY again. To turn the display off automatically. When you select each mode, you selected. (see "MTS" on page 48. 38 Standard: Select to scroll through available ...

Operating Instructions
Page 50
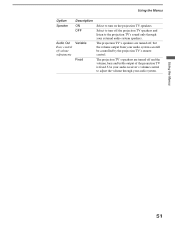
Steady ON Sound Select to turn off Steady Sound. OFF Select to stabilize the volume. Effect TruSurround Select ...to second audio programs when a signal is received. (If no SAP signal is present, the projection TV remains in Stereo mode.) Mono Select for stereo reception when viewing a program broadcast in the Audio menu. Select ...to automatically switch the projection TV to reduce noise during weak stereo broadcasts.) 50 Simulated Adds a surround-like effect to emphasize left ...
Steady ON Sound Select to turn off Steady Sound. OFF Select to stabilize the volume. Effect TruSurround Select ...to second audio programs when a signal is received. (If no SAP signal is present, the projection TV remains in Stereo mode.) Mono Select for stereo reception when viewing a program broadcast in the Audio menu. Select ...to automatically switch the projection TV to reduce noise during weak stereo broadcasts.) 50 Simulated Adds a surround-like effect to emphasize left ...
Operating Instructions
Page 51
... control to turn on the projection TV speakers. Using the Menus 51 The projection TV's speakers are turned off and the volume, bass and treble output of volume adjustments Variable Fixed Select to the projection TV's sound only through your audio system can still be controlled by the projection TV's remote control. The projection TV's speakers are turned off the projection TV speakers and listen...
... control to turn on the projection TV speakers. Using the Menus 51 The projection TV's speakers are turned off and the volume, bass and treble output of volume adjustments Variable Fixed Select to the projection TV's sound only through your audio system can still be controlled by the projection TV's remote control. The projection TV's speakers are turned off the projection TV speakers and listen...

Operating Instructions
Page 56
.... To change the password 1 Select Change Password option when in the Parent menu. Parental Control will be canceled temporarily until you turn your password using the 0-9 buttons. 3 Confirm the new password by entering it again. 4 Press MENU to set more restrictive ... tuned to a blocked program. 2 Enter your projection TV off . Using the Menus z If you are blocked from viewing. Maximum ratings permitted are: ❏ US: TV-Y, TV-G, G ❏ Canada: TV-Y, C, G Youth Maximum ratings permitted are: ❏ US: TV-PG, PG ❏ Canada: TV-PG, PG, 8 ans+ Young Adult Maximum ...
.... To change the password 1 Select Change Password option when in the Parent menu. Parental Control will be canceled temporarily until you turn your password using the 0-9 buttons. 3 Confirm the new password by entering it again. 4 Press MENU to set more restrictive ... tuned to a blocked program. 2 Enter your projection TV off . Using the Menus z If you are blocked from viewing. Maximum ratings permitted are: ❏ US: TV-Y, TV-G, G ❏ Canada: TV-Y, C, G Youth Maximum ratings permitted are: ❏ US: TV-PG, PG ❏ Canada: TV-PG, PG, 8 ans+ Young Adult Maximum ...

Operating Instructions
Page 62
... screen. ON Select in the Timer menu. Using the Menus Using the Timer Menu To select the Timer menu 1 Press MENU. 2 Move the joystick to turn off the Timer. (Your previous settings will be saved.) Set the current time. OFF Select to the Timer icon and press . To set the Current... Time 1 Use the joystick to select "Current Time", then press . 2 If it is currently Daylight Saving Time, be sure to set your projection TV's clock to the current time and Daylight Saving Mode. 1 Move the joystick to "Timer 1" or "Timer 2", then press . 2 Use the joystick to enter your day...
... screen. ON Select in the Timer menu. Using the Menus Using the Timer Menu To select the Timer menu 1 Press MENU. 2 Move the joystick to turn off the Timer. (Your previous settings will be saved.) Set the current time. OFF Select to the Timer icon and press . To set the Current... Time 1 Use the joystick to select "Current Time", then press . 2 If it is currently Daylight Saving Time, be sure to set your projection TV's clock to the current time and Daylight Saving Mode. 1 Move the joystick to "Timer 1" or "Timer 2", then press . 2 Use the joystick to enter your day...

Operating Instructions
Page 68
... /off green POWER button (inside the panel) CH +/- To Do This ... Turn on /off Change channels Record Play Stop Fast forward Rewind the tape Pause Search the picture forward or backward Change input mode Press green POWER ... Player Open the panel and move the slide switch to the AV input you coded for this device. Other Information Operating Other Components with Your Projection TV Remote Control Operating a VCR Open the panel and move the slide switch to the DVD input you coded for this device. to step backward of...
... /off green POWER button (inside the panel) CH +/- To Do This ... Turn on /off Change channels Record Play Stop Fast forward Rewind the tape Pause Search the picture forward or backward Change input mode Press green POWER ... Player Open the panel and move the slide switch to the AV input you coded for this device. Other Information Operating Other Components with Your Projection TV Remote Control Operating a VCR Open the panel and move the slide switch to the DVD input you coded for this device. to step backward of...

Operating Instructions
Page 70
...If your projection TV does not turn on page 50) Cannot receive digital channels ❏ (when a DTV receiver is set to the wall outlet. ❏ Locate the projection TV at 1-800-222-SONY (7669) (U.S. Replace the batteries. ❏ Press TV (FUNCTION) when operating your projection TV. ❏ Make sure the projection TV's power.... (see page 48) ❏ Check antenna/cable connections. ❏ Adjust the convergence again using an antenna presently in TV memory. (see page 53) No color ❏ Adjust the Color settings in the Video menu. (see page 48) Only snow and noise appear ...
...If your projection TV does not turn on page 50) Cannot receive digital channels ❏ (when a DTV receiver is set to the wall outlet. ❏ Locate the projection TV at 1-800-222-SONY (7669) (U.S. Replace the batteries. ❏ Press TV (FUNCTION) when operating your projection TV. ❏ Make sure the projection TV's power.... (see page 48) ❏ Check antenna/cable connections. ❏ Adjust the convergence again using an antenna presently in TV memory. (see page 53) No color ❏ Adjust the Color settings in the Video menu. (see page 48) Only snow and noise appear ...


