Instruction Manual
Page 2
... be of sufficient magnitude to constitute a risk of electric shock to persons. Reorient or relocate the receiving antenna. - CAUTION You are designed to operate this manual could void your authority to provide reasonable protection against harmful interference in a residential installation. This label is no guarantee that to which can radiate radio...
... be of sufficient magnitude to constitute a risk of electric shock to persons. Reorient or relocate the receiving antenna. - CAUTION You are designed to operate this manual could void your authority to provide reasonable protection against harmful interference in a residential installation. This label is no guarantee that to which can radiate radio...

Instruction Manual
Page 3
... the subtitles 35 Adjusting the delay between the picture and sound 36 - Shuffle Play Playing repeatedly 22 - Table of Contents About this manual 5 Playable discs 6 Getting Started Hooking up the system 9 Positioning the speakers 12 Setting the clock 13 Performing QUICK SETUP 14 Using...VIDEO CDs with sound 29 Using the on a DVD-R/ DVD-RW in random order 21 - CD Synchro Recording Recording onto a tape manually 51 - Manual Recording continued 3US Resume Play Creating your favorite disc onto a tape 51 - Normal Play Resuming playback from COMPONENT VIDEO OUT jacks 16 ...
... the subtitles 35 Adjusting the delay between the picture and sound 36 - Shuffle Play Playing repeatedly 22 - Table of Contents About this manual 5 Playable discs 6 Getting Started Hooking up the system 9 Positioning the speakers 12 Setting the clock 13 Performing QUICK SETUP 14 Using...VIDEO CDs with sound 29 Using the on a DVD-R/ DVD-RW in random order 21 - CD Synchro Recording Recording onto a tape manually 51 - Manual Recording continued 3US Resume Play Creating your favorite disc onto a tape 51 - Normal Play Resuming playback from COMPONENT VIDEO OUT jacks 16 ...

Instruction Manual
Page 5
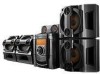
... and CD-Rs/CD-RWs in VIDEO CD or Super VCD format). About this manual • The instructions in this manual describe the controls on the disc. • The following symbols are for models FST-ZX100D, LBT-ZX100D, FST-ZX80D, LBT-ZX80D and MHC-GN1000D. Speaker System • Front speakers SS-ZX100D • Surround speakers SS...
... and CD-Rs/CD-RWs in VIDEO CD or Super VCD format). About this manual • The instructions in this manual describe the controls on the disc. • The following symbols are for models FST-ZX100D, LBT-ZX100D, FST-ZX80D, LBT-ZX80D and MHC-GN1000D. Speaker System • Front speakers SS-ZX100D • Surround speakers SS...
Instruction Manual
Page 47
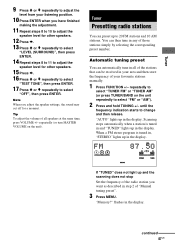
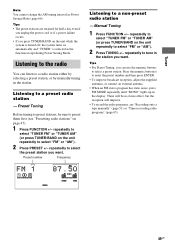
... the scanning does not stop Set the frequency of the radio station you want as described in your area and then store the frequency of "Manual tuning preset". 3 Press MENU. flashes in the display. until the frequency indication starts to change and then release. repeatedly (or turn MASTER VOLUME on ..."TUNER FM" or "TUNER AM" (or press TUNER/BAND on the unit). "Memory?" Tuner 9 Press V or v repeatedly to adjust the level from your favourite stations manually. 1 Press FUNCTION +/- Tip To adjust the volume of those stations simply by selecting the corresponding preset number.
... the scanning does not stop Set the frequency of the radio station you want as described in your area and then store the frequency of "Manual tuning preset". 3 Press MENU. flashes in the display. until the frequency indication starts to change and then release. repeatedly (or turn MASTER VOLUME on ..."TUNER FM" or "TUNER AM" (or press TUNER/BAND on the unit). "Memory?" Tuner 9 Press V or v repeatedly to adjust the level from your favourite stations manually. 1 Press FUNCTION +/- Tip To adjust the volume of those stations simply by selecting the corresponding preset number.
Instruction Manual
Page 48
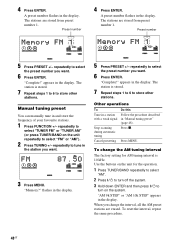
.... 3 Press MENU. To change the interval, all the AM preset stations are stored from preset number 1. A preset number flashes in "Manual tuning preset" (page 48). repeatedly to select the preset number you change the AM tuning interval The factory setting for the operation. 1... in the display. Cancel presetting Press MENU. Use the buttons on the unit for AM tuning interval is 10 kHz. 4 Press ENTER. Manual tuning preset You can manually tune in the display. 5 Press PRESET +/- Preset number 4 Press ENTER. "Complete!" The station is stored. 7 Repeat steps 1 to...
.... 3 Press MENU. To change the interval, all the AM preset stations are stored from preset number 1. A preset number flashes in "Manual tuning preset" (page 48). repeatedly to select the preset number you change the AM tuning interval The factory setting for the operation. 1... in the display. Cancel presetting Press MENU. Use the buttons on the unit for AM tuning interval is 10 kHz. 4 Press ENTER. Manual tuning preset You can manually tune in the display. 5 Press PRESET +/- Preset number 4 Press ENTER. "Complete!" The station is stored. 7 Repeat steps 1 to...
Instruction Manual
Page 49
...Preset Tuning Before tuning to preset stations, be no stereo effect, but the reception will be sure to preset them first (see "Recording onto a tape manually" (page 51) or "Timer recording radio programs" (page 65). 49US Press the numeric button(s) to a non-preset radio station - repeatedly to select..." on the unit repeatedly to select the preset station you want . repeatedly to a radio station either by selecting a preset station, or by manually tuning in the display. Listening to select "TUNER FM" or "TUNER AM" (or press TUNER/BAND on automatically and "TUNER" is turned ...
...Preset Tuning Before tuning to preset stations, be no stereo effect, but the reception will be sure to preset them first (see "Recording onto a tape manually" (page 51) or "Timer recording radio programs" (page 65). 49US Press the numeric button(s) to a non-preset radio station - repeatedly to select..." on the unit repeatedly to select the preset station you want . repeatedly to a radio station either by selecting a preset station, or by manually tuning in the display. Listening to select "TUNER FM" or "TUNER AM" (or press TUNER/BAND on automatically and "TUNER" is turned ...
Instruction Manual
Page 51
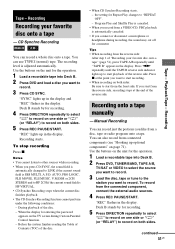
... station you start from the reverse side: After step 1 of the reverse side. If you want to record. 3 Press CD SYNC. Manual Recording You can record a whole disc onto a tape. Playback/Tape - Program Play and Shuffle Play is SBS MULTI, A.F.D. Use the buttons...from a VIDEO CD, PBC playback is adjusted automatically. Press x at the end of "Recording your favorite disc onto a tape - Recording onto a tape manually - You can use TYPE I (normal) tape. Recording Recording starts. To stop recording Press x. the setting for recording. 5 Press DIRECTION repeatedly to ...
... station you start from the reverse side: After step 1 of the reverse side. If you want to record. 3 Press CD SYNC. Manual Recording You can record a whole disc onto a tape. Playback/Tape - Program Play and Shuffle Play is SBS MULTI, A.F.D. Use the buttons...from a VIDEO CD, PBC playback is adjusted automatically. Press x at the end of "Recording your favorite disc onto a tape - Recording onto a tape manually - You can use TYPE I (normal) tape. Recording Recording starts. To stop recording Press x. the setting for recording. 5 Press DIRECTION repeatedly to ...

Instruction Manual
Page 52
..., the display changes cyclically as follows: GROOVE ON* t V-GROOVE ON* t GROOVE OFF * The volume switches to start from a disc onto a tape manually: You can reinforce the bass and create a more powerful sound. "REC" lights up to start playback of the reverse side. • When recording from...the radio, move the respective antenna to select the tracks during recording pause mode (after step 4 and before step 6 of "Recording onto a tape manually" (page 51), press TAPE A/B repeatedly until the TAPE B reverse side indicator lights up in the display if "V-GROOVE ON" is ideal for video ...
..., the display changes cyclically as follows: GROOVE ON* t V-GROOVE ON* t GROOVE OFF * The volume switches to start from a disc onto a tape manually: You can reinforce the bass and create a more powerful sound. "REC" lights up to start playback of the reverse side. • When recording from...the radio, move the respective antenna to select the tracks during recording pause mode (after step 4 and before step 6 of "Recording onto a tape manually" (page 51), press TAPE A/B repeatedly until the TAPE B reverse side indicator lights up in the display if "V-GROOVE ON" is ideal for video ...

Instruction Manual
Page 56
... setting. Select DELAY 11) or DELAY ON2) DELAY 21) To create a "live performance. 1) FST-ZX100D/LBT-ZX100D/FST-ZX80D/ LBT-ZX80D only. 2)MHC-GN1000D only. Chorusing sound effect - The CHORUS indicator lights up . Select To output sound AUTO WAVE1), In circular motion around the MANUAL WAVE2) room AUTO FADER1), Back and forth between the front...
... setting. Select DELAY 11) or DELAY ON2) DELAY 21) To create a "live performance. 1) FST-ZX100D/LBT-ZX100D/FST-ZX80D/ LBT-ZX80D only. 2)MHC-GN1000D only. Chorusing sound effect - The CHORUS indicator lights up . Select To output sound AUTO WAVE1), In circular motion around the MANUAL WAVE2) room AUTO FADER1), Back and forth between the front...

Instruction Manual
Page 57
... (FST-ZX100D/LBT-ZX100D/FST-ZX80D/ LBT-ZX80D only) You can only select the X-BEAT mode if the X-ROUND mode is cut off . • You cannot turn on the X-ROUND mode when - Creating beat effect - the headphones are connected to another speaker by turning the X-ROUND JOG clockwise or counterclockwise. 2) You can manually change . 57US...
... (FST-ZX100D/LBT-ZX100D/FST-ZX80D/ LBT-ZX80D only) You can only select the X-BEAT mode if the X-ROUND mode is cut off . • You cannot turn on the X-ROUND mode when - Creating beat effect - the headphones are connected to another speaker by turning the X-ROUND JOG clockwise or counterclockwise. 2) You can manually change . 57US...
Instruction Manual
Page 73
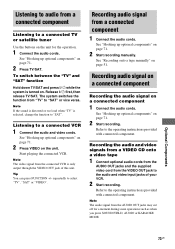
... or too loud when "TV" is only output through the VIDEO OUT jack of your VCR. 2 Start recording. See "Recording onto a tape manually" on page 71. 2 Start recording manually. Note The audio signal from the AUDIO OUT jacks may cut off for the operation. 1 Connect the audio cords. Release ?/1 first, then release...
... or too loud when "TV" is only output through the VIDEO OUT jack of your VCR. 2 Start recording. See "Recording onto a tape manually" on page 71. 2 Start recording manually. Note The audio signal from the AUDIO OUT jacks may cut off for the operation. 1 Connect the audio cords. Release ?/1 first, then release...


