
Operating Instructions
Page 2
Refer to them whenever you have fallen into your safety. LF-X1 or LF-X5 Serial No Contacting Sony If, after reading these instructions. 3) Heed all warnings. 4) Follow all servicing to the use of your Sony dealer regarding this apparatus near any way, such as radiators, heat registers, ... time. 14) Refer all instructions. 5) Do not use attachments/accessories specified by the manufacturer. 12) Use only with the cart, stand, tripod, bracket, or table specified by the manufacturer, or sold with the apparatus. Record the serial number in accordance with the manufacturer...
Refer to them whenever you have fallen into your safety. LF-X1 or LF-X5 Serial No Contacting Sony If, after reading these instructions. 3) Heed all warnings. 4) Follow all servicing to the use of your Sony dealer regarding this apparatus near any way, such as radiators, heat registers, ... time. 14) Refer all instructions. 5) Do not use attachments/accessories specified by the manufacturer. 12) Use only with the cart, stand, tripod, bracket, or table specified by the manufacturer, or sold with the apparatus. Record the serial number in accordance with the manufacturer...

Operating Instructions
Page 5
...Controls 10 Setup and Connections 17 Attaching the Base Station Stand 19 Connecting to a TV Antenna 20 Connecting to an External TV Tuner (STB 20 Connecting Other Devices 21 Turning On the Power 23 Carrying and Positioning the Monitor 28 Setting Up TV Channels 30 Using the On-screen Remote Control 33 ...Network Settings 40 Setting Up Mail 43 Guide to On-screen Icons 45 Wireless Connection at Home 47 Wired LAN Connection at Home 48 Wired LAN Connection On the Go 48 Wireless Connection On the Go 49 About Wireless Security 51 Enable Wired LAN 53 Setting Up the Monitor 54 What's ...
...Controls 10 Setup and Connections 17 Attaching the Base Station Stand 19 Connecting to a TV Antenna 20 Connecting to an External TV Tuner (STB 20 Connecting Other Devices 21 Turning On the Power 23 Carrying and Positioning the Monitor 28 Setting Up TV Channels 30 Using the On-screen Remote Control 33 ...Network Settings 40 Setting Up Mail 43 Guide to On-screen Icons 45 Wireless Connection at Home 47 Wired LAN Connection at Home 48 Wired LAN Connection On the Go 48 Wireless Connection On the Go 49 About Wireless Security 51 Enable Wired LAN 53 Setting Up the Monitor 54 What's ...

Operating Instructions
Page 11
... qg qh qj qk qf Stylus/stylus compartment (1 page 30) qg POWER switch (1 page 26) Turns the monitor power on and off. qh VOLUME +/- Monitor stand (1 page 28) Adjusts the angle of the monitor screen. wa ws 11 Continued Rear ql ql Monitor handle (1 page 28) Pull out the handle when...
... qg qh qj qk qf Stylus/stylus compartment (1 page 30) qg POWER switch (1 page 26) Turns the monitor power on and off. qh VOLUME +/- Monitor stand (1 page 28) Adjusts the angle of the monitor screen. wa ws 11 Continued Rear ql ql Monitor handle (1 page 28) Pull out the handle when...
Operating Instructions
Page 13
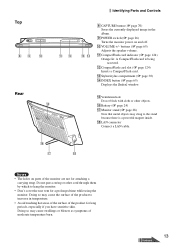
...0 VOLUME +/- qa CompactFlash card indicator (1 page 124) Orange lit: A CompactFlash card is a powerful magnet inside. qh Battery (1 page 24) qj Monitor stand (1 page 28) Note that metal objects may cling to increase in the album. 9 POWER switch (1 page 26) Turns the monitor power on parts of...CAPTURE button (1 page 70) Saves the currently displayed image in temperature. • Avoid touching hot areas of the surface of the product to the stand because there is being accessed. Doing so may cause the surface of the product for attaching a carrying strap. buttons (1 page 65) Adjusts the...
...0 VOLUME +/- qa CompactFlash card indicator (1 page 124) Orange lit: A CompactFlash card is a powerful magnet inside. qh Battery (1 page 24) qj Monitor stand (1 page 28) Note that metal objects may cling to increase in the album. 9 POWER switch (1 page 26) Turns the monitor power on parts of...CAPTURE button (1 page 70) Saves the currently displayed image in temperature. • Avoid touching hot areas of the surface of the product to the stand because there is being accessed. Doing so may cause the surface of the product for attaching a carrying strap. buttons (1 page 65) Adjusts the...

Operating Instructions
Page 15
... Blaster (1) • Power cord (2) • Operating instructions (1) • Quick Start Guide (1) • Base station stand (1) • Important software notice (1) • Ferrite core (for External Keyboard) ◆For LF-X5 • Base station (1) • Monitor (1) • Stylus (1) • BP-LX5A battery (1) • BP-...Power cord (2) • Carrying case (1) • Operating instructions (1) • Quick Start Guide (1) • Base station stand (1) • Important software notice (1) Note Be sure to turn off the monitor power when putting the monitor in the carrying case.
... Blaster (1) • Power cord (2) • Operating instructions (1) • Quick Start Guide (1) • Base station stand (1) • Important software notice (1) • Ferrite core (for External Keyboard) ◆For LF-X5 • Base station (1) • Monitor (1) • Stylus (1) • BP-LX5A battery (1) • BP-...Power cord (2) • Carrying case (1) • Operating instructions (1) • Quick Start Guide (1) • Base station stand (1) • Important software notice (1) Note Be sure to turn off the monitor power when putting the monitor in the carrying case.

Operating Instructions
Page 17
Setup and Connections BASIC: Installing and Connecting Attaching the Base Station Stand page 19 Connecting to a TV Antenna page 20 Connecting to an External TV Tuner (STB page 20 Connecting Other Devices page 21 Turning On the Power page 23 Carrying and Positioning the Monitor page 28 BASIC: Basic Setting Setting Up TV Channels page 30 Using the On-screen Remote Control page 33 Connecting to the Internet page 37 Configuring Network Settings page 40 Setting Up Mail page 43 BASIC: Guide to On-screen Icons Guide to On-screen Icons page 45 17
Setup and Connections BASIC: Installing and Connecting Attaching the Base Station Stand page 19 Connecting to a TV Antenna page 20 Connecting to an External TV Tuner (STB page 20 Connecting Other Devices page 21 Turning On the Power page 23 Carrying and Positioning the Monitor page 28 BASIC: Basic Setting Setting Up TV Channels page 30 Using the On-screen Remote Control page 33 Connecting to the Internet page 37 Configuring Network Settings page 40 Setting Up Mail page 43 BASIC: Guide to On-screen Icons Guide to On-screen Icons page 45 17

Operating Instructions
Page 19
Stopper Stopper Stand 19 Install the 4 rubber feet and 2 stoppers so they fit in the proper holes on the stand. Setup and Connections Attaching the Base Station Stand BASIC: Installing and Connecting Attaching the Base Station Stand To keep the base station stable, attach the base station stand.
Stopper Stopper Stand 19 Install the 4 rubber feet and 2 stoppers so they fit in the proper holes on the stand. Setup and Connections Attaching the Base Station Stand BASIC: Installing and Connecting Attaching the Base Station Stand To keep the base station stable, attach the base station stand.
Operating Instructions
Page 24
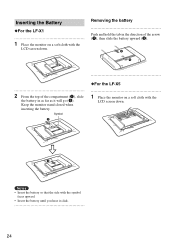
Keep the monitor stand closed when inserting the battery. Symbol 1 Place the monitor on a soft cloth with the LCD screen down . Removing the battery Push and hold the tab in the direction of the arrow (1), then slide the battery upward (2). ◆For the LF-X5 2 From the top of the compartment (1),... slide the battery in as far as it click. 24 Inserting the Battery ◆For the LF-X1 1 Place the monitor on a soft cloth with the LCD screen down . ...
Keep the monitor stand closed when inserting the battery. Symbol 1 Place the monitor on a soft cloth with the LCD screen down . Removing the battery Push and hold the tab in the direction of the arrow (1), then slide the battery upward (2). ◆For the LF-X5 2 From the top of the compartment (1),... slide the battery in as far as it click. 24 Inserting the Battery ◆For the LF-X1 1 Place the monitor on a soft cloth with the LCD screen down . ...

Operating Instructions
Page 28
... decreases significantly, it needs replacement. • Depending on the bottom. 28 Under normal lighting conditions. ◆For the LF-X5 Make the monitor upright using the stand on the type of 120 degrees. The battery can be charged about 300 times before it is time to adjust the screen... Using the Monitor Handle (LF-X1 Only) Pull out and use . Notes • When storing the battery long-term, use up the entire charge at least once a year, before the r indicator appears. Pull Adjusting the Monitor Stand ◆For the LF-X1 Use the monitor stand to buy a new battery...
... decreases significantly, it needs replacement. • Depending on the bottom. 28 Under normal lighting conditions. ◆For the LF-X5 Make the monitor upright using the stand on the type of 120 degrees. The battery can be charged about 300 times before it is time to adjust the screen... Using the Monitor Handle (LF-X1 Only) Pull out and use . Notes • When storing the battery long-term, use up the entire charge at least once a year, before the r indicator appears. Pull Adjusting the Monitor Stand ◆For the LF-X1 Use the monitor stand to buy a new battery...
Operating Instructions
Page 29
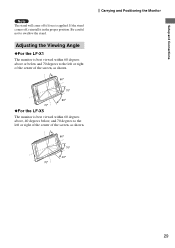
Adjusting the Viewing Angle ◆For the LF-X1 The monitor is best viewed within 60 degrees above or below , and 70 degrees to swallow the stand. Be careful not to the left or right of the center of the screen, as shown. If the stand comes off if force is best viewed within 60 degrees above , 40 degrees below and 70 degrees to the left or right of the center of the screen, as shown. 29 Carrying and Positioning the Monitor ◆For the LF-X5 The monitor is applied. Setup and Connections Note The stand will come off , reinstall it in the proper position.
Adjusting the Viewing Angle ◆For the LF-X1 The monitor is best viewed within 60 degrees above or below , and 70 degrees to swallow the stand. Be careful not to the left or right of the center of the screen, as shown. If the stand comes off if force is best viewed within 60 degrees above , 40 degrees below and 70 degrees to the left or right of the center of the screen, as shown. 29 Carrying and Positioning the Monitor ◆For the LF-X5 The monitor is applied. Setup and Connections Note The stand will come off , reinstall it in the proper position.
Operating Instructions
Page 153
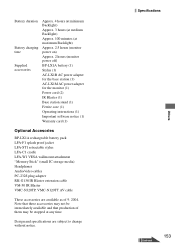
... battery (1) Stylus (1) AC-LX1B AC power adapter for the base station (1) AC-LX1M AC power adapter for the monitor (1) Power cord (2) IR Blaster (1) Base station stand (1) Ferrite core (1) Operating instructions (1) Important software notice (1) Warranty card (1) Optional Accesories BP-LX1A rechargeable battery pack LFA-F1 splash proof jacket LFA-ST1 retractable stylus...
... battery (1) Stylus (1) AC-LX1B AC power adapter for the base station (1) AC-LX1M AC power adapter for the monitor (1) Power cord (2) IR Blaster (1) Base station stand (1) Ferrite core (1) Operating instructions (1) Important software notice (1) Warranty card (1) Optional Accesories BP-LX1A rechargeable battery pack LFA-F1 splash proof jacket LFA-ST1 retractable stylus...
Operating Instructions
Page 156
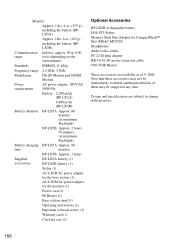
... battery (1) Stylus (1) AC-LX1B AC power adapter for the base station (1) AC-LX5M AC power adapter for the monitor (1) Power cord (2) IR Blaster (1) Base station stand (1) Operating instructions (1) Important software notice (1) Warranty card (1) Carrying case (1) Optional Accesories BP-LX5B rechargeable battery LFA-ST5 Stylus Memory Stick Duo Adaptor for CompactFlash™...
... battery (1) Stylus (1) AC-LX1B AC power adapter for the base station (1) AC-LX5M AC power adapter for the monitor (1) Power cord (2) IR Blaster (1) Base station stand (1) Operating instructions (1) Important software notice (1) Warranty card (1) Carrying case (1) Optional Accesories BP-LX5B rechargeable battery LFA-ST5 Stylus Memory Stick Duo Adaptor for CompactFlash™...

Operating Instructions
Page 157
... Additional monitors 58 Address Book 96 Album Window 104 Attaching a Picture 90 Auto Program 30 AV IN jack 11 B Backlight 27, 128, 137 base station stand 19 battery 27 Battery charge indicator........ 11, 12 Battery Life 27 Bound monitor 58 C CAPTURE 70, 80 CAPTURE button 11, 13 Changing channels 65 Changing... 68 Save 75, 78 Sending Mail 89 set up the NetAV 55 Setting Up Mail 43 Setting Up to Use Public Wireless Access 49 Setting Up TV Channels 30 Setting Up TV Channels Manually 129 set-top box 20 Slide Show 104, 107 Specifications 151 SSID 50, 133 SSL 75, 76 Status ...
... Additional monitors 58 Address Book 96 Album Window 104 Attaching a Picture 90 Auto Program 30 AV IN jack 11 B Backlight 27, 128, 137 base station stand 19 battery 27 Battery charge indicator........ 11, 12 Battery Life 27 Bound monitor 58 C CAPTURE 70, 80 CAPTURE button 11, 13 Changing channels 65 Changing... 68 Save 75, 78 Sending Mail 89 set up the NetAV 55 Setting Up Mail 43 Setting Up to Use Public Wireless Access 49 Setting Up TV Channels 30 Setting Up TV Channels Manually 129 set-top box 20 Slide Show 104, 107 Specifications 151 SSID 50, 133 SSL 75, 76 Status ...