
Operating Instructions (primary manual)
Page 1
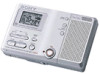
3-247-850-12(1) Portable MiniDisc Recorder Operating Instructions Recorder Operation p_a_g_e__8______ Troubleshooting and explanations _______p_a_g_e__48______ MZ-B10 ©2003 Sony Corporation
3-247-850-12(1) Portable MiniDisc Recorder Operating Instructions Recorder Operation p_a_g_e__8______ Troubleshooting and explanations _______p_a_g_e__48______ MZ-B10 ©2003 Sony Corporation
Operating Instructions (primary manual)
Page 2
...For customers who purchased this product will increase eye hazard. MZ-B10 Serial No. Thank you periodic mailings about new products, services and other important announcements. Please consult with this product in the USA Owner's Record The serial number is located at the inside of the battery... Economic Area). INVISIBLE LASER RADIATION WHEN OPEN AVOID EXPOSURE TO BEAM Certain countries may regulate disposal of the lid. Registering your Sony dealer regarding this product. Refer to power this product. Information IN NO EVENT SHALL SELLER BE LIABLE FOR ANY DIRECT, INCIDENTAL...
...For customers who purchased this product will increase eye hazard. MZ-B10 Serial No. Thank you periodic mailings about new products, services and other important announcements. Please consult with this product in the USA Owner's Record The serial number is located at the inside of the battery... Economic Area). INVISIBLE LASER RADIATION WHEN OPEN AVOID EXPOSURE TO BEAM Certain countries may regulate disposal of the lid. Registering your Sony dealer regarding this product. Refer to power this product. Information IN NO EVENT SHALL SELLER BE LIABLE FOR ANY DIRECT, INCIDENTAL...

Operating Instructions (primary manual)
Page 4
... away 16 Various ways of recording 18 Long-time recording (MDLP 18 Recording from a stereo microphone 19 Recording from externally connected equipment 20 Recording with digital (optical) input (Digital Recording 21 Recording from a TV or radio (Analog Recording 22 To start/stop recording in sync with the sound source (Synchro-recording 23 Adding track marks while recording 24 Adding track marks...
... away 16 Various ways of recording 18 Long-time recording (MDLP 18 Recording from a stereo microphone 19 Recording from externally connected equipment 20 Recording with digital (optical) input (Digital Recording 21 Recording from a TV or radio (Analog Recording 22 To start/stop recording in sync with the sound source (Synchro-recording 23 Adding track marks while recording 24 Adding track marks...

Operating Instructions (primary manual)
Page 5
Using the group function 32 Using the group function 32 Using the group function when recording 32 Recording tracks to a new group 32 Recording a track to an existing group 33 Using the group function when playing 33 Playing a track in group play 33 Editing groups 34 Assigning tracks or ... a disc (Group Move 36 To erase a group 37 Other operations 38 Useful settings 38 How to use the menu items 38 Creating a new group when recording 39 To select microphone sensitivity 39 Starting an operation quickly (Quick Mode 40 Using an optional foot control unit 40 List of menus 41 Power...
Using the group function 32 Using the group function 32 Using the group function when recording 32 Recording tracks to a new group 32 Recording a track to an existing group 33 Using the group function when playing 33 Playing a track in group play 33 Editing groups 34 Assigning tracks or ... a disc (Group Move 36 To erase a group 37 Other operations 38 Useful settings 38 How to use the menu items 38 Creating a new group when recording 39 To select microphone sensitivity 39 Starting an operation quickly (Quick Mode 40 Using an optional foot control unit 40 List of menus 41 Power...
Operating Instructions (primary manual)
Page 6
Troubleshooting and explanations 48 Troubleshooting 48 While recording 48 While playing 50 While Editing 51 While using group function 52 Others 52 Messages 53 Explanations 56 6
Troubleshooting and explanations 48 Troubleshooting 48 While recording 48 While playing 50 While Editing 51 While using group function 52 Others 52 Messages 53 Explanations 56 6
Operating Instructions (primary manual)
Page 9
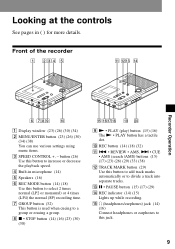
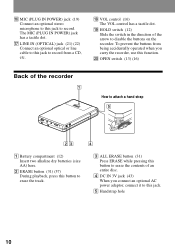
... (26) (29) (33) (38) L TRACK MARK button (29) Use this button to select 2 times normal (LP2 or monaural) or 4 times (LP4) the normal (SP) recording time. button (26) Use this button to add track marks automatically or to a group or erasing a group. H x • STOP button (14) (16) (23) (30)... (38) qg qhqjqk ql w; Front of the recorder 1 234 5 qa qsqd qf Recorder Operation 6 789 q; A Display window (23) (26) (30) (34) B MENU/ENTER button (23) (26) (30) (34) (38) You can use various ...
... (26) (29) (33) (38) L TRACK MARK button (29) Use this button to select 2 times normal (LP2 or monaural) or 4 times (LP4) the normal (SP) recording time. button (26) Use this button to add track marks automatically or to a group or erasing a group. H x • STOP button (14) (16) (23) (30)... (38) qg qhqjqk ql w; Front of the recorder 1 234 5 qa qsqd qf Recorder Operation 6 789 q; A Display window (23) (26) (30) (34) B MENU/ENTER button (23) (26) (30) (34) (38) You can use various ...
Operating Instructions (primary manual)
Page 10
... 23 4 A Battery compartment (12) Insert two alkaline dry batteries (size AA) here. C ALL ERASE button (31) Press ERASE while pressing this jack to record from being accidentally operated when you connect an optional AC power adaptor, connect it to this function. Q LINE IN (OPTICAL) jack (21) (22) Connect an...the contents of an entire disc. E Handstrap hole 10 D DC IN 3V jack (43) When you carry the recorder, use this jack. B ERASE button (31) (37) During playback, press this jack to record. The MIC (PLUG IN POWER) jack has a tactile dot. To prevent the buttons from a CD, etc. ...
... 23 4 A Battery compartment (12) Insert two alkaline dry batteries (size AA) here. C ALL ERASE button (31) Press ERASE while pressing this jack to record from being accidentally operated when you connect an optional AC power adaptor, connect it to this function. Q LINE IN (OPTICAL) jack (21) (22) Connect an...the contents of an entire disc. E Handstrap hole 10 D DC IN 3V jack (43) When you carry the recorder, use this jack. B ERASE button (31) (37) During playback, press this jack to record. The MIC (PLUG IN POWER) jack has a tactile dot. To prevent the buttons from a CD, etc. ...

Operating Instructions (primary manual)
Page 11
...that the disc is selected. Flashes while selecting a group. D Group indication (33) Lights up while in a disc while recording or stopped. L Time indication (18) (26) (30) (34) Shows the elapsed time while recording or playing. 11 E Battery level indication (42) F SOUND indication (26) Lights up when selecting specific play . C... display (18) (26) (30) (34) Displays the disc and track names, error messages, track numbers, etc. K REC REMAIN indication (18) Shows the remaining recordable time in group play mode. qa qs G Pause indication H REC indication (14) I SYNC (synchro...
...that the disc is selected. Flashes while selecting a group. D Group indication (33) Lights up while in a disc while recording or stopped. L Time indication (18) (26) (30) (34) Shows the elapsed time while recording or playing. 11 E Battery level indication (42) F SOUND indication (26) Lights up when selecting specific play . C... display (18) (26) (30) (34) Displays the disc and track names, error messages, track numbers, etc. K REC REMAIN indication (18) Shows the remaining recordable time in group play mode. qa qs G Pause indication H REC indication (14) I SYNC (synchro...
Operating Instructions (primary manual)
Page 12
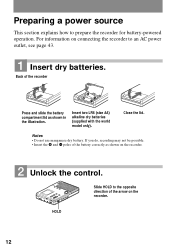
Close the lid. Notes • Do not use manganese dry battery. If you do, recording may not be possible. • Insert the e and E poles of the battery correctly as shown in the illustration. Insert two LR6 (size AA) alkaline dry ...batteries (supplied with the world model only). Slide HOLD to the opposite direction of the recorder e E e E Press and slide the battery compartment lid as shown on the recorder. 2 Unlock the control. HOLD 12 Preparing a power source This section explains how to an AC power outlet, see page...
Close the lid. Notes • Do not use manganese dry battery. If you do, recording may not be possible. • Insert the e and E poles of the battery correctly as shown in the illustration. Insert two LR6 (size AA) alkaline dry ...batteries (supplied with the world model only). Slide HOLD to the opposite direction of the recorder e E e E Press and slide the battery compartment lid as shown on the recorder. 2 Unlock the control. HOLD 12 Preparing a power source This section explains how to an AC power outlet, see page...
Operating Instructions (primary manual)
Page 13
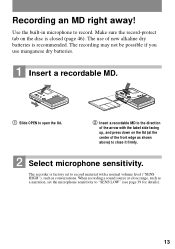
... front edge as shown above) to close range, such as a narration, set to record material with the label side facing up, and press down on the disc is factory set the microphone sensitivity to record. The recorder is closed (page 46). Use the built-in microphone to "SENS LOW" (see ...page 39 for details). 13 When recording a sound source at the center of the arrow with a normal volume level ("SENS ...
... front edge as shown above) to close range, such as a narration, set to record material with the label side facing up, and press down on the disc is factory set the microphone sensitivity to record. The recorder is closed (page 46). Use the built-in microphone to "SENS LOW" (see ...page 39 for details). 13 When recording a sound source at the center of the arrow with a normal volume level ("SENS ...
Operating Instructions (primary manual)
Page 14
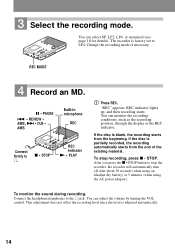
...x • STOP button to LP4. This adjustment does not affect the recording level since the level is partially recorded, the recording automatically starts from the beginning. You can monitor the recording conditions, such as the recording position, through the display or the REC indicator. "REC" appears, REC...SP, LP2, LP4, or monaural (see page 18 for details). To monitor the sound during recording. If the disc is adjusted automatically. 14 To stop the recorder, the recorder will automatically turn off after about 30 seconds (when using an alkaline dry battery) or 5 ...
...x • STOP button to LP4. This adjustment does not affect the recording level since the level is partially recorded, the recording automatically starts from the beginning. You can monitor the recording conditions, such as the recording position, through the display or the REC indicator. "REC" appears, REC...SP, LP2, LP4, or monaural (see page 18 for details). To monitor the sound during recording. If the disc is adjusted automatically. 14 To stop the recorder, the recorder will automatically turn off after about 30 seconds (when using an alkaline dry battery) or 5 ...

Operating Instructions (primary manual)
Page 15
..." appears in the display. Do not move or jog the recorder or disconnect the power source while the indication is not record-protected (page 46). • Premastered MDs cannot be recorded, and then press X • PAUSE. the batteries are not added while recording with a microphone (voice mirror) flashes flashes slowly goes off momentarily 1) Except when...
..." appears in the display. Do not move or jog the recorder or disconnect the power source while the indication is not record-protected (page 46). • Premastered MDs cannot be recorded, and then press X • PAUSE. the batteries are not added while recording with a microphone (voice mirror) flashes flashes slowly goes off momentarily 1) Except when...
Operating Instructions (primary manual)
Page 16
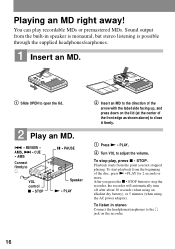
.... 1 Press N • PLAY. 2 Turn VOL to the direction of the arrow with the label side facing up, and press down on the recorder. 16 To stop the recorder, the recorder will automatically turn off after about 30 seconds (when using an alkaline dry battery), or 5 minutes (when using the AC power adaptor). To...; PAUSE Speaker N • PLAY 2 Insert an MD to adjust the volume. Sound output from the built-in stereo Connect the headphones/earphones to stop play recordable MDs or premastered MDs.
.... 1 Press N • PLAY. 2 Turn VOL to the direction of the arrow with the label side facing up, and press down on the recorder. 16 To stop the recorder, the recorder will automatically turn off after about 30 seconds (when using an alkaline dry battery), or 5 minutes (when using the AC power adaptor). To...; PAUSE Speaker N • PLAY 2 Insert an MD to adjust the volume. Sound output from the built-in stereo Connect the headphones/earphones to stop play recordable MDs or premastered MDs.

Operating Instructions (primary manual)
Page 17
... the power is not locked (page 12). Notes • The sound may not open until you reach the beginning of the first track on the recorder Press X • PAUSE. Press > • CUE • AMS. Press and hold . • REVIEW • AMS or > • CUE • AMS. During pause..., press and hold . • REVIEW • AMS or > • CUE • AMS. While the recorder is stopped, press and hold . • REVIEW • AMS or > • CUE • AMS. Press x • STOP and open the lid.3) 1) If you press . &#...
... the power is not locked (page 12). Notes • The sound may not open until you reach the beginning of the first track on the recorder Press X • PAUSE. Press > • CUE • AMS. Press and hold . • REVIEW • AMS or > • CUE • AMS. During pause..., press and hold . • REVIEW • AMS or > • CUE • AMS. While the recorder is stopped, press and hold . • REVIEW • AMS or > • CUE • AMS. Press x • STOP and open the lid.3) 1) If you press . &#...
Operating Instructions (primary manual)
Page 18
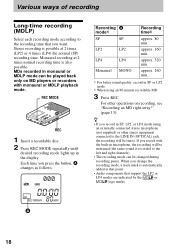
... at that point. • Audio components that you record with monaural or MDLP playback mode. MDs recorded in microphone, the recording will be changed during recording pause. If you want. Each time you record in SP, LP2, or LP4 mode using an 80-minute recordable MD 3 Press REC. Recording A mode1) SP SP LP2 LP2 LP4 LP4 Monaural...
... at that point. • Audio components that you record with monaural or MDLP playback mode. MDs recorded in microphone, the recording will be changed during recording pause. If you want. Each time you record in SP, LP2, or LP4 mode using an 80-minute recordable MD 3 Press REC. Recording A mode1) SP SP LP2 LP2 LP4 LP4 Monaural...
Operating Instructions (primary manual)
Page 19
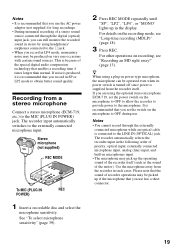
... "SP", "LP2", "LP4", or "MONO" lights up the operating sound of the recorder itself . For other operations on recording, see "Long-time recording (MDLP)" (page 18). 3 Press REC. The recorder automatically selects the recorder input in the display. Use the microphone away from a stereo microphone Connect a stereo microphone...This is because of the special digital audio compression technology that you set the power switch on the microphone to OFF to allow the recorder to provide power to the microphone. If noise is produced, it is recommended that you use has a short connector. 19 z ...
... "SP", "LP2", "LP4", or "MONO" lights up the operating sound of the recorder itself . For other operations on recording, see "Long-time recording (MDLP)" (page 18). 3 Press REC. The recorder automatically selects the recorder input in the display. Use the microphone away from a stereo microphone Connect a stereo microphone...This is because of the special digital audio compression technology that you set the power switch on the microphone to OFF to allow the recorder to provide power to the microphone. If noise is produced, it is recommended that you use has a short connector. 19 z ...

Operating Instructions (primary manual)
Page 20
... seconds of blank or low-level segment (with a sound source other than 2 seconds of line cable and switches to the recorder is in normal play mode while recording using digital (optical) input. • when the source is analog. Note Track marks may be copied incorrectly: • when... mode. • when programs with no audio signal for both digital and analog input jacks. Connect the recorder to record using either digital (optical) input or analog (line) input. To record, see "Recording with 2 phono plugs or a stereo-mini plug) (page 22) Analog Even when a digital source (...
... seconds of blank or low-level segment (with a sound source other than 2 seconds of line cable and switches to the recorder is in normal play mode while recording using digital (optical) input. • when the source is analog. Note Track marks may be copied incorrectly: • when... mode. • when programs with no audio signal for both digital and analog input jacks. Connect the recorder to record using either digital (optical) input or analog (line) input. To record, see "Recording with 2 phono plugs or a stereo-mini plug) (page 22) Analog Even when a digital source (...

Operating Instructions (primary manual)
Page 21
...on AC power as the power source. -Digital output may not be disabled on the recording mode, see "Recording an MD right away!" (page 13). During synchro-recording, the starting and stopping of digital out when the AC power adaptor is possible even ... portable CD player. -Some portable CD players may be capable of recording is useful for making digital recordings. Digital recording is disconnected. Notes • You can make digital recordings. Recording with digital (optical) input (Digital Recording) Connect to a digital source using the built-in sampling rate converter...
...on AC power as the power source. -Digital output may not be disabled on the recording mode, see "Recording an MD right away!" (page 13). During synchro-recording, the starting and stopping of digital out when the AC power adaptor is possible even ... portable CD player. -Some portable CD players may be capable of recording is useful for making digital recordings. Digital recording is disconnected. Notes • You can make digital recordings. Recording with digital (optical) input (Digital Recording) Connect to a digital source using the built-in sampling rate converter...
Operating Instructions (primary manual)
Page 22
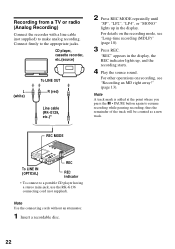
...to the appropriate jacks. "REC" appears in the display, the REC indicator lights up in the display. For details on recording, see "Long-time recording (MDLP)" (page 18). 3 Press REC. Connect firmly to a portable CD player having a stereo mini-jack, use ... PAUSE button again to make analog recording. For other operations on the recording mode, see "Recording an MD right away!" (page 13). Recording from a TV or radio (Analog Recording) Connect the recorder with a line cable (not supplied) to resume recording while pausing recording; Note Use the connecting cords without...
...to the appropriate jacks. "REC" appears in the display, the REC indicator lights up in the display. For details on recording, see "Long-time recording (MDLP)" (page 18). 3 Press REC. Connect firmly to a portable CD player having a stereo mini-jack, use ... PAUSE button again to make analog recording. For other operations on the recording mode, see "Recording an MD right away!" (page 13). Recording from a TV or radio (Analog Recording) Connect the recorder with a line cable (not supplied) to resume recording while pausing recording; Note Use the connecting cords without...
Operating Instructions (primary manual)
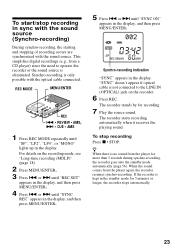
Page 23
...; REVIEW • AMS, > • CUE • AMS 1 Press REC MODE repeatedly until "SYNC REC" appears in the display. Synchro-recording is kept in the display, and then press MENU/ENTER. 4 Press . Synchro-recording indication "SYNC" appears in the display, and then press MENU/ENTER. "SYNC" doesn't appear if optical cable is not...
...; REVIEW • AMS, > • CUE • AMS 1 Press REC MODE repeatedly until "SYNC REC" appears in the display. Synchro-recording is kept in the display, and then press MENU/ENTER. 4 Press . Synchro-recording indication "SYNC" appears in the display, and then press MENU/ENTER. "SYNC" doesn't appear if optical cable is not...


