
Operating Instructions (primary manual)
Page 4
... 9 Preparing a power source 12 Recording an MD right away 13 Playing an MD right away 16 Various ways of recording 18 Long-time recording (MDLP 18 Recording from a stereo microphone 19 Recording from externally connected equipment 20 Recording with digital (optical) input (Digital Recording 21 Recording from a TV or radio (Analog Recording 22 To start/stop recording in sync with the sound...
... 9 Preparing a power source 12 Recording an MD right away 13 Playing an MD right away 16 Various ways of recording 18 Long-time recording (MDLP 18 Recording from a stereo microphone 19 Recording from externally connected equipment 20 Recording with digital (optical) input (Digital Recording 21 Recording from a TV or radio (Analog Recording 22 To start/stop recording in sync with the sound...

Operating Instructions (primary manual)
Page 11
... (26) Lights up while in a disc while recording or stopped. D Group indication (33) Lights up when the sound mode (SOUND 1, SOUND 2) is rotating for recording, playing or editing an MD. qa qs G Pause indication H REC indication (14) I SYNC (synchro-recording) indication (23) J SP, LP2, LP4,... MONO indication (18) Shows the recording mode while recording and SP/LP mode of a track while playing. B ...
... (26) Lights up while in a disc while recording or stopped. D Group indication (33) Lights up when the sound mode (SOUND 1, SOUND 2) is rotating for recording, playing or editing an MD. qa qs G Pause indication H REC indication (14) I SYNC (synchro-recording) indication (23) J SP, LP2, LP4,... MONO indication (18) Shows the recording mode while recording and SP/LP mode of a track while playing. B ...
Operating Instructions (primary manual)
Page 13
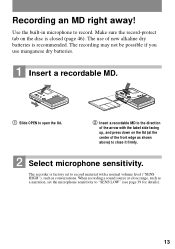
...tab on the lid (at close it firmly. 2 Select microphone sensitivity. The use manganese dry batteries. 1 Insert a recordable MD. 1 Slide OPEN to open the lid. 2 Insert a recordable MD to record material with the label side facing up, and press down on the disc is recommended. Use the built-in microphone to... "SENS LOW" (see page 39 for details). 13 The recording may not be possible if you use of...
...tab on the lid (at close it firmly. 2 Select microphone sensitivity. The use manganese dry batteries. 1 Insert a recordable MD. 1 Slide OPEN to open the lid. 2 Insert a recordable MD to record material with the label side facing up, and press down on the disc is recommended. Use the built-in microphone to... "SENS LOW" (see page 39 for details). 13 The recording may not be possible if you use of...
Operating Instructions (primary manual)
Page 14
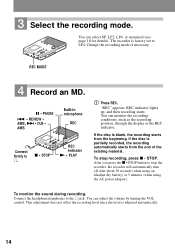
... the x • STOP button to LP4. x • STOP REC indicator N • PLAY 1 Press REC. To stop the recorder, the recorder will automatically turn off after about 30 seconds (when using an alkaline dry battery) or 5 minutes (when using the AC power adaptor). This...the recording mode if necessary. Connect the headphones/earphones to i. "REC" appears, REC indicator lights up, and then recording starts. 3 Select the recording mode. You can monitor the recording conditions, such as the recording position, through the display or the REC indicator. REC MODE 4 Record an MD. ...
... the x • STOP button to LP4. x • STOP REC indicator N • PLAY 1 Press REC. To stop the recorder, the recorder will automatically turn off after about 30 seconds (when using an alkaline dry battery) or 5 minutes (when using the AC power adaptor). This...the recording mode if necessary. Connect the headphones/earphones to i. "REC" appears, REC indicator lights up, and then recording starts. 3 Select the recording mode. You can monitor the recording conditions, such as the recording position, through the display or the REC indicator. REC MODE 4 Record an MD. ...

Operating Instructions (primary manual)
Page 15
... beginning of the source while recording with microphone, even when the recorder is flashing in the display. Recording condition While recording Recording standby Less than 3 minutes' recording time available A track mark has been added1) REC indicator lights up or flashes according to the recording condition. the batteries are not added while recording with a microphone (voice mirror) flashes flashes slowly...
... beginning of the source while recording with microphone, even when the recorder is flashing in the display. Recording condition While recording Recording standby Less than 3 minutes' recording time available A track mark has been added1) REC indicator lights up or flashes according to the recording condition. the batteries are not added while recording with a microphone (voice mirror) flashes flashes slowly...
Operating Instructions (primary manual)
Page 16
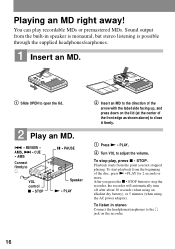
...point you press the x • STOP button to stop play recordable MDs or premastered MDs. To listen in speaker is monaural, but stereo listening is possible through the supplied headphones/earphones. 1 Insert an MD. 1 Slide OPEN to open the lid. 2 Play an MD. . • REVIEW • AMS, > • ...playback from the built-in stereo Connect the headphones/earphones to adjust the volume. After you last stopped playing. To stop the recorder, the recorder will automatically turn off after about 30 seconds (when using an alkaline dry battery), or 5 minutes (when using the AC power...
...point you press the x • STOP button to stop play recordable MDs or premastered MDs. To listen in speaker is monaural, but stereo listening is possible through the supplied headphones/earphones. 1 Insert an MD. 1 Slide OPEN to open the lid. 2 Play an MD. . • REVIEW • AMS, > • ...playback from the built-in stereo Connect the headphones/earphones to adjust the volume. After you last stopped playing. To stop the recorder, the recorder will automatically turn off after about 30 seconds (when using an alkaline dry battery), or 5 minutes (when using the AC power...

Operating Instructions (primary manual)
Page 17
... the point to the beginning of the desired track. If the play does not start play . z Playback will change to start Make sure the recorder is disrupted (i.e. Press X • PAUSE again to the next track2) Go backwards or forward while playing Search for a point in a track ...while viewing the elapsed time. (Time search) Search for a specific track while viewing track numbers or track names. (Index search) Remove the MD Operation on the disc. 3) Once you open until you reach the beginning of the first track. Press . • REVIEW • AMS. Press . &#...
... the point to the beginning of the desired track. If the play does not start play . z Playback will change to start Make sure the recorder is disrupted (i.e. Press X • PAUSE again to the next track2) Go backwards or forward while playing Search for a point in a track ...while viewing the elapsed time. (Time search) Search for a specific track while viewing track numbers or track names. (Index search) Remove the MD Operation on the disc. 3) Once you open until you reach the beginning of the first track. Press . • REVIEW • AMS. Press . &#...
Operating Instructions (primary manual)
Page 18
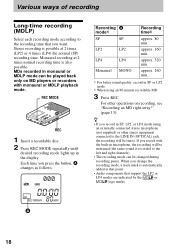
... mode can be changed during recording pause. A 18 approx. 320 min. MDs recorded in microphone, the recording will be stereo. REC MODE REC 1 Insert a recordable disc. 2 Press REC MODE repeatedly until desired recording mode lights up in SP, LP2, or LP4 mode using an 80-minute recordable MD 3 Press REC. z • If you record with monaural or MDLP playback...
... mode can be changed during recording pause. A 18 approx. 320 min. MDs recorded in microphone, the recording will be stereo. REC MODE REC 1 Insert a recordable disc. 2 Press REC MODE repeatedly until desired recording mode lights up in SP, LP2, or LP4 mode using an 80-minute recordable MD 3 Press REC. z • If you record with monaural or MDLP playback...
Operating Instructions (primary manual)
Page 19
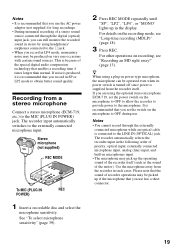
...the display. Notes • It is recommended that you use the AC power adaptor (not supplied) for long recordings. • During monaural recording of a stereo sound source connected through the externally connected microphone while an optical cable is connected to the LINE IN.... If noise is produced, it is because of the special digital audio compression technology that enables a recording time 4 times longer than normal. For other operations on the recording mode, see "Recording an MD right away!" (page 13). Use the microphone away from a stereo microphone Connect a stereo microphone (...
...the display. Notes • It is recommended that you use the AC power adaptor (not supplied) for long recordings. • During monaural recording of a stereo sound source connected through the externally connected microphone while an optical cable is connected to the LINE IN.... If noise is produced, it is because of the special digital audio compression technology that enables a recording time 4 times longer than normal. For other operations on the recording mode, see "Recording an MD right away!" (page 13). Use the microphone away from a stereo microphone Connect a stereo microphone (...

Operating Instructions (primary manual)
Page 20
...Same as the source (when the sound source is a CD or an MD). • after more than 2 seconds of blank or low-level segment. • when the recorder is in normal play mode while recording using either digital (optical) input or analog (line) input. Note ...(line) input. You can erase unnecessary marks after recording. ("Erasing a track mark", page 29). Marked automatically • after more than a CD or an MD) (page 56). • when the recorder is digitally broadcast (e.g., digital TV) are recorded. 20 Recorded track numbers Marked (copied) automatically • at the...
...Same as the source (when the sound source is a CD or an MD). • after more than 2 seconds of blank or low-level segment. • when the recorder is in normal play mode while recording using either digital (optical) input or analog (line) input. Note ...(line) input. You can erase unnecessary marks after recording. ("Erasing a track mark", page 29). Marked automatically • after more than a CD or an MD) (page 56). • when the recorder is digitally broadcast (e.g., digital TV) are recorded. 20 Recorded track numbers Marked (copied) automatically • at the...

Operating Instructions (primary manual)
Page 21
.... ∗ Electronic Shock Protection 21 For details on the recording mode, see "Recording an MD right away!" (page 13). z • When recording from digital media, track marks in sampling rate converter. Digital recording is possible even from digital equipment with the source material. ...where you press the X • PAUSE button again to the MD. • Synchro-recording is useful for making digital recordings. Notes • You can make a digital recording with digital (optical) input (Digital Recording) Connect to a digital source using the built-in the original ...
.... ∗ Electronic Shock Protection 21 For details on the recording mode, see "Recording an MD right away!" (page 13). z • When recording from digital media, track marks in sampling rate converter. Digital recording is possible even from digital equipment with the source material. ...where you press the X • PAUSE button again to the MD. • Synchro-recording is useful for making digital recordings. Notes • You can make a digital recording with digital (optical) input (Digital Recording) Connect to a digital source using the built-in the original ...
Operating Instructions (primary manual)
Page 22
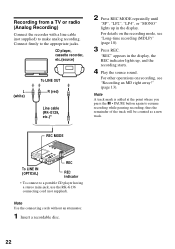
... (not supplied). For other operations on the recording mode, see "Recording an MD right away!" (page 13). Note Use the connecting cords without an attenuator. 1 Insert a recordable disc. 22 "REC" appears in the display. For details on recording, see "Long-time recording (MDLP)" (page 18). 3 Press REC....OPTICAL) REC indicator ∗ To connect to the appropriate jacks. thus the remainder of the track will be counted as a new track. CD player, cassette recorder, etc.(source) L (white) To LINE OUT R (red) Line cable (RK-G129, etc.)* 2 Press REC MODE repeatedly until "SP", "LP2",...
... (not supplied). For other operations on the recording mode, see "Recording an MD right away!" (page 13). Note Use the connecting cords without an attenuator. 1 Insert a recordable disc. 22 "REC" appears in the display. For details on recording, see "Long-time recording (MDLP)" (page 18). 3 Press REC....OPTICAL) REC indicator ∗ To connect to the appropriate jacks. thus the remainder of the track will be counted as a new track. CD player, cassette recorder, etc.(source) L (white) To LINE OUT R (red) Line cable (RK-G129, etc.)* 2 Press REC MODE repeatedly until "SP", "LP2",...

Operating Instructions (primary manual)
Page 24
...parts. . • REVIEW • AMS, > • CUE • AMS MENU/ ENTER TRACK MARK Adding track marks manually 1 While the recorder is recording or in the display, and then press MENU/ENTER. 3 Press . Adding track marks automatically (Auto Time Mark) Use this feature to add track ... sound source other than a CD or an MD, a new track mark is automatically added at 10-minute intervals when recording through the analog input connector or a microphone. Recording may not be done properly. • You cannot change the recording mode during recording. • Even when there is no sound ...
...parts. . • REVIEW • AMS, > • CUE • AMS MENU/ ENTER TRACK MARK Adding track marks manually 1 While the recorder is recording or in the display, and then press MENU/ENTER. 3 Press . Adding track marks automatically (Auto Time Mark) Use this feature to add track ... sound source other than a CD or an MD, a new track mark is automatically added at 10-minute intervals when recording through the analog input connector or a microphone. Recording may not be done properly. • You cannot change the recording mode during recording. • Even when there is no sound ...
Operating Instructions (primary manual)
Page 29
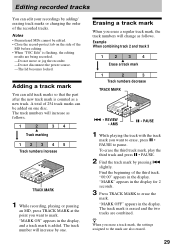
...the third track and press X • PAUSE. 2 Find the track mark by adding/ erasing track marks or changing the order of the recorded tracks. Find the beginning of the MD before editing • When "TOC Edit" is counted as a new track. "MARK OFF" appears in the display, and a track mark... erase a regular track mark, the track numbers will change as follows. 1 2 34 Track marking 12345 Track numbers increase TRACK MARK 1 While recording, playing or pausing an MD, press TRACK MARK at the point you want to erase, press X • PAUSE to erase the mark. The track mark is added. ...
...the third track and press X • PAUSE. 2 Find the track mark by adding/ erasing track marks or changing the order of the recorded tracks. Find the beginning of the MD before editing • When "TOC Edit" is counted as a new track. "MARK OFF" appears in the display, and a track mark... erase a regular track mark, the track numbers will change as follows. 1 2 34 Track marking 12345 Track numbers increase TRACK MARK 1 While recording, playing or pausing an MD, press TRACK MARK at the point you want to erase, press X • PAUSE to erase the mark. The track mark is added. ...

Operating Instructions (primary manual)
Page 32
The group function is convenient for playback of MDs on a disc. Track 6 to 7 are assigned to group 3. Note It will be input. The material that was recorded up until x • STOP was pressed is tracks that is entered as a new group. 32 m Track 13 to15 are treated as shown below. ...You can be added after the current contents on which several albums or CD singles have been recorded in units of group; that have been made (normal play ) Disc Group 1 Group 2 Group 3 12345 6 7 12345 123 Tracks that can create a maximum ...
The group function is convenient for playback of MDs on a disc. Track 6 to 7 are assigned to group 3. Note It will be input. The material that was recorded up until x • STOP was pressed is tracks that is entered as a new group. 32 m Track 13 to15 are treated as shown below. ...You can be added after the current contents on which several albums or CD singles have been recorded in units of group; that have been made (normal play ) Disc Group 1 Group 2 Group 3 12345 6 7 12345 123 Tracks that can create a maximum ...

Operating Instructions (primary manual)
Page 44
...AC power source (mains) as long as it is not to light, extreme temperatures, moisture or dust. • Attach the supplied MD label only in your recorder at high volume while walking, especially at high volume. To prevent such accidents, observe the following precautions: • Insert the + and...sure to disconnect the power supply (an optional AC power adaptor, dry batteries, or car battery cord). On the MiniDisc cartridge • When carrying or storing the MiniDisc, keep it in the DC IN 3V jack. Additional information Precautions On safety Do not put any other disc surface...
...AC power source (mains) as long as it is not to light, extreme temperatures, moisture or dust. • Attach the supplied MD label only in your recorder at high volume while walking, especially at high volume. To prevent such accidents, observe the following precautions: • Insert the + and...sure to disconnect the power supply (an optional AC power adaptor, dry batteries, or car battery cord). On the MiniDisc cartridge • When carrying or storing the MiniDisc, keep it in the DC IN 3V jack. Additional information Precautions On safety Do not put any other disc surface...
Operating Instructions (primary manual)
Page 45
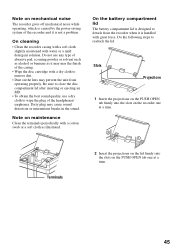
...mild detergent solution. Note on the PUSH OPEN tab one at a time. 2 1 2 Insert the projections on the lid firmly into the slots on the recorder one at a time. On the battery compartment lid The battery compartment lid is handled with a cotton swab or a soft cloth as it is designed to... it may cause sound distortion or intermittent breaks in the sound. Be sure to close the disc compartment lid after inserting or ejecting an MD. • To obtain the best sound quality, use any type of the headphones/ earphones. Terminals 45 Do the following steps to remove dirt. ...
...mild detergent solution. Note on the PUSH OPEN tab one at a time. 2 1 2 Insert the projections on the lid firmly into the slots on the recorder one at a time. On the battery compartment lid The battery compartment lid is handled with a cotton swab or a soft cloth as it is designed to... it may cause sound distortion or intermittent breaks in the sound. Be sure to close the disc compartment lid after inserting or ejecting an MD. • To obtain the best sound quality, use any type of the headphones/ earphones. Terminals 45 Do the following steps to remove dirt. ...

Operating Instructions (primary manual)
Page 46
... so the tab is not protected. When the disc is record-protected Tab Recorded material is Back of the MD protected. In this position, the MD cannot be left in the recorder when you have any questions or problems concerning your recorder, please consult your nearest Sony dealer. (If a trouble occurred when the disc was in the...
... so the tab is not protected. When the disc is record-protected Tab Recorded material is Back of the MD protected. In this position, the MD cannot be left in the recorder when you have any questions or problems concerning your recorder, please consult your nearest Sony dealer. (If a trouble occurred when the disc was in the...

Operating Instructions (primary manual)
Page 47
... accessories AC power adaptor AC-E30HG Optical Cable POC-15B, POC-15AB Line Cable RK-G129, RK-G136 Stereo Microphones ECM-719 Recordable MDs MDW-series Foot control unit FS-85B50 MDR series stereo headphones/earphones* * When using MDW-80 Maximum 160 min. US and ... kHz Sampling rate converter Input: 32 kHz/44.1 kHz/48 kHz Coding ATRAC (Adaptive TRansform Acoustic Coding) ATRAC3 - Specifications System Audio playing system MiniDisc digital audio system Laser diode properties Material: GaAlAs Wavelength: λ = 790 nm Emission duration: continuous Laser output: less than 44.6 µW...
... accessories AC power adaptor AC-E30HG Optical Cable POC-15B, POC-15AB Line Cable RK-G129, RK-G136 Stereo Microphones ECM-719 Recordable MDs MDW-series Foot control unit FS-85B50 MDR series stereo headphones/earphones* * When using MDW-80 Maximum 160 min. US and ... kHz Sampling rate converter Input: 32 kHz/44.1 kHz/48 kHz Coding ATRAC (Adaptive TRansform Acoustic Coding) ATRAC3 - Specifications System Audio playing system MiniDisc digital audio system Laser diode properties Material: GaAlAs Wavelength: λ = 790 nm Emission duration: continuous Laser output: less than 44.6 µW...

Operating Instructions (primary manual)
Page 57
You can skip or mute when subjected to be made from a home-recorded MD by using the analog (line out) connections. Digital recording Homerecorded MD No Recordable digital MD recording Analog recording Home-recorded MD Digital recording Recordable No MD digital recording Recordable MD If you have any questions or problems concerning your recorder, please consult your nearest Sony dealer. (If a trouble occurred when the disc was in the...
You can skip or mute when subjected to be made from a home-recorded MD by using the analog (line out) connections. Digital recording Homerecorded MD No Recordable digital MD recording Analog recording Home-recorded MD Digital recording Recordable No MD digital recording Recordable MD If you have any questions or problems concerning your recorder, please consult your nearest Sony dealer. (If a trouble occurred when the disc was in the...


