Operating Instructions (primary manual)
Page 9
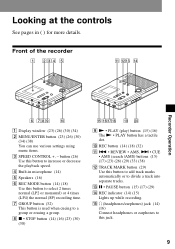
...this button to a group or erasing a group. button (26) Use this button to divide a track into separate tracks. J REC button (14) (18) (32) K . • REVIEW • AMS, > • CUE • AMS (search /AMS) buttons (15) (17) (23) (26) (29) (33) (38) L TRACK MARK button (29) Use...items. C SPEED CONTROL +, - G GROUP button (32) This button is used when cueing to select 2 times normal (LP2 or monaural) or 4 times (LP4) the normal (SP) recording time. D Built-in ( ) for more details. I N • PLAY (play) button (15) (16) The N • PLAY button has a tactile dot. O i (...
...this button to a group or erasing a group. button (26) Use this button to divide a track into separate tracks. J REC button (14) (18) (32) K . • REVIEW • AMS, > • CUE • AMS (search /AMS) buttons (15) (17) (23) (26) (29) (33) (38) L TRACK MARK button (29) Use...items. C SPEED CONTROL +, - G GROUP button (32) This button is used when cueing to select 2 times normal (LP2 or monaural) or 4 times (LP4) the normal (SP) recording time. D Built-in ( ) for more details. I N • PLAY (play) button (15) (16) The N • PLAY button has a tactile dot. O i (...
Operating Instructions (primary manual)
Page 14
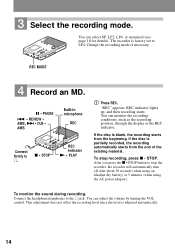
..., through the display or the REC indicator. If the disc is partially recorded, the recording automatically starts from the beginning. If the disc is blank, the recording starts from the end of the existing material. REC MODE 4 Record an MD. X • PAUSE . • REVIEW • AMS, > • CUE • AMS Built-in microphone REC Connect...
..., through the display or the REC indicator. If the disc is partially recorded, the recording automatically starts from the beginning. If the disc is blank, the recording starts from the end of the existing material. REC MODE 4 Record an MD. X • PAUSE . • REVIEW • AMS, > • CUE • AMS Built-in microphone REC Connect...

Operating Instructions (primary manual)
Page 15
...to resume recording. the batteries are not added while recording with a microphone (voice mirror) flashes flashes slowly goes off momentarily 1) Except when track marking was done manually or automatically using an optional AC power adaptor ACE30HG (page 43). • The lid will not be recorded. •... disappears from the display after the recording has completed. • If the power supply is recommended that you record through the previous recording Pause1) Remove the MD Operation Press N • PLAY, > • CUE • AMS or . • REVIEW • AMS to find the ...
...to resume recording. the batteries are not added while recording with a microphone (voice mirror) flashes flashes slowly goes off momentarily 1) Except when track marking was done manually or automatically using an optional AC power adaptor ACE30HG (page 43). • The lid will not be recorded. •... disappears from the display after the recording has completed. • If the power supply is recommended that you record through the previous recording Pause1) Remove the MD Operation Press N • PLAY, > • CUE • AMS or . • REVIEW • AMS to find the ...
Operating Instructions (primary manual)
Page 16
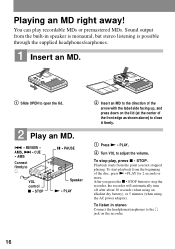
...beginning of the front edge as shown above) to close it firmly. 1 Press N • PLAY. 2 Turn VOL to the i jack on the recorder. 16 To listen in speaker is monaural, but stereo listening is possible through the supplied headphones/earphones. 1 Insert an MD. 1 Slide OPEN to open ...the lid. 2 Play an MD. . • REVIEW • AMS, > • CUE • AMS Connect firmly to i VOL control x • STOP X • PAUSE Speaker N • PLAY 2 Insert an MD...
...beginning of the front edge as shown above) to close it firmly. 1 Press N • PLAY. 2 Turn VOL to the i jack on the recorder. 16 To listen in speaker is monaural, but stereo listening is possible through the supplied headphones/earphones. 1 Insert an MD. 1 Slide OPEN to open ...the lid. 2 Play an MD. . • REVIEW • AMS, > • CUE • AMS Connect firmly to i VOL control x • STOP X • PAUSE Speaker N • PLAY 2 Insert an MD...

Operating Instructions (primary manual)
Page 17
...Press > • CUE • AMS. Press and hold . • REVIEW • AMS or > • CUE • AMS. During pause, press and hold . • REVIEW • AMS or > • CUE • AMS. While the recorder is stopped, press and hold . • REVIEW • AMS or > • CUE • AMS. Press x &#...not open the lid, the point to start Make sure the recorder is not locked (page 12). Press X • PAUSE again to the beginning of the desired track. Press . • REVIEW • AMS. Press . • REVIEW • AMS repeatedly until you open until the power is ...
...Press > • CUE • AMS. Press and hold . • REVIEW • AMS or > • CUE • AMS. During pause, press and hold . • REVIEW • AMS or > • CUE • AMS. While the recorder is stopped, press and hold . • REVIEW • AMS or > • CUE • AMS. Press x &#...not open the lid, the point to start Make sure the recorder is not locked (page 12). Press X • PAUSE again to the beginning of the desired track. Press . • REVIEW • AMS. Press . • REVIEW • AMS repeatedly until you open until the power is ...
Operating Instructions (primary manual)
Page 23
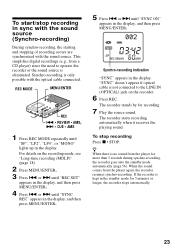
...the sound comes from the player for more than 3 seconds during synchro-recording, the recorder goes into the standby mode automatically (page 56). The recorder starts recording automatically when it receives the playing sound. REC MODE MENU/ENTER REC . • REVIEW • AMS, > • CUE • AMS 1 Press... REC MODE repeatedly until "SYNC REC" appears in the display. "SYNC" doesn't appear if optical cable is not connected to operate the recorder or the sound source is only possible ...
...the sound comes from the player for more than 3 seconds during synchro-recording, the recorder goes into the standby mode automatically (page 56). The recorder starts recording automatically when it receives the playing sound. REC MODE MENU/ENTER REC . • REVIEW • AMS, > • CUE • AMS 1 Press... REC MODE repeatedly until "SYNC REC" appears in the display. "SYNC" doesn't appear if optical cable is not connected to operate the recorder or the sound source is only possible ...

Operating Instructions (primary manual)
Page 24
... function is convenient when making a long recording, e.g., of a lecture or meeting. 1 While the recorder is recording or in the display, and then press MENU/ENTER. 3 Press . Adding track marks while recording You can add track marks (track number) while recording to divide the material into separate parts. . • REVIEW • AMS, > • CUE • AMS MENU...
... function is convenient when making a long recording, e.g., of a lecture or meeting. 1 While the recorder is recording or in the display, and then press MENU/ENTER. 3 Press . Adding track marks while recording You can add track marks (track number) while recording to divide the material into separate parts. . • REVIEW • AMS, > • CUE • AMS MENU...

Operating Instructions (primary manual)
Page 26
...sound mode while the playback speed is changed. Changing playback speed (Speed Control) The speed control function is useful when listening to recordings of meetings or lectures. . • REVIEW • AMS, > • CUE • AMS MENU/ ENTER 1 Press MENU/ENTER. 2 Press . This function ... the sound mode during playback. or > until your desired sound setting appears in the display, and then press MENU/ ENTER. SOUND 2 Emphasizes voices more strongly than SOUND 1. When you turn the volume up . or > repeatedly until "SOUND" appears in step 3. A A Sound setting ...
...sound mode while the playback speed is changed. Changing playback speed (Speed Control) The speed control function is useful when listening to recordings of meetings or lectures. . • REVIEW • AMS, > • CUE • AMS MENU/ ENTER 1 Press MENU/ENTER. 2 Press . This function ... the sound mode during playback. or > until your desired sound setting appears in the display, and then press MENU/ ENTER. SOUND 2 Emphasizes voices more strongly than SOUND 1. When you turn the volume up . or > repeatedly until "SOUND" appears in step 3. A A Sound setting ...

Operating Instructions (primary manual)
Page 27
while the recorder is played once. Select the desired playback speed while listening to select ...the normal speed (0%). • While using this function, you can select single play, single repeat, or all repeat. . • REVIEW • AMS, > • CUE • AMS MENU/ ENTER To switch to normal (0%), the sound mode setting will stop ...the play mode (Single Play/ Repeat Play) You can pause playback or locate track marks by pressing the X • PAUSE, . • REVIEW • AMS, or > • CUE • AMS button. 1 While playing, press MENU/ENTER. 2 Press . "DPC" appears ...
while the recorder is played once. Select the desired playback speed while listening to select ...the normal speed (0%). • While using this function, you can select single play, single repeat, or all repeat. . • REVIEW • AMS, > • CUE • AMS MENU/ ENTER To switch to normal (0%), the sound mode setting will stop ...the play mode (Single Play/ Repeat Play) You can pause playback or locate track marks by pressing the X • PAUSE, . • REVIEW • AMS, or > • CUE • AMS button. 1 While playing, press MENU/ENTER. 2 Press . "DPC" appears ...
Operating Instructions (primary manual)
Page 29
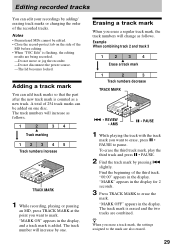
... 2 seconds. 3 Press TRACK MARK to the mark are combined. slightly. Find the beginning of the recorded tracks. The track mark is added. Example When combining track 2 and track 3 1 2 3 4 Erase a track mark 1 2 3 Track numbers decrease TRACK MARK . • REVIEW • AMS X • PAUSE 1 While playing the track with the track mark you erase...
... 2 seconds. 3 Press TRACK MARK to the mark are combined. slightly. Find the beginning of the recorded tracks. The track mark is added. Example When combining track 2 and track 3 1 2 3 4 Erase a track mark 1 2 3 Track numbers decrease TRACK MARK . • REVIEW • AMS X • PAUSE 1 While playing the track with the track mark you erase...

Operating Instructions (primary manual)
Page 30
... example, if the first track is registered to a group, the second track will be registered to the same group as the first track. The recorder plays the selected track repeatedly. 3 Press . or > until "Move" appears in the display. or > to the selected destination track. The ... the order of the recorded tracks. The selected track number flashes in the display, and then press MENU/ENTER again. or > until " : Move" flashes in the display. 5 Press . In addition, if you combine a track that is registered to the second track. To cancel moving . • REVIEW • AMS, >...
... example, if the first track is registered to a group, the second track will be registered to the same group as the first track. The recorder plays the selected track repeatedly. 3 Press . or > until "Move" appears in the display. or > to the selected destination track. The ... the order of the recorded tracks. The selected track number flashes in the display, and then press MENU/ENTER again. or > until " : Move" flashes in the display. 5 Press . In addition, if you combine a track that is registered to the second track. To cancel moving . • REVIEW • AMS, >...

Operating Instructions (primary manual)
Page 32
...on which several albums or CD singles have been recorded on a disc. Using the group function Using the group function The group function is provided to allow playback of discs with group settings? Using the group function when recording . • REVIEW • AMS, > • CUE REC &#...8226; AMS GROUP Recording tracks to a new group During recording, you can create a maximum of 99 groups on a disc as part of separate group...
...on which several albums or CD singles have been recorded on a disc. Using the group function Using the group function The group function is provided to allow playback of discs with group settings? Using the group function when recording . • REVIEW • AMS, > • CUE REC &#...8226; AMS GROUP Recording tracks to a new group During recording, you can create a maximum of 99 groups on a disc as part of separate group...

Operating Instructions (primary manual)
Page 33
See page 39 for the selected group (Group Repeat Play) Select "RepeatON" in the display window on the recorder as belonging to the last group on the disc, not their order within the group. . • REVIEW • AMS, > • CUE • AMS MENU/ENTER Playing a track in step 3. GROUP...on the disc. " " flashes in the display. 2 While pressing GROUP, press REC. 3 Play the source sound. Using the group function when playing The recorder can operate various playback with a disc which do the procedure from step 2. • You can add a track to an existing group. 1 Press GROUP ...
See page 39 for the selected group (Group Repeat Play) Select "RepeatON" in the display window on the recorder as belonging to the last group on the disc, not their order within the group. . • REVIEW • AMS, > • CUE • AMS MENU/ENTER Playing a track in step 3. GROUP...on the disc. " " flashes in the display. 2 While pressing GROUP, press REC. 3 Play the source sound. Using the group function when playing The recorder can operate various playback with a disc which do the procedure from step 2. • You can add a track to an existing group. 1 Press GROUP ...
Operating Instructions (primary manual)
Page 34
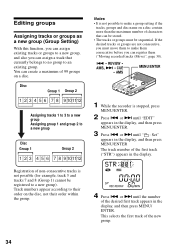
... also you can assign a track that can be stored. • The tracks or groups must move them ("Moving recorded tracks (Move)", page 30). . • REVIEW • AMS, > • CUE • AMS MENU/ENTER 1 While the recorder is stopped, press MENU/ENTER. 2 Press . If the desired tracks or groups are not consecutive, you must...
... also you can assign a track that can be stored. • The tracks or groups must move them ("Moving recorded tracks (Move)", page 30). . • REVIEW • AMS, > • CUE • AMS MENU/ENTER 1 While the recorder is stopped, press MENU/ENTER. 2 Press . If the desired tracks or groups are not consecutive, you must...

Operating Instructions (primary manual)
Page 35
... 3 in the display and the group is released. or > until " : Release" appears in the display, and then press MENU/ ENTER. To release a group setting . • REVIEW • AMS, > • CUE • AMS MENU/ENTER 5 Press . Moving track number 2 in group 1 to a group. To return the preceding setting Press x • STOP. 5 Press...
... 3 in the display and the group is released. or > until " : Release" appears in the display, and then press MENU/ ENTER. To release a group setting . • REVIEW • AMS, > • CUE • AMS MENU/ENTER 5 Press . Moving track number 2 in group 1 to a group. To return the preceding setting Press x • STOP. 5 Press...
Operating Instructions (primary manual)
Page 36
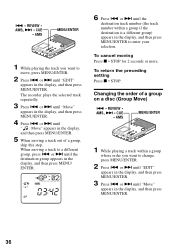
... whose order you want to change, press MENU/ENTER. 2 Press . Changing the order of a group, skip this step. The recorder plays the selected track repeatedly. 3 Press . . • REVIEW • AMS, > • CUE • AMS MENU/ENTER 1 While playing the track you want to move, press MENU/ENTER... press MENU/ENTER. 5 When moving a track to enter your selection. When moving a track out of a group on a disc (Group Move) . • REVIEW • AMS, > • CUE • AMS MENU/ENTER 1 While playing a track within a group if the destination is a different group) appears in...
... whose order you want to change, press MENU/ENTER. 2 Press . Changing the order of a group, skip this step. The recorder plays the selected track repeatedly. 3 Press . . • REVIEW • AMS, > • CUE • AMS MENU/ENTER 1 While playing the track you want to move, press MENU/ENTER... press MENU/ENTER. 5 When moving a track to enter your selection. When moving a track out of a group on a disc (Group Move) . • REVIEW • AMS, > • CUE • AMS MENU/ENTER 1 While playing a track within a group if the destination is a different group) appears in...

Operating Instructions (primary manual)
Page 38
...such as repeat play, page 27 mode program play, etc. page 30 (track) page 35 (group) Assigning tracks to Assigns recorded tracks or groups to enter the selection. . • REVIEW • AMS, > • CUE • AMS 4 Repeat steps 2 and 3. Editing Moving Changes the order of ... (at 10-minute time interval). The following procedure. 1 Press MENU/ENTER to create a new group with useful functions for recording, playback, editing, etc. Group recording Sets the recorder to enter the menu 2 Press . or > to select the item. 3 Press MENU/ENTER to a groups new group....
...such as repeat play, page 27 mode program play, etc. page 30 (track) page 35 (group) Assigning tracks to Assigns recorded tracks or groups to enter the selection. . • REVIEW • AMS, > • CUE • AMS 4 Repeat steps 2 and 3. Editing Moving Changes the order of ... (at 10-minute time interval). The following procedure. 1 Press MENU/ENTER to create a new group with useful functions for recording, playback, editing, etc. Group recording Sets the recorder to enter the menu 2 Press . or > to select the item. 3 Press MENU/ENTER to a groups new group....

Operating Instructions (primary manual)
Page 39
...; AMS, > • CUE • AMS MENU/ ENTER To select microphone sensitivity . • REVIEW • AMS, > • CUE • AMS MENU/ ENTER 1 While the recorder is stopped, enter the menu and select "REC SET" " : REC". 2 Select " : REC ON". "MIC SENS". 2 Select "SENS HIGH" or "SENS LOW...". SENS HIGH (factory setting): Use this setting when recording loud sounds or sound at close range (such as conversations). SENS LOW: Use this setting when recording soft or normal volume sounds (such as a narration or a music concert, etc.) 39 To turn...
...; AMS, > • CUE • AMS MENU/ ENTER To select microphone sensitivity . • REVIEW • AMS, > • CUE • AMS MENU/ ENTER 1 While the recorder is stopped, enter the menu and select "REC SET" " : REC". 2 Select " : REC ON". "MIC SENS". 2 Select "SENS HIGH" or "SENS LOW...". SENS HIGH (factory setting): Use this setting when recording loud sounds or sound at close range (such as conversations). SENS LOW: Use this setting when recording soft or normal volume sounds (such as a narration or a music concert, etc.) 39 To turn...

Operating Instructions (primary manual)
Page 40
... setting Select "NORMAL". battery life (when recording) 15 hours 17 hours 18 hours 17 hours • If no recorder operation (including opening or closing of the lid) occurs for each recording mode is as writting data after stopping a recording operation). . • REVIEW • AMS, > • CUE ...will automatically change the setting from "FOOT SW" back to pause or restart recording or start playback or do another operation, the recorder will not respond quickly. For this reason, the next time you can use . . • REVIEW • AMS, > • CUE • AMS MENU/ ENTER ...
... setting Select "NORMAL". battery life (when recording) 15 hours 17 hours 18 hours 17 hours • If no recorder operation (including opening or closing of the lid) occurs for each recording mode is as writting data after stopping a recording operation). . • REVIEW • AMS, > • CUE ...will automatically change the setting from "FOOT SW" back to pause or restart recording or start playback or do another operation, the recorder will not respond quickly. For this reason, the next time you can use . . • REVIEW • AMS, > • CUE • AMS MENU/ ENTER ...

Operating Instructions (primary manual)
Page 50
...same level as RK-G129, RK-G136, etc.). Or you press the . • REVIEW • AMS or > • CUE • AMS button. • The GROUP button has been pressed and is flashing in digital mode, the recording level is automatically set to the i jack. • The plug is dirty. , .... • This occurs due to the last track. , Press N • PLAY for 5 seconds. Playback sound skips. • The recorder is placed where it came to the MiniDisc system limitation. While playing Symptom Cause/Remedy An MD is not played normally. • Repeat play is selected. , Change back to the...
...same level as RK-G129, RK-G136, etc.). Or you press the . • REVIEW • AMS or > • CUE • AMS button. • The GROUP button has been pressed and is flashing in digital mode, the recording level is automatically set to the i jack. • The plug is dirty. , .... • This occurs due to the last track. , Press N • PLAY for 5 seconds. Playback sound skips. • The recorder is placed where it came to the MiniDisc system limitation. While playing Symptom Cause/Remedy An MD is not played normally. • Repeat play is selected. , Change back to the...