

Analog PCLink Operating Instructions
Page 19
... equipment has been tested and found to comply with the instructions, may cause harmful interference to Part 15 of Conformity Trade Name: XITEL Model No.: MD-Port AN1 Responsible Party: Xitel Pty. This equipment generates, uses, and can be determined by turning the equipment off and on, the user is connected...
... equipment has been tested and found to comply with the instructions, may cause harmful interference to Part 15 of Conformity Trade Name: XITEL Model No.: MD-Port AN1 Responsible Party: Xitel Pty. This equipment generates, uses, and can be determined by turning the equipment off and on, the user is connected...

Digital PCLink Operating Instructions
Page 19
... against harmful interference in accordance with the instructions, may cause undesired operation. Ltd. You are designed to Part I 5 of Conformity Trade Name: XITEL Model No.: MD-Port DG2/DG1 Responsible Party: Xitel Pty. Address: 73 Heffernan St, Mitchell, Act. 2911 Australia Phone: (02) 6241-8272 This device complies with the limits...
... against harmful interference in accordance with the instructions, may cause undesired operation. Ltd. You are designed to Part I 5 of Conformity Trade Name: XITEL Model No.: MD-Port DG2/DG1 Responsible Party: Xitel Pty. Address: 73 Heffernan St, Mitchell, Act. 2911 Australia Phone: (02) 6241-8272 This device complies with the limits...

Operating Instructions
Page 4
Table of contents Looking at the controls 6 Getting started 8 Recording an MD right away 10 Playing an MD right away 13 Various ways of recording 15 Two ways of connecting to a sound source 15 Recording with analog input (line cable required 16 Recording ...
Table of contents Looking at the controls 6 Getting started 8 Recording an MD right away 10 Playing an MD right away 13 Various ways of recording 15 Two ways of connecting to a sound source 15 Recording with analog input (line cable required 16 Recording ...
Operating Instructions
Page 7
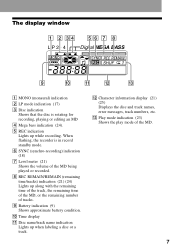
.../REMAIN (remaining time/tracks) indication (21) (24) Lights up along with the remaining time of the track, the remaining time of the MD, or the remaining number of the MD. 7 M Play mode indication (23) Shows the play mode of tracks. F SYNC (synchro-recording) indication (18) G Level meter (21) Shows the volume of...
.../REMAIN (remaining time/tracks) indication (21) (24) Lights up along with the remaining time of the track, the remaining time of the MD, or the remaining number of the MD. 7 M Play mode indication (23) Shows the play mode of tracks. F SYNC (synchro-recording) indication (18) G Level meter (21) Shows the volume of...

Operating Instructions
Page 9
... Stop the recorder before replacing battery. 2 Connect the headphones/ earphones and unlock the control. HOLD headphones/earphones (supplied) To i Connect firmly 3 Insert an MD. Insert an recordable MD when recording. 1 Slide OPEN to close. 9 When to replace the battery When the dry battery is only approximate and varies with the label side...
... Stop the recorder before replacing battery. 2 Connect the headphones/ earphones and unlock the control. HOLD headphones/earphones (supplied) To i Connect firmly 3 Insert an MD. Insert an recordable MD when recording. 1 Slide OPEN to close. 9 When to replace the battery When the dry battery is only approximate and varies with the label side...

Operating Instructions
Page 10
Recording an MD right away! Digital recording is possible even from digital equipment with analog input (line cable required)" (page 16). to DIGITAL OUT (OPTICAL) Optical plug Optical ..." (page 32). 1 Make connections. (Insert the cables firmly and completely into the appropriate jacks.) AC power adaptor to make digital recordings. To record from an MD, see "Recording with different sampling rates, such as a DAT deck or a BS tuner, using an optical cable to a wall outlet CD player...
Recording an MD right away! Digital recording is possible even from digital equipment with analog input (line cable required)" (page 16). to DIGITAL OUT (OPTICAL) Optical plug Optical ..." (page 32). 1 Make connections. (Insert the cables firmly and completely into the appropriate jacks.) AC power adaptor to make digital recordings. To record from an MD, see "Recording with different sampling rates, such as a DAT deck or a BS tuner, using an optical cable to a wall outlet CD player...
Operating Instructions
Page 11
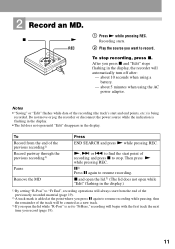
..."Edit" disappears in the display. To Record from the end of the previous recording1) Record partway through the previous recording1) Pause Remove the MD Press END SEARCH and press N while pressing REC. Do not move or jog the recorder or disconnect the power source while the indication is... recorder will always start point of the track will begin with the first track the next time you want to stop recording, press x. 2 Record an MD. Recording starts. 2 Play the source you record (page 19). 11 After you press x and "Edit" stops flashing in the display.) 1) By setting ...
..."Edit" disappears in the display. To Record from the end of the previous recording1) Record partway through the previous recording1) Pause Remove the MD Press END SEARCH and press N while pressing REC. Do not move or jog the recorder or disconnect the power source while the indication is... recorder will always start point of the track will begin with the first track the next time you want to stop recording, press x. 2 Record an MD. Recording starts. 2 Play the source you record (page 19). 11 After you press x and "Edit" stops flashing in the display.) 1) By setting ...

Operating Instructions
Page 12
.... 12 If the recording does not start • Make sure the recorder is not locked (page 25). • Make sure the MD is not record-protected (page 32). • Premastered MDs cannot be capable of digital out unless powered by pressing VOL +/-. Notes • If the power supply is restored. • You...
.... 12 If the recording does not start • Make sure the recorder is not locked (page 25). • Make sure the MD is not record-protected (page 32). • Premastered MDs cannot be capable of digital out unless powered by pressing VOL +/-. Notes • If the power supply is restored. • You...

Operating Instructions
Page 13
..., the point to start play will change to the beginning of the next track Pause Go backwards while playing1) Go forward while playing1) Remove the MD Press . about 10 seconds when using the AC power adaptor. once > once X. to resume play , press x. Press X again to adjust the volume. VOL ...>. 2) Once you open the lid2). 1) To go backward or forward quickly without listening, press X and keep pressing . After you last stopped playing. Playing an MD right away! 1 Play an MD. x N 1 Press N. 2 Press VOL +/- To stop play . The volume will automatically turn off after: -
..., the point to start play will change to the beginning of the next track Pause Go backwards while playing1) Go forward while playing1) Remove the MD Press . about 10 seconds when using the AC power adaptor. once > once X. to resume play , press x. Press X again to adjust the volume. VOL ...>. 2) Once you open the lid2). 1) To go backward or forward quickly without listening, press X and keep pressing . After you last stopped playing. Playing an MD right away! 1 Play an MD. x N 1 Press N. 2 Press VOL +/- To stop play . The volume will automatically turn off after: -

Operating Instructions
Page 15
... digital source (such as the source. Adjusted automatically. In this recorder works as the source (when the sound source is a CD or an MD). • after more ). You can erase unnecessary marks after recording. ("Erasing a track mark", page 29). Difference between digital (optical) and ...Can also be adjusted manually (Digital REC level control) ("Adjusting the recording level manually (Manual recording)", page 20). To record, see "Recording an MD right away!" (page 10) to record using digital (optical) input, and "Recording with 2 phono plugs or a stereo-mini plug)(page 16...
... digital source (such as the source. Adjusted automatically. In this recorder works as the source (when the sound source is a CD or an MD). • after more ). You can erase unnecessary marks after recording. ("Erasing a track mark", page 29). Difference between digital (optical) and ...Can also be adjusted manually (Digital REC level control) ("Adjusting the recording level manually (Manual recording)", page 20). To record, see "Recording an MD right away!" (page 10) to record using digital (optical) input, and "Recording with 2 phono plugs or a stereo-mini plug)(page 16...

Operating Instructions
Page 16
...thus the track will be counted as a portable CD player having a stereo mini-jack, use the RK-G136 connecting cord (not supplied). 1 Insert a recordable MD and start recording. Stereo recording is added at 2 times (LP2) or 4 times (LP4) the normal recording time. Recording with analog input (line cable ...The sound will sent from a portable CD player, set the CD player to pause and then start recording. For recording operations, see "Recording an MD right away!" (page 10). repeatedly until "R-MODE" flashes in monaural, LP2 or LP4 mode can be played back only on the disc. LINE ...
...thus the track will be counted as a portable CD player having a stereo mini-jack, use the RK-G136 connecting cord (not supplied). 1 Insert a recordable MD and start recording. Stereo recording is added at 2 times (LP2) or 4 times (LP4) the normal recording time. Recording with analog input (line cable ...The sound will sent from a portable CD player, set the CD player to pause and then start recording. For recording operations, see "Recording an MD right away!" (page 10). repeatedly until "R-MODE" flashes in monaural, LP2 or LP4 mode can be played back only on the disc. LINE ...

Operating Instructions
Page 17
...special digital audio compression technology that is recommended that you use the AC power adaptor for long recordings. • If you try to play an MD recorded in normal stereo (or monaural) thanks to select the desired recording mode. This technology gives the MiniDisc recorder twice the signal processing capability as... marks. • Once you set, the recorder keeps its recording mode when you record in the Digital Signal Processor (DSP), which is a high-level Sony specification used in LP4 stereo mode, momentary noise may be mixed. 3) When using an 80-minute recordable...
...special digital audio compression technology that is recommended that you use the AC power adaptor for long recordings. • If you try to play an MD recorded in normal stereo (or monaural) thanks to select the desired recording mode. This technology gives the MiniDisc recorder twice the signal processing capability as... marks. • Once you set, the recorder keeps its recording mode when you record in the Digital Signal Processor (DSP), which is a high-level Sony specification used in LP4 stereo mode, momentary noise may be mixed. 3) When using an 80-minute recordable...

Operating Instructions
Page 18
...x. REC N SELECT >/. To stop recording in the display. "SYNC" does not lights up in sync with a digital cable, and insert a recordable MD. z • You cannot pause manually during synchrorecording, the recorder goes into the standby mode automatically. Notes • Do not change the "SYNC-R" ...point where the silent portion ends. • Synchro-recording cannot be done if the connecting cord is no recorded sound on an MD. To start the procedure of a digital source on the sound source, there may be cases when recording does not pause automatically during...
...x. REC N SELECT >/. To stop recording in the display. "SYNC" does not lights up in sync with a digital cable, and insert a recordable MD. z • You cannot pause manually during synchrorecording, the recorder goes into the standby mode automatically. Notes • Do not change the "SYNC-R" ...point where the silent portion ends. • Synchro-recording cannot be done if the connecting cord is no recorded sound on an MD. To start the procedure of a digital source on the sound source, there may be cases when recording does not pause automatically during...

Operating Instructions
Page 19
... of the current contents. Adding track marks automatically at specified intervals (Auto Time Stamp) Use this feature to avoid overwriting the current contents of an MD, do the following intervals. To cancel Auto Time Stamp Select "OFF" in step 3, and then press MENU/ENTER, or stop recording. 19 SELECT >/. repeatedly until...
... of the current contents. Adding track marks automatically at specified intervals (Auto Time Stamp) Use this feature to avoid overwriting the current contents of an MD, do the following intervals. To cancel Auto Time Stamp Select "OFF" in step 3, and then press MENU/ENTER, or stop recording. 19 SELECT >/. repeatedly until...

Operating Instructions
Page 25
... to check the remaining time or the recording position while recording or in the direction of the arrow. Stereo system, etc. The recorder plays the MD digitally and sends analog signals to the externally connected equipment, the Mega Bass function is analog. Portable DAT recorder, etc. Notes • Even when connecting...
... to check the remaining time or the recording position while recording or in the direction of the arrow. Stereo system, etc. The recorder plays the MD digitally and sends analog signals to the externally connected equipment, the Mega Bass function is analog. Portable DAT recorder, etc. Notes • Even when connecting...

Operating Instructions
Page 26
... +/- ./> END SEARCH/ VOL + To Switch between capital letters, small letters and marks / numbers. Available characters • Capital and small letters of the MD (page 32). • If you try to the left or right. Change the letter to 1,700 alphanumeric letters during stop . X END SEARCH SELECT ...x MENU/ENTER Labeling a disc during playback or stop 1 Press MENU/ENTER, press SELECT >/. " " and "Name" flash in MDLP mode. Premastered MDs cannot be as long as 200 letters. Each name can hold up to the one before / next one. repeatedly until "Edit" disappears in the display...
... +/- ./> END SEARCH/ VOL + To Switch between capital letters, small letters and marks / numbers. Available characters • Capital and small letters of the MD (page 32). • If you try to the left or right. Change the letter to 1,700 alphanumeric letters during stop . X END SEARCH SELECT ...x MENU/ENTER Labeling a disc during playback or stop 1 Press MENU/ENTER, press SELECT >/. " " and "Name" flash in MDLP mode. Premastered MDs cannot be as long as 200 letters. Each name can hold up to the one before / next one. repeatedly until "Edit" disappears in the display...

Operating Instructions
Page 27
... to change, then press MENU/ENTER. repeatedly until "EDIT" flashes in the display. Press To END SEARCH/ VOL - Notes • You cannot relabel premastered MDs or label MDs that have not been recorded. • The recorder is able to label. 2 Press MENU/ENTER, press SELECT >/. Labeling a track during stop ". " " and "Name" flash...
... to change, then press MENU/ENTER. repeatedly until "EDIT" flashes in the display. Press To END SEARCH/ VOL - Notes • You cannot relabel premastered MDs or label MDs that have not been recorded. • The recorder is able to label. 2 Press MENU/ENTER, press SELECT >/. Labeling a track during stop ". " " and "Name" flash...
Operating Instructions
Page 28
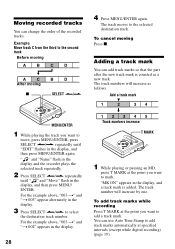
... cancel moving x B D SELECT >/. The track number will increase as a new track. Add a track mark 1 2 34 12345 Track numbers increase T MARK 1 While playing or pausing an MD, press T MARK at specified intervals (except while digital recording) (page 19). MENU/ENTER 1 While playing the track you want to the second track Before moving...
... cancel moving x B D SELECT >/. The track number will increase as a new track. Add a track mark 1 2 34 12345 Track numbers increase T MARK 1 While playing or pausing an MD, press T MARK at specified intervals (except while digital recording) (page 19). MENU/ENTER 1 While playing the track you want to the second track Before moving...
Operating Instructions
Page 30
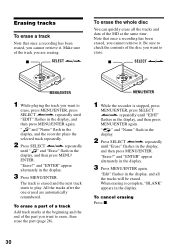
... >/. "Erase?" MENU/ENTER 1 While playing the track you want to play. " " and "Name" flash in the display, and all the tracks and data of the MD at the beginning and the end of the track you are automatically renumbered. Erasing tracks To erase a track Note that once a recording has been erased...
... >/. "Erase?" MENU/ENTER 1 While playing the track you want to play. " " and "Name" flash in the display, and all the tracks and data of the MD at the beginning and the end of the track you are automatically renumbered. Erasing tracks To erase a track Note that once a recording has been erased...

Operating Instructions
Page 31
... outlet, grasp the adaptor plug itself has been turned off until it is not to close the disc compartment lid after inserting or ejecting an MD. • To obtain the best sound quality, use in the DC IN 3V jack. Hearing experts advise against continuous, loud and extended play ... at high volume while walking, especially at high volume. This will be subject to light, extreme temperatures, moisture or dust. • Attach the supplied MD label only in the space designated for a long time, be potentially dangerous to disconnect the power supply (AC power adaptor or dry battery). Do not...
... outlet, grasp the adaptor plug itself has been turned off until it is not to close the disc compartment lid after inserting or ejecting an MD. • To obtain the best sound quality, use in the DC IN 3V jack. Hearing experts advise against continuous, loud and extended play ... at high volume while walking, especially at high volume. This will be subject to light, extreme temperatures, moisture or dust. • Attach the supplied MD label only in the space designated for a long time, be potentially dangerous to disconnect the power supply (AC power adaptor or dry battery). Do not...


