
VAIO User Guide
Page 8
Computer Features Locating Controls and Ports Using the Touch Pad Using Memory Stick Media Page 8
Computer Features Locating Controls and Ports Using the Touch Pad Using Memory Stick Media Page 8

VAIO User Guide
Page 9
Locating Controls and Ports Controls and ports on your computer Front 1 Hard disk drive indicator 9 Left and right buttons 2 Num lock indicator 10 Wireless LAN switch 3 Caps lock indicator 11 Wireless LAN indicator 4 Scroll lock indicator 12 Memory Stick® media indicator 5 Power indicator 13 Memory Stick media slot 6 Battery indicator 14 Keyboard 7 Power button 15 Speakers 8 Touch pad Back 16 Computer screen (LCD) Page 9
Locating Controls and Ports Controls and ports on your computer Front 1 Hard disk drive indicator 9 Left and right buttons 2 Num lock indicator 10 Wireless LAN switch 3 Caps lock indicator 11 Wireless LAN indicator 4 Scroll lock indicator 12 Memory Stick® media indicator 5 Power indicator 13 Memory Stick media slot 6 Battery indicator 14 Keyboard 7 Power button 15 Speakers 8 Touch pad Back 16 Computer screen (LCD) Page 9

VAIO User Guide
Page 11
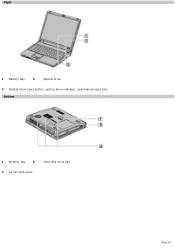
Right 1 Battery bay 3 Optical drive 2 Optical drive eject button, optical drive indicator, and manual eject hole Bottom 1 Memory bay 2 3 Air fan and vents Hard disk drive bay Page 11
Right 1 Battery bay 3 Optical drive 2 Optical drive eject button, optical drive indicator, and manual eject hole Bottom 1 Memory bay 2 3 Air fan and vents Hard disk drive bay Page 11

VAIO User Guide
Page 12
Locating Controls and Ports Controls and ports on your computer Front 1 Hard disk drive indicator 9 Left and right buttons 2 Num lock indicator 10 Wireless LAN switch 3 Caps lock indicator 11 Wireless LAN indicator 4 Scroll lock indicator 12 Memory Stick® media indicator 5 Power indicator 13 Memory Stick media slot 6 Battery indicator 14 Keyboard 7 Power button 15 Speakers 8 Touch pad Back 16 Computer screen (LCD) Page 12
Locating Controls and Ports Controls and ports on your computer Front 1 Hard disk drive indicator 9 Left and right buttons 2 Num lock indicator 10 Wireless LAN switch 3 Caps lock indicator 11 Wireless LAN indicator 4 Scroll lock indicator 12 Memory Stick® media indicator 5 Power indicator 13 Memory Stick media slot 6 Battery indicator 14 Keyboard 7 Power button 15 Speakers 8 Touch pad Back 16 Computer screen (LCD) Page 12
VAIO User Guide
Page 14
Right 1 Battery bay 3 Optical drive 2 Optical drive eject button, optical drive indicator, and manual eject hole Bottom 1 Memory bay 2 3 Air fan and vents Hard disk drive bay Page 14
Right 1 Battery bay 3 Optical drive 2 Optical drive eject button, optical drive indicator, and manual eject hole Bottom 1 Memory bay 2 3 Air fan and vents Hard disk drive bay Page 14

VAIO User Guide
Page 19
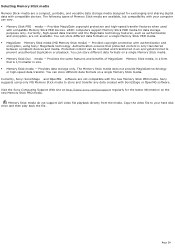
Page 19 Because it is specially designed for external data storage. Using Memory Stick Media This compact, portable, and versatile recording medium has a data capacity exceeding that of a floppy disk. The medium is removable, the media can be used for exchanging and sharing digital data with compatible products.
Page 19 Because it is specially designed for external data storage. Using Memory Stick Media This compact, portable, and versatile recording medium has a data capacity exceeding that of a floppy disk. The medium is removable, the media can be used for exchanging and sharing digital data with compatible products.
VAIO User Guide
Page 20
... or playback. You can be recorded and transferred in size. Memory Stick media - Protected content can store different data formats on a single Memory Stick media. Memory Stick Duo media - VAIO® computers support Memory Stick PRO media for data storage purposes only. Currently, Sony® SonicStage and OpenMG software are not compatible with compatible...
... or playback. You can be recorded and transferred in size. Memory Stick media - Protected content can store different data formats on a single Memory Stick media. Memory Stick Duo media - VAIO® computers support Memory Stick PRO media for data storage purposes only. Currently, Sony® SonicStage and OpenMG software are not compatible with compatible...

VAIO User Guide
Page 21
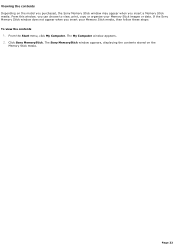
Inserting Memory Stick media Before using Memory Stick media, back up and toward the Memory Stick media slot. Inserting the media in place. Carefully slide the Memory Stick media into the slot until it clicks in the wrong direction may damage the connector pins. 2. To insert Memory Stick media 1. Inserting Mem ory Stick Media Page 21 The Memory Stick media indicator briefly blinks. The media slot accommodates only one Memory Stick media at a time. Insert the Memory Stick media with the arrow facing up important data.
Inserting Memory Stick media Before using Memory Stick media, back up and toward the Memory Stick media slot. Inserting the media in place. Carefully slide the Memory Stick media into the slot until it clicks in the wrong direction may damage the connector pins. 2. To insert Memory Stick media 1. Inserting Mem ory Stick Media Page 21 The Memory Stick media indicator briefly blinks. The media slot accommodates only one Memory Stick media at a time. Insert the Memory Stick media with the arrow facing up important data.
VAIO User Guide
Page 22
From the Start menu, click My Computer. Viewing the contents Depending on the Memory Stick media. From this window, you insert your Memory Stick images or data. Page 22 The My Computer window appears. 2. If the Sony Memory Stick window does not appear when you can choose to view, print, copy or organize your Memory Stick media, then follow these steps: To view the contents 1. The Sony MemoryStick window appears, displaying the contents stored on the model you purchased, the Sony Memory Stick window may appear when you insert a Memory Stick media. Click Sony MemoryStick.
From the Start menu, click My Computer. Viewing the contents Depending on the Memory Stick media. From this window, you insert your Memory Stick images or data. Page 22 The My Computer window appears. 2. If the Sony Memory Stick window does not appear when you can choose to view, print, copy or organize your Memory Stick media, then follow these steps: To view the contents 1. The Sony MemoryStick window appears, displaying the contents stored on the model you purchased, the Sony Memory Stick window may appear when you insert a Memory Stick media. Click Sony MemoryStick.

VAIO User Guide
Page 23
Write-protect off Data can be read from accidental erasure or overwriting. When the write-protect tab of the Memory Stick media is designed with a write-protect tab to protect data from but not saved on the Memory Stick media. Write-protecting Memory Stick media Memory Stick® media is set or release write-protection. Move the tab to the right or left to set to LOCK, data cannot be recorded or erased. Write-protect on Data can be saved on the Memory Stick media. Protect Tab Page 23 Using the Write-
Write-protect off Data can be read from accidental erasure or overwriting. When the write-protect tab of the Memory Stick media is designed with a write-protect tab to protect data from but not saved on the Memory Stick media. Write-protecting Memory Stick media Memory Stick® media is set or release write-protection. Move the tab to the right or left to set to LOCK, data cannot be recorded or erased. Write-protect on Data can be saved on the Memory Stick media. Protect Tab Page 23 Using the Write-

VAIO User Guide
Page 24
... more information about using Memory Stick Formatter, refer to reformat Memory Stick media, use when you are finished. From the Start menu, point to Memory Stick Utility, and click Memory Stick Formatter. 4. Click Exit when you purchase it . Formatting Memory Stick media Memory Stick® media is... window appears, follow the on -screen instructions and click OK. 5. Insert the Memory Stick media into the Memory Stick media slot. See To insert Memory Stick media for immediate use the Memory Stick Formatter that the media does not contain files you want to it . Page...
... more information about using Memory Stick Formatter, refer to reformat Memory Stick media, use when you are finished. From the Start menu, point to Memory Stick Utility, and click Memory Stick Formatter. 4. Click Exit when you purchase it . Formatting Memory Stick media Memory Stick® media is... window appears, follow the on -screen instructions and click OK. 5. Insert the Memory Stick media into the Memory Stick media slot. See To insert Memory Stick media for immediate use the Memory Stick Formatter that the media does not contain files you want to it . Page...

VAIO User Guide
Page 25
To remove Memory Stick media 1. Page 25 Reinsert the media into the slot and press Enter to finish reading or writing data. Make sure the access light is removed prematurely, a blue screen with a message may appear prompting you to continue or exit. Push the Memory Stick media in toward the computer. 4. Removing Memory Stick media If the media is off. 3. This enables the media to continue. Wait a minimum of 10 seconds after the Memory Stick media finishes reading or writing data before removing the media. 2. When the Memory Stick media ejects, pull it out.
To remove Memory Stick media 1. Page 25 Reinsert the media into the slot and press Enter to finish reading or writing data. Make sure the access light is removed prematurely, a blue screen with a message may appear prompting you to continue or exit. Push the Memory Stick media in toward the computer. 4. Removing Memory Stick media If the media is off. 3. This enables the media to continue. Wait a minimum of 10 seconds after the Memory Stick media finishes reading or writing data before removing the media. 2. When the Memory Stick media ejects, pull it out.

VAIO User Guide
Page 26
... substances Page 26 See the instructions that came with your Memory Stick media. Frequently asked questions Why can't I extend the life of the copyright holders. Sony is subject to save music files onto my Memory Stick media? Copyright protected music cannot be recorded... from a CD or downloaded from the Memory Stick media onto your computer. Yes, and you reformat Memory Stick media, back up important data...
... substances Page 26 See the instructions that came with your Memory Stick media. Frequently asked questions Why can't I extend the life of the copyright holders. Sony is subject to save music files onto my Memory Stick media? Copyright protected music cannot be recorded... from a CD or downloaded from the Memory Stick media onto your computer. Yes, and you reformat Memory Stick media, back up important data...
VAIO User Guide
Page 32
... Turns on when the wireless LAN function is on. Normal typing resumes when the Caps Lock indicator is charging. Memory Stick® Turns on when data is read from or written to the Memory Stick media. (Do not enter Standby mode or turn off the computer when this indicator is on.) When... the indicator is off, the Memory Stick media is off. Press the key a second time to activate the numeric keypad. Normal scrolling resumes when the Scroll Lock indicator is not being ...
... Turns on when the wireless LAN function is on. Normal typing resumes when the Caps Lock indicator is charging. Memory Stick® Turns on when data is read from or written to the Memory Stick media. (Do not enter Standby mode or turn off the computer when this indicator is on.) When... the indicator is off, the Memory Stick media is off. Press the key a second time to activate the numeric keypad. Normal scrolling resumes when the Scroll Lock indicator is not being ...
VAIO User Guide
Page 50
... of the system and peripheral devices in this mode. 3. Click Start on , and the computer screen (LCD) is off . 2. The power indicator blinks in memory (RAM). Press the Fn+F12 keys, or press the power button and release it immediately. Press the power button to return to the hard disk... 2. To activate Standby mode 1. Press any key to return to avoid data loss. If the computer does not activate Hibernate mode, see To use VAIO Power Management for more information. Using power saving modes In addition to the normal operating mode, which allows you select. Click Stand By when the...
... of the system and peripheral devices in this mode. 3. Click Start on , and the computer screen (LCD) is off . 2. The power indicator blinks in memory (RAM). Press the Fn+F12 keys, or press the power button and release it immediately. Press the power button to return to the hard disk... 2. To activate Standby mode 1. Press any key to return to avoid data loss. If the computer does not activate Hibernate mode, see To use VAIO Power Management for more information. Using power saving modes In addition to the normal operating mode, which allows you select. Click Stand By when the...
VAIO User Guide
Page 88
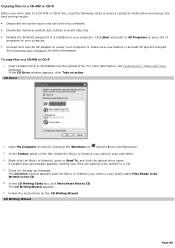
... to avoid a computer malfunction and ensure the best writing results: Deactivate the screen saver and exit anti-virus software. Deactivate memory-resident disc utilities to avoid data loss. Disable the FindFast program if it is at least 50 percent charged. Close on the CD... or make sure your files are waiting to be written to a CD. 5. A taskbar pop-up message. The CD Drive window appears with Sony Software. See Powering Your Computer for more information, see a list of programs on your computer. For more information. In the CD Writing Tasks box...
... to avoid a computer malfunction and ensure the best writing results: Deactivate the screen saver and exit anti-virus software. Deactivate memory-resident disc utilities to avoid data loss. Disable the FindFast program if it is at least 50 percent charged. Close on the CD... or make sure your files are waiting to be written to a CD. 5. A taskbar pop-up message. The CD Drive window appears with Sony Software. See Powering Your Computer for more information, see a list of programs on your computer. For more information. In the CD Writing Tasks box...

VAIO User Guide
Page 92
... read most DVD-R media. Page 92 Change the power schemes to speed up disc access when playing a DVD. Press the Fn+F7 keys to use memory-resident utility software to Max Battery if it is playing a DVD. See Selecting a display for more information. 4. Insert the DVD into the optical drive. For...
... read most DVD-R media. Page 92 Change the power schemes to speed up disc access when playing a DVD. Press the Fn+F7 keys to use memory-resident utility software to Max Battery if it is playing a DVD. See Selecting a display for more information. 4. Insert the DVD into the optical drive. For...

VAIO User Guide
Page 94
.... Reduce the volume before playing a DVD. This may produce noise while playing. Insert the DVD into the optical drive. 4. Click Start on how to use memory-resident utility software to malfunction. Set the power schemes to All Programs. 2. See To select a power scheme for more battery power you to use a program...
.... Reduce the volume before playing a DVD. This may produce noise while playing. Insert the DVD into the optical drive. 4. Click Start on how to use memory-resident utility software to malfunction. Set the power schemes to All Programs. 2. See To select a power scheme for more battery power you to use a program...
VAIO User Guide
Page 95
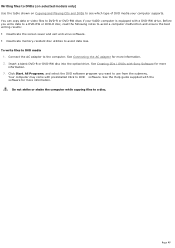
...files to DVD-R or DVD-RW discs if your computer supports. See Creating CDs / DVDs with Sony Software for more information. 2. Do not strike or shake the computer while copying files to DVD ... table shown on Copying and Playing CDs and DVDs to see which type of DVD media your VAIO® computer is equipped with a DVD-RW drive. See Connecting the AC adapter for more information... best writing results: Deactivate the screen saver and exit anti-virus software. Deactivate memory-resident disc utilities to use from the submenu. Before you want to avoid data loss. See the ...
...files to DVD-R or DVD-RW discs if your computer supports. See Creating CDs / DVDs with Sony Software for more information. 2. Do not strike or shake the computer while copying files to DVD ... table shown on Copying and Playing CDs and DVDs to see which type of DVD media your VAIO® computer is equipped with a DVD-RW drive. See Connecting the AC adapter for more information... best writing results: Deactivate the screen saver and exit anti-virus software. Deactivate memory-resident disc utilities to use from the submenu. Before you want to avoid data loss. See the ...

VAIO User Guide
Page 117
Audio and Video Connections Using i.LINK Digital Video Recorders Using Computer Monitors and Projectors Changing Video Memory Size Using Speakers Using Microphones Page 117
Audio and Video Connections Using i.LINK Digital Video Recorders Using Computer Monitors and Projectors Changing Video Memory Size Using Speakers Using Microphones Page 117


