

Operating Instructions (primary manual)
Page 2
...to these numbers whenever you connect a computer to this monitor, attach the supplied ferrite cores. To prevent fire or shock hazard, do this, this monitor will be easily accessible. This equipment generates, uses,...the user will not conform to mandatory FCC/IC/CE (EN55022) standards. For PFM-500A1WE users THIS APPARATUS MUST BE EARTHED IMPORTANT The wires in this mains lead are...Rules. In a domestic environment, this product. Serial No. Note When you call upon your Sony dealer regarding this product may cause radio interference in a residential area is coloured brown must be...
...to these numbers whenever you connect a computer to this monitor, attach the supplied ferrite cores. To prevent fire or shock hazard, do this, this monitor will be easily accessible. This equipment generates, uses,...the user will not conform to mandatory FCC/IC/CE (EN55022) standards. For PFM-500A1WE users THIS APPARATUS MUST BE EARTHED IMPORTANT The wires in this mains lead are...Rules. In a domestic environment, this product. Serial No. Note When you call upon your Sony dealer regarding this product may cause radio interference in a residential area is coloured brown must be...
Operating Instructions (primary manual)
Page 3
... 18 (EN) Menu Guide 18 (EN) EN Watching the Picture 22 (EN) Switching the Picture 22 (EN) Watching a Still Picture 22 (EN) Input Signal and Monitor Status Information Display 22 (EN) Adjusting the Picture 24 (EN) Adjusting the Contrast, Brightness, Chroma, and Phase 24 (EN) Emphasizing the Contrast of the Picture... When There Is No Input Signal (Power Saving Function 30 (EN) Selecting the On-screen Language 31 (EN) Self-diagnosis Function 31 (EN) Operating a Specific Monitor With the Remote Commander 32 (EN) Using the Other Remote Commander 33 (EN) Specifications 34 (EN) 3 (EN)
... 18 (EN) Menu Guide 18 (EN) EN Watching the Picture 22 (EN) Switching the Picture 22 (EN) Watching a Still Picture 22 (EN) Input Signal and Monitor Status Information Display 22 (EN) Adjusting the Picture 24 (EN) Adjusting the Contrast, Brightness, Chroma, and Phase 24 (EN) Emphasizing the Contrast of the Picture... When There Is No Input Signal (Power Saving Function 30 (EN) Selecting the On-screen Language 31 (EN) Self-diagnosis Function 31 (EN) Operating a Specific Monitor With the Remote Commander 32 (EN) Using the Other Remote Commander 33 (EN) Specifications 34 (EN) 3 (EN)

Operating Instructions (primary manual)
Page 5
...13) 53rd (O.C) 10A/250V 10A/250V VDE VDE Japan VM1296 VM1313 HVCTF 10A/125V DENTORI ... 1) Windows95 is a registered trademark of several monitors by using the on power connection Use a proper power cord for user-friendly access. • Power Saving function. • Self-diagnosis ...for PAL Y/C separation. • Up to x4 zooming. • Accepts infrared or wired Sony Remote Commanders using the index number features. Features The PFM-500A1WU is 16:9 42-inch flat panel monitor adopting the PDP (Plasma Display Panel) and accepts various types of signals with indication. &#...
...13) 53rd (O.C) 10A/250V 10A/250V VDE VDE Japan VM1296 VM1313 HVCTF 10A/125V DENTORI ... 1) Windows95 is a registered trademark of several monitors by using the on power connection Use a proper power cord for user-friendly access. • Power Saving function. • Self-diagnosis ...for PAL Y/C separation. • Up to x4 zooming. • Accepts infrared or wired Sony Remote Commanders using the index number features. Features The PFM-500A1WU is 16:9 42-inch flat panel monitor adopting the PDP (Plasma Display Panel) and accepts various types of signals with indication. &#...

Operating Instructions (primary manual)
Page 6
... the cover. 6 (EN) For details on using the left connector panel, see "Left Connector Panel" on page 11(EN). 3 Retractable feet Use for setting the monitor on the floor. Location and Function of this cover. You can install the Remote Commander in the back of Parts and Controls Front / Sides Left...
... the cover. 6 (EN) For details on using the left connector panel, see "Left Connector Panel" on page 11(EN). 3 Retractable feet Use for setting the monitor on the floor. Location and Function of this cover. You can install the Remote Commander in the back of Parts and Controls Front / Sides Left...

Operating Instructions (primary manual)
Page 8
... power saving mode, see "Self-diagnosis Function" on page 31(EN). 3 Power indicator Lights up when the monitor is turned on . buttons Press to move the cursor (z) to an item or to turn the monitor on . The u (standby) indicator lights up or flash that show they can be operated. Note The buttons...
... power saving mode, see "Self-diagnosis Function" on page 31(EN). 3 Power indicator Lights up when the monitor is turned on . buttons Press to move the cursor (z) to an item or to turn the monitor on . The u (standby) indicator lights up or flash that show they can be operated. Note The buttons...

Operating Instructions (primary manual)
Page 10
Location and Function of Parts and Controls 3 LINE IN connectors VIDEO IN (BNC-type): Connect to the composite video signal output of another monitor. Connect to the H sync signal or composite sync signal input of the video equipment. When using these connectors. Connect to the RGB.... When the plug is connected to the audio inputs of the sync signal level mismatch. AUDIO OUT (L/R) (phono type): Loop-through outputs of another monitor or video equipment. 6 Service connector (mini DIN 8-pin) This connector is output from the VIDEO OUT connector or Y/C OUT jack. VIDEO OUT (BNC...
Location and Function of Parts and Controls 3 LINE IN connectors VIDEO IN (BNC-type): Connect to the composite video signal output of another monitor. Connect to the H sync signal or composite sync signal input of the video equipment. When using these connectors. Connect to the RGB.... When the plug is connected to the audio inputs of the sync signal level mismatch. AUDIO OUT (L/R) (phono type): Loop-through outputs of another monitor or video equipment. 6 Service connector (mini DIN 8-pin) This connector is output from the VIDEO OUT connector or Y/C OUT jack. VIDEO OUT (BNC...

Operating Instructions (primary manual)
Page 11
...electric current might flow from the AUDIO IN jacks. Connect to the CONTROL S jacks of video equipment or another monitors. Note Do not connect the speaker's cord to the monitor and to a wall outlet. Note These jacks are variable outputs. Notes • If you connect the CONTROL S... aiming the supplied Remote Commander to the remote control detector of the monitor, connect the CONTROL S OUT jack of the monitor and the CONTROL S IN jack of other equipment's CONTROL S OUT jack, you cannot operate the monitor with the Remote Commander. • You can simultaneously control all equipment...
...electric current might flow from the AUDIO IN jacks. Connect to the CONTROL S jacks of video equipment or another monitors. Note Do not connect the speaker's cord to the monitor and to a wall outlet. Note These jacks are variable outputs. Notes • If you connect the CONTROL S... aiming the supplied Remote Commander to the remote control detector of the monitor, connect the CONTROL S OUT jack of the monitor and the CONTROL S IN jack of other equipment's CONTROL S OUT jack, you cannot operate the monitor with the Remote Commander. • You can simultaneously control all equipment...
Operating Instructions (primary manual)
Page 12
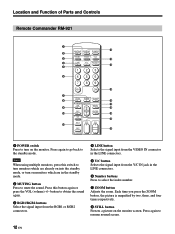
...161; OFF @¡ ID MODE 1 POWER switch Press to turn on monitors which are in the LINE connectors. 6 Number buttons Press to turn monitors which are already on into the standby mode, or turn on the monitor screen. Press again to the standby mode. Press this switch to select ... press the ZOOM button, the picture is magnified by two, three, and four times respectively. 8 STILL button Freezes a picture on the monitor. Note When using multiple monitors, press this button again or press the VOL (volume) +/- button to obtain the sound again. 3 RGB1/RGB2 buttons Select the signal...
...161; OFF @¡ ID MODE 1 POWER switch Press to turn on monitors which are in the LINE connectors. 6 Number buttons Press to turn monitors which are already on into the standby mode, or turn on the monitor screen. Press again to the standby mode. Press this switch to select ... press the ZOOM button, the picture is magnified by two, three, and four times respectively. 8 STILL button Freezes a picture on the monitor. Note When using multiple monitors, press this button again or press the VOL (volume) +/- button to obtain the sound again. 3 RGB1/RGB2 buttons Select the signal...

Operating Instructions (primary manual)
Page 13
... signal input from possible battery leakage, remove the batteries if you connect the cable to the CONTROL S IN jack on the top of the monitor screen. button to increase the volume, or the - buttons This button does not operate with the Remote Commander. 13 (EN) When you... use this switch instead of the monitor you can use multiple monitors, you cannot operate the monitor with the monitor. Be sure to half a year. If the Remote Commander does not operate properly, the batteries might be exhausted....
... signal input from possible battery leakage, remove the batteries if you connect the cable to the CONTROL S IN jack on the top of the monitor screen. button to increase the volume, or the - buttons This button does not operate with the Remote Commander. 13 (EN) When you... use this switch instead of the monitor you can use multiple monitors, you cannot operate the monitor with the monitor. Be sure to half a year. If the Remote Commander does not operate properly, the batteries might be exhausted....

Operating Instructions (primary manual)
Page 15
... be 0°C - +35°C (32°F - 95°F). Side ,,,,, 10(4) Wall 5 (2) Wall Units: cm (inches) 25 (9 7/8) Wall 15 (EN) Caution • When you install the monitor, make sure there is at the bottom.
... be 0°C - +35°C (32°F - 95°F). Side ,,,,, 10(4) Wall 5 (2) Wall Units: cm (inches) 25 (9 7/8) Wall 15 (EN) Caution • When you install the monitor, make sure there is at the bottom.

Operating Instructions (primary manual)
Page 18
.... For details on using the reset function, see "Restoring the PIC CONTROL Menu Items to Original Settings" on the monitor screen. 3 Press >/. The availability depends on the monitor screen. 4 Press >/. The setting is not available. Using On-screen Menus Operating Through Menus Menu Guide Menu operating ...an item. PIC CONTROL menu This menu is input. to set. Remote Commander SELECT MENU Monitor MENU . > ENT ENTER The buttons on the control panel are four buttons on the monitor and the Remote Commander for the selected item appears on the types of the Picture (...
.... For details on using the reset function, see "Restoring the PIC CONTROL Menu Items to Original Settings" on the monitor screen. 3 Press >/. The availability depends on the monitor screen. 4 Press >/. The setting is not available. Using On-screen Menus Operating Through Menus Menu Guide Menu operating ...an item. PIC CONTROL menu This menu is input. to set. Remote Commander SELECT MENU Monitor MENU . > ENT ENTER The buttons on the control panel are four buttons on the monitor and the Remote Commander for the selected item appears on the types of the Picture (...

Operating Instructions (primary manual)
Page 19
... SAVE Set the time period to move the picture up the picture two, three, and four times. !£ ASPECT Set the aspect ratio of the monitor screen when turning on page 27(EN). Press > to !£. The moiré pattern or noise decreases even the screen looks a little blurred. !¶ DISPLAY...
... SAVE Set the time period to move the picture up the picture two, three, and four times. !£ ASPECT Set the aspect ratio of the monitor screen when turning on page 27(EN). Press > to !£. The moiré pattern or noise decreases even the screen looks a little blurred. !¶ DISPLAY...

Operating Instructions (primary manual)
Page 20
...(EN). @º LOAD Recalls the preset settings. @¡ SAVE Saves the settings. For details, see "Using the Other Remote Commander" on the monitor. Using On-screen Menus c MEMORY menu This menu is used for the remote control setting. @™ R EMO T E I NDEX NO . ...: 001 @£ R EMO T E MOD E : TV @¢ R EMO T E ON L Y : O F F S E L E C T ENTER C A N C E L MENU @™ INDEX NO. TV: Sony monitors' or TVs' commander PJ: Sony projectors' commander OFF: Disables the remote control. To cancel the REMOTE ONLY mode, set the number, use the buttons on page 33(EN...
...(EN). @º LOAD Recalls the preset settings. @¡ SAVE Saves the settings. For details, see "Using the Other Remote Commander" on the monitor. Using On-screen Menus c MEMORY menu This menu is used for the remote control setting. @™ R EMO T E I NDEX NO . ...: 001 @£ R EMO T E MOD E : TV @¢ R EMO T E ON L Y : O F F S E L E C T ENTER C A N C E L MENU @™ INDEX NO. TV: Sony monitors' or TVs' commander PJ: Sony projectors' commander OFF: Disables the remote control. To cancel the REMOTE ONLY mode, set the number, use the buttons on page 33(EN...

Operating Instructions (primary manual)
Page 21
... The standby mode is not counted as OPERATION time. @• SOFTWARE Indicates the system software version. @ª TEMPERATURE Indicates whether the internal temperature of the monitor. @∞ STATUS @§ [ P F M - 5 0 0 A 1WU ] @¶ SER I ON : 2000001 : 000000H @• SO F TWA R E : Ver 1 . 0 0 @ª T ...8734; Model name Indicates the model name. @§ SERIAL No. Note When the "FAN NG" message appears, contact your authorized Sony dealer. When the u indicator flashes or NG indicates, see "Selfdiagnosis Function" on page 31(EN). The u indicator on the ...
... The standby mode is not counted as OPERATION time. @• SOFTWARE Indicates the system software version. @ª TEMPERATURE Indicates whether the internal temperature of the monitor. @∞ STATUS @§ [ P F M - 5 0 0 A 1WU ] @¶ SER I ON : 2000001 : 000000H @• SO F TWA R E : Ver 1 . 0 0 @ª T ...8734; Model name Indicates the model name. @§ SERIAL No. Note When the "FAN NG" message appears, contact your authorized Sony dealer. When the u indicator flashes or NG indicates, see "Selfdiagnosis Function" on page 31(EN). The u indicator on the ...
Operating Instructions (primary manual)
Page 22
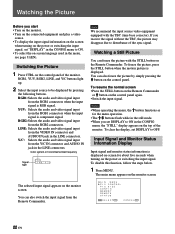
.... To freeze the picture, press the STILL button when the motion picture is component signal. The main menu appears on the control panel of the monitor. Color system or horizontal/vertical frequency Signal type PAL L I G MEMOR Y R EMO T E STATUS S E L E C T ENTER C A N C E L MENU 22 (EN) If you set... corrector). To disable this function, follow the steps below. 1 Press MENU. Watching the Picture Before you start • Turn on the monitor. • Turn on the connected equipment and play a video source. • To display the input signal information on the screen when turning...
.... To freeze the picture, press the STILL button when the motion picture is component signal. The main menu appears on the control panel of the monitor. Color system or horizontal/vertical frequency Signal type PAL L I G MEMOR Y R EMO T E STATUS S E L E C T ENTER C A N C E L MENU 22 (EN) If you set... corrector). To disable this function, follow the steps below. 1 Press MENU. Watching the Picture Before you start • Turn on the monitor. • Turn on the connected equipment and play a video source. • To display the input signal information on the screen when turning...
Operating Instructions (primary manual)
Page 23
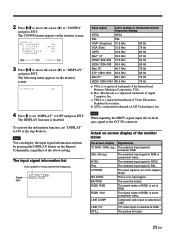
...Composite video input is muted. Actual on the Remote Commander, regardless of Video Electronics Standard Association. RGB1 YUV The signal mode of the monitor status On-screen display Significance 31.5kHz / 60Hz (eg.) The selected input signal is computer RGB. 525 / 60 (eg.) The.... RGB1 RGB The signal mode of the capture range. STILL The picture is a registered trademark of ATI Technologies, Inc. The following menu appears on the monitor screen. OTHERS The input signal is out of RGB1 is NTSC. d) ATI is frozen. 23 (EN) CONF I G V ENHANCE H F I L TER D I...
...Composite video input is muted. Actual on the Remote Commander, regardless of Video Electronics Standard Association. RGB1 YUV The signal mode of the monitor status On-screen display Significance 31.5kHz / 60Hz (eg.) The selected input signal is computer RGB. 525 / 60 (eg.) The.... RGB1 RGB The signal mode of the capture range. STILL The picture is a registered trademark of ATI Technologies, Inc. The following menu appears on the monitor screen. OTHERS The input signal is out of RGB1 is NTSC. d) ATI is frozen. 23 (EN) CONF I G V ENHANCE H F I L TER D I...

Operating Instructions (primary manual)
Page 24
...50) to MAX (+50). >: to make overall picture greenish .: to make overall picture purplish 24 (EN) Turn on the monitor screen and select the "CONTRAST", "BRIGHTNESS", "CHROMA", or "PHASE" from MIN (0) to MAX (+100). >: to increase picture...00 : 00 : H I G MEMOR Y R EMO T E STATUS S E L E C T ENTER C A N C E L MENU 2 Press >/. buttons and press the ENT button. The PIC CONTROL menu appears on the monitor screen. MA I N MENU P I C CONTROL P I C S I ZE CONF I GH : ON C A N C E L MENU Select the "PHASE" with the >/. Adjust the phase with the >/. Adjust the chroma ...
...50) to MAX (+50). >: to make overall picture greenish .: to make overall picture purplish 24 (EN) Turn on the monitor screen and select the "CONTRAST", "BRIGHTNESS", "CHROMA", or "PHASE" from MIN (0) to MAX (+100). >: to increase picture...00 : 00 : H I G MEMOR Y R EMO T E STATUS S E L E C T ENTER C A N C E L MENU 2 Press >/. buttons and press the ENT button. The PIC CONTROL menu appears on the monitor screen. MA I N MENU P I C CONTROL P I C S I ZE CONF I GH : ON C A N C E L MENU Select the "PHASE" with the >/. Adjust the phase with the >/. Adjust the chroma ...
Operating Instructions (primary manual)
Page 25
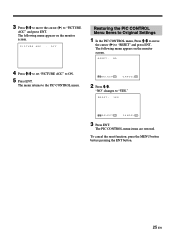
... "PICTURE AGC" and press ENT. "NO" changes to Original Settings 1 In the PIC CONTROL menu, Press >/. The following menu appears on the monitor screen. The following menu appears on the monitor screen. The PIC CONTROL menu items are restored. 3 Press >/. P I CTURE AGC : OF F Restoring the PIC CONTROL Menu Items to "YES." RESET...
... "PICTURE AGC" and press ENT. "NO" changes to Original Settings 1 In the PIC CONTROL menu, Press >/. The following menu appears on the monitor screen. The following menu appears on the monitor screen. The PIC CONTROL menu items are restored. 3 Press >/. P I CTURE AGC : OF F Restoring the PIC CONTROL Menu Items to "YES." RESET...

Operating Instructions (primary manual)
Page 26
... large as the original size. P I C S I ZE H S I ZE H SH I FT V S I ZE V SH I ZE : 00 7 Press >/. The following menu appears on the monitor screen. V S I FT Z OOM ASPECT RESET S E L E C T ENTER : 00 : 00 : 00 : 00 : x1 : 4x3 C A N C E L MENU 3 Press >/. ... the PIC SIZE menu. 26 (EN) to move the cursor (z) to MAX(+50). Resizing the Picture 1 Press MENU. The PIC SIZE menu appears on the monitor screen. H S I G MEMOR Y R EMO T E STATUS S E L E C T ENTER C A N C E L MENU 2 Press >/. The menu returns to "H SIZE" and press ENT. MA I N MENU P...
... large as the original size. P I C S I ZE H S I ZE H SH I FT V S I ZE V SH I ZE : 00 7 Press >/. The following menu appears on the monitor screen. V S I FT Z OOM ASPECT RESET S E L E C T ENTER : 00 : 00 : 00 : 00 : x1 : 4x3 C A N C E L MENU 3 Press >/. ... the PIC SIZE menu. 26 (EN) to move the cursor (z) to MAX(+50). Resizing the Picture 1 Press MENU. The PIC SIZE menu appears on the monitor screen. H S I G MEMOR Y R EMO T E STATUS S E L E C T ENTER C A N C E L MENU 2 Press >/. The menu returns to "H SIZE" and press ENT. MA I N MENU P...

Operating Instructions (primary manual)
Page 27
...menu, press >/. RESET : YES Zooming Up the Picture You can also operate with the ZOOM button on the monitor screen. The following menu appears on the monitor screen. to shift the picture. >: to shift the picture upward .: to shift the picture downward The vertical ... menu returns to "V SHIFT" and press ENT. 4 Press >/. to move the cursor (z) to the PIC SIZE menu. 27 (EN) The following menu appears on the monitor screen from MIN(-50) to set zoom. V SH I FT : 00 Restoring the Original Picture Size and Position 1 In the PIC SIZE menu, press >/. S E L E C T ...
...menu, press >/. RESET : YES Zooming Up the Picture You can also operate with the ZOOM button on the monitor screen. The following menu appears on the monitor screen. to shift the picture. >: to shift the picture upward .: to shift the picture downward The vertical ... menu returns to "V SHIFT" and press ENT. 4 Press >/. to move the cursor (z) to the PIC SIZE menu. 27 (EN) The following menu appears on the monitor screen from MIN(-50) to set zoom. V SH I FT : 00 Restoring the Original Picture Size and Position 1 In the PIC SIZE menu, press >/. S E L E C T ...


