Operating Instructions
Page 3
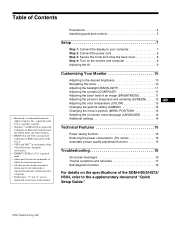
... Secure the cords and close the back cover 8 Step 4: Turn on the monitor and computer 9 Adjusting the tilt 9 Customizing Your...image (BRIGHTNESS 11 Adjusting the picture's sharpness and centering (SCREEN) . . . . . 12 GB Adjusting the color ...position (MENU POSITION 14 Selecting the on-screen menu language (LANGUAGE 14 Additional settings ... picture quality adjustment function 15 Troubleshooting 16 On-screen messages 16 Trouble symptoms and remedies 17 Self-...Standards Association. • ENERGY STAR is a U.S. http://www.sony.net/ 3 registered mark. • Adobe and Acrobat are ...
... Secure the cords and close the back cover 8 Step 4: Turn on the monitor and computer 9 Adjusting the tilt 9 Customizing Your...image (BRIGHTNESS 11 Adjusting the picture's sharpness and centering (SCREEN) . . . . . 12 GB Adjusting the color ...position (MENU POSITION 14 Selecting the on-screen menu language (LANGUAGE 14 Additional settings ... picture quality adjustment function 15 Troubleshooting 16 On-screen messages 16 Trouble symptoms and remedies 17 Self-...Standards Association. • ENERGY STAR is a U.S. http://www.sony.net/ 3 registered mark. • Adobe and Acrobat are ...
Operating Instructions
Page 5
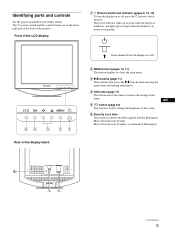
...OK MENU OK MENU 54 3 21 Rear of the screen. GB 6 Security Lock Hole The security lock hole should be applied with the Kensington Micro Saver Security System. Micro Saver Security System is used to change the brightness of the display stand Press upward to turn the display on or off . 2 MENU button...monitor. Identifying parts and controls See the pages in power saving mode. Front of the LCD display 1 1 (Power) switch and indicator (pages 9, 15, 19) To turn the display on or off , press the 1 (power) switch upward. The power indicator lights up in orange when the monitor is...
...OK MENU OK MENU 54 3 21 Rear of the screen. GB 6 Security Lock Hole The security lock hole should be applied with the Kensington Micro Saver Security System. Micro Saver Security System is used to change the brightness of the display stand Press upward to turn the display on or off . 2 MENU button...monitor. Identifying parts and controls See the pages in power saving mode. Front of the LCD display 1 1 (Power) switch and indicator (pages 9, 15, 19) To turn the display on or off , press the 1 (power) switch upward. The power indicator lights up in orange when the monitor is...
Operating Instructions
Page 9
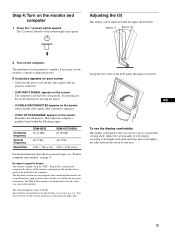
...GB To use it as it up in the power saving mode. The installation of your eyes. 9 Horizontal frequency Vertical frequency Resolution SDM-HS53 28-61 kHz SDM-HS73/HS93 28-80 kHz 48-75 Hz 48-75 Hz 1024 × 768 or less 1280 × 1024 or less For ...the keyboard or moving the mouse. • If CABLE DISCONNECTED appears on the screen: Check that light is . The 1 (power) indicator of the LCD panel, then adjust screen tilt. Try pressing any particular high value. Step 4: Turn on the screen: Reconnect the old monitor. In this monitor. The first time you can ...
...GB To use it as it up in the power saving mode. The installation of your eyes. 9 Horizontal frequency Vertical frequency Resolution SDM-HS53 28-61 kHz SDM-HS73/HS93 28-80 kHz 48-75 Hz 48-75 Hz 1024 × 768 or less 1280 × 1024 or less For ...the keyboard or moving the mouse. • If CABLE DISCONNECTED appears on the screen: Check that light is . The 1 (power) indicator of the LCD panel, then adjust screen tilt. Try pressing any particular high value. Step 4: Turn on the screen: Reconnect the old monitor. In this monitor. The first time you can ...
Operating Instructions
Page 10
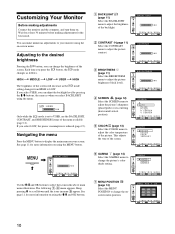
...Monitor Before making adjustments for the best result. Wait for at least 30 minutes before making adjustments Connect the monitor and the computer, and turn them on using the M/m and OK buttons. 1 BACKLIGHT (page 11) Select the BACKLIGHT menu to LOW. Each time you press the...menu to adjust the picture contrast. 3 BRIGHTNESS 8 (page 11) Select the BRIGHTNESS menu to adjust the picture brightness (black level). 4 SCREEN (page 12) Select the SCREEN menu to adjust the picture's sharpness (phase/pitch) or its centering (horizontal/vertical position). 5 COLOR (page 13) Select the COLOR menu...
...Monitor Before making adjustments for the best result. Wait for at least 30 minutes before making adjustments Connect the monitor and the computer, and turn them on using the M/m and OK buttons. 1 BACKLIGHT (page 11) Select the BACKLIGHT menu to LOW. Each time you press the...menu to adjust the picture contrast. 3 BRIGHTNESS 8 (page 11) Select the BRIGHTNESS menu to adjust the picture brightness (black level). 4 SCREEN (page 12) Select the SCREEN menu to adjust the picture's sharpness (phase/pitch) or its centering (horizontal/vertical position). 5 COLOR (page 13) Select the COLOR menu...
Operating Instructions
Page 12
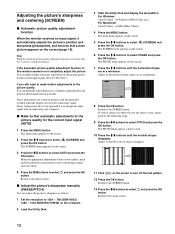
... adjusts the picture's position and sharpness (phase/pitch), and ensures that the vertical stripes disappear. 11 Click [END] on the screen to turn off the test pattern. 12 Press the OK button. Note While the automatic picture quality adjustment function is activated, only the 1... Click [Utility] t [Mac]/[Mac Utility]. 4 Press the MENU button. Return to select button. The SCREEN menu appears on the screen. 6 Press the M/m buttons to 1024 × 768 (SDM-HS53) 1280 × 1024 (SDM-HS73/HS93) on the screen. 7 Press the M/m buttons until the vertical stripes disappear.
... adjusts the picture's position and sharpness (phase/pitch), and ensures that the vertical stripes disappear. 11 Click [END] on the screen to turn off the test pattern. 12 Press the OK button. Note While the automatic picture quality adjustment function is activated, only the 1... Click [Utility] t [Mac]/[Mac Utility]. 4 Press the MENU button. Return to select button. The SCREEN menu appears on the screen. 6 Press the M/m buttons to 1024 × 768 (SDM-HS53) 1280 × 1024 (SDM-HS73/HS93) on the screen. 7 Press the M/m buttons until the vertical stripes disappear.
Operating Instructions
Page 13
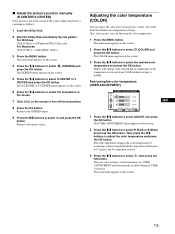
...center the test pattern in memory for USER ADJUSTMENT and automatically recalled whenever USER is selected. The SCREEN menu appears on the screen. 13 The H CENTER or V CENTER menu appears on the screen to turn off the test pattern. 8 Press the OK button. Return to select ADJUST and press the... OK button. Return to the SCREEN menu. 9 Press the M/m buttons to select button. Also, if necessary, you can select the color level of the screen, adjust the picture's...
...center the test pattern in memory for USER ADJUSTMENT and automatically recalled whenever USER is selected. The SCREEN menu appears on the screen. 13 The H CENTER or V CENTER menu appears on the screen to turn off the test pattern. 8 Press the OK button. Return to select ADJUST and press the... OK button. Return to the SCREEN menu. 9 Press the M/m buttons to select button. Also, if necessary, you can select the color level of the screen, adjust the picture's...

Operating Instructions
Page 18
...• Adjust the picture position (page 13). MENU If any problem persists, call your authorized Sony dealer and give the following information: • Model name: SDM-HS53 or SDM-HS73 or SDM-HS93 • Serial number • Detailed description of the problem • Date of purchase &#...specifications of your computer (SDM-HS73/HS93). • Eliminate the use of manufacture 18 Displaying this monitor's information While the monitor is receiving a video signal, press and hold the MENU button for the display to become bright after turning on the screen) Check these items •...
...• Adjust the picture position (page 13). MENU If any problem persists, call your authorized Sony dealer and give the following information: • Model name: SDM-HS53 or SDM-HS73 or SDM-HS93 • Serial number • Detailed description of the problem • Date of purchase &#...specifications of your computer (SDM-HS73/HS93). • Eliminate the use of manufacture 18 Displaying this monitor's information While the monitor is receiving a video signal, press and hold the MENU button for the display to become bright after turning on the screen) Check these items •...
Operating Instructions
Page 19
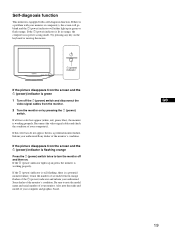
...the condition of the monitor's condition. Inform your authorized Sony dealer of your computer(s). OK MENU 1 (power) indicator If the picture disappears from the screen and the 1 (power) indicator is green 1 Turn off and then on. Be sure to turn the monitor off the 1 (power) switch and ...disconnect the video signal cables from the screen and the 1 (power) indicator is in power saving ...
...the condition of the monitor's condition. Inform your authorized Sony dealer of your computer(s). OK MENU 1 (power) indicator If the picture disappears from the screen and the 1 (power) indicator is green 1 Turn off and then on. Be sure to turn the monitor off the 1 (power) switch and ...disconnect the video signal cables from the screen and the 1 (power) indicator is in power saving ...
Quick Setup Guide
Page 2
... the CD-ROM, Adobe Acrobat Reader (later than version 4.0) needs to be installed on your monitor to a computer or other equipment. • Turn off the monitor, computer, and any equipment that generates a strong magnetic field, such as a TV or various other equipment before connecting them. &#...unit. Subjecting the monitor to extreme temperatures, such as in an automobile parked in an outdoor environment, be sure that the LCD screen is compatible with high-precision technology. If setting up temporarily in direct sunlight or near an open automatically. For Macintosh Load the ...
... the CD-ROM, Adobe Acrobat Reader (later than version 4.0) needs to be installed on your monitor to a computer or other equipment. • Turn off the monitor, computer, and any equipment that generates a strong magnetic field, such as a TV or various other equipment before connecting them. &#...unit. Subjecting the monitor to extreme temperatures, such as in an automobile parked in an outdoor environment, be sure that the LCD screen is compatible with high-precision technology. If setting up temporarily in direct sunlight or near an open automatically. For Macintosh Load the ...

Quick Setup Guide
Page 5
... manufacture If any problem persists, call your authorized Sony dealer and give the following information: • Model name: SDM-HS53 or SDM-HS73 or SDM-HS93 Dimensions (width/height/depth) Display (upright):... Horizontal: Max.1024 dots Vertical: Max.768 lines 1 Turn off the 1 (power) switch and disconnect the video signal cables from the screen and the 1 (power) indicator is flashing orange Dimensions ...-diagnosis function Specifications This monitor is equipped with your monitor or computer(s), the screen will go SDM-HS53 LCD panel Panel type: a-Si TFT Active Matrix blank and the ...
... manufacture If any problem persists, call your authorized Sony dealer and give the following information: • Model name: SDM-HS53 or SDM-HS73 or SDM-HS93 Dimensions (width/height/depth) Display (upright):... Horizontal: Max.1024 dots Vertical: Max.768 lines 1 Turn off the 1 (power) switch and disconnect the video signal cables from the screen and the 1 (power) indicator is flashing orange Dimensions ...-diagnosis function Specifications This monitor is equipped with your monitor or computer(s), the screen will go SDM-HS53 LCD panel Panel type: a-Si TFT Active Matrix blank and the ...


