Operating Instructions
Page 3
...the power cord 8 Step 3: Secure the cords and close the back cover 8 Step 4: Turn on the monitor and computer 9 Adjusting the tilt 9 Customizing Your Monitor 10 Adjusting to the desired brightness 10 Navigating the menu 10 Adjusting the backlight (BACKLIGHT 11 Adjusting the contrast ... of their respective companies. • Furthermore, "" and "" are trademarks of the SDM-HS53/HS73/ HS93, refer to Apple Computer, Inc., registered in this manual. http://www.sony.net/ 3 registered mark. • Adobe and Acrobat are trademarks of Adobe Systems Incorporated. •...
...the power cord 8 Step 3: Secure the cords and close the back cover 8 Step 4: Turn on the monitor and computer 9 Adjusting the tilt 9 Customizing Your Monitor 10 Adjusting to the desired brightness 10 Navigating the menu 10 Adjusting the backlight (BACKLIGHT 11 Adjusting the contrast ... of their respective companies. • Furthermore, "" and "" are trademarks of the SDM-HS53/HS73/ HS93, refer to Apple Computer, Inc., registered in this manual. http://www.sony.net/ 3 registered mark. • Adobe and Acrobat are trademarks of Adobe Systems Incorporated. •...
Operating Instructions
Page 4
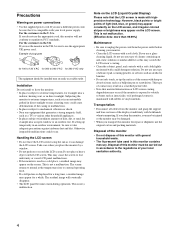
... is not a malfunction. If you do not use a different power cord, be carried out in a cold place, a residual image may occur if the monitor is exposed to use any type of light (red, blue, or green) may appear constantly on the LCD screen, and irregular colored stripes or brightness...8226; The LCD panel becomes warm during operation. This may result in a scratched picture tube. • Note that the LCD screen is used in this monitor must be sure that generates a strong magnetic field, such as this may scratch the LCD screen's coating. • Clean the cabinet, panel, and ...
... is not a malfunction. If you do not use a different power cord, be carried out in a cold place, a residual image may occur if the monitor is exposed to use any type of light (red, blue, or green) may appear constantly on the LCD screen, and irregular colored stripes or brightness...8226; The LCD panel becomes warm during operation. This may result in a scratched picture tube. • Note that the LCD screen is used in this monitor must be sure that generates a strong magnetic field, such as this may scratch the LCD screen's coating. • Clean the cabinet, panel, and ...
Operating Instructions
Page 5
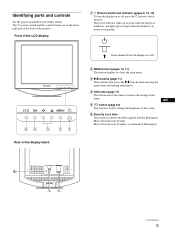
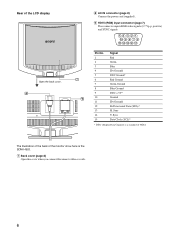
... screen. Micro Saver Security System is used to turn the display on , and lights up in orange when the monitor is in the menu. 5 button (page 10) This button is a trademark of the monitor. The power indicator lights up in green when the display is turned on or off . 2 MENU button (pages...
... screen. Micro Saver Security System is used to turn the display on , and lights up in orange when the monitor is in the menu. 5 button (page 10) This button is a trademark of the monitor. The power indicator lights up in green when the display is turned on or off . 2 MENU button (pages...
Operating Instructions
Page 6
Sync Data Clock (SCL)* * DDC (Display Data Channel) is the SDM-HS53. 7 Back cover (page 8) Open this cover when you connect/disconnect cables or cords. 6 The illustration of the back of the monitor show here is a standard of the LCD display Open the back cover. 8 AC IN connector (page 8) Connect the power cord...
Sync Data Clock (SCL)* * DDC (Display Data Channel) is the SDM-HS53. 7 Back cover (page 8) Open this cover when you connect/disconnect cables or cords. 6 The illustration of the back of the monitor show here is a standard of the LCD display Open the back cover. 8 AC IN connector (page 8) Connect the power cord...
Operating Instructions
Page 7
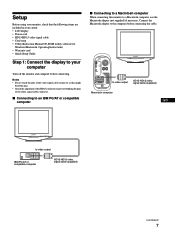
... necessary. Connect the Macintosh adapter to the computer before connecting. Notes • Do not touch the pins of the video signal cable connector as this monitor to video output IBM PC/AT or compatible computer HD15-HD15 video signal cable (supplied) (continued) 7 Setup Before using your... monitor, check that the following items are included in your carton: • LCD display • Power cord • HD15-HD15 video signal cable • Cord strap &#...
... necessary. Connect the Macintosh adapter to the computer before connecting. Notes • Do not touch the pins of the video signal cable connector as this monitor to video output IBM PC/AT or compatible computer HD15-HD15 video signal cable (supplied) (continued) 7 Setup Before using your... monitor, check that the following items are included in your carton: • LCD display • Power cord • HD15-HD15 video signal cable • Cord strap &#...
Operating Instructions
Page 8
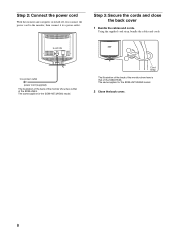
.... Cord strap The illustration of the back of the monitor show here is that of the SDM-HS53. The same applies for the SDM-HS73/HS93 model. Step 2: Connect the power cord With the monitor and computer switched off, first connect the power cord to the monitor, then connect it to a power outlet power cord... (supplied) The illustration of the back of the monitor show here is that of the SDM-HS53. Step 3: Secure the cords and close the back cover 1 Bundle the cables and cords. Using the supplied cord strap, bundle the cables and cords. ...
.... Cord strap The illustration of the back of the monitor show here is that of the SDM-HS53. The same applies for the SDM-HS73/HS93 model. Step 2: Connect the power cord With the monitor and computer switched off, first connect the power cord to the monitor, then connect it to a power outlet power cord... (supplied) The illustration of the back of the monitor show here is that of the SDM-HS53. Step 3: Secure the cords and close the back cover 1 Bundle the cables and cords. Using the supplied cord strap, bundle the cables and cords. ...
Operating Instructions
Page 9
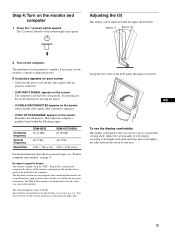
...2 Turn on page 17. If no picture appears on your computer after connecting the monitor, the setup Wizard may appear on the screen: The computer is automatically selected so...the screen: Reconnect the old monitor. Try pressing any particular high value. Horizontal frequency Vertical frequency Resolution SDM-HS53 28-61 kHz SDM-HS73/HS93 28-80 kHz ...48-75 Hz 48-75 Hz 1024 × 768 or less 1280 × 1024 or less For more information about the on-screen messages, see "Trouble symptoms and remedies" on the computer. The Plug & Play monitor...
...2 Turn on page 17. If no picture appears on your computer after connecting the monitor, the setup Wizard may appear on the screen: The computer is automatically selected so...the screen: Reconnect the old monitor. Try pressing any particular high value. Horizontal frequency Vertical frequency Resolution SDM-HS53 28-61 kHz SDM-HS73/HS93 28-80 kHz ...48-75 Hz 48-75 Hz 1024 × 768 or less 1280 × 1024 or less For more information about the on-screen messages, see "Trouble symptoms and remedies" on the computer. The Plug & Play monitor...
Operating Instructions
Page 10
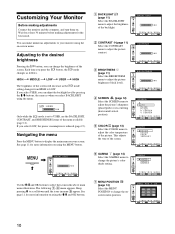
Wait for at least 30 minutes before making adjustments Connect the monitor and the computer, and turn them on. See page 11 for more information on using the on-screen menu. This adjusts the tone of the ... of the picture. Navigating the menu Press the MENU button to display the main menu on your monitor using the M/m and OK buttons. 1 BACKLIGHT (page 11) Select the BACKLIGHT menu to your screen. Customizing Your Monitor Before making adjustments for more information on using the menu. : USER 100 Only while the mode...
Wait for at least 30 minutes before making adjustments Connect the monitor and the computer, and turn them on. See page 11 for more information on using the on-screen menu. This adjusts the tone of the ... of the picture. Navigating the menu Press the MENU button to display the main menu on your monitor using the M/m and OK buttons. 1 BACKLIGHT (page 11) Select the BACKLIGHT menu to your screen. Customizing Your Monitor Before making adjustments for more information on using the menu. : USER 100 Only while the mode...
Operating Instructions
Page 12
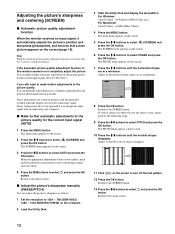
...PHASE and press the OK button. The SCREEN menu appears on the screen. 6 Press the M/m buttons to 1024 × 768 (SDM-HS53) 1280 × 1024 (SDM-HS73/HS93) on the screen. 3 Press the M/m buttons to select button. Return to the SCREEN menu. 13 Press the M/m ...are at a minimum. 8 Press the OK button. Adjusting the picture's sharpness and centering (SCREEN) x Automatic picture quality adjustment function When the monitor receives an input signal, it automatically adjusts the picture's position and sharpness (phase/pitch), and ensures that a clear picture appears on the screen....
...PHASE and press the OK button. The SCREEN menu appears on the screen. 6 Press the M/m buttons to 1024 × 768 (SDM-HS53) 1280 × 1024 (SDM-HS73/HS93) on the screen. 3 Press the M/m buttons to select button. Return to the SCREEN menu. 13 Press the M/m ...are at a minimum. 8 Press the OK button. Adjusting the picture's sharpness and centering (SCREEN) x Automatic picture quality adjustment function When the monitor receives an input signal, it automatically adjusts the picture's position and sharpness (phase/pitch), and ensures that a clear picture appears on the screen....
Operating Instructions
Page 14
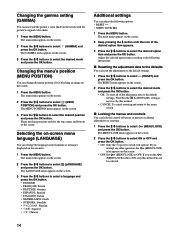
...: Dutch • SVENSKA: Swedish • : Russian • : Japanese • : Chinese Additional settings You can change the menu position if it is not reset by this monitor. 1 Press the MENU button. The RESET menu appears on the screen. • OFF:Set (MENU LOCK) to select (LANGUAGE) and press the OK button. If...
...: Dutch • SVENSKA: Swedish • : Russian • : Japanese • : Chinese Additional settings You can change the menu position if it is not reset by this monitor. 1 Press the MENU button. The RESET menu appears on the screen. • OFF:Set (MENU LOCK) to select (LANGUAGE) and press the OK button. If...
Operating Instructions
Page 15
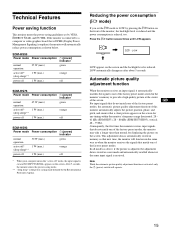
... input signal, it automatically matches the signal to one of the factory preset modes, the monitor may take a longer time than normal for any timing within the monitor's frequency range (horizontal: 28 - 61 kHz (SDM-HS53), 28 - 80 kHz (SDM-HS73/HS93), vertical: 48 - 75 Hz). GB Note While the automatic picture quality adjustment...
... input signal, it automatically matches the signal to one of the factory preset modes, the monitor may take a longer time than normal for any timing within the monitor's frequency range (horizontal: 28 - 61 kHz (SDM-HS53), 28 - 80 kHz (SDM-HS73/HS93), vertical: 48 - 75 Hz). GB Note While the automatic picture quality adjustment...
Operating Instructions
Page 16
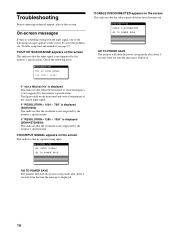
... on the screen This indicates that the resolution is displayed. If "RESOLUTION > 1280 × 1024" is displayed (SDM-HS73/HS93) This indicates that the input signal is not supported by the monitor's specifications. I NFORMA T I ON CAB L E D I SCONNECT ED GO TO POWER SAVE GO TO POWER ...17. Check the following messages appears on the screen This indicates that the resolution is not supported by the monitor's specifications. If "RESOLUTION > 1024 × 768" is displayed (SDM-HS53) This indicates that the video signal cable has been disconnected. I NFORMA T I ON NO I ...
... on the screen This indicates that the resolution is displayed. If "RESOLUTION > 1280 × 1024" is displayed (SDM-HS73/HS93) This indicates that the input signal is not supported by the monitor's specifications. I NFORMA T I ON CAB L E D I SCONNECT ED GO TO POWER SAVE GO TO POWER ...17. Check the following messages appears on the screen This indicates that the resolution is not supported by the monitor's specifications. If "RESOLUTION > 1024 × 768" is displayed (SDM-HS53) This indicates that the video signal cable has been disconnected. I NFORMA T I ON NO I ...
Operating Instructions
Page 17
... Picture flickers, bounces, oscillates, or is scrambled • If you are supported by this monitor. This is connected. GB (continued) 17 Select "SONY" from the "Manufacturers" list and select "SDM-HS53," "SDM-HS73" or "SDM-HS93" from the "Models" list in the "Models" list, try "Plug & Play...." If you replaced an old monitor with this monitor does not appear in the Windows device selection...
... Picture flickers, bounces, oscillates, or is scrambled • If you are supported by this monitor. This is connected. GB (continued) 17 Select "SONY" from the "Manufacturers" list and select "SDM-HS53," "SDM-HS73" or "SDM-HS93" from the "Models" list in the "Models" list, try "Plug & Play...." If you replaced an old monitor with this monitor does not appear in the Windows device selection...

Operating Instructions
Page 18
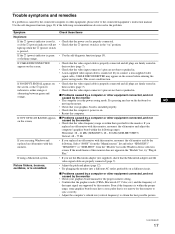
...number Week and year of video cable extensions and/or video switch boxes. • Check that some video modes do not operate ( appears on the monitor. • Adjust the pitch and phase (page 12). • Adjust the pitch and phase (page 12). • Adjust the color temperature (page...11). • Adjust the pitch and phase (page 12). MENU If any problem persists, call your authorized Sony dealer and give the following information: • Model name: SDM-HS53 or SDM-HS73 or SDM-HS93 • Serial number • Detailed description of the problem • Date of purchase • Name...
...number Week and year of video cable extensions and/or video switch boxes. • Check that some video modes do not operate ( appears on the monitor. • Adjust the pitch and phase (page 12). • Adjust the pitch and phase (page 12). • Adjust the color temperature (page...11). • Adjust the pitch and phase (page 12). MENU If any problem persists, call your authorized Sony dealer and give the following information: • Model name: SDM-HS53 or SDM-HS73 or SDM-HS93 • Serial number • Detailed description of the problem • Date of purchase • Name...
Operating Instructions
Page 19
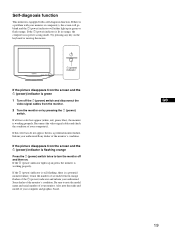
...color bars appear (white, red, green, blue), the monitor is working properly. Try pressing any key on by pressing the 1 (power) switch. Reconnect the video signal cables and check the condition of your authorized Sony dealer of your monitor or computer(s), the screen will go blank and the ...1 (power) indicator will either light up in green, the monitor is working properly. If the picture disappears from the monitor. 2 Turn the monitor on the keyboard or moving the...
...color bars appear (white, red, green, blue), the monitor is working properly. Try pressing any key on by pressing the 1 (power) switch. Reconnect the video signal cables and check the condition of your authorized Sony dealer of your monitor or computer(s), the screen will go blank and the ...1 (power) indicator will either light up in green, the monitor is working properly. If the picture disappears from the monitor. 2 Turn the monitor on the keyboard or moving the...
Quick Setup Guide
Page 2
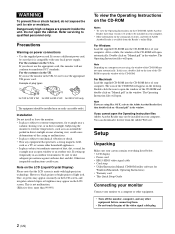
...-click on the desktop. Do not open the Operating Instruction files Adobe Acrobat Reader may appear on "Manual.pdf" in the window. Subjecting the monitor to mechanical vibration or shock. • Near any other household appliances. • In places subject to qualified personnel only. After a while,...connecting them. • Do not touch the pins of Adobe Acrobat Reader is made with your computer. Installation Do not install or leave the monitor: • In places subject to extreme temperatures, for 240 V AC only The equipment should be sure to use a different power cord, ...
...-click on the desktop. Do not open the Operating Instruction files Adobe Acrobat Reader may appear on "Manual.pdf" in the window. Subjecting the monitor to mechanical vibration or shock. • Near any other household appliances. • In places subject to qualified personnel only. After a while,...connecting them. • Do not touch the pins of Adobe Acrobat Reader is made with your computer. Installation Do not install or leave the monitor: • In places subject to extreme temperatures, for 240 V AC only The equipment should be sure to use a different power cord, ...
Quick Setup Guide
Page 3
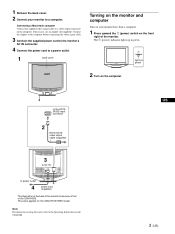
...power outlet. 1 back cover Turning on the monitor and computer Turn on your monitor to a video output connector on the computer. The 1 (power) indicator lights up in green OK MENU 2 Turn on the computer. The same applies for the SDM-HS73/HS93 model. Connecting a Macintosh computer ...Connect the supplied video signal cable to a computer. lights in green. US 3 (US) 1 Remove the back cover. 2 Connect your monitor first, then a computer. 1 Press upward the 1 (power)...
...power outlet. 1 back cover Turning on the monitor and computer Turn on your monitor to a video output connector on the computer. The 1 (power) indicator lights up in green OK MENU 2 Turn on the computer. The same applies for the SDM-HS73/HS93 model. Connecting a Macintosh computer ...Connect the supplied video signal cable to a computer. lights in green. US 3 (US) 1 Remove the back cover. 2 Connect your monitor first, then a computer. 1 Press upward the 1 (power)...
Quick Setup Guide
Page 4
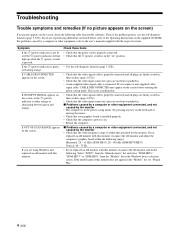
... the Operating Instructions on the supplied CD-ROM. x Problems caused by the monitor • Check that the video frequency range is installed properly. • Check that specified for possible solutions. Select "SONY" from the "Manufacturers" list and select "SDM-HS53," "SDM-HS73" or "SDM-HS93" from the "Models" list in . • A non-supplied video signal...
... the Operating Instructions on the supplied CD-ROM. x Problems caused by the monitor • Check that the video frequency range is installed properly. • Check that specified for possible solutions. Select "SONY" from the "Manufacturers" list and select "SDM-HS53," "SDM-HS73" or "SDM-HS93" from the "Models" list in . • A non-supplied video signal...

Quick Setup Guide
Page 5
...MANUFACTURED : 2003-52 Serial number Week and year of manufacture If any problem persists, call your authorized Sony dealer and give the following information: • Model name: SDM-HS53 or SDM-HS73 or SDM-HS93 Dimensions (width/height/depth) Display (upright): Approx. 441 × 404 × 216 ...8226; Vertical blanking width should be more than 450 µsec. properly. Self-diagnosis function Specifications This monitor is equipped with your monitor or computer(s), the screen will go SDM-HS53 LCD panel Panel type: a-Si TFT Active Matrix blank and the 1 (power) indicator will ...
...MANUFACTURED : 2003-52 Serial number Week and year of manufacture If any problem persists, call your authorized Sony dealer and give the following information: • Model name: SDM-HS53 or SDM-HS73 or SDM-HS93 Dimensions (width/height/depth) Display (upright): Approx. 441 × 404 × 216 ...8226; Vertical blanking width should be more than 450 µsec. properly. Self-diagnosis function Specifications This monitor is equipped with your monitor or computer(s), the screen will go SDM-HS53 LCD panel Panel type: a-Si TFT Active Matrix blank and the 1 (power) indicator will ...


