Operating Instructions
Page 4
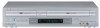
Table of contents 2 WARNING 2 Welcome! 2 General Precautions 3 Important Safety Instructions 3 DVD Precautions 6 About this manual 6 This player can play the following discs 7 Notes about discs Getting Started 8 Step 1 : Unpacking 9 Step 2 : Setting up the remote commander 12 Step 3 : Basic hookups 19 Step 4 : Selecting a language 20 Step...using the timer 42 Checking/changing/canceling timer settings Advanced Hookups 44 A/V Receiver hookup 46 S-Video/Component Video hookup DVD Settings and Adjustements 48 Audio Setup 51 Screen Setup 4 Table of contents 54 Setting the display or sound track ...
Table of contents 2 WARNING 2 Welcome! 2 General Precautions 3 Important Safety Instructions 3 DVD Precautions 6 About this manual 6 This player can play the following discs 7 Notes about discs Getting Started 8 Step 1 : Unpacking 9 Step 2 : Setting up the remote commander 12 Step 3 : Basic hookups 19 Step 4 : Selecting a language 20 Step...using the timer 42 Checking/changing/canceling timer settings Advanced Hookups 44 A/V Receiver hookup 46 S-Video/Component Video hookup DVD Settings and Adjustements 48 Audio Setup 51 Screen Setup 4 Table of contents 54 Setting the display or sound track ...
Operating Instructions
Page 8
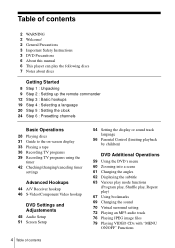
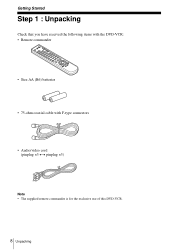
Getting Started Step 1 : Unpacking Check that you have received the following items with the DVD-VCR: • Remote commander • Size AA (R6) batteries • 75-ohm coaxial cable with F-type connectors • Audio/video cord (pinplug ×3 y pinplug ×3) Note • The supplied remote commander is for the exclusive use of this DVD-VCR. 8 Unpacking
Getting Started Step 1 : Unpacking Check that you have received the following items with the DVD-VCR: • Remote commander • Size AA (R6) batteries • 75-ohm coaxial cable with F-type connectors • Audio/video cord (pinplug ×3 y pinplug ×3) Note • The supplied remote commander is for the exclusive use of this DVD-VCR. 8 Unpacking

Operating Instructions
Page 9
... up the remote commander 9 VCR and a Sony TV. on the remote commander marked with an old one. • Do not use this remote commander to operate your Sony TV. SELECT DVD To operate the DVD player the VCR your TV Set TV / DVD·VIDEO to DVD·VIDEO, then press SELECT DVD and point at the remote sensor at the DVD-VCR DVD·VIDEO...
... up the remote commander 9 VCR and a Sony TV. on the remote commander marked with an old one. • Do not use this remote commander to operate your Sony TV. SELECT DVD To operate the DVD player the VCR your TV Set TV / DVD·VIDEO to DVD·VIDEO, then press SELECT DVD and point at the remote sensor at the DVD-VCR DVD·VIDEO...

Operating Instructions
Page 10
...10 12 11 12 07, 10, 11 03, 05, 18 08, 12 03, 08, 14 07 03, 04, 12 12 15 10 Setting up the remote commander You can use the buttons marked with your TV. If your TV is listed in the following table, set the appropriate manufacturer's code number.... 1 Set TV / DVD·VIDEO at a time until you can also use the ?/1, VOL +/-, CH +/-, MUTING*, TV/VIDEO and ENTER* buttons to control non-Sony TVs. Then release ?/1. To control the DVD-VCR, reset TV / DVD·VIDEO to DVD·VIDEO. * for Sony TV only Code numbers of the remote commander to control...
...10 12 11 12 07, 10, 11 03, 05, 18 08, 12 03, 08, 14 07 03, 04, 12 12 15 10 Setting up the remote commander You can use the buttons marked with your TV. If your TV is listed in the following table, set the appropriate manufacturer's code number.... 1 Set TV / DVD·VIDEO at a time until you can also use the ?/1, VOL +/-, CH +/-, MUTING*, TV/VIDEO and ENTER* buttons to control non-Sony TVs. Then release ?/1. To control the DVD-VCR, reset TV / DVD·VIDEO to DVD·VIDEO. * for Sony TV only Code numbers of the remote commander to control...
Operating Instructions
Page 11
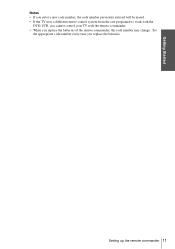
Getting Started Notes • If you enter a new code number, the code number previously entered will be erased. • If the TV uses a different remote control system from the one programed to work with the DVD-VCR, you cannot control your TV with the remote commander. • When you replace the batteries. Set the appropriate code number every time you replace the batteries of the remote commander, the code number may change. Setting up the remote commander 11
Getting Started Notes • If you enter a new code number, the code number previously entered will be erased. • If the TV uses a different remote control system from the one programed to work with the DVD-VCR, you cannot control your TV with the remote commander. • When you replace the batteries. Set the appropriate code number every time you replace the batteries of the remote commander, the code number may change. Setting up the remote commander 11

Operating Instructions
Page 15
...; Do not press any buttons on page 19. If this happens, see "Step 4 : Selecting a language" on the DVD-VCR or remote commander during Auto preset. • Auto preset starts automatically only when you purchase the DVD-VCR. • Auto preset can be incorrectly set using a time signal provided by pressing x STOP on page 22. Getting...
...; Do not press any buttons on page 19. If this happens, see "Step 4 : Selecting a language" on the DVD-VCR or remote commander during Auto preset. • Auto preset starts automatically only when you purchase the DVD-VCR. • Auto preset can be incorrectly set using a time signal provided by pressing x STOP on page 22. Getting...

Operating Instructions
Page 17
...or "--:--" appears in the display window, see "Step 4 : Selecting a language" on page 22. You have now completed DVD-VCR setup. Getting Started Hookup 2 : DVD-VCR setup Plug the DVD-VCR into the AC outlet. to French or Spanish, see "Using Manual Clock Set" on page 19. To change the on-...add or disable channels manually, see "Step 6 : Presetting channels" on page 24. • Do not press any buttons on the DVD-VCR or remote commander during Auto preset. • Auto preset starts automatically only when you plug in the display window. Notes • If you purchase the...
...or "--:--" appears in the display window, see "Step 4 : Selecting a language" on page 22. You have now completed DVD-VCR setup. Getting Started Hookup 2 : DVD-VCR setup Plug the DVD-VCR into the AC outlet. to French or Spanish, see "Using Manual Clock Set" on page 19. To change the on-...add or disable channels manually, see "Step 6 : Presetting channels" on page 24. • Do not press any buttons on the DVD-VCR or remote commander during Auto preset. • Auto preset starts automatically only when you plug in the display window. Notes • If you purchase the...

Operating Instructions
Page 19
.... Selecting a language 19 If your TV. • To control the DVD-VCR, set the TV to video input. • If the DVD player is connected to the DVD-VCR using A/V connections, set TV / DVD·VIDEO to DVD·VIDEO on the remote (page 9). • Set the "RF Output Channel" to "3CH" or "4CH" in...RETURN 1 Press SET UP. The "SETUP MENU" appears. 2 Press V/v/B/b to exit the menu. Getting Started Step 4 : Selecting a language You can change the on the DVD-VCR and your TV is in "OPTION SETUP" menu (page 89). Before you start... • Turn on -screen display language.
.... Selecting a language 19 If your TV. • To control the DVD-VCR, set the TV to video input. • If the DVD player is connected to the DVD-VCR using A/V connections, set TV / DVD·VIDEO to DVD·VIDEO on the remote (page 9). • Set the "RF Output Channel" to "3CH" or "4CH" in...RETURN 1 Press SET UP. The "SETUP MENU" appears. 2 Press V/v/B/b to exit the menu. Getting Started Step 4 : Selecting a language You can change the on the DVD-VCR and your TV is in "OPTION SETUP" menu (page 89). Before you start... • Turn on -screen display language.

Operating Instructions
Page 20
...cable box, turn it on. • To control the DVD-VCR, set TV / DVD·VIDEO to DVD·VIDEO on the DVD-VCR and your TV is connected to the DVD-VCR using A/V connections, set the TV to automatically set the time manually (page 22). Stop the DVD playback. 1 Press SET UP. Your DVDVCR can pick ...works only if a channel in "OPTION SETUP" menu (page 89). If broadcasters in your area is in play mode, you start... • Turn on the remote (page 9). • Set the "RF Output Channel" to select (Clock Set/ Adjust), then press ENTER. Step 5 : Setting the clock Using the Auto ...
...cable box, turn it on. • To control the DVD-VCR, set TV / DVD·VIDEO to DVD·VIDEO on the DVD-VCR and your TV is connected to the DVD-VCR using A/V connections, set the TV to automatically set the time manually (page 22). Stop the DVD playback. 1 Press SET UP. Your DVDVCR can pick ...works only if a channel in "OPTION SETUP" menu (page 89). If broadcasters in your area is in play mode, you start... • Turn on the remote (page 9). • Set the "RF Output Channel" to select (Clock Set/ Adjust), then press ENTER. Step 5 : Setting the clock Using the Auto ...
Operating Instructions
Page 22
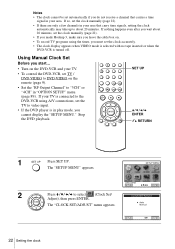
...using the timer, you must set TV / DVD·VIDEO to DVD·VIDEO on the remote (page 9). • Set the "RF Output Channel" to "3CH" or "4CH" in play mode, you start... • Turn on the DVD-VCR and your TV is connected to the DVD-VCR using A/V connections, set the TV to select .... The "SETUP MENU" appears. 2 Press V/v/B/b to video input. • If the DVD player is turned off. Using Manual Clock Set Before you cannot display the "SETUP MENU." If your TV. • To control the DVD-VCR, set the clock accurately. • The clock display appears when VIDEO mode is selected...
...using the timer, you must set TV / DVD·VIDEO to DVD·VIDEO on the remote (page 9). • Set the "RF Output Channel" to "3CH" or "4CH" in play mode, you start... • Turn on the DVD-VCR and your TV is connected to the DVD-VCR using A/V connections, set the TV to select .... The "SETUP MENU" appears. 2 Press V/v/B/b to video input. • If the DVD player is turned off. Using Manual Clock Set Before you cannot display the "SETUP MENU." If your TV. • To control the DVD-VCR, set the clock accurately. • The clock display appears when VIDEO mode is selected...

Operating Instructions
Page 24
...125. If you have already decided which channels you start... • Turn on the remote (page 9). • Set the "RF Output Channel" to "3CH" or "4CH" in your TV. Step 6 : Presetting channels This DVD-VCR is in play mode, you cannot display the "SETUP MENU." Then, if there are... to 13, UHF channels 14 to 69 and unscrambled CATV channels 1 to DVD·VIDEO on the DVD-VCR and your area using a cable box, turn it on. • To control the DVD-VCR, set them manually. Stop the DVD playback. 1 Press SET UP. Presetting all receivable channels automatically Before you wish ...
...125. If you have already decided which channels you start... • Turn on the remote (page 9). • Set the "RF Output Channel" to "3CH" or "4CH" in your TV. Step 6 : Presetting channels This DVD-VCR is in play mode, you cannot display the "SETUP MENU." Then, if there are... to 13, UHF channels 14 to 69 and unscrambled CATV channels 1 to DVD·VIDEO on the DVD-VCR and your area using a cable box, turn it on. • To control the DVD-VCR, set them manually. Stop the DVD playback. 1 Press SET UP. Presetting all receivable channels automatically Before you wish ...

Operating Instructions
Page 26
When using A/V connections, set the TV to video input. • If the DVD player is connected to the DVD-VCR using a cable box, turn it on. • To control the DVD-VCR, set TV / DVD·VIDEO to DVD·VIDEO on the remote (page 9). • Set the "RF Output Channel" to "3CH" or "4CH" in play mode..., you start... • Turn on the DVD-VCR and your TV is in "OPTION SETUP" menu (page 89)....
When using A/V connections, set the TV to video input. • If the DVD player is connected to the DVD-VCR using a cable box, turn it on. • To control the DVD-VCR, set TV / DVD·VIDEO to DVD·VIDEO on the remote (page 9). • Set the "RF Output Channel" to "3CH" or "4CH" in play mode..., you start... • Turn on the DVD-VCR and your TV is in "OPTION SETUP" menu (page 89)....

Operating Instructions
Page 29
... the disc, a menu Hour Minute Second may appear on the remote or scene in Step 1. For VIDEO CDs, see page 59. To Resume playback for more than 5 minutes, the DVD player will automatically stop playback. 2 Press H PLAY. For DVD or Video CD, each time you stopped the disc in continuous play... X PAUSE Resume play after pause H PLAY Advance by frame in pause mode C Go to the next chapter, track, or scene > on the remote in continuous play ). The DVD player starts playback from the point where you press the button, the playback speed changes as follows. × 2 t FF1/FR1 t FF2/FR2 t...
... the disc, a menu Hour Minute Second may appear on the remote or scene in Step 1. For VIDEO CDs, see page 59. To Resume playback for more than 5 minutes, the DVD player will automatically stop playback. 2 Press H PLAY. For DVD or Video CD, each time you stopped the disc in continuous play... X PAUSE Resume play after pause H PLAY Advance by frame in pause mode C Go to the next chapter, track, or scene > on the remote in continuous play ). The DVD player starts playback from the point where you press the button, the playback speed changes as follows. × 2 t FF1/FR1 t FF2/FR2 t...

Operating Instructions
Page 35
... • The sound is muted during playback at various speeds. • The picture may show noise when playing at the point on this VCR but the remote commander's function switches to find later. You can be played back on the tape that you insert a tape with its safety tab removed, ...normal playback. Press O RETURN repeatedly to exit the menu. • When playback does not start even if you want to DVD automatically. When S-VHS tapes are played in the VCR, the enhanced resolution will not record in S-VHS mode on other special playback modes. Streaks appear while playing in the...
... • The sound is muted during playback at various speeds. • The picture may show noise when playing at the point on this VCR but the remote commander's function switches to find later. You can be played back on the tape that you insert a tape with its safety tab removed, ...normal playback. Press O RETURN repeatedly to exit the menu. • When playback does not start even if you want to DVD automatically. When S-VHS tapes are played in the VCR, the enhanced resolution will not record in S-VHS mode on other special playback modes. Streaks appear while playing in the...

Operating Instructions
Page 38
To record on the remote commander. if not, skip this step. 3 Select another TV program while recording 1 Press TV/VIDEO to display "TV" in the LP mode. • It may not be recorded on . The TV screen will not be indicated accurately for the VCR to calculate and display the...disc on the TV. Safety tab Tips • To select a channel, you press DISPLAY. • You cannot record a DVD to the TV's antenna input; When using A/V connections, set the TV to a VCR tape. • To watch another channel on the disc tray. 3 Press H PLAY. To save a recording To prevent ...
To record on the remote commander. if not, skip this step. 3 Select another TV program while recording 1 Press TV/VIDEO to display "TV" in the LP mode. • It may not be recorded on . The TV screen will not be indicated accurately for the VCR to calculate and display the...disc on the TV. Safety tab Tips • To select a channel, you press DISPLAY. • You cannot record a DVD to the TV's antenna input; When using A/V connections, set the TV to a VCR tape. • To watch another channel on the disc tray. 3 Press H PLAY. To save a recording To prevent ...

Operating Instructions
Page 92
...The clock has stopped and "--:--" appears in the remote commander with new ones if they are pointing the remote commander at the remote sensor on the DVD-VCR. • Replace all the batteries in the display window. • The clock stops if the DVD-VCR is disconnected from the wall outlet. Reset the clock... (and timer). The code number may change when you replace the batteries of the tape is very poor and tracking cannot be adjusted. • Set your nearest Sony dealer. (For customers in USA...
...The clock has stopped and "--:--" appears in the remote commander with new ones if they are pointing the remote commander at the remote sensor on the DVD-VCR. • Replace all the batteries in the display window. • The clock stops if the DVD-VCR is disconnected from the wall outlet. Reset the clock... (and timer). The code number may change when you replace the batteries of the tape is very poor and tracking cannot be adjusted. • Set your nearest Sony dealer. (For customers in USA...

Operating Instructions
Page 94
...in the MP3 format that are not recorded on the DVD being played. • The DVD prohibits the changing of the direct selection button on the remote (page 59). • Multilingual tracks are not finalized (page 7). • Make sure the TV / DVD·VIDEO switch is set correctly. • Select... correctly VIDEO or DVD with the disc. • Try using the DVD's menu instead of the language for ...
...in the MP3 format that are not recorded on the DVD being played. • The DVD prohibits the changing of the direct selection button on the remote (page 59). • Multilingual tracks are not finalized (page 7). • Make sure the TV / DVD·VIDEO switch is set correctly. • Select... correctly VIDEO or DVD with the disc. • Try using the DVD's menu instead of the language for ...

Operating Instructions
Page 95
... hold control on the DVD being played. • The DVD prohibits changing of the angles. Clean the video heads using the DVD's menu instead of the subtitles. If a Sony cleaning cassette is not at your local Sony dealer for the VCR. buttons. Additional Information continued... video input. A TV program does not appear on the DVD being played. • The DVD prohibits the changing of the direct selection button on the remote (page 59). • Multilingual subtitles are using the DVD's menu instead of "Troubleshooting"). Operation Symptom Remedy The subtitle ...
... hold control on the DVD being played. • The DVD prohibits changing of the angles. Clean the video heads using the DVD's menu instead of the subtitles. If a Sony cleaning cassette is not at your local Sony dealer for the VCR. buttons. Additional Information continued... video input. A TV program does not appear on the DVD being played. • The DVD prohibits the changing of the direct selection button on the remote (page 59). • Multilingual subtitles are using the DVD's menu instead of "Troubleshooting"). Operation Symptom Remedy The subtitle ...
Operating Instructions
Page 100
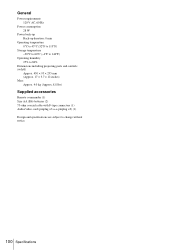
... including projecting parts and controls (w/h/d) Approx. 430 × 95 × 295 mm (Approx. 17 × 3.7 × 12 inches) Mass Approx. 4.0 kg (Approx. 8.8 lbs) Supplied accessories Remote commander (1) Size AA (R6) batteries (2) 75-ohm coaxial cable with F-type connectors (1) Audio/video cord (pinplug ×3 y pinplug ×3) (1) Design and specifications are subject to...
... including projecting parts and controls (w/h/d) Approx. 430 × 95 × 295 mm (Approx. 17 × 3.7 × 12 inches) Mass Approx. 4.0 kg (Approx. 8.8 lbs) Supplied accessories Remote commander (1) Size AA (R6) batteries (2) 75-ohm coaxial cable with F-type connectors (1) Audio/video cord (pinplug ×3 y pinplug ×3) (1) Design and specifications are subject to...
Operating Instructions
Page 101
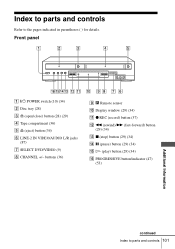
buttons (36) I Remote sensor J Display window (29) (34) K z REC (record) button (37) L m (rewind)/M (fast-forward) button (29) (34) M x (stop) button (29) (34) N X (pause) button (29) (34) O H (play) button (29) (34) P PROGRESSIVE button/indicator (47) (53) ...Additional Information continued Index to the pages indicated in parentheses ( ) for details. Front panel A ?/1 POWER switch (10) (34) B Disc tray (28) C A (open/close) button (28) (29) D Tape compartment (36) E A (eject) button (34) F LINE-2 IN VIDEO/AUDIO L/R jacks (87) G SELECT DVD...
buttons (36) I Remote sensor J Display window (29) (34) K z REC (record) button (37) L m (rewind)/M (fast-forward) button (29) (34) M x (stop) button (29) (34) N X (pause) button (29) (34) O H (play) button (29) (34) P PROGRESSIVE button/indicator (47) (53) ...Additional Information continued Index to the pages indicated in parentheses ( ) for details. Front panel A ?/1 POWER switch (10) (34) B Disc tray (28) C A (open/close) button (28) (29) D Tape compartment (36) E A (eject) button (34) F LINE-2 IN VIDEO/AUDIO L/R jacks (87) G SELECT DVD...


