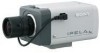

User Guide
Page 2
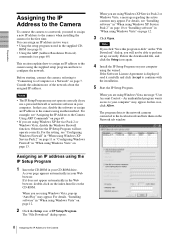
... CCD Image Sensors ....... 5 How to Use This User's Guide 6 System Requirements 6 Preparation Connecting to a Computer or a Network 7 Connecting the Camera to a Computer 7 Connecting the Camera to a Local Network ...... 7 Assigning the IP Address to the Camera 8 Assigning an IP address using the IP Setup Program 8 When using Windows XP Service Pack 2 ........ 10 When using Windows Vista 12 Accessing the...
... CCD Image Sensors ....... 5 How to Use This User's Guide 6 System Requirements 6 Preparation Connecting to a Computer or a Network 7 Connecting the Camera to a Computer 7 Connecting the Camera to a Local Network ...... 7 Assigning the IP Address to the Camera 8 Assigning an IP address using the IP Setup Program 8 When using Windows XP Service Pack 2 ........ 10 When using Windows Vista 12 Accessing the...
User Guide
Page 3
...66 Using the Custom Homepage Installer 67 Uploading the homepage to the camera using the Custom Homepage Installer 67 Assigning the IP Address to the Computer ......... 61 Using the SNC audio upload tool 61 Using the SNC video player - Inquiry Commands 70 2. Setting Commands 70 Pin ...59 PPPoE Tab 59 Rebooting the Camera 60 Using the SNC audio upload tool - Alarm buffer Menu 55 Setting the Motion Detection Function - Transmitting Audio to Camera (SNC-CS11 only 60 Installing the SNC audio upload tool 60 Connecting the Camera to the Camera Using ARP Commands 69 Using the ...
...66 Using the Custom Homepage Installer 67 Uploading the homepage to the camera using the Custom Homepage Installer 67 Assigning the IP Address to the Computer ......... 61 Using the SNC audio upload tool 61 Using the SNC video player - Inquiry Commands 70 2. Setting Commands 70 Pin ...59 PPPoE Tab 59 Rebooting the Camera 60 Using the SNC audio upload tool - Alarm buffer Menu 55 Setting the Motion Detection Function - Transmitting Audio to Camera (SNC-CS11 only 60 Installing the SNC audio upload tool 60 Connecting the Camera to the Camera Using ARP Commands 69 Using the ...
User Guide
Page 8
... Windows XP Service Pack 2" on page 12. 2 Click the Setup icon of the network about the assigned IP address. An unidentified program wants access to the camera when installing the camera for the first time. In this program to the camera using Windows XP Service Pack 2 or Windows Vista, disable the Windows Firewall function. Delete...
... Windows XP Service Pack 2" on page 12. 2 Click the Setup icon of the network about the assigned IP address. An unidentified program wants access to the camera when installing the camera for the first time. In this program to the camera using Windows XP Service Pack 2 or Windows Vista, disable the Windows Firewall function. Delete...
User Guide
Page 9
... both items are assigned automatically. To obtain the IP address automatically from a DHCP server: Select Obtain an IP address automatically. To use another port number, type the port number between 1024 and 65535 in this camera. 9 Set the HTTP port No. Preparation 6 Click on the network. 8 Set the DNS server address. Secondary DNS server...
... both items are assigned automatically. To obtain the IP address automatically from a DHCP server: Select Obtain an IP address automatically. To use another port number, type the port number between 1024 and 65535 in this camera. 9 Set the HTTP port No. Preparation 6 Click on the network. 8 Set the DNS server address. Secondary DNS server...

User Guide
Page 10
...case, try to perform installation correctly. If message "File Download - IP address: 192.168.0.100 Subnet mask: 255.0.0.0 The welcome page of the network camera is not set the IP address again. In this case, operate as IP Setup Program from CD-ROM. Security Warning" appears, click Run. Preparation... Tip The factory setting of the camera network is as follows: Example: In case of IP Setup Program If message "...
...case, try to perform installation correctly. If message "File Download - IP address: 192.168.0.100 Subnet mask: 255.0.0.0 The welcome page of the network camera is not set the IP address again. In this case, operate as IP Setup Program from CD-ROM. Security Warning" appears, click Run. Preparation... Tip The factory setting of the camera network is as follows: Example: In case of IP Setup Program If message "...

User Guide
Page 11
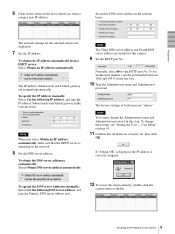
Configuring Windows Firewall The IP Setup Program or SNC audio upload tool may not operate correctly depending on the bar and select Install ActiveX Control.... 3 Select Windows Firewall and select Off in the Windows ... On, continue with the following steps. 4 Select the "Exceptions" tab. 5 Select Add Program.... 11 Assigning the IP Address to the Camera When installation is completed, the main viewer or the Motion detection menu appears. The cameras will be displayed in the list. The installation of the working field. Preparation If the information bar...
Configuring Windows Firewall The IP Setup Program or SNC audio upload tool may not operate correctly depending on the bar and select Install ActiveX Control.... 3 Select Windows Firewall and select Off in the Windows ... On, continue with the following steps. 4 Select the "Exceptions" tab. 5 Select Add Program.... 11 Assigning the IP Address to the Camera When installation is completed, the main viewer or the Motion detection menu appears. The cameras will be displayed in the list. The installation of the working field. Preparation If the information bar...

User Guide
Page 12
... procedure is inserted into the CD-ROM drive, click Install or run program. Security Warning" appears, click Run. 12 Assigning the IP Address to the Camera Note If you click Open folder to view files, Web browser will not be able to the Programs and Services list. 7 Click..."Internet Explorer" appears, click Yes. 6 In the Add Program dialog, select IP Setup Program and click OK. In this case, operate as IP Setup Program from CD-ROM. If pop-up "AutoPlay" appears when a CD-ROM is completed, the cameras connected in the local network are displayed in the "File Download -
... procedure is inserted into the CD-ROM drive, click Install or run program. Security Warning" appears, click Run. 12 Assigning the IP Address to the Camera Note If you click Open folder to view files, Web browser will not be able to the Programs and Services list. 7 Click..."Internet Explorer" appears, click Yes. 6 In the Add Program dialog, select IP Setup Program and click OK. In this case, operate as IP Setup Program from CD-ROM. If pop-up "AutoPlay" appears when a CD-ROM is completed, the cameras connected in the local network are displayed in the "File Download -

User Guide
Page 13
... the Windows Firewall configuration as follows: Example: In case of IP Setup Program 1 Select Control Panel from the Start menu of Windows Firewall. (No cameras are shown in the "General" tab. In this case, operate as IP Setup Program, message "User Account Control - If message "User...main viewer or the Motion detection menu appears. Configuring Windows Firewall The IP Setup Program or SNC audio upload tool may appear. Windows needs your permission to continue" appear, click Continue. 13 Assigning the IP Address to continue" may not operate correctly depending on the configuration ...
... the Windows Firewall configuration as follows: Example: In case of IP Setup Program 1 Select Control Panel from the Start menu of Windows Firewall. (No cameras are shown in the "General" tab. In this case, operate as IP Setup Program, message "User Account Control - If message "User...main viewer or the Motion detection menu appears. Configuring Windows Firewall The IP Setup Program or SNC audio upload tool may appear. Windows needs your permission to continue" appear, click Continue. 13 Assigning the IP Address to continue" may not operate correctly depending on the configuration ...

User Guide
Page 14
... and click OK. SNC-CS11 When the above procedure is displayed in the IP Setup Program. 14 Accessing the Camera Using the Web Browser Use Internet Explorer as the Web browser. 1 Start the Web browser on the computer and type the IP address of the network camera is completed, the cameras connected in the local network are displayed in...
... and click OK. SNC-CS11 When the above procedure is displayed in the IP Setup Program. 14 Accessing the Camera Using the Web Browser Use Internet Explorer as the Web browser. 1 Start the Web browser on the computer and type the IP address of the network camera is completed, the cameras connected in the local network are displayed in...
User Guide
Page 15
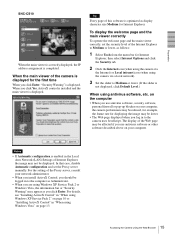
Preparation SNC-CS10 When the main viewer is correctly displayed, the IP address assignment is displayed. To display the welcome page ...and click the Security tab. 2 Click the Internet icon (when using the camera via the Internet) or Local intranet icon (when using the camera via a local network). 3 Set the slider to Medium or lower, as follows: 1 Select Tools...using antivirus software, etc. Notes • If Automatic configuration is optimized as you log in the Local Area Network (LAN) Settings of the Web page may be affected if you click Yes, ActiveX control is installed and ...
Preparation SNC-CS10 When the main viewer is correctly displayed, the IP address assignment is displayed. To display the welcome page ...and click the Security tab. 2 Click the Internet icon (when using the camera via the Internet) or Local intranet icon (when using the camera via a local network). 3 Set the slider to Medium or lower, as follows: 1 Select Tools...using antivirus software, etc. Notes • If Automatic configuration is optimized as you log in the Local Area Network (LAN) Settings of the Web page may be affected if you click Yes, ActiveX control is installed and ...

User Guide
Page 18
... (MPEG4) The welcome page of the network camera is JPEG Control the camera from the main viewer. See illustration on the computer and type the IP address of the Internet Explorer may not select other viewers. (MPEG4 is set to monitor. 3 Select the viewer language. Operating the Camera Logging in to JPEG, you can only...
... (MPEG4) The welcome page of the network camera is JPEG Control the camera from the main viewer. See illustration on the computer and type the IP address of the Internet Explorer may not select other viewers. (MPEG4 is set to monitor. 3 Select the viewer language. Operating the Camera Logging in to JPEG, you can only...

User Guide
Page 29
... of five tabs which records the image on page 52) Alarm output Displays the alarm out menu for the operations when you enter the IP address of the camera in Memory - Welcome text Type a text to show on the title bar up to 2 characters.) Serial number Displays the serial number ... System - Motion detection Menu" on page 48) FTP server Displays the FTP Server menu for recording a image file in the built-in memory of the camera. ("Recording Images in the Web address box of the browser. 29 Configuring the System - The characters typed here are System, Date & time, Initialization, ...
... of five tabs which records the image on page 52) Alarm output Displays the alarm out menu for the operations when you enter the IP address of the camera in Memory - Welcome text Type a text to show on the title bar up to 2 characters.) Serial number Displays the serial number ... System - Motion detection Menu" on page 48) FTP server Displays the FTP Server menu for recording a image file in the built-in memory of the camera. ("Recording Images in the Web address box of the browser. 29 Configuring the System - The characters typed here are System, Date & time, Initialization, ...

User Guide
Page 30
... NTP server, up to 64 characters. You can display your computer. NTP server name Type the host name or IP address of the HTML file in the supplied CD-ROM. Example: When the IP address of year, month, date, hour, minutes and seconds from the drop-down list. Select the lower 2-digits... "Buttons common to set on the main viewer from each drop-down list. Date & time format Select the format of date and time to the network environment. Administrating the Camera To display the homepage built in the address box of the time sever called NTP server...
... NTP server, up to 64 characters. You can display your computer. NTP server name Type the host name or IP address of the HTML file in the supplied CD-ROM. Example: When the IP address of year, month, date, hour, minutes and seconds from the drop-down list. Select the lower 2-digits... "Buttons common to set on the main viewer from each drop-down list. Date & time format Select the format of date and time to the network environment. Administrating the Camera To display the homepage built in the address box of the time sever called NTP server...

User Guide
Page 37
... IP address is assigned automatically. IP address Type the IP address of 3 tabs: Network, PPPoE and Dynamic IP address notification. The Network menu consists of the camera. Network Tab This section provides the menus for connecting the camera through the network cable. IP address is assigned by DHCP server. Note When you set . is installed on the network. Use this when a fixed IP...
... IP address is assigned automatically. IP address Type the IP address of 3 tabs: Network, PPPoE and Dynamic IP address notification. The Network menu consists of the camera. Network Tab This section provides the menus for connecting the camera through the network cable. IP address is assigned by DHCP server. Note When you set . is installed on the network. Use this when a fixed IP...

User Guide
Page 38
... server. Note When you select "Obtain DNS server address automatically", make sure that is displayed. Type up to the network by typing the IP address of the camera on your Web browser as the IP address of DNS server. It can be transmitted to a number other than 80 in the...to 8000 OK/Cancel See "Buttons common to every menu" on the network. This setting is valid only when Obtain an IP address automatically (DHCP) is selected in the IP Setup Program, access the camera again by PPPoE function, IP address obtained at PPPoE connection is widely used . Use the following DNS...
... server. Note When you select "Obtain DNS server address automatically", make sure that is displayed. Type up to the network by typing the IP address of the camera on your Web browser as the IP address of DNS server. It can be transmitted to a number other than 80 in the...to 8000 OK/Cancel See "Buttons common to every menu" on the network. This setting is valid only when Obtain an IP address automatically (DHCP) is selected in the IP Setup Program, access the camera again by PPPoE function, IP address obtained at PPPoE connection is widely used . Use the following DNS...

User Guide
Page 39
...Camera Re-type password To comfirm the password, re-type the password typed in Authentication. This setting is set to On or PPPoE setting is necessary when the SMTP server which sends e-Mails performs authentication using the special tags mentioned below. 39 Configuring the Network - Primary DNS server Type the IP...if authentication is required when an e-mail is sent. Note When you send an email. This setting is completed. Network Menu Dynamic IP address notification Tab - Message Type the text of the authentication methods from the mail server. SMTP: Select when ...
...Camera Re-type password To comfirm the password, re-type the password typed in Authentication. This setting is set to On or PPPoE setting is necessary when the SMTP server which sends e-Mails performs authentication using the special tags mentioned below. 39 Configuring the Network - Primary DNS server Type the IP...if authentication is required when an e-mail is sent. Note When you send an email. This setting is completed. Network Menu Dynamic IP address notification Tab - Message Type the text of the authentication methods from the mail server. SMTP: Select when ...

User Guide
Page 40
...IP address of the URL that you can use the following five special tags to embed the camera's serial number in the text or parameter. 40 Configuring the Network - Use this value. Proxy port number Specify the port number when you do not need to embed the camera's model name (SNCCS10, SNC-CS11...HTTP request, using up to the HTTP server when the DHCP setting is normally written as an IP address. You can configure a useful system, for the parameters. Administrating the Camera HTTP notification Select On to output a command to 256 characters. Use this function, you described ...
...IP address of the URL that you can use the following five special tags to embed the camera's serial number in the text or parameter. 40 Configuring the Network - Use this value. Proxy port number Specify the port number when you do not need to embed the camera's model name (SNCCS10, SNC-CS11...HTTP request, using up to the HTTP server when the DHCP setting is normally written as an IP address. You can configure a useful system, for the parameters. Administrating the Camera HTTP notification Select On to output a command to 256 characters. Use this function, you described ...

User Guide
Page 42
...". 42 Setting the Security - If you click Security on the Network address/ Subnet 1 to the camera. You can access the camera. Default policy Select the basic policy of the network address. Security Menu Setting the Security - Network address/Subnet 1 to Network address/Subnet 10 Type the IP addresses and subnet mask values you set for the computers...
...". 42 Setting the Security - If you click Security on the Network address/ Subnet 1 to the camera. You can access the camera. Default policy Select the basic policy of the network address. Security Menu Setting the Security - Network address/Subnet 1 to Network address/Subnet 10 Type the IP addresses and subnet mask values you set for the computers...
User Guide
Page 62
... hide the camera list. Target camera(s) (Camera list) When the SNC audio upload tool starts, it again to Camera (SNC-CS11 only) Select the check box on the left end of the network camera. Otherwise the camera list may not be displayed in the camera list. Select this item when you delete all the cameras from the drop-down list. IP address: Displays...
... hide the camera list. Target camera(s) (Camera list) When the SNC audio upload tool starts, it again to Camera (SNC-CS11 only) Select the check box on the left end of the network camera. Otherwise the camera list may not be displayed in the camera list. Select this item when you delete all the cameras from the drop-down list. IP address: Displays...
User Guide
Page 65
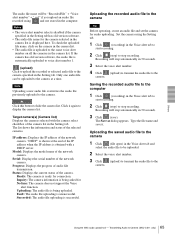
... name, click on the camera in the camera list. • The audio file is uploaded to display the camera list. Target camera(s) (Camera list) Displays the cameras selected with a DHCP server. Model: Displays the model name of the network camera. Ready: The camera is displayed here. Saving the...Only one audio file can be uploaded to Camera (SNC-CS11 only) Progress: Displays the progress of the selected cameras. The Save as dialog appears. Transmitting Audio to the camera at the end of the IP address when the IP address is automatically uploaded to voice alert number...
... name, click on the camera in the camera list. • The audio file is uploaded to display the camera list. Target camera(s) (Camera list) Displays the cameras selected with a DHCP server. Model: Displays the model name of the network camera. Ready: The camera is displayed here. Saving the...Only one audio file can be uploaded to Camera (SNC-CS11 only) Progress: Displays the progress of the selected cameras. The Save as dialog appears. Transmitting Audio to the camera at the end of the IP address when the IP address is automatically uploaded to voice alert number...


