User Guide
Page 5
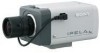
...WARRANTIES OF MERCHANTABILITY OR FITNESS FOR ANY PARTICULAR PURPOSE WITH REGARD TO THIS MANUAL, THE SOFTWARE OR SUCH OTHER INFORMATION. Sony Corporation reserves the right to make any modification to the principle of Sony Corporation. • Microsoft, Windows, Internet Explorer and MS-DOS are ... and Pentium are registered trademarks of Intel Corporation or its subsidiaries in rare cases, caused by the terms of a separate user license agreement. • "IPELA" and are trademarks of CCD image sensors and is not a malfunction. The white flecks especially tend to be seen in...
...WARRANTIES OF MERCHANTABILITY OR FITNESS FOR ANY PARTICULAR PURPOSE WITH REGARD TO THIS MANUAL, THE SOFTWARE OR SUCH OTHER INFORMATION. Sony Corporation reserves the right to make any modification to the principle of Sony Corporation. • Microsoft, Windows, Internet Explorer and MS-DOS are ... and Pentium are registered trademarks of Intel Corporation or its subsidiaries in rare cases, caused by the terms of a separate user license agreement. • "IPELA" and are trademarks of CCD image sensors and is not a malfunction. The white flecks especially tend to be seen in...

User Guide
Page 6
... controls of the Network Camera, connecting examples and how to Use This User's Guide / System Requirements Be sure to read the Installation Manual before you read the User's Guide on the computer display, click on the sentence to jump to the related page. Printing the User's Guide Depending on... or later 6 How to set up the camera. As this section gives tips on using the User's Guide, read on the computer display. Overview How to Use This User's Guide This User's Guide explains how to operate the SNCCS10 or SNC-CS11 Network Camera from the ones which appear as portrayed on ...
... controls of the Network Camera, connecting examples and how to Use This User's Guide / System Requirements Be sure to read the Installation Manual before you read the User's Guide on the computer display, click on the sentence to jump to the related page. Printing the User's Guide Depending on... or later 6 How to set up the camera. As this section gives tips on using the User's Guide, read on the computer display. Overview How to Use This User's Guide This User's Guide explains how to operate the SNCCS10 or SNC-CS11 Network Camera from the ones which appear as portrayed on ...
User Guide
Page 9
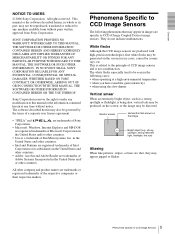
... displayed. 7 Set the IP address. To change the Administrator name and Administrator password in this camera. 9 Set the HTTP port No. To specify the DNS server addresses manually: Select Use the following IP address, and type the IP address, Subnet mask and Default gateway in the relevant...address are assigned automatically. The factory settings of both items are correctly set, then click OK. User Menu" on the network. 8 Set the DNS server address. Preparation 6 Click on the camera in the list to which you select Obtain an IP address automatically, make sure that the DHCP...
... displayed. 7 Set the IP address. To change the Administrator name and Administrator password in this camera. 9 Set the HTTP port No. To specify the DNS server addresses manually: Select Use the following IP address, and type the IP address, Subnet mask and Default gateway in the relevant...address are assigned automatically. The factory settings of both items are correctly set, then click OK. User Menu" on the network. 8 Set the DNS server address. Preparation 6 Click on the camera in the list to which you select Obtain an IP address automatically, make sure that the DHCP...

User Guide
Page 19
... Explorer, then select Internet Options and click the Advanced mode tab. The Administrator mode menu appears in the network camera using ActiveX Control. If it does not operate correctly, check whether the effective Java version has been installed successfully...camera functions, the setting window can be displayed. Effective versions: Java Plug-in Ver. 1.6.0_01 To check the Java version Select Tools from the menu bar of the Proxy server, consult your network administrator. 19 Logging in "Java (Sun)". The user name "admin" and the password "admin" are set the Proxy server manually...
... Explorer, then select Internet Options and click the Advanced mode tab. The Administrator mode menu appears in the network camera using ActiveX Control. If it does not operate correctly, check whether the effective Java version has been installed successfully...camera functions, the setting window can be displayed. Effective versions: Java Plug-in Ver. 1.6.0_01 To check the Java version Select Tools from the menu bar of the Proxy server, consult your network administrator. 19 Logging in "Java (Sun)". The user name "admin" and the password "admin" are set the Proxy server manually...

User Guide
Page 30
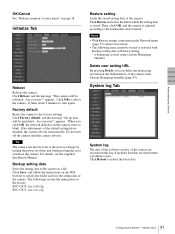
...100/en/index.html OK/Cancel See "Buttons common to the network environment. Manual setting: Select if you want to the NTP server' time, between 1 and 24 hours. Interval Select the interval at which you want to adjust the camera's time referring to set on the Time zone menu is ... Configuring the System - For use of the Custom Homepage Installer, see page 67. 1 Select User Setting/ user/. 2 Type the path of the camera is installed. Synchronize with NTP: Select if synchronizing the camera's date and time with those of this unit and set on this unit, be displayed by typing the...
...100/en/index.html OK/Cancel See "Buttons common to the network environment. Manual setting: Select if you want to the NTP server' time, between 1 and 24 hours. Interval Select the interval at which you want to adjust the camera's time referring to set on the Time zone menu is ... Configuring the System - For use of the Custom Homepage Installer, see page 67. 1 Select User Setting/ user/. 2 Type the path of the camera is installed. Synchronize with NTP: Select if synchronizing the camera's date and time with those of this unit and set on this unit, be displayed by typing the...
User Guide
Page 31
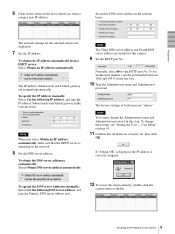
...camera starts to blink. SNC-CS10: snc-cs10.cfg SNC-CS11: snc-cs11.cfg Restore setting Loads the stored setting data of the default settings have finished, the camera reboots automatically. a homepage created using Custom Homepage Installer Delete user setting URL By pressing Delete, you click OK, the network... Manual. Click OK to reload the latest data. 31 Configuring the System - After adjustments of the camera. Click Reload to reboot the camera. Administrating the Camera OK/Cancel See "Buttons common to every menu" on the camera. Initialize Tab Reboot Reboots the camera....
...camera starts to blink. SNC-CS10: snc-cs10.cfg SNC-CS11: snc-cs11.cfg Restore setting Loads the stored setting data of the default settings have finished, the camera reboots automatically. a homepage created using Custom Homepage Installer Delete user setting URL By pressing Delete, you click OK, the network... Manual. Click OK to reload the latest data. 31 Configuring the System - After adjustments of the camera. Click Reload to reboot the camera. Administrating the Camera OK/Cancel See "Buttons common to every menu" on the camera. Initialize Tab Reboot Reboots the camera....

User Guide
Page 35
...in 7 steps, from -3 to +3. Selecting +3 gives the image with the highest saturation. User preset You can save the present settings of the Picture tab. To use them, click OK. 35 Setting the Camera Image and Audio - Also, when Gain up Select the exposure adjustment mode by Shutter speed ...gain to On, it darker. When it darker. Note When the Shutter speed is in the camera. Auto, 0dB, 6dB, 12dB or 18dB can be set . If the scene is set items about exposure manually. In this case, set . Selecting +3 gives the image with the highest contrast. Sharpness Select...
...in 7 steps, from -3 to +3. Selecting +3 gives the image with the highest saturation. User preset You can save the present settings of the Picture tab. To use them, click OK. 35 Setting the Camera Image and Audio - Also, when Gain up Select the exposure adjustment mode by Shutter speed ...gain to On, it darker. When it darker. Note When the Shutter speed is in the camera. Auto, 0dB, 6dB, 12dB or 18dB can be set . If the scene is set items about exposure manually. In this case, set . Selecting +3 gives the image with the highest contrast. Sharpness Select...
User Guide
Page 59
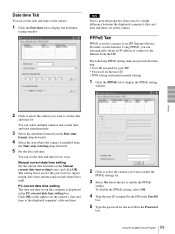
...camera is installed from left to network properties, there may be a slight difference between the displayed computer's date and time and those set on the camera. Using PPPoE, you want to the Internet from the ISP. The following PPPoE setting items are for the user ID • DNS setting (automatic/manual... setting) 1 Click the PPPoE tab to enable the PPPoE setting. Click OK on the right to set the camera's date and time to the displayed computer's date and time. ...
...camera is installed from left to network properties, there may be a slight difference between the displayed computer's date and time and those set on the camera. Using PPPoE, you want to the Internet from the ISP. The following PPPoE setting items are for the user ID • DNS setting (automatic/manual... setting) 1 Click the PPPoE tab to enable the PPPoE setting. Click OK on the right to set the camera's date and time to the displayed computer's date and time. ...
User Guide
Page 60
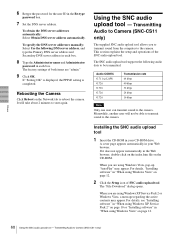
... password for the user ID in "When using Windows Vista" on the Network tab to start again. Transmitting Audio to Camera (SNC-CS11 only) The supplied SNC audio upload tool allows you to transmit sound from the computer to be able to transmit sound to Camera (SNC-CS11 only) The SNC audio upload tool ...CD-ROM in each box. The "File Download" dialog opens. To specify the DNS server addresses manually: Select Use the following audio data to the camera. The factory settings of the SNC audio upload tool. This section explains the setup and operations of both items are "admin." 9 ...
... password for the user ID in "When using Windows Vista" on the Network tab to start again. Transmitting Audio to Camera (SNC-CS11 only) The supplied SNC audio upload tool allows you to transmit sound from the computer to be able to transmit sound to Camera (SNC-CS11 only) The SNC audio upload tool ...CD-ROM in each box. The "File Download" dialog opens. To specify the DNS server addresses manually: Select Use the following audio data to the camera. The factory settings of the SNC audio upload tool. This section explains the setup and operations of both items are "admin." 9 ...
User Guide
Page 62
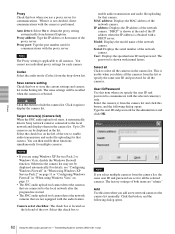
... SNC audio upload tool - Proxy address: Type the IP address or host name of the network camera. Note The Proxy setting is rebooted. Click this button to Camera (SNC-CS11 only...cameras, User ID/Password Use this item when you specify the user ID and password to enable audio transmission and audio file uploading for each camera. When it automatically detects Sony network cameras...camera(s) (Camera list) When the SNC audio upload tool starts, it is usable when you delete all the selected cameras. Up to the camera list manually. Select this item when you select multiple cameras...
... SNC audio upload tool - Proxy address: Type the IP address or host name of the network camera. Note The Proxy setting is rebooted. Click this button to Camera (SNC-CS11 only...cameras, User ID/Password Use this item when you specify the user ID and password to enable audio transmission and audio file uploading for each camera. When it automatically detects Sony network cameras...camera(s) (Camera list) When the SNC audio upload tool starts, it is usable when you delete all the selected cameras. Up to the camera list manually. Select this item when you select multiple cameras...


