User Guide
Page 2
...Menu ......... 28 System Tab 28 Date & time Tab 29 Initialize Tab 30 System log Tab 31 Access log tab 31 Setting the Camera Image and Audio - Camera Menu 32 Common Tab 32 Picture Tab 33 Day/Night Tab (SNC-DF85/DF80 only) ..........34 Video codec Tab 35 Streaming Tab ...certificate Tab 43 Setting the 802.1X authentication function - Setting the periodical recording mode 57 Folder structure of image memory 57 Downloading Images from the Camera - FTP client Menu 52 Common Tab - Network Menu .....38 Network Tab 38 Dynamic IP address notification Tab - User Menu 47 Setting the ...
...Menu ......... 28 System Tab 28 Date & time Tab 29 Initialize Tab 30 System log Tab 31 Access log tab 31 Setting the Camera Image and Audio - Camera Menu 32 Common Tab 32 Picture Tab 33 Day/Night Tab (SNC-DF85/DF80 only) ..........34 Video codec Tab 35 Streaming Tab ...certificate Tab 43 Setting the 802.1X authentication function - Setting the periodical recording mode 57 Folder structure of image memory 57 Downloading Images from the Camera - FTP client Menu 52 Common Tab - Network Menu .....38 Network Tab 38 Dynamic IP address notification Tab - User Menu 47 Setting the ...

User Guide
Page 3
... Schedule Menu 63 Setting the Alarm Buffer - Transmitting audio to camera 74 Installing the SNC audio upload tool 74 Connecting the camera to the Camera Using ARP Commands 85 Using the SNMP 86 1. Inquiry Commands 86 2. Masking a Camera Image 81 Installing the SNC privacy masking tool .......... 81 Using ...the SNC privacy masking tool 81 Setting a privacy mask 82 Using the Custom Homepage Installer 83 Uploading the homepage to the camera using the Custom Homepage Installer 83 Assigning the IP Address to the computer 74 Using the SNC audio upload tool 75 Using the...
... Schedule Menu 63 Setting the Alarm Buffer - Transmitting audio to camera 74 Installing the SNC audio upload tool 74 Connecting the camera to the Camera Using ARP Commands 85 Using the SNMP 86 1. Inquiry Commands 86 2. Masking a Camera Image 81 Installing the SNC privacy masking tool .......... 81 Using ...the SNC privacy masking tool 81 Setting a privacy mask 82 Using the Custom Homepage Installer 83 Uploading the homepage to the camera using the Custom Homepage Installer 83 Assigning the IP Address to the computer 74 Using the SNC audio upload tool 75 Using the...
User Guide
Page 5
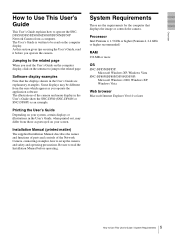
... display in the User's Guide show the SNC-DF80 (SNC-DF80N or SNC-DF80P) as you operate the camera. The User's Guide is written to set up the camera, and safety and operating precautions. Printing the User's Guide Depending on the sentence to jump to operate the ...SNCDF85N/DF85P/DF80N/DF80P/DF50N/DF50P Network Camera from the ones which appear as an example. System Requirements These are explanatory examples. Processor Intel Pentium 4, 1.5 GHz or higher (Pentium 4, 2.4 ...
... display in the User's Guide show the SNC-DF80 (SNC-DF80N or SNC-DF80P) as you operate the camera. The User's Guide is written to set up the camera, and safety and operating precautions. Printing the User's Guide Depending on the sentence to jump to operate the ...SNCDF85N/DF85P/DF80N/DF80P/DF50N/DF50P Network Camera from the ones which appear as an example. System Requirements These are explanatory examples. Processor Intel Pentium 4, 1.5 GHz or higher (Pentium 4, 2.4 ...
User Guide
Page 6
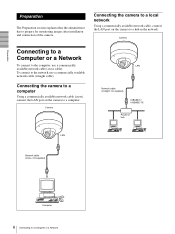
To connect to the computer, use a commercially available network cable (straight cable). Connecting the camera to a computer Using a commercially available network cable (cross), connect the LAN port on the camera to a Computer or a Network Camera Connecting to a Computer or a Network To connect to the network, use a commercially available network cable (cross cable). Preparation Preparation...
To connect to the computer, use a commercially available network cable (straight cable). Connecting the camera to a computer Using a commercially available network cable (cross), connect the LAN port on the camera to a Computer or a Network Camera Connecting to a Computer or a Network To connect to the network, use a commercially available network cable (cross cable). Preparation Preparation...
User Guide
Page 7
...Vista, pop-up correctly. If the Software License Agreement is displayed, read it for the first time. The program detects the network cameras connected to the Camera Using ARP Commands" on the CD-ROM. Consult the administrator of IP Setup Program. You can assign an IP address in two ways...Setup Program 1 Insert the CD-ROM in "When using Windows Vista" on your computer. Otherwise the IP Setup Program will not be able to the camera using another method. The "File Download" dialog opens. In this program to your CD-ROM drive. ROM (see page 7) • Using the ...
...Vista, pop-up correctly. If the Software License Agreement is displayed, read it for the first time. The program detects the network cameras connected to the Camera Using ARP Commands" on the CD-ROM. Consult the administrator of IP Setup Program. You can assign an IP address in two ways...Setup Program 1 Insert the CD-ROM in "When using Windows Vista" on your computer. Otherwise the IP Setup Program will not be able to the camera using another method. The "File Download" dialog opens. In this program to your CD-ROM drive. ROM (see page 7) • Using the ...
User Guide
Page 8
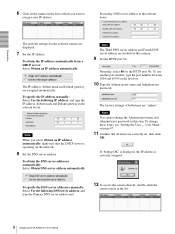
...Use the following IP address, and type the IP address, Subnet mask and Default gateway in the relevant boxes. Preparation 6 Click on the camera in the list to which you select Obtain an IP address automatically, make sure that the DHCP server is correctly assigned. The network settings .... 8 Set the DNS server address. To obtain the DNS server addresses automatically: Select Obtain DNS server address automatically. Secondary DNS server address in this camera. 9 Set the HTTP port No. Normally, select 80 for the HTTP port No. If "Setting OK" is displayed, the IP address is operating...
...Use the following IP address, and type the IP address, Subnet mask and Default gateway in the relevant boxes. Preparation 6 Click on the camera in the list to which you select Obtain an IP address automatically, make sure that the DHCP server is correctly assigned. The network settings .... 8 Set the DNS server address. To obtain the DNS server addresses automatically: Select Obtain DNS server address automatically. Secondary DNS server address in this camera. 9 Set the HTTP port No. Normally, select 80 for the HTTP port No. If "Setting OK" is displayed, the IP address is operating...
User Guide
Page 9
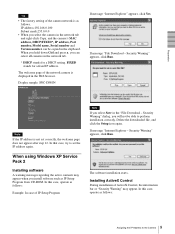
... installation of ActiveX Control, the information bar or "Security Warning" may appear when you install software such as follows: Example: In case of the network camera is displayed in the "File Download - IP address:192.168.0.100 Subnet mask:255.0.0.0 • When you select Save in the Web browser. Display sample... page does not appear after step 12. Delete the downloaded file, and click the Setup icon again. Preparation Tip • The factory setting of the camera network is not set the IP address again. The welcome page of IP Setup Program Note If you select the...
... installation of ActiveX Control, the information bar or "Security Warning" may appear when you install software such as follows: Example: In case of the network camera is displayed in the "File Download - IP address:192.168.0.100 Subnet mask:255.0.0.0 • When you select Save in the Web browser. Display sample... page does not appear after step 12. Delete the downloaded file, and click the Setup icon again. Preparation Tip • The factory setting of the camera network is not set the IP address again. The welcome page of IP Setup Program Note If you select the...
User Guide
Page 10
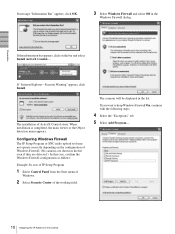
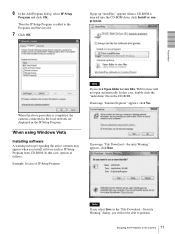
... following steps. 4 Select the "Exceptions" tab. 5 Select Add Program.... 10 Assigning the IP Address to the Camera If the information bar appears, click on the configuration of Windows Firewall. (No cameras are shown in the list even if they are detected.) In this case, confirm the Windows Firewall configuration as...: In case of IP Setup Program 1 Select Control Panel from the Start menu of Windows. 2 Select Security Center of ActiveX Control starts. The cameras will be displayed in the Windows Firewall dialog. The installation of the working field. If " Internet Explorer -
... following steps. 4 Select the "Exceptions" tab. 5 Select Add Program.... 10 Assigning the IP Address to the Camera If the information bar appears, click on the configuration of Windows Firewall. (No cameras are shown in the list even if they are detected.) In this case, confirm the Windows Firewall configuration as...: In case of IP Setup Program 1 Select Control Panel from the Start menu of Windows. 2 Select Security Center of ActiveX Control starts. The cameras will be displayed in the Windows Firewall dialog. The installation of the working field. If " Internet Explorer -
User Guide
Page 11
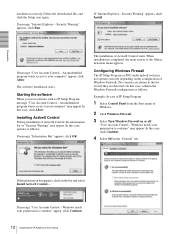
... Program Note If you select Save in the IP Setup Program. Security Warning" appears, click Run. Preparation When the above procedure is completed, the cameras connected in the local network are displayed in the "File Download - If message "Internet Explorer" appears, click Yes. Note If you click Open ... Click OK. In this case, operate as IP Setup Program from CD-ROM. If pop-up "AutoPlay" appears when a CD-ROM is added to the Camera If message "File Download - 6 In the Add Program dialog, select IP Setup Program and click OK. In this case, double-click the "index.htm"...
... Program Note If you select Save in the IP Setup Program. Security Warning" appears, click Run. Preparation When the above procedure is completed, the cameras connected in the local network are displayed in the "File Download - If message "Internet Explorer" appears, click Yes. Note If you click Open ... Click OK. In this case, operate as IP Setup Program from CD-ROM. If pop-up "AutoPlay" appears when a CD-ROM is added to the Camera If message "File Download - 6 In the Add Program dialog, select IP Setup Program and click OK. In this case, double-click the "index.htm"...
User Guide
Page 12
... permission to continue" appear, click Continue. 12 Assigning the IP Address to continue" may not operate correctly depending on the configuration of Windows Firewall. (No cameras are detected.) In this case, operate as IP Setup Program, message "User Account Control - In this case, click Allow. If the information bar appears, click...
... permission to continue" appear, click Continue. 12 Assigning the IP Address to continue" may not operate correctly depending on the configuration of Windows Firewall. (No cameras are detected.) In this case, operate as IP Setup Program, message "User Account Control - In this case, click Allow. If the information bar appears, click...
User Guide
Page 13
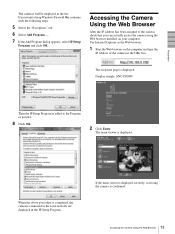
...list. 8 Click OK. 2 Click Enter. The main viewer is displayed. The welcome page is displayed. When the above procedure is completed, the cameras connected in the local network are displayed in the list. Use Internet Explorer as the Web browser. 1 Start the Web browser on your computer.... If the main viewer is displayed correctly, accessing the camera is added to keep Windows Firewall On, continue with the following steps. 5 Select the "Exceptions" tab. 6 Select Add Program.... 7 If the ...
...list. 8 Click OK. 2 Click Enter. The main viewer is displayed. The welcome page is displayed. When the above procedure is completed, the cameras connected in the local network are displayed in the list. Use Internet Explorer as the Web browser. 1 Start the Web browser on your computer.... If the main viewer is displayed correctly, accessing the camera is added to keep Windows Firewall On, continue with the following steps. 5 Select the "Exceptions" tab. 6 Select Add Program.... 7 If the ...
User Guide
Page 14
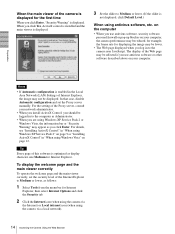
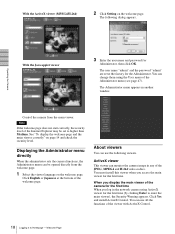
... Internet Options and click the Security tab. 2 Click the Internet icon (when using the camera via the Internet) or Local intranet icon (when using the camera via a local network). 14 Accessing the Camera Using the Web Browser To display the welcome page and the main viewer correctly To operate the... you click Enter. When you click Yes, ActiveX control is installed and the main viewer is displayed. 3 Set the slider to the camera uses JavaScript. on the computer • When you use antivirus software, security software, personal firewall or pop-up blocker on your computer, the...
... Internet Options and click the Security tab. 2 Click the Internet icon (when using the camera via the Internet) or Local intranet icon (when using the camera via a local network). 14 Accessing the Camera Using the Web Browser To display the welcome page and the main viewer correctly To operate the... you click Enter. When you click Yes, ActiveX control is installed and the main viewer is displayed. 3 Set the slider to the camera uses JavaScript. on the computer • When you use antivirus software, security software, personal firewall or pop-up blocker on your computer, the...
User Guide
Page 15
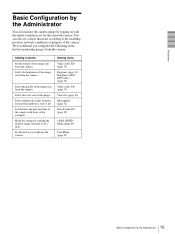
...initial conditions set various functions according to an email. Select the quality of the computer. Setting contents Set the format of the camera. You can monitor the camera image by the Administrator Select the brightness of the image. Setting menu Video codec Tab (page 35) Exposure (page 33) ... (SMTP) Menu (page 49) User Menu (page 47) 15 Basic Configuration by logging in with those of the image sent from the camera. We recommend you configure the following items before monitoring images from the external microphone is sent or not. Select the view size of the image...
...initial conditions set various functions according to an email. Select the quality of the computer. Setting contents Set the format of the camera. You can monitor the camera image by the Administrator Select the brightness of the image. Setting menu Video codec Tab (page 35) Exposure (page 33) ... (SMTP) Menu (page 49) User Menu (page 47) 15 Basic Configuration by logging in with those of the image sent from the camera. We recommend you configure the following items before monitoring images from the external microphone is sent or not. Select the view size of the image...
User Guide
Page 16
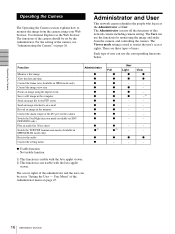
...(Available in JPEG mode only) z Control the image view size z Zoom an image using your Web browser. User Menu" of the camera, see "Administrating the Camera" on page 47. z z - - z DF85/DF80 only) Play an audio file (Voice alert) z Switch the TCP/UDP ...transmission mode (Available in the memory z Control the alarm output of this network camera including camera setting. Operating the Camera Operating the Camera The Operating the Camera section explains how to restrict the user's access rights. The Administrator can use all the functions of...
...(Available in JPEG mode only) z Control the image view size z Zoom an image using your Web browser. User Menu" of the camera, see "Administrating the Camera" on page 47. z z - - z DF85/DF80 only) Play an audio file (Voice alert) z Switch the TCP/UDP ...transmission mode (Available in the memory z Control the alarm output of this network camera including camera setting. Operating the Camera Operating the Camera The Operating the Camera section explains how to restrict the user's access rights. The Administrator can use all the functions of...
User Guide
Page 17
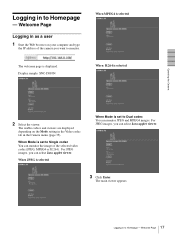
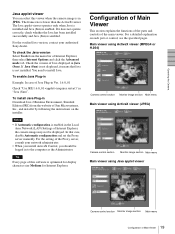
...is selected 2 Select the viewer. Welcome Page When Mode is set to monitor. For JPEG images, you can monitor the image of the camera you want to Single codec You can select Java applet viewer. The usable codecs and viewers are displayed depending on your computer and type ...the IP address of the selected video codec (JPEG, MPEG4 or H.264). Operating the Camera Logging in the Camera menu (page 35). When JPEG is selected When Mode is set to Homepage - For JPEG images, you can monitor JPEG and MPEG4 images...
...is selected 2 Select the viewer. Welcome Page When Mode is set to monitor. For JPEG images, you can monitor the image of the camera you want to Single codec You can select Java applet viewer. The usable codecs and viewers are displayed depending on your computer and type ...the IP address of the selected video codec (JPEG, MPEG4 or H.264). Operating the Camera Logging in the Camera menu (page 35). When JPEG is selected When Mode is set to Homepage - For JPEG images, you can monitor JPEG and MPEG4 images...
User Guide
Page 18
...Welcome Page Click English or Japanese at the factory for the first time. When you access the main viewer for the Administrator. Operating the Camera With the Java applet viewer 3 Enter the user name and password for the first time (by clicking Enter to Homepage - Click Yes... and install ActiveX Control. The following viewers. The Administrator menu appears in to enter the main viewer), the Security Warning appears. Control the camera from the welcome page. 1 Select the viewer language on the welcome page. ActiveX viewer This viewer can be set at the bottom of ...
...Welcome Page Click English or Japanese at the factory for the first time. When you access the main viewer for the Administrator. Operating the Camera With the Java applet viewer 3 Enter the user name and password for the first time (by clicking Enter to Homepage - Click Yes... and install ActiveX Control. The following viewers. The Administrator menu appears in to enter the main viewer), the Security Warning appears. Control the camera from the welcome page. 1 Select the viewer language on the welcome page. ActiveX viewer This viewer can be set at the bottom of ...
User Guide
Page 19
..., you should be displayed. The Java applet viewer operates only when Java is installed and Java (Sun) is lower than the ActiveX viewer. Operating the Camera Java applet viewer You can select this software is optimized for display character size Medium for Internet Explorer. The frame rate is enabled. If Java... Java Plug-in "Java (Sun)". Notes • If Automatic configuration is in the Local Area Network (LAN) Settings of the Proxy server, consult your authorized Sony dealer. Tip Every page of this viewer when the camera image is enabled in JPEG.
..., you should be displayed. The Java applet viewer operates only when Java is installed and Java (Sun) is lower than the ActiveX viewer. Operating the Camera Java applet viewer You can select this software is optimized for display character size Medium for Internet Explorer. The frame rate is enabled. If Java... Java Plug-in "Java (Sun)". Notes • If Automatic configuration is in the Local Area Network (LAN) Settings of the Proxy server, consult your authorized Sony dealer. Tip Every page of this viewer when the camera image is enabled in JPEG.
User Guide
Page 20
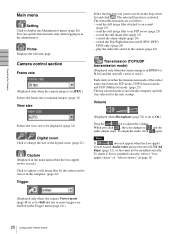
... click , the icon changes to use from the drop-down list and click . switch the Day/Night function on page 18. (Displayed only when, the camera Viewer mode (page 48) is used, Audio codec may not be set to On.) Drag the bar to G.711 (64 kbps) (page 32), or Java... (page 23) - Volume Selects the view size to be installed correctly. To output the audio, click again. control the alarm output (page 24) - Operating the Camera Main menu Setting Click to an e-mail (page 23) - The selected function is saved in the main menu when the Java applet viewer is set...
... click , the icon changes to use from the drop-down list and click . switch the Day/Night function on page 18. (Displayed only when, the camera Viewer mode (page 48) is used, Audio codec may not be set to On.) Drag the bar to G.711 (64 kbps) (page 32), or Java... (page 23) - Volume Selects the view size to be installed correctly. To output the audio, click again. control the alarm output (page 24) - Operating the Camera Main menu Setting Click to an e-mail (page 23) - The selected function is saved in the main menu when the Java applet viewer is set...
User Guide
Page 21
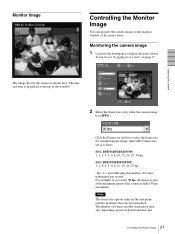
... image shot by the camera is displayed at the maximum speed of frames transmitted per second. SNC-DF85N/DF80N/DF50N 1, 2, 3, 4, 5, 6, 8, 10, 15, 20, 25, 30 fps SNC-... 30 fps, the image is in JPEG). The number of the window. 2 Select the frame rate (only when the camera image is sent at the top of frames actually transmitted may vary depending on network environments and 21 Controlling the Monitor Image ... box to display the main viewer. Monitor Image Controlling the Monitor Image You can monitor the camera image on the monitor window of frames that can be transmitted. Monitoring the...
... image shot by the camera is displayed at the maximum speed of frames transmitted per second. SNC-DF85N/DF80N/DF50N 1, 2, 3, 4, 5, 6, 8, 10, 15, 20, 25, 30 fps SNC-... 30 fps, the image is in JPEG). The number of the window. 2 Select the frame rate (only when the camera image is sent at the top of frames actually transmitted may vary depending on network environments and 21 Controlling the Monitor Image ... box to display the main viewer. Monitor Image Controlling the Monitor Image You can monitor the camera image on the monitor window of frames that can be transmitted. Monitoring the...
User Guide
Page 22
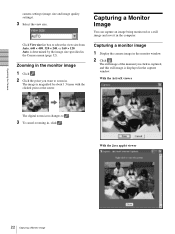
...view size from Auto, 640 × 480, 320 × 240, or 160 × 120. Click View size list box to zoom in the Camera menu (page 32). The image is determined by about 1.5 times with the clicked point at the center. Auto is magnified by the image size specified...Capturing a Monitor Image You can capture an image being monitored as a still image and save it in the capture window. Capturing a monitor image 1 Display the camera image in , click . With the Java applet viewer 22 Capturing a Monitor Image With the ActiveX viewer The digital zoom icon changes to . 3 To cancel...
...view size from Auto, 640 × 480, 320 × 240, or 160 × 120. Click View size list box to zoom in the Camera menu (page 32). The image is determined by about 1.5 times with the clicked point at the center. Auto is magnified by the image size specified...Capturing a Monitor Image You can capture an image being monitored as a still image and save it in the capture window. Capturing a monitor image 1 Display the camera image in , click . With the Java applet viewer 22 Capturing a Monitor Image With the ActiveX viewer The digital zoom icon changes to . 3 To cancel...


