Operating Instructions
Page 3
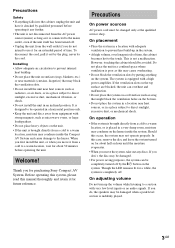
...to the mains outlet, even if the unit itself has been turned off. • Unplug the unit from the wall outlet if you do , the speakers may be completely turned off by qualified personnel before operating the unit. Installing • Allow adequate air circulation to prevent internal heat buildup. • ... from a cold to a warm location, or is placed in a confined space where ventilation is poor as this manual thoroughly and retain it for purchasing Sony Compact AV System. Should this case, remove the disc and leave the system turned on the system. If you do not intend to use it...
...to the mains outlet, even if the unit itself has been turned off. • Unplug the unit from the wall outlet if you do , the speakers may be completely turned off by qualified personnel before operating the unit. Installing • Allow adequate air circulation to prevent internal heat buildup. • ... from a cold to a warm location, or is placed in a confined space where ventilation is poor as this manual thoroughly and retain it for purchasing Sony Compact AV System. Should this case, remove the disc and leave the system turned on the system. If you do not intend to use it...

Operating Instructions
Page 4
... procedure to this. If colour irregularity should cause the TV screen to 30 minutes. IMPORTANT NOTICE Caution: This system is displayed on your nearest Sony dealer. Remove the disc, and then press and hold the x button on after 15 to have any type of the unit. On your TV...'s colour If the speakers should persist, place the speakers farther away from a wall outlet. 4GB If you risk permanent damage to your television screen. After "MECHA LOCK" is capable of time...
... procedure to this. If colour irregularity should cause the TV screen to 30 minutes. IMPORTANT NOTICE Caution: This system is displayed on your nearest Sony dealer. Remove the disc, and then press and hold the x button on after 15 to have any type of the unit. On your TV...'s colour If the speakers should persist, place the speakers farther away from a wall outlet. 4GB If you risk permanent damage to your television screen. After "MECHA LOCK" is capable of time...

Operating Instructions
Page 5
... 10 Note on DVD 5-DISC changer 10 Guide to the Control Menu Display...... 11 Getting Started Unpacking 13 Inserting Batteries into the Remote....... 13 Step 1: Speaker System Hookup........... 14 Step 2: Antenna Hookups 18 Step 3: TV and Video Component Hookups 20 Step 4: Connecting the AC Power Cords 22... Speaker Setup 23 Playing Discs Playing Discs 24 Resuming Playback from the Point Where You Stopped the Disc 27 (Resume Play) Using the DVD's Menu 27 ...
... 10 Note on DVD 5-DISC changer 10 Guide to the Control Menu Display...... 11 Getting Started Unpacking 13 Inserting Batteries into the Remote....... 13 Step 1: Speaker System Hookup........... 14 Step 2: Antenna Hookups 18 Step 3: TV and Video Component Hookups 20 Step 4: Connecting the AC Power Cords 22... Speaker Setup 23 Playing Discs Playing Discs 24 Resuming Playback from the Point Where You Stopped the Disc 27 (Resume Play) Using the DVD's Menu 27 ...

Operating Instructions
Page 13
... on the system. Doing so may cause a malfunction. • If you have the following items: • Speakers (5) • Subwoofer (1) • AM loop antenna (1) • FM wire antenna (1) • Speaker cords (3.5m × 3, 10m × 2, 5m × 1) (12ft. × 3, 34ft. ...Video cord (1) • Remote Commander (remote) RM-SP900 (1) • R6 (size AA) batteries (2) • Operating Instructions (1) • Speakers-connection and Installation (card) (1) Inserting Batteries into the remote casing, particularly when replacing the batteries. • Do not expose the remote sensor to...
... on the system. Doing so may cause a malfunction. • If you have the following items: • Speakers (5) • Subwoofer (1) • AM loop antenna (1) • FM wire antenna (1) • Speaker cords (3.5m × 3, 10m × 2, 5m × 1) (12ft. × 3, 34ft. ...Video cord (1) • Remote Commander (remote) RM-SP900 (1) • R6 (size AA) batteries (2) • Operating Instructions (1) • Speakers-connection and Installation (card) (1) Inserting Batteries into the remote casing, particularly when replacing the batteries. • Do not expose the remote sensor to...

Operating Instructions
Page 14
To obtain the best possible surround sound, specify the speaker parameters (distance, level, etc.) on page 23. Step 1: Speaker System Hookup Connect the supplied speaker system using the supplied speaker cords by matching the colours of the cords. Do not connect any speakers other than those of the jacks to be connected. (-) (-) (+) (+) colour tube 14GB Required cords Speaker cords The connector and the colour tube of the speaker cords are the same colour as the label of the jacks to those supplied with this system.
To obtain the best possible surround sound, specify the speaker parameters (distance, level, etc.) on page 23. Step 1: Speaker System Hookup Connect the supplied speaker system using the supplied speaker cords by matching the colours of the cords. Do not connect any speakers other than those of the jacks to be connected. (-) (-) (+) (+) colour tube 14GB Required cords Speaker cords The connector and the colour tube of the speaker cords are the same colour as the label of the jacks to those supplied with this system.

Operating Instructions
Page 15
continued 15GB Getting Started Terminals for connecting the speakers Connect Front speakers Surround speakers Centre speaker Subwoofer To the SPEAKER FRONT L (white) and R (red) jacks SPEAKER SURR L (blue) and R (grey) jacks SPEAKER CENTER (green) jack SPEAKER WOOFER (purple) jack Front speaker (R) Centre speaker Front speaker (L) FRONT R CENTER FRONT L SURR R WOOFER SURR L SPEAKER SCAN SELECT SELECTABLE R INTERLACE COMPONENT VIDEO OUT R VIDEO 1 AUDIO OUT VIDEO...
continued 15GB Getting Started Terminals for connecting the speakers Connect Front speakers Surround speakers Centre speaker Subwoofer To the SPEAKER FRONT L (white) and R (red) jacks SPEAKER SURR L (blue) and R (grey) jacks SPEAKER CENTER (green) jack SPEAKER WOOFER (purple) jack Front speaker (R) Centre speaker Front speaker (L) FRONT R CENTER FRONT L SURR R WOOFER SURR L SPEAKER SCAN SELECT SELECTABLE R INTERLACE COMPONENT VIDEO OUT R VIDEO 1 AUDIO OUT VIDEO...

Operating Instructions
Page 16
... conditions of insulation. If the cords are reversed, the sound and will lack bass and may damage the system. Tip Connect the speaker cable after bending the speaker wire at the end of the speakers may be sure to #. For details on the components: 3 to 3, and # to follow these precautions when connecting the...
... conditions of insulation. If the cords are reversed, the sound and will lack bass and may damage the system. Tip Connect the speaker cable after bending the speaker wire at the end of the speakers may be sure to #. For details on the components: 3 to 3, and # to follow these precautions when connecting the...
Operating Instructions
Page 17
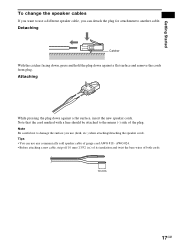
... from plug. Note that the cord marked with a line should be attached to damage the surface you can use (desk, etc.) when attaching/detaching the speaker cords. Note Be careful not to the minus (-) side of both cords. 10 mm 17GB Attaching While pressing the plug down against a flat surface, insert... the new speaker cords. AWG #24. • Before attaching a new cable, strip off 10 mm (13/32 in.) of its insulation and twist the bare wires of the...
... from plug. Note that the cord marked with a line should be attached to damage the surface you can use (desk, etc.) when attaching/detaching the speaker cords. Note Be careful not to the minus (-) side of both cords. 10 mm 17GB Attaching While pressing the plug down against a flat surface, insert... the new speaker cords. AWG #24. • Before attaching a new cable, strip off 10 mm (13/32 in.) of its insulation and twist the bare wires of the...

Operating Instructions
Page 18
... the AM loop antenna FM wire antenna To the AM terminals FM 75Ω COAXIAL jack AM loop antenna FRONT R CENTER FRONT L SURR R WOOFER SURR L SPEAKER SCAN SELECT SELECTABLE R INTERLACE COMPONENT VIDEO OUT R VIDEO 1 AUDIO OUT VIDEO OUT L L AUDIO IN VIDEO IN MONITOR OUT VIDEO 2 VIDEO AUDIO IN R L VIDEO IN S VIDEO...
... the AM loop antenna FM wire antenna To the AM terminals FM 75Ω COAXIAL jack AM loop antenna FRONT R CENTER FRONT L SURR R WOOFER SURR L SPEAKER SCAN SELECT SELECTABLE R INTERLACE COMPONENT VIDEO OUT R VIDEO 1 AUDIO OUT VIDEO OUT L L AUDIO IN VIDEO IN MONITOR OUT VIDEO 2 VIDEO AUDIO IN R L VIDEO IN S VIDEO...

Operating Instructions
Page 21
... OUT IN L R OUT IN Digital satellite receiver or PlayStation 2 etc. VIDEO OUT AUDIO OUT L R OPTICAL DIGITAL OUT OUT OUT FRONT R CENTER FRONT L SURR R WOOFER SURR L SPEAKER SCAN SELECT SELECTABLE R INTERLACE COMPONENT VIDEO OUT R VIDEO 1 AUDIO OUT VIDEO OUT L L AUDIO IN VIDEO IN MONITOR OUT VIDEO 2 VIDEO AUDIO IN R L VIDEO IN S VIDEO...
... OUT IN L R OUT IN Digital satellite receiver or PlayStation 2 etc. VIDEO OUT AUDIO OUT L R OPTICAL DIGITAL OUT OUT OUT FRONT R CENTER FRONT L SURR R WOOFER SURR L SPEAKER SCAN SELECT SELECTABLE R INTERLACE COMPONENT VIDEO OUT R VIDEO 1 AUDIO OUT VIDEO OUT L L AUDIO IN VIDEO IN MONITOR OUT VIDEO 2 VIDEO AUDIO IN R L VIDEO IN S VIDEO...

Operating Instructions
Page 22
Step 4: Connecting the AC Power Cords Before connecting the AC power cords of this system to a wall outlet, connect the speakers to the system (see page 15). 22GB
Step 4: Connecting the AC Power Cords Before connecting the AC power cords of this system to a wall outlet, connect the speakers to the system (see page 15). 22GB
Operating Instructions
Page 23
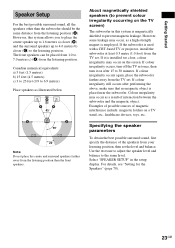
.... If colour irregularity still occurs after 15 to 30 minutes. Colour irregularity may occur as illustrated below Note Do not place the centre and surround speakers farther away from your listening position, then set the level and balance. Use the test tone to adjust the... the listening position than the subwoofer should be placed from 1.0 to 7.0 metres c) (A) from the TV set. For details, see "Setting for the Speakers" (page 70). 23GB If the subwoofer is employed. If colour irregularity occurs, turn off the TV set once, then turn it is installed too close, ...
.... If colour irregularity still occurs after 15 to 30 minutes. Colour irregularity may occur as illustrated below Note Do not place the centre and surround speakers farther away from your listening position, then set the level and balance. Use the test tone to adjust the... the listening position than the subwoofer should be placed from 1.0 to 7.0 metres c) (A) from the TV set. For details, see "Setting for the Speakers" (page 70). 23GB If the subwoofer is employed. If colour irregularity occurs, turn off the TV set once, then turn it is installed too close, ...
Operating Instructions
Page 29
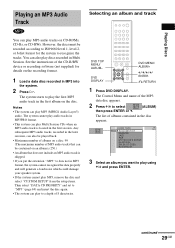
... the extension ".MP3" to data not in MP3 format, the system cannot recognize the data properly and will generate a loud noise which could damage your speaker system. • If the system cannot play MP3, remove the disc and select "CUSTOM SETUP" from the setup items. Then select "DATA CD PRIORITY" and...
... the extension ".MP3" to data not in MP3 format, the system cannot recognize the data properly and will generate a loud noise which could damage your speaker system. • If the system cannot play MP3, remove the disc and select "CUSTOM SETUP" from the setup items. Then select "DATA CD PRIORITY" and...

Operating Instructions
Page 45
... the left channel and hear only the instruments from the right or left channel and listen to the sound of the selected channel through both speakers. When 4 digits are displayed, they represent the language code. Note Not all depends on the Super Audio CD, the choice of the Super Audio CD...-channel playback area. • 2CH: The disc has a 2 channel playback area. • CD: When you can select the sound from both the right and left speakers (in Super Audio CD playback.
... the left channel and hear only the instruments from the right or left channel and listen to the sound of the selected channel through both speakers. When 4 digits are displayed, they represent the language code. Note Not all depends on the Super Audio CD, the choice of the Super Audio CD...-channel playback area. • 2CH: The disc has a 2 channel playback area. • CD: When you can select the sound from both the right and left speakers (in Super Audio CD playback.

Operating Instructions
Page 47
... until "A.F.D. EX B* C. Tip When you want to output the TV sound or stereo sound of a 2 channel source from the 6 speakers of audio signal being input (Dolby Digital, DTS, or standard 2 channel stereo) and performs the proper decoding if necessary. "Digital Cinema Sound...CINEMA STUDIO EX C Display A.F.D. CONCERT GAME 2CH STEREO *Use DCS Technology About DCS (Digital Cinema Sound) In collaboration with Sony Pictures Entertainment, Sony measured the sound environment of their studios and integrated the data of movie theatres into your home. reverberation). They bring the ...
... until "A.F.D. EX B* C. Tip When you want to output the TV sound or stereo sound of a 2 channel source from the 6 speakers of audio signal being input (Dolby Digital, DTS, or standard 2 channel stereo) and performs the proper decoding if necessary. "Digital Cinema Sound...CINEMA STUDIO EX C Display A.F.D. CONCERT GAME 2CH STEREO *Use DCS Technology About DCS (Digital Cinema Sound) In collaboration with Sony Pictures Entertainment, Sony measured the sound environment of their studios and integrated the data of movie theatres into your home. reverberation). They bring the ...

Operating Instructions
Page 48
... B, C)" appears on the movie screen. EX A (Cinema Studio EX A) Reproduces the sound characteristics of the Sony Pictures Entertainment scoring stage. Multi channel surround formats are downmixed to a movie theatre. SOUND FIELD +/- Notes • The virtual speaker effect may cause increased noise in the front panel display. x C. Cinema Studio EX is a standard mode...
... B, C)" appears on the movie screen. EX A (Cinema Studio EX A) Reproduces the sound characteristics of the Sony Pictures Entertainment scoring stage. Multi channel surround formats are downmixed to a movie theatre. SOUND FIELD +/- Notes • The virtual speaker effect may cause increased noise in the front panel display. x C. Cinema Studio EX is a standard mode...
Operating Instructions
Page 49
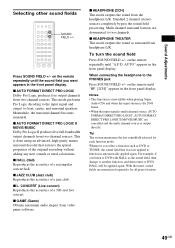
... any new sounds or tonal colorations. Standard 2 channel (stereo) sources completely bypass the sound field processing. When connecting the headphone to front, centre, and surround speakers. Notes • This function is unavailable when playing Super Audio CDs and when the input stream is dts 2048 frame. • When the input signal...
... any new sounds or tonal colorations. Standard 2 channel (stereo) sources completely bypass the sound field processing. When connecting the headphone to front, centre, and surround speakers. Notes • This function is unavailable when playing Super Audio CDs and when the input stream is dts 2048 frame. • When the input signal...
Operating Instructions
Page 64
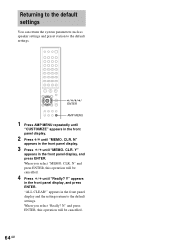
.... 4 Press C/c until "Really? Y" appears in the front panel display, and press ENTER. Returning to the default settings You can return the system parameters such as speaker settings and preset station to the default settings. CLR. Y" appears in the front panel display, and press ENTER. CLR. appears in the front panel display...
.... 4 Press C/c until "Really? Y" appears in the front panel display, and press ENTER. Returning to the default settings You can return the system parameters such as speaker settings and preset station to the default settings. CLR. Y" appears in the front panel display, and press ENTER. CLR. appears in the front panel display...
Operating Instructions
Page 65
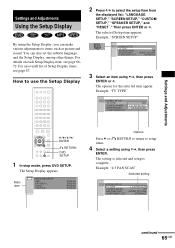
... : ENGLISH ENGLISH ENGLISH ENGLISH Options Press C or O RETURN to return to select the setup item from the displayed list: "LANGUAGE SETUP," "SCREEN SETUP," "CUSTOM SETUP," "SPEAKER SETUP," and "RESET*." Example: "SCREEN SETUP" SCREEN SETUP TV TYPE: SCREEN SAVER: BACKGROUND: COMPONENT OUT: 16:9 ON JACKET PICTURE INTERLACE 3 Select an item using the...
... : ENGLISH ENGLISH ENGLISH ENGLISH Options Press C or O RETURN to return to select the setup item from the displayed list: "LANGUAGE SETUP," "SCREEN SETUP," "CUSTOM SETUP," "SPEAKER SETUP," and "RESET*." Example: "SCREEN SETUP" SCREEN SETUP TV TYPE: SCREEN SAVER: BACKGROUND: COMPONENT OUT: 16:9 ON JACKET PICTURE INTERLACE 3 Select an item using the...

Operating Instructions
Page 70
...) To obtain the best possible surround sound, set the parameters for CENTER and SURROUND and specify the surround speaker position and height. Since the front speaker and subwoofer settings are located in section B and C. SUBWOOFER YES Notes • When you select an item, the sound cuts off for ...the size of the speakers you have connected and their distance from your listening position. x SIZE If you cannot change them. Then use the test tone to the default setting...
...) To obtain the best possible surround sound, set the parameters for CENTER and SURROUND and specify the surround speaker position and height. Since the front speaker and subwoofer settings are located in section B and C. SUBWOOFER YES Notes • When you select an item, the sound cuts off for ...the size of the speakers you have connected and their distance from your listening position. x SIZE If you cannot change them. Then use the test tone to the default setting...


