Operating Instructions
Page 4
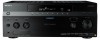
...-HD and DTS-HD Master Audio are trademarks or registered trademarks of HDMI Licensing LLC. To ensure that for EMC and product safety is Sony Corporation, 1-7-1 Konan Minato-ku...should be treated as those on how to the applicable collection point for model STR-DA5400ES. This receiver incorporates Dolby* Digital and Pro Logic Surround and the DTS** Digital Surround System...directives The manufacturer of this manual describe the controls on the supplied remote. This receiver incorporates High-Definition Multimedia Interface (HDMI™) technology. For more ...
...-HD and DTS-HD Master Audio are trademarks or registered trademarks of HDMI Licensing LLC. To ensure that for EMC and product safety is Sony Corporation, 1-7-1 Konan Minato-ku...should be treated as those on how to the applicable collection point for model STR-DA5400ES. This receiver incorporates Dolby* Digital and Pro Logic Surround and the DTS** Digital Surround System...directives The manufacturer of this manual describe the controls on the supplied remote. This receiver incorporates High-Definition Multimedia Interface (HDMI™) technology. For more ...

Operating Instructions
Page 6
... 2: Connecting speakers 25 3: Connecting the monitor 27 4a: Connecting the audio components ........29 4b: Connecting the video components .......34 5: Connecting the antennas (aerials 43 6: Preparing the receiver and the remote ....44 7: Displaying the GUI menu on the TV screen 45 8: ... radio .........71 Selecting a channel of the satellite radio ....73 Presetting satellite radio channels 74 Restricting access to specific channels (Parental Lock) (SIRIUS only 75 Enjoying Surround Sound Playing back with 2-channel sound 79 Playing back with multi-channel surround 80 Enjoying a surround...
... 2: Connecting speakers 25 3: Connecting the monitor 27 4a: Connecting the audio components ........29 4b: Connecting the video components .......34 5: Connecting the antennas (aerials 43 6: Preparing the receiver and the remote ....44 7: Displaying the GUI menu on the TV screen 45 8: ... radio .........71 Selecting a channel of the satellite radio ....73 Presetting satellite radio channels 74 Restricting access to specific channels (Parental Lock) (SIRIUS only 75 Enjoying Surround Sound Playing back with 2-channel sound 79 Playing back with multi-channel surround 80 Enjoying a surround...
Operating Instructions
Page 7
... Speaker settings 114 Surround settings 118 EQ settings 119 Multi Zone settings 120 Audio settings 121 Video settings 122 HDMI settings 125 System settings 126 Operating without connecting to a TV ..... 127 Using the Remote Operating each component using the remote 132 Programming the remote 135 Performing several commands in sequence automatically (Macro Play 139 Setting...
... Speaker settings 114 Surround settings 118 EQ settings 119 Multi Zone settings 120 Audio settings 121 Video settings 122 HDMI settings 125 System settings 126 Operating without connecting to a TV ..... 127 Using the Remote Operating each component using the remote 132 Programming the remote 135 Performing several commands in sequence automatically (Macro Play 139 Setting...
Operating Instructions
Page 8
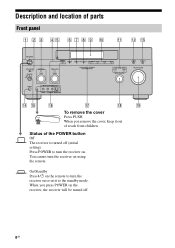
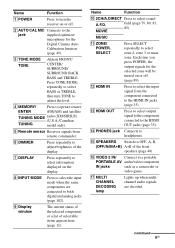
Press POWER to turn the receiver on the receiver, the receiver will be turned off (initial setting). When you remove the cover, keep it to turn the receiver on . When you press POWER on using the remote. Description and location of reach from children. You cannot turn the receiver on or set it out of parts Front panel To remove the cover Press PUSH. Status of the POWER button Off The receiver is turned off . 8GB On/Standby Press ?/1 on the remote to the standby mode.
Press POWER to turn the receiver on the receiver, the receiver will be turned off (initial setting). When you remove the cover, keep it to turn the receiver on . When you press POWER on using the remote. Description and location of reach from children. You cannot turn the receiver on or set it out of parts Front panel To remove the cover Press PUSH. Status of the POWER button Off The receiver is turned off . 8GB On/Standby Press ?/1 on the remote to the standby mode.
Operating Instructions
Page 9
... the level. Press TONE MODE repeatedly to select BASS or TREBLE, then turn the receiver on or off (page 89). I Display window The current status of the selected ...input signal from remote commander. Press to select output signal to the component connected to a portable PORTABLE AV audio/video component IN jacks such as a camcorder or video game. P VIDEO 2 IN/ ... SELECT repeatedly to select information displayed on or off . continued 9GB Q MULTI CHANNEL DECODING lamp Lights up when multichannel audio signals are connected to both digital and analog jacks (page 102). C TONE ...
... the level. Press TONE MODE repeatedly to select BASS or TREBLE, then turn the receiver on or off (page 89). I Display window The current status of the selected ...input signal from remote commander. Press to select output signal to the component connected to a portable PORTABLE AV audio/video component IN jacks such as a camcorder or video game. P VIDEO 2 IN/ ... SELECT repeatedly to select information displayed on or off . continued 9GB Q MULTI CHANNEL DECODING lamp Lights up when multichannel audio signals are connected to both digital and analog jacks (page 102). C TONE ...
Operating Instructions
Page 15
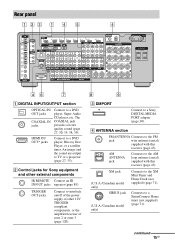
B Control jacks for Sony equipment and other 12V TRIGGER compliant components, or the amplifier/receiver of other external components IR REMOTE Connect an IR IN/OUT jacks repeater (page 89). continued 15GB The COAXIAL jack provides a better quality sound (page 27, 30, 35, ...receiver (page 43). An image and the sound are output to a DVD player, Blu-ray Disc Player, or a satellite tuner. HDMI IN/ OUT* jacks Connect to TV or a projector (page 27, 35). Rear panel A DIGITAL INPUT/OUTPUT section OPTICAL IN/ OUT jacks COAXIAL IN jacks Connect to a DVD player, Super Audio...
B Control jacks for Sony equipment and other 12V TRIGGER compliant components, or the amplifier/receiver of other external components IR REMOTE Connect an IR IN/OUT jacks repeater (page 89). continued 15GB The COAXIAL jack provides a better quality sound (page 27, 30, 35, ...receiver (page 43). An image and the sound are output to a DVD player, Blu-ray Disc Player, or a satellite tuner. HDMI IN/ OUT* jacks Connect to TV or a projector (page 27, 35). Rear panel A DIGITAL INPUT/OUTPUT section OPTICAL IN/ OUT jacks COAXIAL IN jacks Connect to a DVD player, Super Audio...
Operating Instructions
Page 17
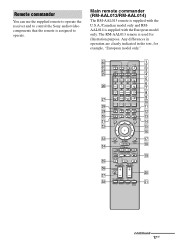
Any differences in operation are clearly indicated in the text, for illustration purpose. continued 17GB The RM-AAL013 remote is used for example, "European model only." Main remote commander (RM-AAL013/RM-AAL014) The RM-AAL013 remote is supplied with the U.S.A./Canadian model only and RMAAL014 is assigned to control the Sony audio/video components that the remote is supplied with the European model only. Remote commander You can use the supplied remote to operate the receiver and to operate.
Any differences in operation are clearly indicated in the text, for illustration purpose. continued 17GB The RM-AAL013 remote is used for example, "European model only." Main remote commander (RM-AAL013/RM-AAL014) The RM-AAL013 remote is supplied with the U.S.A./Canadian model only and RMAAL014 is assigned to control the Sony audio/video components that the remote is supplied with the European model only. Remote commander You can use the supplied remote to operate the receiver and to operate.
Operating Instructions
Page 18
... the audio/ video components that the remote is turned on or off the receiver and other Sony components (SYSTEM STANDBY). To turn off with this button. Press to store a station during tuner operation. clear a mistake when you press the input button (5). Press SHIFT (wg), then press ENT/MEM to enter the value after selecting a channel, disc...
... the audio/ video components that the remote is turned on or off the receiver and other Sony components (SYSTEM STANDBY). To turn off with this button. Press to store a station during tuner operation. clear a mistake when you press the input button (5). Press SHIFT (wg), then press ENT/MEM to enter the value after selecting a channel, disc...

Operating Instructions
Page 19
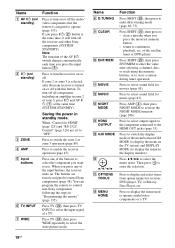
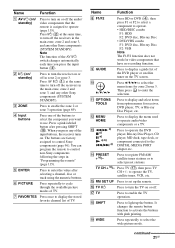
...remote button function to light up the remote (page 108). preset/tune to analog signal without any adjustment (page 79). wj -/-- wl 2CH/ A.DIRECT Press to select sound field or to switch the audio...- Note When the HDMI input is the one from the HDMI OUT or COMPONENT VIDEO MONITOR OUT jack. TV CH + b)/- SLEEP V RM SET UP Press AMP ...receiver to operate the TV, satellite tuner, VCR, etc. es DISPLAY Press to select the category mode for satellite tuner. continued 19GB CATEGORY MODE (U.S.A./ Canadian model only) Press to select information displayed in Picture) window. select channel...
...remote button function to light up the remote (page 108). preset/tune to analog signal without any adjustment (page 79). wj -/-- wl 2CH/ A.DIRECT Press to select sound field or to switch the audio...- Note When the HDMI input is the one from the HDMI OUT or COMPONENT VIDEO MONITOR OUT jack. TV CH + b)/- SLEEP V RM SET UP Press AMP ...receiver to operate the TV, satellite tuner, VCR, etc. es DISPLAY Press to select the category mode for satellite tuner. continued 19GB CATEGORY MODE (U.S.A./ Canadian model only) Press to select information displayed in Picture) window. select channel...
Operating Instructions
Page 20
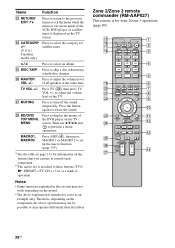
... may not work depending on the model. • The above operation may not be possible or may operate differently than described. Zone 2/Zone 3 remote commander (RM-AAP027) This remote is intended to serve as a mark of operation. TV VOL +/- eg DISC SKIP Press to control each component. a)See the table on page...
... may not work depending on the model. • The above operation may not be possible or may operate differently than described. Zone 2/Zone 3 remote commander (RM-AAP027) This remote is intended to serve as a mark of operation. TV VOL +/- eg DISC SKIP Press to control each component. a)See the table on page...
Operating Instructions
Page 21
... channel, disc or track using the numeric buttons. You can program the remote to control non-Sony components following the steps in the main zone, zone 2 and zone 3, and any other Sony components (SYSTEM STANDBY). J V/v/B/b Press V/v/B/b to select the menu items for video components that the remote is... to turn the TV on or off the audio/ video components that have no recording function. M m/M a) x a) X a) N a) b) ./> a) Press to operate the DVD player, Blu-ray Disc Player, CD player, MD deck, tape deck, or component connected to turn off the receivers in zone 2 or zone 3. P TV ...
... channel, disc or track using the numeric buttons. You can program the remote to control non-Sony components following the steps in the main zone, zone 2 and zone 3, and any other Sony components (SYSTEM STANDBY). J V/v/B/b Press V/v/B/b to select the menu items for video components that the remote is... to turn the TV on or off the audio/ video components that have no recording function. M m/M a) x a) X a) N a) b) ./> a) Press to operate the DVD player, Blu-ray Disc Player, CD player, MD deck, tape deck, or component connected to turn off the receivers in zone 2 or zone 3. P TV ...
Operating Instructions
Page 44
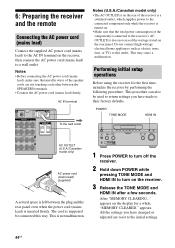
6: Preparing the receiver and the remote Connecting the AC power cord (mains lead) Connect the supplied AC power cord (mains lead) to the AC IN terminal on the receiver, then connect the AC power cord (mains lead) to the receiver's AC OUTLET(s) does not exceed the wattage stated on ...speaker cords are reset to their factory defaults. After "MEMORY CLEARING..." The cord is turned on the display for the first time, initialize the receiver by performing the following procedure. appears. appears on . • Make sure that metallic wires of the component(s) connected to a wall outlet....
6: Preparing the receiver and the remote Connecting the AC power cord (mains lead) Connect the supplied AC power cord (mains lead) to the AC IN terminal on the receiver, then connect the AC power cord (mains lead) to the receiver's AC OUTLET(s) does not exceed the wattage stated on ...speaker cords are reset to their factory defaults. After "MEMORY CLEARING..." The cord is turned on the display for the first time, initialize the receiver by performing the following procedure. appears. appears on . • Make sure that metallic wires of the component(s) connected to a wall outlet....

Operating Instructions
Page 45
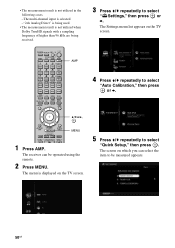
...to a TV. ?/1 AMP GUI MODE MENU 1 Connect a TV monitor to this happens, program the remote codes again (page 135). The receiver can select the functions or change the settings of the receiver by using the remote. Refer to "3: Connecting the monitor" (page 27). 2 Turn on the TV screen. Getting Started...to avoid possible damage from battery leakage and corrosion. • When you want to operate the receiver without connecting to a TV" (page 127) if you replace the batteries, the programmed remote codes may be operated using the GUI menu on the TV screen. Observe the correct polarity when...
...to a TV. ?/1 AMP GUI MODE MENU 1 Connect a TV monitor to this happens, program the remote codes again (page 135). The receiver can select the functions or change the settings of the receiver by using the remote. Refer to "3: Connecting the monitor" (page 27). 2 Turn on the TV screen. Getting Started...to avoid possible damage from battery leakage and corrosion. • When you want to operate the receiver without connecting to a TV" (page 127) if you replace the batteries, the programmed remote codes may be operated using the GUI menu on the TV screen. Observe the correct polarity when...
Operating Instructions
Page 46
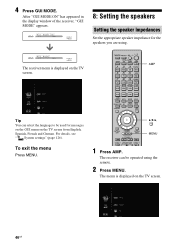
... language to be operated using . The menu is displayed on the TV screen. 46GB AMP The receiver menu is displayed on the TV screen. Tip You can be used for the speakers you are using the remote. 2 Press MENU. For details, see " System settings" (page 126). V/v/b, MENU 1 Press ...AMP. 4 Press GUI MODE. After "GUI MODE ON" has appeared in the display window of the receiver, "GUI MODE" appears. 8: Setting the speakers Setting the...
... language to be operated using . The menu is displayed on the TV screen. 46GB AMP The receiver menu is displayed on the TV screen. Tip You can be used for the speakers you are using the remote. 2 Press MENU. For details, see " System settings" (page 126). V/v/b, MENU 1 Press ...AMP. 4 Press GUI MODE. After "GUI MODE ON" has appeared in the display window of the receiver, "GUI MODE" appears. 8: Setting the speakers Setting the...
Operating Instructions
Page 50
...screen. The menu is not utilized when Dolby TrueHD signals with a sampling frequency of higher than 96 kHz are being received. 3 Press V/v repeatedly to be operated using the remote. 2 Press MENU. AMP 4 Press V/v repeatedly to select "Quick Setup," then press . • The measurement result... is not utilized in the following cases. -The multi-channel input is selected. -"2ch Analog Direct" is being used. • The measurement ...
...screen. The menu is not utilized when Dolby TrueHD signals with a sampling frequency of higher than 96 kHz are being received. 3 Press V/v repeatedly to be operated using the remote. 2 Press MENU. AMP 4 Press V/v repeatedly to select "Quick Setup," then press . • The measurement result... is not utilized in the following cases. -The multi-channel input is selected. -"2ch Analog Direct" is being used. • The measurement ...
Operating Instructions
Page 55
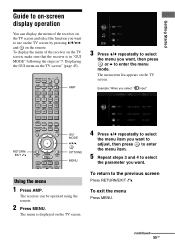
... screen and select the function you want to use on the TV screen by pressing V/v/B/b and on the remote. The receiver can display the menu of the receiver on the TV screen, make sure that the receiver is displayed on the TV screen. 4 Press V/v repeatedly to select the menu item you want . The menu...
... screen and select the function you want to use on the TV screen by pressing V/v/B/b and on the remote. The receiver can display the menu of the receiver on the TV screen, make sure that the receiver is displayed on the TV screen. 4 Press V/v repeatedly to select the menu item you want . The menu...

Operating Instructions
Page 56
... menu in FM/AM SIRIUS radio or satellite tuner connected (page 65, 69). The receiver can adjust the settings of the speakers, the surround effect, equalizer, audio, video and other inputs connected to the receiver (page 58). The option menu appears. 5 Press V/v repeatedly to select the option ...the video component connected to select the parameter you want , then press or b to the DIGITAL MEDIA PORT adapter (page 60). Using the option menus When you want , then press . 6 Press V/v repeatedly to the DIGITAL MEDIA PORT adapter (page 60). You can operate the receiver using the remote. ...
... menu in FM/AM SIRIUS radio or satellite tuner connected (page 65, 69). The receiver can adjust the settings of the speakers, the surround effect, equalizer, audio, video and other inputs connected to the receiver (page 58). The option menu appears. 5 Press V/v repeatedly to select the option ...the video component connected to select the parameter you want , then press or b to the DIGITAL MEDIA PORT adapter (page 60). Using the option menus When you want , then press . 6 Press V/v repeatedly to the DIGITAL MEDIA PORT adapter (page 60). You can operate the receiver using the remote. ...
Operating Instructions
Page 58
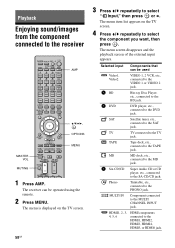
The receiver can be operated using the remote. 2 Press MENU. The menu item list appears on the TV screen. 58GB 3 Press V/v repeatedly to the VIDEO 1 or VIDEO 2 jack. SAT Satellite... receiver AMP MASTER VOL MUTING V/v/B/b, OPTIONS MENU 1 Press AMP. SA-CD/CD Super Audio CD or CD player, etc., connected to the BD jack. Selected input Components that can be used Video1, Video2 VIDEO... the DVD jack. The menu is displayed on the TV screen. 4 Press V/v repeatedly to the MULTI CHANNEL INPUT jack. TAPE Tape deck, etc., connected to the HDMI1, HDMI2, HDMI3, HDMI4, HDMI5, or ...
The receiver can be operated using the remote. 2 Press MENU. The menu item list appears on the TV screen. 58GB 3 Press V/v repeatedly to the VIDEO 1 or VIDEO 2 jack. SAT Satellite... receiver AMP MASTER VOL MUTING V/v/B/b, OPTIONS MENU 1 Press AMP. SA-CD/CD Super Audio CD or CD player, etc., connected to the BD jack. Selected input Components that can be used Video1, Video2 VIDEO... the DVD jack. The menu is displayed on the TV screen. 4 Press V/v repeatedly to the MULTI CHANNEL INPUT jack. TAPE Tape deck, etc., connected to the HDMI1, HDMI2, HDMI3, HDMI4, HDMI5, or ...

Operating Instructions
Page 59
... then press . Tips • You can change the items to be sure to turn off the receiver, be displayed. 1 Press V/v repeatedly on the " Input" screen to select the input you can ...button. To turn the knob quickly. This is registered. to raise the volume. button on the remote. To cancel, press MUTING on the "A/ V Sync" menu for the input are displayed in ...you select " Input," you want to display, then press . • Input Assign Input name and audio/video input jack assigned to 8 characters for labeling the jacks with which you want . 2 Press OPTIONS. ...
... then press . Tips • You can change the items to be sure to turn off the receiver, be displayed. 1 Press V/v repeatedly on the " Input" screen to select the input you can ...button. To turn the knob quickly. This is registered. to raise the volume. button on the remote. To cancel, press MUTING on the "A/ V Sync" menu for the input are displayed in ...you select " Input," you want to display, then press . • Input Assign Input name and audio/video input jack assigned to 8 characters for labeling the jacks with which you want . 2 Press OPTIONS. ...

Operating Instructions
Page 60
...Press AMP. The receiver can be operated using the remote. • Do not connect or disconnect the DIGITAL MEDIA PORT adapter to/from the receiver while the system is displayed on connecting the DIGITAL MEDIA PORT adapter, see "Connecting components with digital audio input/output jacks"... " Music" or " Video," then press or b. 4 Press V/v repeatedly to select "DMPORT1," "DMPORT2," or a component connected to the DIGITAL MEDIA PORT adapter, then press . 60GB Sony offers the following DIGITAL MEDIA PORT adapters: • TDM-BT1 Bluetooth™ Wireless Audio Adapter • TDM-NW1...
...Press AMP. The receiver can be operated using the remote. • Do not connect or disconnect the DIGITAL MEDIA PORT adapter to/from the receiver while the system is displayed on connecting the DIGITAL MEDIA PORT adapter, see "Connecting components with digital audio input/output jacks"... " Music" or " Video," then press or b. 4 Press V/v repeatedly to select "DMPORT1," "DMPORT2," or a component connected to the DIGITAL MEDIA PORT adapter, then press . 60GB Sony offers the following DIGITAL MEDIA PORT adapters: • TDM-BT1 Bluetooth™ Wireless Audio Adapter • TDM-NW1...


