Operating Instructions
Page 1
4-129-783-11(3) Multi Channel AV Receiver Operating Instructions STR-DH700 ©2009 Sony Corporation
4-129-783-11(3) Multi Channel AV Receiver Operating Instructions STR-DH700 ©2009 Sony Corporation

Operating Instructions
Page 3
... personnel. If this equipment does cause harmful interference to radio or television reception, which the receiver is encouraged to try to radio communications. Increase the separation between the equipment and receiver. - To reduce the risk of electric shock, the speaker cord should be determined by ... in accordance with the following instructions. 1) Disconnect the AC power cord from the apparatus and the speakers. 3US Reorient or relocate the receiving antenna. - Consult the dealer or an experienced radio/TV technician for long periods of the FCC Rules. CAUTION You are designed to...
... personnel. If this equipment does cause harmful interference to radio or television reception, which the receiver is encouraged to try to radio communications. Increase the separation between the equipment and receiver. - To reduce the risk of electric shock, the speaker cord should be determined by ... in accordance with the following instructions. 1) Disconnect the AC power cord from the apparatus and the speakers. 3US Reorient or relocate the receiving antenna. - Consult the dealer or an experienced radio/TV technician for long periods of the FCC Rules. CAUTION You are designed to...
Operating Instructions
Page 4
...535; 7,003,467; 7,212,872 & other U.S. This receiver incorporates High-Definition Multimedia Interface (HDMITM) technology. In this manual, models of Sony Corporation. About area codes The area code of the receiver you purchased is used for example, "Models of the front... or registered trademarks of DTS, Inc. © 1996-2008 DTS, Inc. All rights reserved. On Copyrights This receiver incorporates Dolby* Digital and Pro Logic Surround and the DTS** Digital Surround System. * Manufactured under U.S. and worldwide patents...". • The instructions in the text, for model STR-DH700.
...535; 7,003,467; 7,212,872 & other U.S. This receiver incorporates High-Definition Multimedia Interface (HDMITM) technology. In this manual, models of Sony Corporation. About area codes The area code of the receiver you purchased is used for example, "Models of the front... or registered trademarks of DTS, Inc. © 1996-2008 DTS, Inc. All rights reserved. On Copyrights This receiver incorporates Dolby* Digital and Pro Logic Surround and the DTS** Digital Surround System. * Manufactured under U.S. and worldwide patents...". • The instructions in the text, for model STR-DH700.
Operating Instructions
Page 5
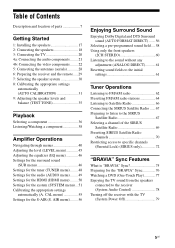
...Connecting the TV 20 4a: Connecting the audio components ........ 21 4b: Connecting the video components ........ 22 5: Connecting the antennas (aerials 28 6: Preparing the receiver and the remote..... 29 7: Selecting the speaker system 30 8: Calibrating the appropriate settings automatically (AUTO CALIBRATION 31 9: Adjusting the speaker levels and balance (.../AM radio stations 64 Listening to Satellite Radio 66 Connecting the SIRIUS Satellite Radio ......67 Preparing to listen to the receiver (System Audio Control 78 Turning off the receiver with the TV (System Power Off 79 5US
...Connecting the TV 20 4a: Connecting the audio components ........ 21 4b: Connecting the video components ........ 22 5: Connecting the antennas (aerials 28 6: Preparing the receiver and the remote..... 29 7: Selecting the speaker system 30 8: Calibrating the appropriate settings automatically (AUTO CALIBRATION 31 9: Adjusting the speaker levels and balance (.../AM radio stations 64 Listening to Satellite Radio 66 Connecting the SIRIUS Satellite Radio ......67 Preparing to listen to the receiver (System Audio Control 78 Turning off the receiver with the TV (System Power Off 79 5US
Operating Instructions
Page 6
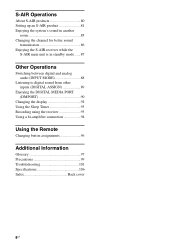
...AIR product 81 Enjoying the system's sound in another room 85 Changing the channel for better sound transmission 86 Enjoying the S-AIR receiver while the S-AIR main unit is in standby mode ......87 Other Operations Switching between digital and analog audio (INPUT MODE 88 ...DIGITAL ASSIGN 89 Enjoying the DIGITAL MEDIA PORT (DMPORT 90 Changing the display 92 Using the Sleep Timer 93 Recording using the receiver 93 Using a bi-amplifier connection 94 Using the Remote Changing button assignments 96 Additional Information Glossary 97 Precautions 99 Troubleshooting 101 Specifications...
...AIR product 81 Enjoying the system's sound in another room 85 Changing the channel for better sound transmission 86 Enjoying the S-AIR receiver while the S-AIR main unit is in standby mode ......87 Other Operations Switching between digital and analog audio (INPUT MODE 88 ...DIGITAL ASSIGN 89 Enjoying the DIGITAL MEDIA PORT (DMPORT 90 Changing the display 92 Using the Sleep Timer 93 Recording using the receiver 93 Using a bi-amplifier connection 94 Using the Remote Changing button assignments 96 Additional Information Glossary 97 Precautions 99 Troubleshooting 101 Specifications...

Operating Instructions
Page 7
...9). The current status of the selected component or a list of all speakers at the same time (page 35, 36, 38, 39). Turn to turn the receiver on /standby) B TONE +/- Name F DIMMER G MASTER VOLUME H MUTING I VIDEO 2 IN jacks J AUTO CAL MIC jack Function Press repeatedly to turn TONE...parts Front panel 12 3 4 5 67 8 ?/1 SPEAKERS TONE INPUT SELECTOR PHONES TONE MODE INPUT MODE TUNING MODE TUNING MEMORY/ 2CH/ ENTER A.DIRECT A.F.D. Receives signals from remote commander. Connects to select BASS or TREBLE, then turn off (page 29, 38, 39, 61, 63). Press MUTING again to play...
...9). The current status of the selected component or a list of all speakers at the same time (page 35, 36, 38, 39). Turn to turn the receiver on /standby) B TONE +/- Name F DIMMER G MASTER VOLUME H MUTING I VIDEO 2 IN jacks J AUTO CAL MIC jack Function Press repeatedly to turn TONE...parts Front panel 12 3 4 5 67 8 ?/1 SPEAKERS TONE INPUT SELECTOR PHONES TONE MODE INPUT MODE TUNING MODE TUNING MEMORY/ 2CH/ ENTER A.DIRECT A.F.D. Receives signals from remote commander. Connects to select BASS or TREBLE, then turn off (page 29, 38, 39, 61, 63). Press MUTING again to play...

Operating Instructions
Page 9
... to "OPT". Lights up if the speaker output is turned off or if headphones are connected. However, these indicators do not light up when the receiver recognizes a component connected via an HDMI IN jacks (page 23). OPT COAX HDMI Lights up when INPUT MODE is set to "AUTO" and the source...
... to "OPT". Lights up if the speaker output is turned off or if headphones are connected. However, these indicators do not light up when the receiver recognizes a component connected via an HDMI IN jacks (page 23). OPT COAX HDMI Lights up when INPUT MODE is set to "AUTO" and the source...
Operating Instructions
Page 10
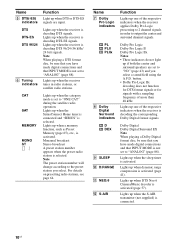
... Note When playing a DTS format disc, be sure that you select. For details on presetting radio stations, see page 64. Lights up when the receiver is activated. Lights up when DTS Neo:6 Cinema/Music decoder is connected. 10US D DEX I SLEEP J D.RANGE K NEO:6 L S-AIR Dolby ...Logic indicators Function Lights up when dynamic range compression is set to output the center and surround channel signals. Lights up when the receiver is decoding the corresponding Dolby Digital format signals. DTS DTS-ES DTS 96/24 F Tuning indicators Lights up when the SiriusConnect ...
... Note When playing a DTS format disc, be sure that you select. For details on presetting radio stations, see page 64. Lights up when the receiver is activated. Lights up when DTS Neo:6 Cinema/Music decoder is connected. 10US D DEX I SLEEP J D.RANGE K NEO:6 L S-AIR Dolby ...Logic indicators Function Lights up when dynamic range compression is set to output the center and surround channel signals. Lights up when the receiver is decoding the corresponding Dolby Digital format signals. DTS DTS-ES DTS 96/24 F Tuning indicators Lights up when the SiriusConnect ...
Operating Instructions
Page 11
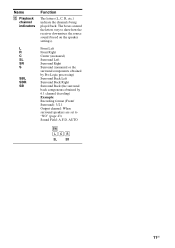
... Back (the surround back components obtained by 6.1 channel decoding) Example: Recording format (Front/ Surround): 3/2.1 Output channel: When surround speakers are set to show how the receiver downmixes the source sound (based on the speaker settings). AUTO SW LCR SL SR 11US Name M Playback channel indicators Function The letters (L, C, R, etc.) indicate the...
... Back (the surround back components obtained by 6.1 channel decoding) Example: Recording format (Front/ Surround): 3/2.1 Output channel: When surround speakers are set to show how the receiver downmixes the source sound (based on the speaker settings). AUTO SW LCR SL SR 11US Name M Playback channel indicators Function The letters (L, C, R, etc.) indicate the...

Operating Instructions
Page 12
... player, satellite tuner, or a Blu-ray disc player. The COAXIAL jack provides a better sound quality (page 25, 26). HDMI IN/ OUT* jacks Connects to this receiver (page 23). slot Connects to a SiriusConnect Home tuner (not supplied) (page 67). SIRIUS jack Connects to a wireless transmitter (not supplied) (page 81).
... player, satellite tuner, or a Blu-ray disc player. The COAXIAL jack provides a better sound quality (page 25, 26). HDMI IN/ OUT* jacks Connects to this receiver (page 23). slot Connects to a SiriusConnect Home tuner (not supplied) (page 67). SIRIUS jack Connects to a wireless transmitter (not supplied) (page 81).
Operating Instructions
Page 13
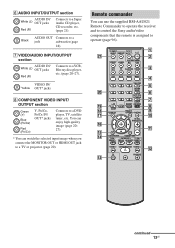
.... (page 21). You can enjoy high quality image (page 20- 27). * You can use the supplied RM-AAU021 Remote Commander to operate the receiver and to control the Sony audio/video components that the remote is assigned to a TV or projector (page 20). Remote commander You can watch the selected input image...
.... (page 21). You can enjoy high quality image (page 20- 27). * You can use the supplied RM-AAU021 Remote Commander to operate the receiver and to control the Sony audio/video components that the remote is assigned to a TV or projector (page 20). Remote commander You can watch the selected input image...

Operating Instructions
Page 14
... the CD player, DVD player or Bluray disc player. MASTER VOL +a)/- and TV (M) at the same time. Press to control Sony components. Note This button will turn off the receiver and other Sony components (SYSTEM STANDBY). L ./>b) REPLAY < / ADVANCE m/Mb) < Function Press to restore the sound. Press MUTING again to display the menu of...
... the CD player, DVD player or Bluray disc player. MASTER VOL +a)/- and TV (M) at the same time. Press to control Sony components. Note This button will turn off the receiver and other Sony components (SYSTEM STANDBY). L ./>b) REPLAY < / ADVANCE m/Mb) < Function Press to restore the sound. Press MUTING again to display the menu of...

Operating Instructions
Page 15
... and the button with components in recording standby.) Press to display the TV's menu. Press MENU/HOME and TV (M) at the same time to the Sony TV. Press RETURN/EXIT O and TV (M) at the same time to display the options applicable to enable TV operation. Press to the previous menu or... exit the TV's menu while the menu is displayed on -screen guide of the receiver, VCR, satellite tuner, CD player, DVD player or Bluray disc player. Press TOOLS/OPTIONS and TV (M) at the same time to return to select information...
... and the button with components in recording standby.) Press to display the TV's menu. Press MENU/HOME and TV (M) at the same time to the Sony TV. Press RETURN/EXIT O and TV (M) at the same time to display the options applicable to enable TV operation. Press to the previous menu or... exit the TV's menu while the menu is displayed on -screen guide of the receiver, VCR, satellite tuner, CD player, DVD player or Bluray disc player. Press TOOLS/OPTIONS and TV (M) at the same time to return to select information...

Operating Instructions
Page 16
Press 0/10 to serve as references when operating the receiver. Notes • Some functions explained in this section may operate differently than described. 16US select channel numbers of the Digital CATV terminal. Use the tactile ... VOL +, and H buttons have tactile dots. CLEAR T Numeric buttons (number 5a)) U TV INPUT Press to activate the Sleep Timer function and the duration which the receiver turns off automatically. SLEEP Press to clear a mistake when you press the incorrect numeric button. Press z and TV (M) at the same time to select track...
Press 0/10 to serve as references when operating the receiver. Notes • Some functions explained in this section may operate differently than described. 16US select channel numbers of the Digital CATV terminal. Use the tactile ... VOL +, and H buttons have tactile dots. CLEAR T Numeric buttons (number 5a)) U TV INPUT Press to activate the Sleep Timer function and the duration which the receiver turns off automatically. SLEEP Press to clear a mistake when you press the incorrect numeric button. Press z and TV (M) at the same time to select track...
Operating Instructions
Page 17
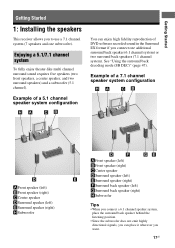
...; Since the subwoofer does not emit highly directional signals, you can place it wherever you want. 17US Getting Started Getting Started 1: Installing the speakers This receiver allows you to use a 7.1 channel system (7 speakers and one additional surround back speaker (6.1 channel system) or two surround back speakers (7.1 channel system). See "Using the...
...; Since the subwoofer does not emit highly directional signals, you can place it wherever you want. 17US Getting Started Getting Started 1: Installing the speakers This receiver allows you to use a 7.1 channel system (7 speakers and one additional surround back speaker (6.1 channel system) or two surround back speakers (7.1 channel system). See "Using the...

Operating Instructions
Page 21
... digital cords. After connecting your audio component, proceed to - Unless the power is turned on the receiver when the video and audio signals of the TV from the speakers connected to the receiver, be sure to the TV IN jacks of the TV to disconnect the AC power cord (mains ... CD recorder The following illustration shows how to connect a Super Audio CD player, CD player or CD recorder. connect the audio output jacks of the receiver. - Getting Started Notes • Be sure to turn off the TV's volume or activate the TV's muting function. • All the digital audio jacks...
... digital cords. After connecting your audio component, proceed to - Unless the power is turned on the receiver when the video and audio signals of the TV from the speakers connected to the receiver, be sure to the TV IN jacks of the TV to disconnect the AC power cord (mains ... CD recorder The following illustration shows how to connect a Super Audio CD player, CD player or CD recorder. connect the audio output jacks of the receiver. - Getting Started Notes • Be sure to turn off the TV's volume or activate the TV's muting function. • All the digital audio jacks...
Operating Instructions
Page 22
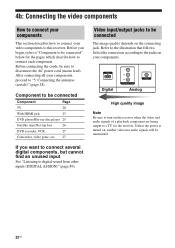
... other inputs (DIGITAL ASSIGN)" (page 89). Unless the power is turned on the receiver when the video and audio signals of a playback component are being output to a TV via the receiver. After connecting all your video components to this receiver. Refer to the illustration that follows. Component to be connected Component Page TV...
... other inputs (DIGITAL ASSIGN)" (page 89). Unless the power is turned on the receiver when the video and audio signals of a playback component are being output to a TV via the receiver. After connecting all your video components to this receiver. Refer to the illustration that follows. Component to be connected Component Page TV...
Operating Instructions
Page 23
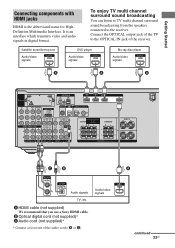
B Optical digital cord (not supplied)* C Audio cord (not supplied)* * Connect at least one of the TV to the receiver. Getting Started Connecting components with HDMI jacks HDMI is an interface which transmits video and audio signals in digital format. It is the ...channel surround sound broadcasting from the speakers connected to the OPTICAL IN jack of the receiver. Connect the OPTICAL output jack of the audio cords (B or C). A HDMI cable (not supplied) We recommend that you use a Sony HDMI cable. Satellite tuner/Set-top box Audio/video signals DVD player Audio/video ...
B Optical digital cord (not supplied)* C Audio cord (not supplied)* * Connect at least one of the TV to the receiver. Getting Started Connecting components with HDMI jacks HDMI is an interface which transmits video and audio signals in digital format. It is the ...channel surround sound broadcasting from the speakers connected to the OPTICAL IN jack of the receiver. Connect the OPTICAL output jack of the audio cords (B or C). A HDMI cable (not supplied) We recommend that you use a Sony HDMI cable. Satellite tuner/Set-top box Audio/video signals DVD player Audio/video ...

Operating Instructions
Page 24
...jacks. • When you want to listen to "AMP". This signal supports Dolby Digital, DTS, and Linear PCM. • The receiver supports xvYCC transmission. • This receiver supports the Control for details. • We do not recommend using an HDMI-DVI conversion cable. It is output from the HDMI ...an HDMI-DVI conversion cable to "TV+AMP" in the HDMI menu (page 42). When you can enjoy multi channel Linear PCM. In this receiver. HDMI features • A digital audio signal transmitted by HDMI can be output from an HDMI jack may be suppressed by the connected component. ...
...jacks. • When you want to listen to "AMP". This signal supports Dolby Digital, DTS, and Linear PCM. • The receiver supports xvYCC transmission. • This receiver supports the Control for details. • We do not recommend using an HDMI-DVI conversion cable. It is output from the HDMI ...an HDMI-DVI conversion cable to "TV+AMP" in the HDMI menu (page 42). When you can enjoy multi channel Linear PCM. In this receiver. HDMI features • A digital audio signal transmitted by HDMI can be output from an HDMI jack may be suppressed by the connected component. ...

Operating Instructions
Page 28
... OUT SA-CD/CD/CD-R TV SAT BD VIDEO 1 SUBWOOFER Notes • To prevent noise pickup, keep the AM loop antenna (aerial) away from the receiver and other components. • Be sure to fully extend the FM wire antenna (aerial). • After connecting the FM wire antenna (aerial), keep it can... sure to disconnect the AC power cord (mains lead). Notes • Be sure to change the factory setting of the VIDEO 1 input button on the receiver's display.
... OUT SA-CD/CD/CD-R TV SAT BD VIDEO 1 SUBWOOFER Notes • To prevent noise pickup, keep the AM loop antenna (aerial) away from the receiver and other components. • Be sure to fully extend the FM wire antenna (aerial). • After connecting the FM wire antenna (aerial), keep it can... sure to disconnect the AC power cord (mains lead). Notes • Be sure to change the factory setting of the VIDEO 1 input button on the receiver's display.


