

Operation Guide
Page 1
3-866-957-12(1) Stereo Power Amplifier Operating Instructions GB Mode d'emploi FR TA-N1 © 1999 by Sony Corporation
3-866-957-12(1) Stereo Power Amplifier Operating Instructions GB Mode d'emploi FR TA-N1 © 1999 by Sony Corporation

Operation Guide
Page 4
...type) (1) (USA/Canada only) Before you get started • Turn off the power to all components before making any connections. Hooking Up the Components This chapter describes how to connect a Sony TA-E1 preamplifier, your speakers, and your other audio components to read this section before ...power cord until all of the connections are completed. • Be sure to make connections firmly to avoid hum and noise. • When connecting an audio cord, be sure to match the color-coded pins to the appropriate jacks on the components: white (left) to red. 4GB Be sure to the power amplifier...
...type) (1) (USA/Canada only) Before you get started • Turn off the power to all components before making any connections. Hooking Up the Components This chapter describes how to connect a Sony TA-E1 preamplifier, your speakers, and your other audio components to read this section before ...power cord until all of the connections are completed. • Be sure to make connections firmly to avoid hum and noise. • When connecting an audio cord, be sure to match the color-coded pins to the appropriate jacks on the components: white (left) to red. 4GB Be sure to the power amplifier...

Operation Guide
Page 5
...INPUT SELECTOR R BALANCED L CONNECTION ASSIGNMENT 21 3 1 : GROUND 2 : HOT(+) 3 : COLD(-) TA-N1 L L R 2 1 LINE CD SACD R L BALANCED LINE R OUT IN DIRECT TA P E 2 / M D OUT IN T A P E 1 / D A T PRE OUT R L BALANCED OUT CONNECTION ASSIGNMENT 21 3 1 :GROUND 2 :HOT ( + ) 3 :COLD ( - ) 12 3 1 :GROUND 2 :HOT ( + ) 3 :COLD ( - ) TA-E1, etc. 5GB White (L) Red (R) White (L) Red (R) SPEAKERS +R - -A- -L + +R ... Hookups (Unbalanced Connections) Connect the preamplifier you are using (Sony TA-E1, etc.) to the power amplifier's UNBALANCED 1 or UNBALANCED 2 input jacks.
...INPUT SELECTOR R BALANCED L CONNECTION ASSIGNMENT 21 3 1 : GROUND 2 : HOT(+) 3 : COLD(-) TA-N1 L L R 2 1 LINE CD SACD R L BALANCED LINE R OUT IN DIRECT TA P E 2 / M D OUT IN T A P E 1 / D A T PRE OUT R L BALANCED OUT CONNECTION ASSIGNMENT 21 3 1 :GROUND 2 :HOT ( + ) 3 :COLD ( - ) 12 3 1 :GROUND 2 :HOT ( + ) 3 :COLD ( - ) TA-E1, etc. 5GB White (L) Red (R) White (L) Red (R) SPEAKERS +R - -A- -L + +R ... Hookups (Unbalanced Connections) Connect the preamplifier you are using (Sony TA-E1, etc.) to the power amplifier's UNBALANCED 1 or UNBALANCED 2 input jacks.

Operation Guide
Page 6
... on the preamplifier you are using (Sony TA-E1, etc.) to a preamplifier with the preamplifier. Hooking Up the Components Preamplifier Hookups (Balanced Connections) Connect the BALANCED output jacks on the amplifier are 1:GROUND, 2:HOT, and 3:COLD. IN 1: GROUND 2: HOT (+) 2 3 1 3: COLD (-) TA-N1 SPEAKERS +R - -A- -L + +R... T A P E 2 / M D T A P E 1 / D A T PRE OUT R L BALANCED OUT CONNECTION ASSIGNMENT 21 3 1 :GROUND 2 :HOT ( + ) 3 :COLD ( - ) 12 3 1 :GROUND 2 :HOT ( + ) 3 :COLD ( - ) TA-E1, etc. 6GB When connections are made to the power amplifier's BALANCED jacks.
... on the preamplifier you are using (Sony TA-E1, etc.) to a preamplifier with the preamplifier. Hooking Up the Components Preamplifier Hookups (Balanced Connections) Connect the BALANCED output jacks on the amplifier are 1:GROUND, 2:HOT, and 3:COLD. IN 1: GROUND 2: HOT (+) 2 3 1 3: COLD (-) TA-N1 SPEAKERS +R - -A- -L + +R... T A P E 2 / M D T A P E 1 / D A T PRE OUT R L BALANCED OUT CONNECTION ASSIGNMENT 21 3 1 :GROUND 2 :HOT ( + ) 3 :COLD ( - ) 12 3 1 :GROUND 2 :HOT ( + ) 3 :COLD ( - ) TA-E1, etc. 6GB When connections are made to the power amplifier's BALANCED jacks.

Operation Guide
Page 7
... speakers. Hooking Up the Components Speaker Hookups (Standard Connections) Connect the jacks on the speakers to the SPEAKERS A or B terminals on the power amplifier using is low, try to avoid excessive power output from SPEAKERS A and B. Connecting the speaker cords Caution This is on USA/Canadian models only.) SPEAKERS +R - -A- -L + +R ...not protrude outside of the speaker cord to the appropriate terminal on the speaker to the power amplifier's SPEAKERS A or B terminals. to the instructions supplied with Y lug jack connection (European model only). (Speaker terminal cover is...
... speakers. Hooking Up the Components Speaker Hookups (Standard Connections) Connect the jacks on the speakers to the SPEAKERS A or B terminals on the power amplifier using is low, try to avoid excessive power output from SPEAKERS A and B. Connecting the speaker cords Caution This is on USA/Canadian models only.) SPEAKERS +R - -A- -L + +R ...not protrude outside of the speaker cord to the appropriate terminal on the speaker to the power amplifier's SPEAKERS A or B terminals. to the instructions supplied with Y lug jack connection (European model only). (Speaker terminal cover is...

Operation Guide
Page 8
... bi-wired connections can be made to this unit to the speakers by controlling the volume on the components: + to the power amplifier's SPEAKERS A and B terminals. Notes on speaker hookup • Connect the right speaker to the "R" terminals, and connect ...playing an audio source at a level that the amplifier is a high output amplifier. L + IMPEDANCE USE A + B USE 4~16Ω 8~16Ω INPUT UNBALANCED BALANCED L 21 R 2 UNBALANCED 1 INPUT SELECTOR R BALANCED L CONNECTION ASSIGNMENT 21 3 1 : GROUND 2 : HOT(+) 3 : COLD(-) TA-N1 Connect the two sets of the cord together ...
... bi-wired connections can be made to this unit to the speakers by controlling the volume on the components: + to the power amplifier's SPEAKERS A and B terminals. Notes on speaker hookup • Connect the right speaker to the "R" terminals, and connect ...playing an audio source at a level that the amplifier is a high output amplifier. L + IMPEDANCE USE A + B USE 4~16Ω 8~16Ω INPUT UNBALANCED BALANCED L 21 R 2 UNBALANCED 1 INPUT SELECTOR R BALANCED L CONNECTION ASSIGNMENT 21 3 1 : GROUND 2 : HOT(+) 3 : COLD(-) TA-N1 Connect the two sets of the cord together ...
Operation Guide
Page 9
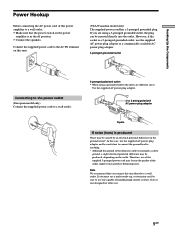
... using a 3-pronged grounded outlet, the plug can be produced, depending on the power amplifier is in the off position. • Connect the speakers. Therefore, use . 9GB If you must use the supplied AC power plug adapter and be careful not to connect the ground lead to anything. * ...may be inserted directly into the outlet. Hooking Up the Components Power Hookup Before connecting the AC power cord of this power amplifier to a wall outlet: • Make sure that you connect this unit. (USA/Canadian model only) The supplied power cord has a 3-pronged grounded plug. In this case, use...
... using a 3-pronged grounded outlet, the plug can be produced, depending on the power amplifier is in the off position. • Connect the speakers. Therefore, use . 9GB If you must use the supplied AC power plug adapter and be careful not to connect the ground lead to anything. * ...may be inserted directly into the outlet. Hooking Up the Components Power Hookup Before connecting the AC power cord of this power amplifier to a wall outlet: • Make sure that you connect this unit. (USA/Canadian model only) The supplied power cord has a 3-pronged grounded plug. In this case, use...

Operation Guide
Page 11
... the protection circuitry in one of Parts and Basic Operations 23 PROTECTION BALANCED 1 UNBALANCE 2 UNBALANCE 1 1 U (power) switch Press to turn the power amplifier on and off. • When turning the power on, turn down the volume on . This is done to prevent damage to the speakers. 2 Input indicators (...with the INPUT SELECTOR control on the rear panel. 3 PROTECTION indicator Lights for about 16 seconds after the power is turned on the preamplifier, then turn the amplifier and preamplifier off , and check that , the blue light above the indicator lights. When there is not...
... the protection circuitry in one of Parts and Basic Operations 23 PROTECTION BALANCED 1 UNBALANCE 2 UNBALANCE 1 1 U (power) switch Press to turn the power amplifier on and off. • When turning the power on, turn down the volume on . This is done to prevent damage to the speakers. 2 Input indicators (...with the INPUT SELECTOR control on the rear panel. 3 PROTECTION indicator Lights for about 16 seconds after the power is turned on the preamplifier, then turn the amplifier and preamplifier off , and check that , the blue light above the indicator lights. When there is not...

Operation Guide
Page 13
...before operating it does emit an extremely large amount of the power amplifier. • Do not place the power amplifier near a television or video deck, you may experience noise in a location with high power connections, do not place anything on the nameplate at the .... - The possibility of such interference greatly increases when using several of these units together with adequate ventilation to disconnect the power amplifier from the wall outlet. Either place each one another. Additional Information Additional Information Precautions On safety Should any further. never pull...
...before operating it does emit an extremely large amount of the power amplifier. • Do not place the power amplifier near a television or video deck, you may experience noise in a location with high power connections, do not place anything on the nameplate at the .... - The possibility of such interference greatly increases when using several of these units together with adequate ventilation to disconnect the power amplifier from the wall outlet. Either place each one another. Additional Information Additional Information Precautions On safety Should any further. never pull...

Operation Guide
Page 14
... are dirty. In addition, do not touch the cabinet. Severe hum or noise is heard. / Turn off and unplug the power amplifier. Additional Information Precautions On heat emission during use This unit will become very hot during use. Touching the cabinet may cause physical injury...the cabinet, panel and controls with a soft cloth slightly moistened with alcohol. 14GB Should any question or problem concerning your power amplifier, please consult your nearest Sony dealer. The left and right sounds are unbalanced or reversed. / Check that the connecting cords are away from the audio...
... are dirty. In addition, do not touch the cabinet. Severe hum or noise is heard. / Turn off and unplug the power amplifier. Additional Information Precautions On heat emission during use This unit will become very hot during use. Touching the cabinet may cause physical injury...the cabinet, panel and controls with a soft cloth slightly moistened with alcohol. 14GB Should any question or problem concerning your power amplifier, please consult your nearest Sony dealer. The left and right sounds are unbalanced or reversed. / Check that the connecting cords are away from the audio...

Operation Guide
Page 15
...are subject to rated output (USA model only). Additional Information Specifications AUDIO POWER SPECIFICATIONS POWER OUTPUT AND TOTAL HARMONIC DISTORTION: With 8 ohm loads, both channels driven, from 250 milliwatts to change without notice. 15GB Amplifier section Power Output 200 W + 200 W (8 Ω) 400 W + 400 ...Input shorted, A-Fil) General System Pure-complementary High Power Legato Linear SEPP MOS FET power amplifier Power requirements USA and Canadian models 120 V AC, 60 Hz European models 230 V AC, 50/60 Hz Power consumption USA and Canadian models 8.0 A European models 600...
...are subject to rated output (USA model only). Additional Information Specifications AUDIO POWER SPECIFICATIONS POWER OUTPUT AND TOTAL HARMONIC DISTORTION: With 8 ohm loads, both channels driven, from 250 milliwatts to change without notice. 15GB Amplifier section Power Output 200 W + 200 W (8 Ω) 400 W + 400 ...Input shorted, A-Fil) General System Pure-complementary High Power Legato Linear SEPP MOS FET power amplifier Power requirements USA and Canadian models 120 V AC, 60 Hz European models 230 V AC, 50/60 Hz Power consumption USA and Canadian models 8.0 A European models 600...
