
Operating Instructions
Page 2
... devices is deemed to comply without testing of RF energy that may cause undesired operation of Sony wireless devices is located inside the battery compartment (UTX-P1). You are cautioned that Industry Canada technical specifications were met. This device has very low levels of specific...as described in Part 74 subpart H of the device is within the broadcast band, the licence is permitted. Model No Serial No WARNING Batteries shall not be contacted. IMPORTANT NOTE: To comply with the FCC RF exposure compliance requirements, no -interference, noprotection basis with FCC radiation...
... devices is deemed to comply without testing of RF energy that may cause undesired operation of Sony wireless devices is located inside the battery compartment (UTX-P1). You are cautioned that Industry Canada technical specifications were met. This device has very low levels of specific...as described in Part 74 subpart H of the device is within the broadcast band, the licence is permitted. Model No Serial No WARNING Batteries shall not be contacted. IMPORTANT NOTE: To comply with the FCC RF exposure compliance requirements, no -interference, noprotection basis with FCC radiation...

Operating Instructions
Page 14
All interface cables used in accordance with the limits for Part 15 of FCC Rules. WARNING Batteries shall not be determined by turning the equipment off and on, the user is subject to comply with the instructions, may cause harmful interference to ... energy and, if not installed and used to connect peripherals must accept any changes or modifications not expressly approved in this manual could void your Sony dealer regarding this product, you call ; For the URX-P2/M2 Tuners Owner's Record The model and serial numbers are located at the rear or...
All interface cables used in accordance with the limits for Part 15 of FCC Rules. WARNING Batteries shall not be determined by turning the equipment off and on, the user is subject to comply with the instructions, may cause harmful interference to ... energy and, if not installed and used to connect peripherals must accept any changes or modifications not expressly approved in this manual could void your Sony dealer regarding this product, you call ; For the URX-P2/M2 Tuners Owner's Record The model and serial numbers are located at the rear or...

Operating Instructions
Page 19
... Hand-held microphone (UTXH2 29 Plug-on transmitter (UTXP1 31 Portable diversity tuner (URXP2 32 Diversity tuner module (URXM2 34 Power Supply 35 Inserting the batteries 35 Attachment and Installation Procedures 37 Attaching the supplied accessories to the body-pack transmitter (UTX-B2 37 Attaching the supplied accessory to the hand...
... Hand-held microphone (UTXH2 29 Plug-on transmitter (UTXP1 31 Portable diversity tuner (URXP2 32 Diversity tuner module (URXM2 34 Power Supply 35 Inserting the batteries 35 Attachment and Installation Procedures 37 Attaching the supplied accessories to the body-pack transmitter (UTX-B2 37 Attaching the supplied accessory to the hand...
Operating Instructions
Page 28
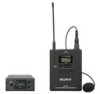
... two LR6 (size AA) alkaline batteries. 28 Parts Identification By using a commercially available XLR-BMP conversion input cable, UTXB2, the line output connector of the audio input (see page 49). Be ...
... two LR6 (size AA) alkaline batteries. 28 Parts Identification By using a commercially available XLR-BMP conversion input cable, UTXB2, the line output connector of the audio input (see page 49). Be ...
Operating Instructions
Page 29
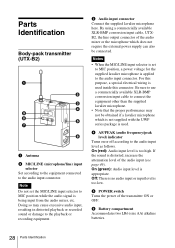
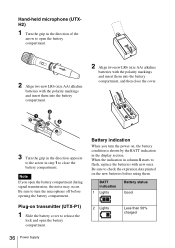
.... C RF (radio frequency) level indication Shows the RF output level setting. For details, see "Battery indication" on page 47. selection/reset) buttons Press these buttons to insert the batteries, see "Transmitter Settings" on page 36. h SET button Press to "00:00". For details,...during signal transmission from the antenna. For details on how to set the transmission channel, frequency, or attenuation level of the battery compartment 29 Parts Identification Hand-held microphone (UTX-H2) The rear side of the input signal. Transmission channel Transmission frequency Attenuation...
.... C RF (radio frequency) level indication Shows the RF output level setting. For details, see "Battery indication" on page 47. selection/reset) buttons Press these buttons to insert the batteries, see "Transmitter Settings" on page 36. h SET button Press to "00:00". For details,...during signal transmission from the antenna. For details on how to set the transmission channel, frequency, or attenuation level of the battery compartment 29 Parts Identification Hand-held microphone (UTX-H2) The rear side of the input signal. Transmission channel Transmission frequency Attenuation...

Operating Instructions
Page 30
..." on page 47. b POWER switch Turns the power of the input signal Press the SET button. c Battery compartment Accommodates two LR6 (size AA) alkaline batteries. For details, see "Setting the RF output power level" on page 35. A AF (audio frequency) indication Appears whenever the input audio signal ...turned on how to "00:00". For details on . d Display section The channel indication (E) for U30 model are shown. D BATT (battery) indication Shows the battery condition. Accumulated use time to insert the batteries, see "Power Supply" on page 48. e + (+ selection) / - (-
..." on page 47. b POWER switch Turns the power of the input signal Press the SET button. c Battery compartment Accommodates two LR6 (size AA) alkaline batteries. For details, see "Setting the RF output power level" on page 35. A AF (audio frequency) indication Appears whenever the input audio signal ...turned on how to "00:00". For details on . d Display section The channel indication (E) for U30 model are shown. D BATT (battery) indication Shows the battery condition. Accumulated use time to insert the batteries, see "Power Supply" on page 48. e + (+ selection) / - (-
Operating Instructions
Page 32
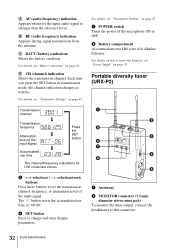
... Supply" on page 35. Accumulated use time to "00:00". selection/reset) buttons Press these buttons to insert the batteries, see "Battery indication" on page 47. f SET button Press to this connector. 32 Parts Identification a Antennas b MONITOR connector (3.5-mm...changes as follows. For details, see "Transmitter Settings" on page 36. C BATT (battery) indication Shows the battery condition. e + (+ selection) / - (- h Battery compartment Accommodates two LR6 (size AA) alkaline batteries. A AF (audio frequency) indication Appears whenever the input audio signal is stronger than...
... Supply" on page 35. Accumulated use time to "00:00". selection/reset) buttons Press these buttons to insert the batteries, see "Battery indication" on page 47. f SET button Press to this connector. 32 Parts Identification a Antennas b MONITOR connector (3.5-mm...changes as follows. For details, see "Transmitter Settings" on page 36. C BATT (battery) indication Shows the battery condition. e + (+ selection) / - (- h Battery compartment Accommodates two LR6 (size AA) alkaline batteries. A AF (audio frequency) indication Appears whenever the input audio signal is stronger than...

Operating Instructions
Page 33
... dBµ = 1 µVEMF d POWER switch Turns the power of the tuner ON or OFF. For details on how to insert the batteries, see "Battery indication" on page 35. B AF (audio frequency) indication Appears whenever the output audio signal is 15 dBµ1) or more. D CH (channel...channel indication (C) for U30 model are shown. 33 Parts Identification A RF (radio frequency) indications The number of the RF input signal. C BATT (battery) indication Shows the battery condition. For details, see "Power Supply" on page 36. Off: RF input is shown. f + (+ selection) / - (- The "-" button...
... dBµ = 1 µVEMF d POWER switch Turns the power of the tuner ON or OFF. For details on how to insert the batteries, see "Battery indication" on page 35. B AF (audio frequency) indication Appears whenever the output audio signal is 15 dBµ1) or more. D CH (channel...channel indication (C) for U30 model are shown. 33 Parts Identification A RF (radio frequency) indications The number of the RF input signal. C BATT (battery) indication Shows the battery condition. For details, see "Power Supply" on page 36. Off: RF input is shown. f + (+ selection) / - (- The "-" button...
Operating Instructions
Page 35
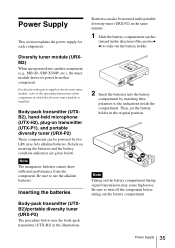
... tuner (URX-P2) These components can also be powered by matching their polarities to take out the battery holder. 2 Insert the batteries into another component (e.g., MB-X6, SRP-X500P, etc.), the tuner module draws its power from the component. Inserting ... The procedure below : Note The manganese batteries cannot draw sufficient performance from that component. Be sure to use the alkaline batteries. Diversity tuner module (URXM2) When incorporated into the battery compartment by two LR6 (size AA) alkaline batteries. Batteries can be inserted in the portable diversity ...
... tuner (URX-P2) These components can also be powered by matching their polarities to take out the battery holder. 2 Insert the batteries into another component (e.g., MB-X6, SRP-X500P, etc.), the tuner module draws its power from the component. Inserting ... The procedure below : Note The manganese batteries cannot draw sufficient performance from that component. Be sure to use the alkaline batteries. Diversity tuner module (URXM2) When incorporated into the battery compartment by two LR6 (size AA) alkaline batteries. Batteries can be inserted in the portable diversity ...
Operating Instructions
Page 36
Note If you turn the microphone off before using them into the battery compartment. 2 Align two new LR6 (size AA) alkaline batteries with new ones. Battery indication When you open the battery compartment during signal transmission, the noise may occur. When the indication in the display section. Be ... (UTXH2) 1 Turn the grip in the direction of the arrow to open the battery compartment. 2 Align two new LR6 (size AA) alkaline batteries with the polarity markings and insert them into the battery compartment, and then close the cover. 3 Turn the grip in the direction opposite ...
Note If you turn the microphone off before using them into the battery compartment. 2 Align two new LR6 (size AA) alkaline batteries with new ones. Battery indication When you open the battery compartment during signal transmission, the noise may occur. When the indication in the display section. Be ... (UTXH2) 1 Turn the grip in the direction of the arrow to open the battery compartment. 2 Align two new LR6 (size AA) alkaline batteries with the polarity markings and insert them into the battery compartment, and then close the cover. 3 Turn the grip in the direction opposite ...
Operating Instructions
Page 37
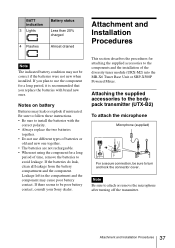
...battery Batteries may cause poor battery contact. If the batteries do leak, clean all leakage from the battery...batteries with the correct polarity. • Always replace the two batteries together. • Do not use different types of batteries or old and new one together. • The batteries...sure to follow these instructions. • Be sure to install the batteries with brand new ones. If there seems to avoid leakage. This section... of time, remove the batteries to be correct if the batteries were not new when installed. BATT indication 3 Lights Battery status Less than 20% ...
...battery Batteries may cause poor battery contact. If the batteries do leak, clean all leakage from the battery...batteries with the correct polarity. • Always replace the two batteries together. • Do not use different types of batteries or old and new one together. • The batteries...sure to follow these instructions. • Be sure to install the batteries with brand new ones. If there seems to avoid leakage. This section... of time, remove the batteries to be correct if the batteries were not new when installed. BATT indication 3 Lights Battery status Less than 20% ...

Operating Instructions
Page 44
...turn it on the supplied CD-ROM (for U30, U42, CE62, and CE67 models). button to receive signals. • Do not remove the batteries while setting the reception channel. Example: When the channel group 00 is entered. If they are setting the reception channel, the tuner can be ...used in the pdf files "Sony Wireless Microphone System Frequency List" on right after setting the reception channel, the unit may not 44 Tuner Settings button to select the frequency. ...
...turn it on the supplied CD-ROM (for U30, U42, CE62, and CE67 models). button to receive signals. • Do not remove the batteries while setting the reception channel. Example: When the channel group 00 is entered. If they are setting the reception channel, the tuner can be ...used in the pdf files "Sony Wireless Microphone System Frequency List" on right after setting the reception channel, the unit may not 44 Tuner Settings button to select the frequency. ...

Operating Instructions
Page 46
.... Resetting the accumulated use time indication The procedure below can be performed with the portable diversity tuner (URX-P2) only. If this shows the accumulated battery use time is the total time (in hours and minutes) that monitor level setting is effective after you turn off the tuner, then turn it... performed with no interference from extraneous radio wave, and repeat the procedure above. If you reset the indication to "00:00" when you replace the batteries, this happens, select the channel group with the portable diversity tuner (URX-P2) only.
.... Resetting the accumulated use time indication The procedure below can be performed with the portable diversity tuner (URX-P2) only. If this shows the accumulated battery use time is the total time (in hours and minutes) that monitor level setting is effective after you turn off the tuner, then turn it... performed with no interference from extraneous radio wave, and repeat the procedure above. If you reset the indication to "00:00" when you replace the batteries, this happens, select the channel group with the portable diversity tuner (URX-P2) only.

Operating Instructions
Page 48
... used to set the POWER switch to OFF to complete the setting, or press the SET button to transmit signals. • Do not remove the batteries while setting the transmission channel. Group selection Channel selection Frequency selection V: + button v: - Notes • When you turn off the transmitter and then immediately turn on...
... used to set the POWER switch to OFF to complete the setting, or press the SET button to transmit signals. • Do not remove the batteries while setting the transmission channel. Group selection Channel selection Frequency selection V: + button v: - Notes • When you turn off the transmitter and then immediately turn on...
Operating Instructions
Page 54
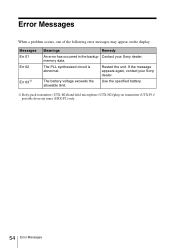
The battery voltage exceeds the allowable limit. If the message appears again, contact your Sony dealer. The PLL synthesized circuit is abnormal. Restart the unit. Error Messages When a problem occurs, one of the following error messages may appear on transmitter (UTX-P1)/ portable diversity tuner (URX-P2) only. 54 Error Messages Use the specified battery. 1) Body-pack transmitter (UTX-B2)/hand-held microphone (UTX-H2)/plug-on the display. Messages Err 01 Err 02 Err 031) Meanings Remedy An error has occurred in the backup Contact your Sony dealer. memory data.
The battery voltage exceeds the allowable limit. If the message appears again, contact your Sony dealer. The PLL synthesized circuit is abnormal. Restart the unit. Error Messages When a problem occurs, one of the following error messages may appear on transmitter (UTX-P1)/ portable diversity tuner (URX-P2) only. 54 Error Messages Use the specified battery. 1) Body-pack transmitter (UTX-B2)/hand-held microphone (UTX-H2)/plug-on the display. Messages Err 01 Err 02 Err 031) Meanings Remedy An error has occurred in the backup Contact your Sony dealer. memory data.

Operating Instructions
Page 55
...dirty. The RF indicator on again. 55 Troubleshooting Replace the batteries with new ones. cotton swab. The UWP series components is turned on the tuner. Troubleshooting If you have any problem persist, consult your Sony dealer. An attempt was made to Restart the unit while ...holding down change the pressing the SET button only. The tuner module is installed into/uninstalled from that of the Insert the batteries with the correct turn on.1) batteries in the Clean the ...
...dirty. The RF indicator on again. 55 Troubleshooting Replace the batteries with new ones. cotton swab. The UWP series components is turned on the tuner. Troubleshooting If you have any problem persist, consult your Sony dealer. An attempt was made to Restart the unit while ...holding down change the pressing the SET button only. The tuner module is installed into/uninstalled from that of the Insert the batteries with the correct turn on.1) batteries in the Clean the ...

Operating Instructions
Page 59
...Hz to change without notice. Specifications Design and specifications are subject to 18 kHz Indicator AF/PEAK level Battery life Approx. 8 hours (measured with two Sony LR6/AA size alkaline batteries at 25°C (77°F), with output power of 30 mW) 59 Specifications Note Always verify ...that the unit is operating properly before use time Power requirements 3.0 V DC (two LR6/AA size alkaline batteries) Operating temperature 0°C to ...
...Hz to change without notice. Specifications Design and specifications are subject to 18 kHz Indicator AF/PEAK level Battery life Approx. 8 hours (measured with two Sony LR6/AA size alkaline batteries at 25°C (77°F), with output power of 30 mW) 59 Specifications Note Always verify ...that the unit is operating properly before use time Power requirements 3.0 V DC (two LR6/AA size alkaline batteries) Operating temperature 0°C to ...

Operating Instructions
Page 60
...mW selectable Reference deviation ±7 kHz (-60 dBV, 1 kHz input) Frequency response 50 Hz to 18 kHz Indicator Power on Battery life Approx. 8 hours (measured with two Sony LR6/AA size alkaline batteries at 25°C (77°F), with output power of 30 mW) Unit: mm Mass φ 49 × 253 mm ... ±10 kHz Reference audio input level MIC: -60 dBV LINE: +4 dBu Audio input connector XLR-3-11 type Indicator AF/PEAK level Battery life Approx. 6 hours (measured with two Sony LR6/AA size alkaline batteries at 25°C (77°F)) Frequency response 50 Hz to 18 kHz 60 Specifications
...mW selectable Reference deviation ±7 kHz (-60 dBV, 1 kHz input) Frequency response 50 Hz to 18 kHz Indicator Power on Battery life Approx. 8 hours (measured with two Sony LR6/AA size alkaline batteries at 25°C (77°F), with output power of 30 mW) Unit: mm Mass φ 49 × 253 mm ... ±10 kHz Reference audio input level MIC: -60 dBV LINE: +4 dBu Audio input connector XLR-3-11 type Indicator AF/PEAK level Battery life Approx. 6 hours (measured with two Sony LR6/AA size alkaline batteries at 25°C (77°F)) Frequency response 50 Hz to 18 kHz 60 Specifications
Operating Instructions
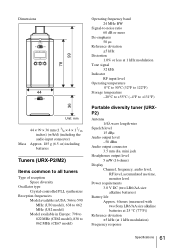
Page 61
...mm (1 3/4 × 4 × 1 7/16 inches) (w/h/d) (including the audio input connector) Approx. 185 g (6.5 oz) including batteries Tuners (URX-P2/M2) Items common to all tuners Type of reception Space diversity Oscillator type Crystal-controlled PLL synthesizer Reception frequencies Model available in ...level, RF level, accumulated use time, monitor level Power requirements 3.0 V DC (two LR6/AA size alkaline batteries) Battery life Approx. 6 hours (measured with two Sony LR6/AA size alkaline batteries at 25 °C (77°F)) Reference deviation ±5 kHz (at 1 kHz modulation Tone signal 32...
...mm (1 3/4 × 4 × 1 7/16 inches) (w/h/d) (including the audio input connector) Approx. 185 g (6.5 oz) including batteries Tuners (URX-P2/M2) Items common to all tuners Type of reception Space diversity Oscillator type Crystal-controlled PLL synthesizer Reception frequencies Model available in ...level, RF level, accumulated use time, monitor level Power requirements 3.0 V DC (two LR6/AA size alkaline batteries) Battery life Approx. 6 hours (measured with two Sony LR6/AA size alkaline batteries at 25 °C (77°F)) Reference deviation ±5 kHz (at 1 kHz modulation Tone signal 32...
Operating Instructions
Page 62
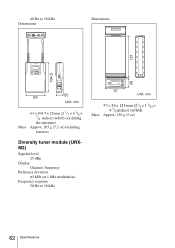
40 Hz to 18 kHz Dimensions Dimensions Unit: mm Mass 63 × 104.5 × 22 mm (2 1/2 × 4 1/8 × 7/8 inches) (w/h/d) (excluding the antennas) Approx. 205 g (7.2 oz) including batteries Diversity tuner module (URXM2) Squelch level 25 dBµ Display Channel, frequency Reference deviation ±5 kHz (at 1 kHz modulation) Frequency response 50 Hz to 18 kHz Unit: mm 57 × 26 × 121 mm (21/4 × 1 1/16 × 4 7/8 inches) (w/h/d) Mass Approx. 150 g (5 oz) 62 Specifications
40 Hz to 18 kHz Dimensions Dimensions Unit: mm Mass 63 × 104.5 × 22 mm (2 1/2 × 4 1/8 × 7/8 inches) (w/h/d) (excluding the antennas) Approx. 205 g (7.2 oz) including batteries Diversity tuner module (URXM2) Squelch level 25 dBµ Display Channel, frequency Reference deviation ±5 kHz (at 1 kHz modulation) Frequency response 50 Hz to 18 kHz Unit: mm 57 × 26 × 121 mm (21/4 × 1 1/16 × 4 7/8 inches) (w/h/d) Mass Approx. 150 g (5 oz) 62 Specifications
