User Guide
Page 2
... Considerations ...9 Getting Started ...11 Locating Controls and Ports...12 About the Indicator Lights ...25 Connecting a Power Source ...27 Using the Battery Pack ...29 Shutting Down Your Computer Safely ...34 Using Your VAIO Computer ...35 Using the Keyboard ...36 Using the Touch Pad ...38 Using Special-function Buttons ...39 Using the Built-in...
... Considerations ...9 Getting Started ...11 Locating Controls and Ports...12 About the Indicator Lights ...25 Connecting a Power Source ...27 Using the Battery Pack ...29 Shutting Down Your Computer Safely ...34 Using Your VAIO Computer ...35 Using the Keyboard ...36 Using the Touch Pad ...38 Using Special-function Buttons ...39 Using the Built-in...
User Guide
Page 4
...Computer...160 On Using the Built-in MOTION EYE Camera...162 On Handling Floppy Disks ...162 On Handling Discs ...163 On Using the Battery Pack...164 On Using Headphones...165 On Handling Memory Stick Media...166 On Handling the Hard Disk ...167 On Handling the Memory Card ...Adapter...168 Troubleshooting ...169 Computer ...171 System Security ...178 Battery...179 Built-in MOTION EYE Camera...181 Internet ...184 Networking ...186 Bluetooth Technology ...189 Optical Discs ...193 Display ...197 Printing ...201 Microphone ......
...Computer...160 On Using the Built-in MOTION EYE Camera...162 On Handling Floppy Disks ...162 On Handling Discs ...163 On Using the Battery Pack...164 On Using Headphones...165 On Handling Memory Stick Media...166 On Handling the Hard Disk ...167 On Handling the Memory Card ...Adapter...168 Troubleshooting ...169 Computer ...171 System Security ...178 Battery...179 Built-in MOTION EYE Camera...181 Internet ...184 Networking ...186 Bluetooth Technology ...189 Optical Discs ...193 Display ...197 Printing ...201 Microphone ......

User Guide
Page 11
... manufacturer's instructions. ❑ Locating Controls and Ports (page 12) ❑ About the Indicator Lights (page 25) ❑ Connecting a Power Source (page 27) ❑ Using the Battery Pack (page 29) ❑ Shutting Down Your Computer Safely (page 34) Upon completion, connect one device (for the first time, do not connect any new... supplied accessories connected and set up your computer. n 11 N Getting Started Getting Started This section describes how to start up your computer with using your VAIO computer. !
... manufacturer's instructions. ❑ Locating Controls and Ports (page 12) ❑ About the Indicator Lights (page 25) ❑ Connecting a Power Source (page 27) ❑ Using the Battery Pack (page 29) ❑ Shutting Down Your Computer Safely (page 34) Upon completion, connect one device (for the first time, do not connect any new... supplied accessories connected and set up your computer. n 11 N Getting Started Getting Started This section describes how to start up your computer with using your VAIO computer. !
User Guide
Page 13
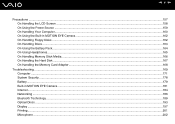
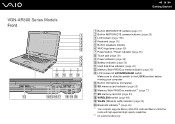
VGN-FE800 Series Models Front n 13 N Getting Started A Built-in MOTION EYE camera (page 41) B Built-in MOTION EYE camera indicator (page 25) C LCD screen (page ... capacity capabilities. L Headphones jack (page 114) M Microphone jack (page 128) N Built-in speakers (stereo) E Keyboard (page 36) F Touch pad (page 38) G Power indicator (page 25) H Battery indicator (page 25) I Hard disk drive indicator (page 25) J Memory Stick Duo/PRO Duo media indicator (page 25) K LCD screen lid LOCK/RELEASE switch Make...
VGN-FE800 Series Models Front n 13 N Getting Started A Built-in MOTION EYE camera (page 41) B Built-in MOTION EYE camera indicator (page 25) C LCD screen (page ... capacity capabilities. L Headphones jack (page 114) M Microphone jack (page 128) N Built-in speakers (stereo) E Keyboard (page 36) F Touch pad (page 38) G Power indicator (page 25) H Battery indicator (page 25) I Hard disk drive indicator (page 25) J Memory Stick Duo/PRO Duo media indicator (page 25) K LCD screen lid LOCK/RELEASE switch Make...
User Guide
Page 15
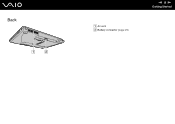
Back A Air vent B Battery connector (page 29) n 15 N Getting Started
Back A Air vent B Battery connector (page 29) n 15 N Getting Started
User Guide
Page 19
N Built-in speakers (stereo) F VAIO logo lamp (page 39) G Power button / Power indicator (page 25) H Touch pad (page 38) I Power indicator (page 25) J Battery indicator (page 25) K Hard disk drive indicator (page 25) L Memory Stick PRO/Duo media indicator (page 25) M LCD screen lid LOCK/...RELEASE switch Make sure to slide this switch to the LOCK position before moving your computer. VGN-AR300 Series Models Front n 19 N Getting...
N Built-in speakers (stereo) F VAIO logo lamp (page 39) G Power button / Power indicator (page 25) H Touch pad (page 38) I Power indicator (page 25) J Battery indicator (page 25) K Hard disk drive indicator (page 25) L Memory Stick PRO/Duo media indicator (page 25) M LCD screen lid LOCK/...RELEASE switch Make sure to slide this switch to the LOCK position before moving your computer. VGN-AR300 Series Models Front n 19 N Getting...

User Guide
Page 21
Back n 21 N Getting Started A VHF/UHF port*1 (page 51) B Air vent C Battery connector (page 29) D Hi-Speed USB (USB 2.0) port*2 (page 129) E DC IN port (page 27) *1 On selected models only. *2 Supports high-/full-/low- speeds.
Back n 21 N Getting Started A VHF/UHF port*1 (page 51) B Air vent C Battery connector (page 29) D Hi-Speed USB (USB 2.0) port*2 (page 129) E DC IN port (page 27) *1 On selected models only. *2 Supports high-/full-/low- speeds.
User Guide
Page 25
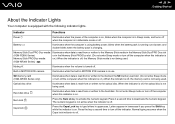
... the optical disc is off the indicator. n 25 N Getting Started About the Indicator Lights Your computer is in use. SD memory card (VGN-AR300 Series only) Illuminates when data is read from or written to turn off . Num lock Press the Num Lk key to deactivate the ... is off , the Memory Stick media is in Sleep mode, and turns off . Letters appear in uppercase. Battery e Illuminates when the computer is using battery power, blinks when the battery pack is running out of the computer is off . The numeric keypad is not active when the indicator is ...
... the optical disc is off the indicator. n 25 N Getting Started About the Indicator Lights Your computer is in use. SD memory card (VGN-AR300 Series only) Illuminates when data is read from or written to turn off . Num lock Press the Num Lk key to deactivate the ... is off , the Memory Stick media is in Sleep mode, and turns off . Letters appear in uppercase. Battery e Illuminates when the computer is using battery power, blinks when the battery pack is running out of the computer is off . The numeric keypad is not active when the indicator is ...
User Guide
Page 27
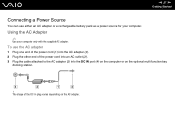
To use either an AC adapter or a rechargeable battery pack as a power source for your computer only with the supplied AC adapter. n 27 N Getting Started Connecting a Power Source You can use the AC adapter 1 ...
To use either an AC adapter or a rechargeable battery pack as a power source for your computer only with the supplied AC adapter. n 27 N Getting Started Connecting a Power Source You can use the AC adapter 1 ...
User Guide
Page 29
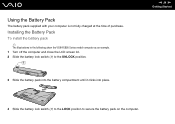
n 29 N Getting Started 4 Slide the battery lock switch (1) to the LOCK position to the UNLOCK position. 3 Slide the battery pack into the battery compartment until it clicks into place. Using the Battery Pack The battery pack supplied with your computer is not fully charged at the time of purchase. Installing the Battery Pack To install the battery pack ✍ The illustrations in the following show the VGN-FE800 Series model computer as an example. 1 Turn off the computer and close the LCD screen lid. 2 Slide the battery lock switch (1) to secure the battery pack on the computer.
n 29 N Getting Started 4 Slide the battery lock switch (1) to the LOCK position to the UNLOCK position. 3 Slide the battery pack into the battery compartment until it clicks into place. Using the Battery Pack The battery pack supplied with your computer is not fully charged at the time of purchase. Installing the Battery Pack To install the battery pack ✍ The illustrations in the following show the VGN-FE800 Series model computer as an example. 1 Turn off the computer and close the LCD screen lid. 2 Slide the battery lock switch (1) to secure the battery pack on the computer.
User Guide
Page 30
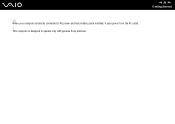
n 30 N Getting Started ✍ When your computer is designed to AC power and has a battery pack installed, it uses power from the AC outlet. ! This computer is directly connected to operate only with genuine Sony batteries.
n 30 N Getting Started ✍ When your computer is designed to AC power and has a battery pack installed, it uses power from the AC outlet. ! This computer is directly connected to operate only with genuine Sony batteries.
User Guide
Page 31
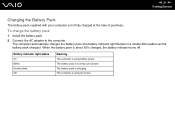
... time of power. The computer automatically charges the battery pack (the battery indicator light flashes in a double blink pattern as the battery pack charges). n 31 N Getting Started Charging the Battery Pack The battery pack supplied with your computer is using battery power. To charge the battery pack 1 Install the battery pack. 2 Connect the AC adapter to the computer...
... time of power. The computer automatically charges the battery pack (the battery indicator light flashes in a double blink pattern as the battery pack charges). n 31 N Getting Started Charging the Battery Pack The battery pack supplied with your computer is using battery power. To charge the battery pack 1 Install the battery pack. 2 Connect the AC adapter to the computer...
User Guide
Page 32
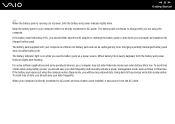
.... To avoid loss of data when using the computer. Charging a partially discharged battery pack does not affect battery life. The battery indicator light is nearly depleted, both the battery and power indicator lights blink. When battery life is on while you use the battery pack as Sleep or Hibernate. Going back to AC power and has...
.... To avoid loss of data when using the computer. Charging a partially discharged battery pack does not affect battery life. The battery indicator light is nearly depleted, both the battery and power indicator lights blink. When battery life is on while you use the battery pack as Sleep or Hibernate. Going back to AC power and has...
User Guide
Page 33
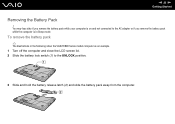
You may lose data if you remove the battery pack while your computer is on and not connected to the UNLOCK position. 3 Slide and hold the battery release latch (2) and slide the battery pack away from the computer. To remove the battery pack ✍ The illustrations in the following show the VGN-FE800 Series model computer as an example. 1 Turn off the computer and close the LCD screen lid. 2 Slide the battery lock switch (1) to the AC adapter or if you remove the battery pack while the computer is in Sleep mode. n 33 N Getting Started Removing the Battery Pack !
You may lose data if you remove the battery pack while your computer is on and not connected to the UNLOCK position. 3 Slide and hold the battery release latch (2) and slide the battery pack away from the computer. To remove the battery pack ✍ The illustrations in the following show the VGN-FE800 Series model computer as an example. 1 Turn off the computer and close the LCD screen lid. 2 Slide the battery lock switch (1) to the AC adapter or if you remove the battery pack while the computer is in Sleep mode. n 33 N Getting Started Removing the Battery Pack !

User Guide
Page 46
Do not use circular discs. Fingerprints and dust on writing data to a disc ❑ Use only Sony Value-added software when writing to CD/DVD media. (e.g. Use of different CD burning software for additional data burning may cause a failure. This may cause ... the instructions included with the Roxio Easy Media Creator software, use the same CD burning software to add data to a used disc. n 46 N Using Your VAIO Computer Notes on the surface of a disc may cause writing errors. ❑ Do not switch power modes while using the preinstalled software and while using...
Do not use circular discs. Fingerprints and dust on writing data to a disc ❑ Use only Sony Value-added software when writing to CD/DVD media. (e.g. Use of different CD burning software for additional data burning may cause a failure. This may cause ... the instructions included with the Roxio Easy Media Creator software, use the same CD burning software to add data to a used disc. n 46 N Using Your VAIO Computer Notes on the surface of a disc may cause writing errors. ❑ Do not switch power modes while using the preinstalled software and while using...
User Guide
Page 64
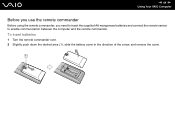
To insert batteries 1 Turn the remote commander over. 2 Slightly push down the dented area (1), slide the battery cover in the direction of the arrow, and remove the cover. n 64 N Using Your VAIO Computer Before you use the remote commander Before using the remote commander, you need to insert the supplied AA manganese batteries and connect the remote sensor to enable communication between the computer and the remote commander.
To insert batteries 1 Turn the remote commander over. 2 Slightly push down the dented area (1), slide the battery cover in the direction of the arrow, and remove the cover. n 64 N Using Your VAIO Computer Before you use the remote commander Before using the remote commander, you need to insert the supplied AA manganese batteries and connect the remote sensor to enable communication between the computer and the remote commander.
User Guide
Page 65
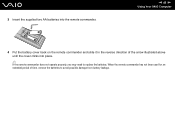
n 65 N Using Your VAIO Computer 4 Put the battery cover back on the remote commander and slide it in the reverse direction of time, remove the batteries to replace the batteries. 3 Insert the supplied two AA batteries into place. ✍ If the remote commander does not operate properly, you may need to avoid possible damage from battery leakage. When the remote commander has not been used for an extended period of the arrow illustrated above until the cover clicks into the remote commander.
n 65 N Using Your VAIO Computer 4 Put the battery cover back on the remote commander and slide it in the reverse direction of time, remove the batteries to replace the batteries. 3 Insert the supplied two AA batteries into place. ✍ If the remote commander does not operate properly, you may need to avoid possible damage from battery leakage. When the remote commander has not been used for an extended period of the arrow illustrated above until the cover clicks into the remote commander.
User Guide
Page 105
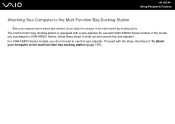
... the steps described in To attach your computer has no battery pack installed, do not need to the multi function bay docking station. For VGN-FE800 Series models, you purchased is equipped with VGN-AR300 Series models. The multi function bay docking station is VGN-AR300 Series, follow these steps to the Multi Function...
... the steps described in To attach your computer has no battery pack installed, do not need to the multi function bay docking station. For VGN-FE800 Series models, you purchased is equipped with VGN-AR300 Series models. The multi function bay docking station is VGN-AR300 Series, follow these steps to the Multi Function...

User Guide
Page 110
..., disconnecting your computer from the multi function bay docking station may cause unstable operations. Do not disconnect your computer. Use of the computer. When the battery pack is lit may result in loss of unsaved data or a failure of the computer still on the docking station may result in loss of...
..., disconnecting your computer from the multi function bay docking station may cause unstable operations. Do not disconnect your computer. Use of the computer. When the battery pack is lit may result in loss of unsaved data or a failure of the computer still on the docking station may result in loss of...
User Guide
Page 142
...turn off a specific device such as the power source for your computer, you can turn off specific devices, your computer and install a fully charged battery pack. To save power while not working, you can take advantage of the power management setting you select. ! The green power indicator light is... in this mode. n 142 N Customizing Your VAIO Computer Using the Power Saving Modes When you use . In addition to the normal operating mode, which allows you to conserve...
...turn off a specific device such as the power source for your computer, you can turn off specific devices, your computer and install a fully charged battery pack. To save power while not working, you can take advantage of the power management setting you select. ! The green power indicator light is... in this mode. n 142 N Customizing Your VAIO Computer Using the Power Saving Modes When you use . In addition to the normal operating mode, which allows you to conserve...


