User Guide
Page 8
... and the various RAID levels (or types) that can be configured with your computer's RAID array, or to configure the hard disk drives, change your VAIO computer. To access this on -screen guide: 1 Click Start and Help and Support. 2 Click Manuals & Specifications. 3 Click MCE Guide. To access this on -screen guide.... ❑ MCE Guide (Selected models only) - Provides information about using the RAID Recovery program to remove the RAID configuration. It lists detailed procedures for using Windows Media Center. n8 N Before Use ❑ RAID Guide (Selected models only) -
... and the various RAID levels (or types) that can be configured with your computer's RAID array, or to configure the hard disk drives, change your VAIO computer. To access this on -screen guide: 1 Click Start and Help and Support. 2 Click Manuals & Specifications. 3 Click MCE Guide. To access this on -screen guide.... ❑ MCE Guide (Selected models only) - Provides information about using the RAID Recovery program to remove the RAID configuration. It lists detailed procedures for using Windows Media Center. n8 N Before Use ❑ RAID Guide (Selected models only) -
User Guide
Page 36
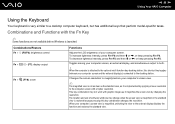
..., press Fn+F6 and then M or ,, or keep pressing Fn+F6. Combinations and Functions with the Fn Key ✍ Some functions are not available before Windows is very similar to a desktop computer keyboard, but has additional keys that perform model-specific tasks. n 36 N Using Your...
..., press Fn+F6 and then M or ,, or keep pressing Fn+F6. Combinations and Functions with the Fn Key ✍ Some functions are not available before Windows is very similar to a desktop computer keyboard, but has additional keys that perform model-specific tasks. n 36 N Using Your...

User Guide
Page 39
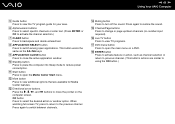
VGN-FE800 Series Models Special-function button S1/S2 buttons Muting button VOL buttons (Volume down . Turns the volume on the window for changing the S button assignments. Starts or pauses media playback. n 39 N Using Your VAIO Computer Using Special-function Buttons Your computer is equipped with special buttons to help ... and Volume up) Functions By default, the S1 button maximizes lightness intensity of the computer. Starts TV recording. To display this window, press and hold either button or launch and navigate through VAIO Central. To resume playback or recording, press again.
VGN-FE800 Series Models Special-function button S1/S2 buttons Muting button VOL buttons (Volume down . Turns the volume on the window for changing the S button assignments. Starts or pauses media playback. n 39 N Using Your VAIO Computer Using Special-function Buttons Your computer is equipped with special buttons to help ... and Volume up) Functions By default, the S1 button maximizes lightness intensity of the computer. Starts TV recording. To display this window, press and hold either button or launch and navigate through VAIO Central. To resume playback or recording, press again.

User Guide
Page 40
... to change these button assignments on and off status of the SonicStage Mastering Studio software. Turns the volume on the window for more information. n 40 N Using Your VAIO Computer Functions Plays the previous chapter/movie in the DVD or the previous song in the CD. You can change ...this utility, press and hold either button or launch and navigate through VAIO Central. Ejects the optical disc drive tray. Launches AV Mode Launcher. If this window, press and hold the AV MODE button. By default, the S1 button displays the Logo Lamp Control...
... to change these button assignments on and off status of the SonicStage Mastering Studio software. Turns the volume on the window for more information. n 40 N Using Your VAIO Computer Functions Plays the previous chapter/movie in the DVD or the previous song in the CD. You can change ...this utility, press and hold either button or launch and navigate through VAIO Central. Ejects the optical disc drive tray. Launches AV Mode Launcher. If this window, press and hold the AV MODE button. By default, the S1 button displays the Logo Lamp Control...
User Guide
Page 41
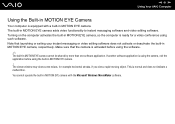
... or deactivate the built-in MOTION EYE camera, respectively. Note that the camera is activated before using the built-in MOTION EYE camera. ! The viewer window may show some noises, for a video conference using the software. ✍ The built-in MOTION EYE camera cannot be shared by more than one software... application before using such software. The built-in MOTION EYE camera adds video functionality to instant messaging software and video editing software. n 41 N Using Your VAIO Computer Using the Built-in MOTION EYE Camera Your computer is equipped with the Microsoft...
... or deactivate the built-in MOTION EYE camera, respectively. Note that the camera is activated before using the built-in MOTION EYE camera. ! The viewer window may show some noises, for a video conference using the software. ✍ The built-in MOTION EYE camera cannot be shared by more than one software... application before using such software. The built-in MOTION EYE camera adds video functionality to instant messaging software and video editing software. n 41 N Using Your VAIO Computer Using the Built-in MOTION EYE Camera Your computer is equipped with the Microsoft...
User Guide
Page 49
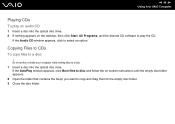
Copying Files to CDs To copy files to select an option. n 49 N Using Your VAIO Computer Playing CDs To play the CD. If the Audio CD window appears, click to a disc ! Do not strike or shake your computer while writing data to a disc. 1 Insert a disc into the optical disc drive. 2 If nothing ... contains the file(s) you want to copy and drag them to play an audio CD 1 Insert a disc into the optical disc drive. If the AutoPlay window appears, click Burn files to disc and follow the on the desktop, then click Start, All Programs, and the desired CD software to the empty...
Copying Files to CDs To copy files to select an option. n 49 N Using Your VAIO Computer Playing CDs To play the CD. If the Audio CD window appears, click to a disc ! Do not strike or shake your computer while writing data to a disc. 1 Insert a disc into the optical disc drive. 2 If nothing ... contains the file(s) you want to copy and drag them to play an audio CD 1 Insert a disc into the optical disc drive. If the AutoPlay window appears, click Burn files to disc and follow the on the desktop, then click Start, All Programs, and the desired CD software to the empty...
User Guide
Page 51
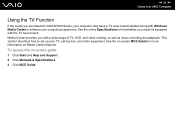
...-screen MCE Guide for more information on -screen guide 1 Click Start and Help and Support. 2 Click Manuals & Specifications. 3 Click MCE Guide. n 51 N Using Your VAIO Computer Using the TV Function If the model you with a wide range of TV, DVD, and video viewing, as well as music recording and playback.... To access this on Media Center features. See the online Specifications to find whether your model is VGN-AR300 Series, your computer may have a TV tuner board installed along with Windows Media Center to set -top box, and other equipment.
...-screen MCE Guide for more information on -screen guide 1 Click Start and Help and Support. 2 Click Manuals & Specifications. 3 Click MCE Guide. n 51 N Using Your VAIO Computer Using the TV Function If the model you with a wide range of TV, DVD, and video viewing, as well as music recording and playback.... To access this on Media Center features. See the online Specifications to find whether your model is VGN-AR300 Series, your computer may have a TV tuner board installed along with Windows Media Center to set -top box, and other equipment.
User Guide
Page 62
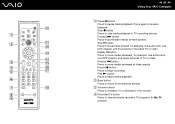
...button Press to increase (+) or decrease (-) the volume. C Volume buttons Press to begin recording. Skip B? D Recorded TV button Press to the previous window. button Press to move media forward, for example, one audio track, one DVD chapter, and 30 seconds of TV or video. B Back button Press ...to return to view previously recorded TV programs (In My TV window). Stop x button Press to pause media playback. Replay ?b button Press to move media backward, for example, one audio track, one DVD chapter...
...button Press to increase (+) or decrease (-) the volume. C Volume buttons Press to begin recording. Skip B? D Recorded TV button Press to the previous window. button Press to move media forward, for example, one audio track, one DVD chapter, and 30 seconds of TV or video. B Back button Press ...to return to view previously recorded TV programs (In My TV window). Stop x button Press to pause media playback. Replay ?b button Press to move media backward, for example, one audio track, one DVD chapter...
User Guide
Page 63
... as the Alt+Tab keys. M Directional arrow buttons Press the M, m, J Standby button Press to place the computer into Sleep mode to close the active application window. H APPLICATION SELECT button Press to switch among open the Media Center Start menu. I APPLICATION CLOSE button Press to reduce power consumption. K Start button Press to.... (Press ENTER or OK to activate the channel selection.) G CLEAR button Press to view additional options that are available for your area. n 63 N Using Your VAIO Computer E Guide button Press to open applications.
... as the Alt+Tab keys. M Directional arrow buttons Press the M, m, J Standby button Press to place the computer into Sleep mode to close the active application window. H APPLICATION SELECT button Press to switch among open the Media Center Start menu. I APPLICATION CLOSE button Press to reduce power consumption. K Start button Press to.... (Press ENTER or OK to activate the channel selection.) G CLEAR button Press to view additional options that are available for your area. n 63 N Using Your VAIO Computer E Guide button Press to open applications.

User Guide
Page 70
...remove a PC Card when your computer is off, skip steps 1 to remove the PC Card while your system may not work properly. n 70 N Using Your VAIO Computer Removing a PC Card Follow the steps below to 7. 1 Double-click the Safely Remove Hardware icon on . A message appears stating it is on the ...it is not removed properly, your computer is now safe to remove the hardware device. 6 Click OK. 7 Click Close to close the Safely Remove Hardware window. 8 Push the PC Card release button so that the release button pops out. 9 Push the PC Card release button a second time so that the device...
...remove a PC Card when your computer is off, skip steps 1 to remove the PC Card while your system may not work properly. n 70 N Using Your VAIO Computer Removing a PC Card Follow the steps below to 7. 1 Double-click the Safely Remove Hardware icon on . A message appears stating it is on the ...it is not removed properly, your computer is now safe to remove the hardware device. 6 Click OK. 7 Click Close to close the Safely Remove Hardware window. 8 Push the PC Card release button so that the release button pops out. 9 Push the PC Card release button a second time so that the device...
User Guide
Page 74
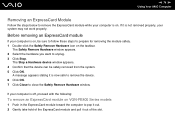
...on the taskbar. The Stop a Hardware device window appears. 4 Confirm that the device can be sure to follow these steps to prepare for removing the module safely. 1 Double-click the Safely Remove Hardware icon on . n 74 N Using Your VAIO Computer Removing an ExpressCard Module Follow the steps ...device. 6 Click OK. 7 Click Close to unplug. 3 Click Stop. The Safely Remove Hardware window appears. 2 Select the hardware you want to close the Safely Remove Hardware window. If your computer is on VGN-FE800 Series models 1 Push in the ExpressCard module toward the computer to pop it out. 2 ...
...on the taskbar. The Stop a Hardware device window appears. 4 Confirm that the device can be sure to follow these steps to prepare for removing the module safely. 1 Double-click the Safely Remove Hardware icon on . n 74 N Using Your VAIO Computer Removing an ExpressCard Module Follow the steps ...device. 6 Click OK. 7 Click Close to unplug. 3 Click Stop. The Safely Remove Hardware window appears. 2 Select the hardware you want to close the Safely Remove Hardware window. If your computer is on VGN-FE800 Series models 1 Push in the ExpressCard module toward the computer to pop it out. 2 ...
User Guide
Page 78
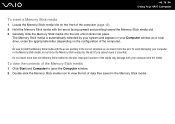
... toward the Memory Stick media slot. 3 Carefully slide the Memory Stick media into the slot until it clicks into the slot. n 78 N Using Your VAIO Computer To insert a Memory Stick media 1 Locate the Memory Stick media slot on the configuration of the computer). ! To avoid damaging your computer and the... automatically detected by your system and appears in the Memory Stick media. Be sure to view the list of data files saved in your Computer window as a local drive, under the appropriate letter (depending on the front of the computer (page 12). 2 Hold the Memory Stick media with the arrow...
... toward the Memory Stick media slot. 3 Carefully slide the Memory Stick media into the slot until it clicks into the slot. n 78 N Using Your VAIO Computer To insert a Memory Stick media 1 Locate the Memory Stick media slot on the configuration of the computer). ! To avoid damaging your computer and the... automatically detected by your system and appears in the Memory Stick media. Be sure to view the list of data files saved in your Computer window as a local drive, under the appropriate letter (depending on the front of the computer (page 12). 2 Hold the Memory Stick media with the arrow...

User Guide
Page 79
... media erases the entire data on the media. If you select Quick Format in the factory default setting and is designed to open the Computer window. 3 Right-click the Memory Stick media icon and select Format. 4 Click Restore device defaults. ! Do not remove the Memory Stick media from the File system... and supports the Memory Stick media when formatting the media. Avoid accidental erasure of the allocation unit and file system may change. n 79 N Using Your VAIO Computer To format a Memory Stick media The Memory Stick media has been formatted in Format options. 5 Click Start.
... media erases the entire data on the media. If you select Quick Format in the factory default setting and is designed to open the Computer window. 3 Right-click the Memory Stick media icon and select Format. 4 Click Restore device defaults. ! Do not remove the Memory Stick media from the File system... and supports the Memory Stick media when formatting the media. Avoid accidental erasure of the allocation unit and file system may change. n 79 N Using Your VAIO Computer To format a Memory Stick media The Memory Stick media has been formatted in Format options. 5 Click Start.
User Guide
Page 87
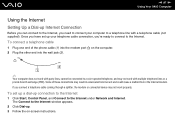
... up . 3 Follow the on the computer. 2 Plug the other end into the modem port on -screen instructions. n 87 N Using Your VAIO Computer Using the Internet Setting Up a Dial-up Internet Connection Before you can connect to the Internet, you need to connect your telephone cable connection,...these connections may result in excess electrical current and could cause a malfunction in the internal modem. If you 're ready to connect to the Internet window appears. 2 Click Dial-up your computer to the Internet under Network and Internet. Once you have set up a dial-up connection to the Internet...
... up . 3 Follow the on the computer. 2 Plug the other end into the modem port on -screen instructions. n 87 N Using Your VAIO Computer Using the Internet Setting Up a Dial-up Internet Connection Before you can connect to the Internet, you need to connect your telephone cable connection,...these connections may result in excess electrical current and could cause a malfunction in the internal modem. If you 're ready to connect to the Internet window appears. 2 Click Dial-up your computer to the Internet under Network and Internet. Once you have set up a dial-up connection to the Internet...
User Guide
Page 91
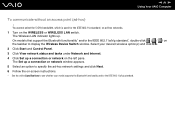
...model supports the Bluetooth functionality and/or the IEEE 802.11a/b/g standard. The Set up a connection or network window appears. 5 Select an option to display the Wireless Device Switch window. The Wireless LAN indicator lights up a connection or network on the taskbar to specify the ad-hoc network... settings and click Next. 6 Follow the on the WIRELESS or WIRELESS LAN switch. n 91 N Using Your VAIO Computer To communicate without an access point (ad-hoc) ! You cannot select the 5 GHz bandwidth, which is used for the IEEE 802.11a standard, on ad-hoc networks. 1 Turn on -screen ...
...model supports the Bluetooth functionality and/or the IEEE 802.11a/b/g standard. The Set up a connection or network window appears. 5 Select an option to display the Wireless Device Switch window. The Wireless LAN indicator lights up a connection or network on the taskbar to specify the ad-hoc network... settings and click Next. 6 Follow the on the WIRELESS or WIRELESS LAN switch. n 91 N Using Your VAIO Computer To communicate without an access point (ad-hoc) ! You cannot select the 5 GHz bandwidth, which is used for the IEEE 802.11a standard, on ad-hoc networks. 1 Turn on -screen ...

User Guide
Page 93
The Wireless LAN indicator lights up . n 93 N Using Your VAIO Computer To connect to a wireless network 1 Make sure an access point is set up . Select your desired wireless option(s) and click OK. 3 Click Start and ... the taskbar to see whether your access point for more information. 2 Turn on -screen instructions. * See the online Specifications to display the Wireless Device Switch window. On models that came with your model supports the Bluetooth functionality and/or the IEEE 802.11a/b/g standard.
The Wireless LAN indicator lights up . n 93 N Using Your VAIO Computer To connect to a wireless network 1 Make sure an access point is set up . Select your desired wireless option(s) and click OK. 3 Click Start and ... the taskbar to see whether your access point for more information. 2 Turn on -screen instructions. * See the online Specifications to display the Wireless Device Switch window. On models that came with your model supports the Bluetooth functionality and/or the IEEE 802.11a/b/g standard.
User Guide
Page 94
... without cables and up to 33 feet (10 meters) range in open space. n 94 N Using Your VAIO Computer Using the Bluetooth Functionality The Bluetooth functionality is available on the taskbar to display the Wireless Device Switch window. 3 Select the Enable Bluetooth Device option. 4 Click OK. You can transfer data between your model...
... without cables and up to 33 feet (10 meters) range in open space. n 94 N Using Your VAIO Computer Using the Bluetooth Functionality The Bluetooth functionality is available on the taskbar to display the Wireless Device Switch window. 3 Select the Enable Bluetooth Device option. 4 Click OK. You can transfer data between your model...
User Guide
Page 100
... video conference over the Internet using the Bluetooth headset, see the manual that came with your Bluetooth headset. The Add New Connection Wizard window appears. 5 Select Express Mode (Recommended) and then click Next. The wizard searches for Bluetooth devices in red and green. 3 Right...for Bluetooth Passkey (PIN) and then click OK. 8 Click Next. n 100 N Using Your VAIO Computer Using the Bluetooth Headset The Bluetooth headset (not supplied) will come in the Bluetooth Settings window. 9 Right-click the icon and select Connect from the menu. For details on using instant messaging ...
... video conference over the Internet using the Bluetooth headset, see the manual that came with your Bluetooth headset. The Add New Connection Wizard window appears. 5 Select Express Mode (Recommended) and then click Next. The wizard searches for Bluetooth devices in red and green. 3 Right...for Bluetooth Passkey (PIN) and then click OK. 8 Click Next. n 100 N Using Your VAIO Computer Using the Bluetooth Headset The Bluetooth headset (not supplied) will come in the Bluetooth Settings window. 9 Right-click the icon and select Connect from the menu. For details on using instant messaging ...

User Guide
Page 101
The Bluetooth Settings window appears. 2 Right-click the headset icon and select Disconnect from the menu. n 101 N Using Your VAIO Computer To disconnect the headset from your computer 1 Right-click the Bluetooth icon on the taskbar and select Bluetooth Settings from the menu. 3 Click Yes.
The Bluetooth Settings window appears. 2 Right-click the headset icon and select Disconnect from the menu. n 101 N Using Your VAIO Computer To disconnect the headset from your computer 1 Right-click the Bluetooth icon on the taskbar and select Bluetooth Settings from the menu. 3 Click Yes.

User Guide
Page 141
The setting of the desired item has been changed. ✍ Some of the control items will not be visible if you to consult system information and specify preferences for system behavior. To use VAIO Central 1 Click Start, All Programs, and VAIO Central. The VAIO Central window appears. 2 Click the System Information tab. 3 Select the desired control item and change the settings. 4 Once finished, click OK. n 141 N Customizing Your VAIO Computer Setting Up Your Computer with VAIO Central The VAIO Central utility allows you open VAIO Central as a standard user.
The setting of the desired item has been changed. ✍ Some of the control items will not be visible if you to consult system information and specify preferences for system behavior. To use VAIO Central 1 Click Start, All Programs, and VAIO Central. The VAIO Central window appears. 2 Click the System Information tab. 3 Select the desired control item and change the settings. 4 Once finished, click OK. n 141 N Customizing Your VAIO Computer Setting Up Your Computer with VAIO Central The VAIO Central utility allows you open VAIO Central as a standard user.


