
User Guide
Page 2
... and Ports...11 About the Indicator Lights ...17 Connecting a Power Source ...18 Using the Battery Pack ...20 Shutting Down Your Computer Safely ...26 Using Your VAIO Computer ...27 Using the Keyboard ...28 Using the Pointing Device ...30 Using Special-function Buttons ...33 Using the Built-in MOTION EYE Camera...34 Using...
... and Ports...11 About the Indicator Lights ...17 Connecting a Power Source ...18 Using the Battery Pack ...20 Shutting Down Your Computer Safely ...26 Using Your VAIO Computer ...27 Using the Keyboard ...28 Using the Pointing Device ...30 Using Special-function Buttons ...33 Using the Built-in MOTION EYE Camera...34 Using...

User Guide
Page 3
... External Microphone ...130 Connecting a Universal Serial Bus (USB) Device...131 Connecting a Printer ...134 Connecting an i.LINK Device ...136 Connecting to a Network (LAN) ...138 Customizing Your VAIO Computer ...140 Setting the Password ...141 Setting Up Your Computer with VAIO Central ...144 Using the Power Saving Modes ...145 Managing Power with...
... External Microphone ...130 Connecting a Universal Serial Bus (USB) Device...131 Connecting a Printer ...134 Connecting an i.LINK Device ...136 Connecting to a Network (LAN) ...138 Customizing Your VAIO Computer ...140 Setting the Password ...141 Setting Up Your Computer with VAIO Central ...144 Using the Power Saving Modes ...145 Managing Power with...

User Guide
Page 6
Contains an overview of -the-art personal computing. Contains safety guidelines and owner information. Printed Documentation ❑ Welcome mat - Documentation Your documentation includes printed information and user guides to read on your purchase of this Sony VAIO® computer, and welcome to provide state-of connections, setting up information, etc. ❑ Safety information - Sony has combined leading-edge technology in audio, video, computing, and communications to the on your VAIO computer. n6 N Before Use Before Use Congratulations on -screen User Guide.
Contains an overview of -the-art personal computing. Contains safety guidelines and owner information. Printed Documentation ❑ Welcome mat - Documentation Your documentation includes printed information and user guides to read on your purchase of this Sony VAIO® computer, and welcome to provide state-of connections, setting up information, etc. ❑ Safety information - Sony has combined leading-edge technology in audio, video, computing, and communications to the on your VAIO computer. n6 N Before Use Before Use Congratulations on -screen User Guide.

User Guide
Page 7
... Start, point to All Programs, and click VAIO Support Central. 2 Click VAIO Documentation. 3 Click VAIO Recovery Guide. ❑ MCE guide - Provides information about restoring individual software programs, software drivers, and drive partition(s) or your computer. To access this online MCE guide: 1 Click Start, point to the Sony online support Web site at http://www...
... Start, point to All Programs, and click VAIO Support Central. 2 Click VAIO Documentation. 3 Click VAIO Recovery Guide. ❑ MCE guide - Provides information about restoring individual software programs, software drivers, and drive partition(s) or your computer. To access this online MCE guide: 1 Click Start, point to the Sony online support Web site at http://www...

User Guide
Page 10
Getting Started This section describes how to get started with using your VAIO computer. ❑ Locating Controls and Ports (page 11) ❑ About the Indicator Lights (page 17) ❑ Connecting a Power Source (page 18) ❑ Using the Battery Pack (page 20) ❑ Shutting Down Your Computer Safely (page 26) n 10 N Getting Started
Getting Started This section describes how to get started with using your VAIO computer. ❑ Locating Controls and Ports (page 11) ❑ About the Indicator Lights (page 17) ❑ Connecting a Power Source (page 18) ❑ Using the Battery Pack (page 20) ❑ Shutting Down Your Computer Safely (page 26) n 10 N Getting Started

User Guide
Page 27
Using Your VAIO Computer This section describes how to get the most out of using your computer. ❑ Using the Keyboard (page 28) ❑ Using the Pointing Device (... (page 65) ❑ Using Wireless LAN (WLAN) (page 67) ❑ Using the Bluetooth Functionality (page 76) ❑ Using Fingerprint Authentication (page 83) n 27 N Using Your VAIO Computer
Using Your VAIO Computer This section describes how to get the most out of using your computer. ❑ Using the Keyboard (page 28) ❑ Using the Pointing Device (... (page 65) ❑ Using Wireless LAN (WLAN) (page 67) ❑ Using the Bluetooth Functionality (page 76) ❑ Using Fingerprint Authentication (page 83) n 27 N Using Your VAIO Computer
User Guide
Page 28
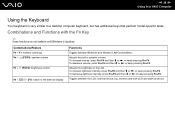
Adjusts the built-in speaker volume. To decrease volume, press Fn+F3 and then m or n 28 N Using Your VAIO Computer Using the Keyboard Your keyboard is launched. Combinations and Functions with the Fn Key ✍ Some functions are not available until Windows is very ...
Adjusts the built-in speaker volume. To decrease volume, press Fn+F3 and then m or n 28 N Using Your VAIO Computer Using the Keyboard Your keyboard is launched. Combinations and Functions with the Fn Key ✍ Some functions are not available until Windows is very ...
User Guide
Page 29
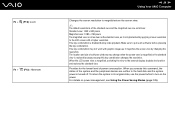
... to the LCD screen with a higher resolution. When you execute this key combination changes the resolution. Fn + (F10): zoom Fn + (F12): Hibernate n 29 N Using Your VAIO Computer Changes the screen resolution to magnify/restore the screen view. ✍ The default resolutions of the standard view and the magnified view are written...
... to the LCD screen with a higher resolution. When you execute this key combination changes the resolution. Fn + (F10): zoom Fn + (F12): Hibernate n 29 N Using Your VAIO Computer Changes the screen resolution to magnify/restore the screen view. ✍ The default resolutions of the standard view and the magnified view are written...
User Guide
Page 30
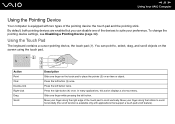
.... Move your finger along the bottom to scroll horizontally (the scroll function is equipped with applications that support a touch pad scroll feature). n 30 N Using Your VAIO Computer Using the Pointing Device Your computer is available only with two types of the touch pad to suite your preference. Using the Touch Pad...
.... Move your finger along the bottom to scroll horizontally (the scroll function is equipped with applications that support a touch pad scroll feature). n 30 N Using Your VAIO Computer Using the Pointing Device Your computer is available only with two types of the touch pad to suite your preference. Using the Touch Pad...
User Guide
Page 31
... down or sideways while pressing the center button (4). (The scroll function is available only with the buttons located below the space bar. n 31 N Using Your VAIO Computer Using the Pointing Stick The keyboard contains a cursor-pointing device, the pointing stick (1). In many applications, this action displays a shortcut menu. Action Description Point...
... down or sideways while pressing the center button (4). (The scroll function is available only with the buttons located below the space bar. n 31 N Using Your VAIO Computer Using the Pointing Stick The keyboard contains a cursor-pointing device, the pointing stick (1). In many applications, this action displays a shortcut menu. Action Description Point...
User Guide
Page 32
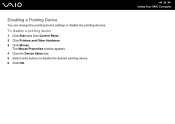
The Mouse Properties window appears. 4 Click the Device Select tab. 5 Select radio buttons to disable the pointing devices. n 32 N Using Your VAIO Computer Disabling a Pointing Device You can change the pointing device settings to disable the desired pointing device. 6 Click OK. To disable a pointing device 1 Click Start and then Control Panel. 2 Click Printers and Other Hardware. 3 Click Mouse.
The Mouse Properties window appears. 4 Click the Device Select tab. 5 Select radio buttons to disable the pointing devices. n 32 N Using Your VAIO Computer Disabling a Pointing Device You can change the pointing device settings to disable the desired pointing device. 6 Click OK. To disable a pointing device 1 Click Start and then Control Panel. 2 Click Printers and Other Hardware. 3 Click Mouse.
User Guide
Page 33
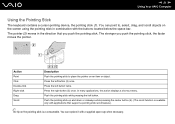
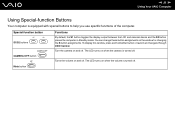
n 33 N Using Your VAIO Computer Using Special-function Buttons Your computer is turned off. Turn the camera on and off . The LED turns on and off . Turns the volume ... device and the S2 button places the computer in Standby mode. To display this window, press and hold either button or launch and navigate through VAIO Central.
n 33 N Using Your VAIO Computer Using Special-function Buttons Your computer is turned off. Turn the camera on and off . The LED turns on and off . Turns the volume ... device and the S2 button places the computer in Standby mode. To display this window, press and hold either button or launch and navigate through VAIO Central.
User Guide
Page 34
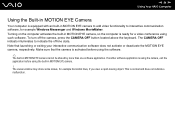
... not indicate a malfunction. The CAMERA OFF indicator illuminates to interactive communication software, for example horizontal lines, if you view a rapid-moving object. n 34 N Using Your VAIO Computer Using the Built-in MOTION EYE Camera Your computer is equipped with an built-in MOTION EYE camera cannot be shared by more than...
... not indicate a malfunction. The CAMERA OFF indicator illuminates to interactive communication software, for example horizontal lines, if you view a rapid-moving object. n 34 N Using Your VAIO Computer Using the Built-in MOTION EYE Camera Your computer is equipped with an built-in MOTION EYE camera cannot be shared by more than...

User Guide
Page 35
... contains the TV tuner bay unit at the time of delivery. You can purchase a bay unit and install it in the computer. n 35 N Using Your VAIO Computer Using the Multi Function Bay Your computer is equipped with a component bay, called multi function bay, for installing your PATA hard disk drive) ❑...
... contains the TV tuner bay unit at the time of delivery. You can purchase a bay unit and install it in the computer. n 35 N Using Your VAIO Computer Using the Multi Function Bay Your computer is equipped with a component bay, called multi function bay, for installing your PATA hard disk drive) ❑...
User Guide
Page 36
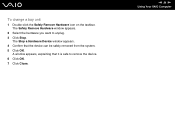
The Safely Remove Hardware window appears. 2 Select the hardware you want to remove the device. 6 Click OK. 7 Click Close. n 36 N Using Your VAIO Computer A window appears, explaining that the device can be safely removed from the system. 5 Click OK. The Stop a Hardware Device window appears. 4 Confirm that it is safe to unplug. 3 Click Stop. To change a bay unit 1 Double-click the Safely Remove Hardware icon on the taskbar.
The Safely Remove Hardware window appears. 2 Select the hardware you want to remove the device. 6 Click OK. 7 Click Close. n 36 N Using Your VAIO Computer A window appears, explaining that the device can be safely removed from the system. 5 Click OK. The Stop a Hardware Device window appears. 4 Confirm that it is safe to unplug. 3 Click Stop. To change a bay unit 1 Double-click the Safely Remove Hardware icon on the taskbar.
User Guide
Page 37
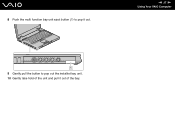
8 Push the multi function bay unit eject button (1) to pop out the installed bay unit. 10 Gently take hold of the unit and pull it out. n 37 N Using Your VAIO Computer 9 Gently pull the button to pop it out of the bay.
8 Push the multi function bay unit eject button (1) to pop out the installed bay unit. 10 Gently take hold of the unit and pull it out. n 37 N Using Your VAIO Computer 9 Gently pull the button to pop it out of the bay.

User Guide
Page 38
11 Insert another bay unit with the label facing up into the bay until it clicks into place. n 38 N Using Your VAIO Computer
11 Insert another bay unit with the label facing up into the bay until it clicks into place. n 38 N Using Your VAIO Computer
User Guide
Page 39
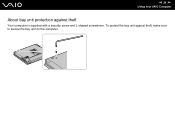
To protect the bay unit against theft Your computer is supplied with a security screw and L-shaped screwdriver. n 39 N Using Your VAIO Computer About bay unit protection against theft, make sure to secure the bay unit on the computer.
To protect the bay unit against theft Your computer is supplied with a security screw and L-shaped screwdriver. n 39 N Using Your VAIO Computer About bay unit protection against theft, make sure to secure the bay unit on the computer.

User Guide
Page 40
... about Media Center. See MCE guide for connecting the supplied coaxial cable feed connector. Locating Ports on your computer to All Programs, and click VAIO Support Central. 2 Click VAIO Documentation. 3 Click MCE 2005 User Guide. To access this online MCE guide 1 Click Start, point to enhance your computing experience. n 40 N Using Your...
... about Media Center. See MCE guide for connecting the supplied coaxial cable feed connector. Locating Ports on your computer to All Programs, and click VAIO Support Central. 2 Click VAIO Documentation. 3 Click MCE 2005 User Guide. To access this online MCE guide 1 Click Start, point to enhance your computing experience. n 40 N Using Your...
User Guide
Page 41
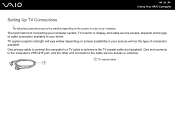
... as well as the type of your home. TV signal reception strength will vary widely depending on service availability in your residency. n 41 N Using Your VAIO Computer Setting Up TV Connections ! A TV coaxial cable The best method of connecting your computer system, TV monitor or display, and cable service access, depends...
... as well as the type of your home. TV signal reception strength will vary widely depending on service availability in your residency. n 41 N Using Your VAIO Computer Setting Up TV Connections ! A TV coaxial cable The best method of connecting your computer system, TV monitor or display, and cable service access, depends...


