
User Guide
Page 2
... Considerations ...8 Getting Started ...10 Locating Controls and Ports...11 About the Indicator Lights ...17 Connecting a Power Source ...18 Using the Battery Pack ...20 Shutting Down Your Computer Safely ...26 Using Your VAIO Computer ...27 Using the Keyboard ...28 Using the Pointing Device ...30 Using Special-function Buttons ...33 Using the Built-in...
... Considerations ...8 Getting Started ...10 Locating Controls and Ports...11 About the Indicator Lights ...17 Connecting a Power Source ...18 Using the Battery Pack ...20 Shutting Down Your Computer Safely ...26 Using Your VAIO Computer ...27 Using the Keyboard ...28 Using the Pointing Device ...30 Using Special-function Buttons ...33 Using the Built-in...
User Guide
Page 4
...Computer...162 On Using the Built-in MOTION EYE Camera...164 On Handling Floppy Disks ...164 On Handling Discs ...165 On Using the Battery Pack...166 On Using Headphones...167 On Handling Memory Stick Media...167 On Handling the Hard Disk ...168 Troubleshooting ...169 Computer ...171... System Security ...181 Battery...184 Built-in MOTION EYE Camera...186 Internet ...189 Networking ...191 Bluetooth Technology ...194 CDs and DVDs...199 Display ...203 Printing ...206...
...Computer...162 On Using the Built-in MOTION EYE Camera...164 On Handling Floppy Disks ...164 On Handling Discs ...165 On Using the Battery Pack...166 On Using Headphones...167 On Handling Memory Stick Media...167 On Handling the Hard Disk ...168 Troubleshooting ...169 Computer ...171... System Security ...181 Battery...184 Built-in MOTION EYE Camera...186 Internet ...189 Networking ...191 Bluetooth Technology ...194 CDs and DVDs...199 Display ...203 Printing ...206...

User Guide
Page 10
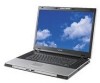
Getting Started This section describes how to get started with using your VAIO computer. ❑ Locating Controls and Ports (page 11) ❑ About the Indicator Lights (page 17) ❑ Connecting a Power Source (page 18) ❑ Using the Battery Pack (page 20) ❑ Shutting Down Your Computer Safely (page 26) n 10 N Getting Started
Getting Started This section describes how to get started with using your VAIO computer. ❑ Locating Controls and Ports (page 11) ❑ About the Indicator Lights (page 17) ❑ Connecting a Power Source (page 18) ❑ Using the Battery Pack (page 20) ❑ Shutting Down Your Computer Safely (page 26) n 10 N Getting Started
User Guide
Page 11
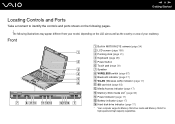
... (Wireless LAN) indicator (page 17) K SD card slot (page 63) L Media Access indicator (page 17) M Memory Stick media slot* (page 60) N Power indicator (page 17) O Battery indicator (page 17) P Hard disk drive indicator (page 17) * Your computer supports Memory Stick Duo media and Memory Stick Pro high speed and high capacity...
... (Wireless LAN) indicator (page 17) K SD card slot (page 63) L Media Access indicator (page 17) M Memory Stick media slot* (page 60) N Power indicator (page 17) O Battery indicator (page 17) P Hard disk drive indicator (page 17) * Your computer supports Memory Stick Duo media and Memory Stick Pro high speed and high capacity...
User Guide
Page 13
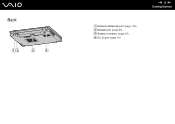
Back n 13 N Getting Started A Network (Ethernet) port (page 138) B Modem port (page 65) C Battery connector (page 20) D DC In port (page 18)
Back n 13 N Getting Started A Network (Ethernet) port (page 138) B Modem port (page 65) C Battery connector (page 20) D DC In port (page 18)
User Guide
Page 17
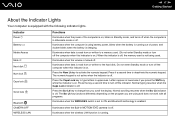
... Press the Num Lk key to deactivate the numeric keypad. Illuminates when the wireless LAN function is in Hibernate mode or off. Indicator Power 1 Battery e Media Access Mute % Hard disk Num lock Caps lock Scroll lock Bluetooth CAMERA OFF WIRELESS LAN Functions Illuminates when the power of power, and... switch is set to ON and Bluetooth technology is off. Press the key a second time to change how you are using battery power, blinks when the battery is running . Normal typing resumes when the Caps Lock indicator is enabled. The Scr Lk key functions differently depending on the ...
... Press the Num Lk key to deactivate the numeric keypad. Illuminates when the wireless LAN function is in Hibernate mode or off. Indicator Power 1 Battery e Media Access Mute % Hard disk Num lock Caps lock Scroll lock Bluetooth CAMERA OFF WIRELESS LAN Functions Illuminates when the power of power, and... switch is set to ON and Bluetooth technology is off. Press the key a second time to change how you are using battery power, blinks when the battery is running . Normal typing resumes when the Caps Lock indicator is enabled. The Scr Lk key functions differently depending on the ...
User Guide
Page 18
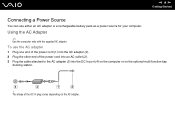
To use either an AC adapter or a rechargeable battery pack as a power source for your computer. Using the AC Adapter ✍ Use the computer only with the supplied AC adapter. n 18 N Getting Started Connecting a Power Source You can use the AC adapter 1 Plug one end of the power cord (1) into the AC adapter (3). 2 Plug the other end of the DC In plug varies depending on the optional multi function bay docking station. ! The shape of the power cord into an AC outlet (2). 3 Plug the cable attached to the AC adapter (3) into the DC In port (4) on the computer or on the AC adapter.
To use either an AC adapter or a rechargeable battery pack as a power source for your computer. Using the AC Adapter ✍ Use the computer only with the supplied AC adapter. n 18 N Getting Started Connecting a Power Source You can use the AC adapter 1 Plug one end of the power cord (1) into the AC adapter (3). 2 Plug the other end of the DC In plug varies depending on the optional multi function bay docking station. ! The shape of the power cord into an AC outlet (2). 3 Plug the cable attached to the AC adapter (3) into the DC In port (4) on the computer or on the AC adapter.
User Guide
Page 20
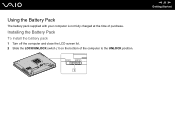
n 20 N Getting Started Installing the Battery Pack To install the battery pack 1 Turn off the computer and close the LCD screen lid. 2 Slide the LOCK/UNLOCK switch (1) on the bottom of purchase. Using the Battery Pack The battery pack supplied with your computer is not fully charged at the time of the computer to the UNLOCK position.
n 20 N Getting Started Installing the Battery Pack To install the battery pack 1 Turn off the computer and close the LCD screen lid. 2 Slide the LOCK/UNLOCK switch (1) on the bottom of purchase. Using the Battery Pack The battery pack supplied with your computer is not fully charged at the time of the computer to the UNLOCK position.
User Guide
Page 21
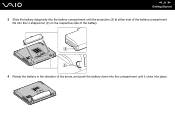
n 21 N Getting Started 3 Slide the battery diagonally into the battery compartment until the projection (2) at either side of the battery compartment fits into the U-shaped cut (3) on the respective side of the battery. 4 Rotate the battery in the direction of the arrow, and push the battery down into the compartment until it clicks into place.
n 21 N Getting Started 3 Slide the battery diagonally into the battery compartment until the projection (2) at either side of the battery compartment fits into the U-shaped cut (3) on the respective side of the battery. 4 Rotate the battery in the direction of the arrow, and push the battery down into the compartment until it clicks into place.

User Guide
Page 22
5 Slide the LOCK/UNLOCK switch to the LOCK position to secure the battery on the computer. ✍ When the computer is designed to AC power and has a battery pack installed, it uses power from the AC outlet. ! n 22 N Getting Started This computer is directly connected to operate only with genuine Sony batteries.
5 Slide the LOCK/UNLOCK switch to the LOCK position to secure the battery on the computer. ✍ When the computer is designed to AC power and has a battery pack installed, it uses power from the AC outlet. ! n 22 N Getting Started This computer is directly connected to operate only with genuine Sony batteries.
User Guide
Page 23
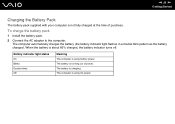
... the time of power. The computer automatically charges the battery (the battery indicator light flashes in a double blink pattern as the battery charges). Battery indicator light status On Blinks Double blinks Off Meaning The computer is using battery power. n 23 N Getting Started Charging the Battery Pack The battery pack supplied with your computer is about 85% charged...
... the time of power. The computer automatically charges the battery (the battery indicator light flashes in a double blink pattern as the battery charges). Battery indicator light status On Blinks Double blinks Off Meaning The computer is using battery power. n 23 N Getting Started Charging the Battery Pack The battery pack supplied with your computer is about 85% charged...
User Guide
Page 24
...is directly connected to AC power. For some software applications and some peripheral devices, the computer may not enter Hibernate mode even when battery life is on while you should save your data frequently and manually activate a power management mode, such as a power source. When the... blink. To avoid loss of data, you should save your data frequently. n 24 N Getting Started ✍ When the battery is running out of power, both the battery and power indicator lights start flashing. Keep the battery pack in the computer while it is directly connected to AC power and has...
...is directly connected to AC power. For some software applications and some peripheral devices, the computer may not enter Hibernate mode even when battery life is on while you should save your data frequently and manually activate a power management mode, such as a power source. When the... blink. To avoid loss of data, you should save your data frequently. n 24 N Getting Started ✍ When the battery is running out of power, both the battery and power indicator lights start flashing. Keep the battery pack in the computer while it is directly connected to AC power and has...
User Guide
Page 25
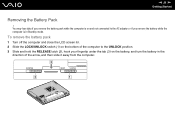
To remove the battery pack 1 Turn off the computer and close the LCD screen lid. 2 Slide the LOCK/UNLOCK switch (1) on the battery, and turn the battery in the direction of the computer to the AC adapter or if you remove the battery while the computer is on and not connected to the UNLOCK position. 3 Slide and hold the RELEASE latch (2), hook your fingertip under the tab (3) on the bottom of the arrow, and then slide it away from the computer. You may lose data if you remove the battery pack while the computer is in Standby mode. n 25 N Getting Started Removing the Battery Pack !
To remove the battery pack 1 Turn off the computer and close the LCD screen lid. 2 Slide the LOCK/UNLOCK switch (1) on the battery, and turn the battery in the direction of the computer to the AC adapter or if you remove the battery while the computer is on and not connected to the UNLOCK position. 3 Slide and hold the RELEASE latch (2), hook your fingertip under the tab (3) on the bottom of the arrow, and then slide it away from the computer. You may lose data if you remove the battery pack while the computer is in Standby mode. n 25 N Getting Started Removing the Battery Pack !
User Guide
Page 53
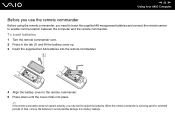
n 53 N Using Your VAIO Computer Before you use the remote commander Before using the remote commander, you may need to insert the supplied AA manganese batteries and connect the remote sensor to replace the batteries. To insert batteries 1 Turn the remote commander over. 2 Press in the tab (1) and lift the battery cover up. 3 Insert the supplied...
n 53 N Using Your VAIO Computer Before you use the remote commander Before using the remote commander, you may need to insert the supplied AA manganese batteries and connect the remote sensor to replace the batteries. To insert batteries 1 Turn the remote commander over. 2 Press in the tab (1) and lift the battery cover up. 3 Insert the supplied...
User Guide
Page 102
... the session when you exit and close all other shape (star, heart, card, etc.), as this process, follow the instructions included with your battery is available only on discs supporting DVD+R DL (Double Layer) recording. Supports writing to a disc. To complete this may not be able to... support 8cm disc writing. This may cause writing errors. ❑ Do not switch power modes while using the pre-installed software and while using the VAIO Zone software. n 102 N Using Peripheral Devices ✍ Supports writing to DVD+R DL (Double Layer) discs is at least 50 percent charged. &#...
... the session when you exit and close all other shape (star, heart, card, etc.), as this process, follow the instructions included with your battery is available only on discs supporting DVD+R DL (Double Layer) recording. Supports writing to a disc. To complete this may not be able to... support 8cm disc writing. This may cause writing errors. ❑ Do not switch power modes while using the pre-installed software and while using the VAIO Zone software. n 102 N Using Peripheral Devices ✍ Supports writing to DVD+R DL (Double Layer) discs is at least 50 percent charged. &#...
User Guide
Page 109
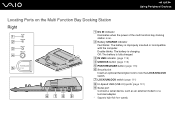
... charging. Double blinks: The battery is fully charged. speeds. C IN USE indicator (page 115) D UNDOCK button (page 115) E PUSH RELEASE button (page 115) F Security slot Insert an optional Kensington lock ... USB (USB 2.0) ports*(page 131) I Serial port Connect a serial device, such as an external modem or a terminal adapter. * Supports high-/full-/low- B Battery CHARGE indicator Fast blinks: The battery is on. n 109 N Using Peripheral Devices Locating Ports on the Multi Function Bay Docking Station Right A DC IN indicator Illuminates when the power...
... charging. Double blinks: The battery is fully charged. speeds. C IN USE indicator (page 115) D UNDOCK button (page 115) E PUSH RELEASE button (page 115) F Security slot Insert an optional Kensington lock ... USB (USB 2.0) ports*(page 131) I Serial port Connect a serial device, such as an external modem or a terminal adapter. * Supports high-/full-/low- B Battery CHARGE indicator Fast blinks: The battery is on. n 109 N Using Peripheral Devices Locating Ports on the Multi Function Bay Docking Station Right A DC IN indicator Illuminates when the power...
User Guide
Page 110
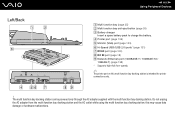
... bay docking station. Left/Back n 110 N Using Peripheral Devices A Multi function bay (page 35) B Multi function bay unit eject button (page 35) C Battery charger Insert a spare battery pack to charge the battery. D Printer port (page 135) E Monitor (VGA) port (page 123) F Hi-Speed USB (USB 2.0) ports* (page 131) G DVI-D port (page 123) H DC...
... bay docking station. Left/Back n 110 N Using Peripheral Devices A Multi function bay (page 35) B Multi function bay unit eject button (page 35) C Battery charger Insert a spare battery pack to charge the battery. D Printer port (page 135) E Monitor (VGA) port (page 123) F Hi-Speed USB (USB 2.0) ports* (page 131) G DVI-D port (page 123) H DC...
User Guide
Page 111
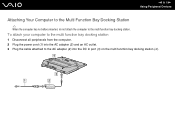
n 111 N Using Peripheral Devices Attaching Your Computer to the Multi Function Bay Docking Station ✍ When the computer has no battery inserted, do not attach the computer to the AC adapter (2) into the DC In port (3) on the multi function bay docking station (4). To attach your computer to the multi function bay docking station 1 Disconnect all peripherals from the computer. 2 Plug the power cord (1) into the AC adapter (2) and an AC outlet. 3 Plug the cable attached to the multi function bay docking station.
n 111 N Using Peripheral Devices Attaching Your Computer to the Multi Function Bay Docking Station ✍ When the computer has no battery inserted, do not attach the computer to the AC adapter (2) into the DC In port (3) on the multi function bay docking station (4). To attach your computer to the multi function bay docking station 1 Disconnect all peripherals from the computer. 2 Plug the power cord (1) into the AC adapter (2) and an AC outlet. 3 Plug the cable attached to the multi function bay docking station.
User Guide
Page 115
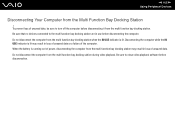
... computer from the Multi Function Bay Docking Station ! To prevent loss of unsaved data, be sure to turn off the computer before disconnection. When the battery is lit may result in loss of unsaved data or a failure of the computer. n 115 N Using Peripheral Devices Disconnecting Your Computer from the multi function...
... computer from the Multi Function Bay Docking Station ! To prevent loss of unsaved data, be sure to turn off the computer before disconnection. When the battery is lit may result in loss of unsaved data or a failure of the computer. n 115 N Using Peripheral Devices Disconnecting Your Computer from the multi function...
User Guide
Page 145
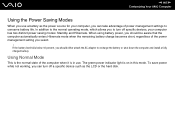
... of the power management setting you to recharge the battery or shut down the computer and install a fully charged battery. The green power indicator light is in this mode. n 145 N Customizing Your VAIO Computer Using the Power Saving Modes When you use . When using battery power, you should either attach the AC adapter to...
... of the power management setting you to recharge the battery or shut down the computer and install a fully charged battery. The green power indicator light is in this mode. n 145 N Customizing Your VAIO Computer Using the Power Saving Modes When you use . When using battery power, you should either attach the AC adapter to...


