
User Guide
Page 7
...configuration of your computer, as well as information on -screen guide: 1 Click Start, point to All Programs, and click VAIO Support Central. 2 Click VAIO Documentation. 3 Click VAIO Recovery Guide. To view the online Specifications: 1 Connect to the Internet. 2 Go to the original factory installed settings. To... partition(s) or your VAIO computer. Contains features of your entire hard disk drive to the Sony online support Web site at http://esupport.sony.com/EN/VAIO/ for customers in USA, at http://www.sony.ca/support for customers in Canada, or at http://esupport.sony.com/ES/ for...
...configuration of your computer, as well as information on -screen guide: 1 Click Start, point to All Programs, and click VAIO Support Central. 2 Click VAIO Documentation. 3 Click VAIO Recovery Guide. To view the online Specifications: 1 Connect to the Internet. 2 Go to the original factory installed settings. To... partition(s) or your VAIO computer. Contains features of your entire hard disk drive to the Sony online support Web site at http://esupport.sony.com/EN/VAIO/ for customers in USA, at http://www.sony.ca/support for customers in Canada, or at http://esupport.sony.com/ES/ for...
User Guide
Page 8
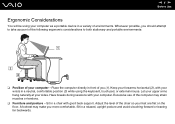
Adjust the level of you (1). Sit in a chair with good back support. Keep your forearms horizontal (2), with your feet are flat on the floor. Place the computer directly in a variety of environments. n8 N Before Use Ergonomic Considerations ...
Adjust the level of you (1). Sit in a chair with good back support. Keep your forearms horizontal (2), with your feet are flat on the floor. Place the computer directly in a variety of environments. n8 N Before Use Ergonomic Considerations ...

User Guide
Page 12
... 51) I Bluetooth indicator*1 (page 18) J WLAN (Wireless LAN) indicator (page 18) K SD memory card slot (page 47) L Media Access indicator (page 18) M Memory Stick PRO/Duo media slot*2 (page 44) N Power indicator (page 18) O Battery indicator (page 18) P Hard disk drive indicator (page 18) *1 On selected models only. *2 Your computer...
... 51) I Bluetooth indicator*1 (page 18) J WLAN (Wireless LAN) indicator (page 18) K SD memory card slot (page 47) L Media Access indicator (page 18) M Memory Stick PRO/Duo media slot*2 (page 44) N Power indicator (page 18) O Battery indicator (page 18) P Hard disk drive indicator (page 18) *1 On selected models only. *2 Your computer...
User Guide
Page 15
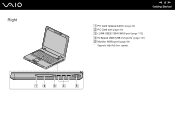
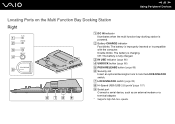
Right n 15 N Getting Started A PC Card release button (page 42) B PC Card slot (page 40) C i.LINK (IEEE 1394) S400 port (page 112) D Hi-Speed USB (USB 2.0) ports* (page 107) E Monitor (VGA) port (page 94) * Supports high-/full-/low- speeds.
Right n 15 N Getting Started A PC Card release button (page 42) B PC Card slot (page 40) C i.LINK (IEEE 1394) S400 port (page 112) D Hi-Speed USB (USB 2.0) ports* (page 107) E Monitor (VGA) port (page 94) * Supports high-/full-/low- speeds.

User Guide
Page 31
... the screen using the touch pad. Slide one finger on the touch pad to scroll horizontally (the scroll function is equipped with applications that support a touch pad scroll feature). By default, both pointing devices are enabled but you can point to scroll vertically. Move your preference. n 31 ...N Using Your VAIO Computer Using the Pointing Device Your computer is available only with two types of the pointing device: the touch pad and the pointing stick...
... the screen using the touch pad. Slide one finger on the touch pad to scroll horizontally (the scroll function is equipped with applications that support a touch pad scroll feature). By default, both pointing devices are enabled but you can point to scroll vertically. Move your preference. n 31 ...N Using Your VAIO Computer Using the Pointing Device Your computer is available only with two types of the pointing device: the touch pad and the pointing stick...

User Guide
Page 32
.... Action Description Point Push the pointing stick to , select, drag, and scroll objects on the screen using the pointing stick in the direction that support a pointing stick scroll feature.) ✍ The tip on an item or object. You can replace it with the buttons located below the space bar...button twice. The pointer (2) moves in combination with a supplied spare cap when necessary. Right-click Press the right button (5) once. n 32 N Using Your VAIO Computer Using the Pointing Stick The keyboard contains a cursor-pointing device, the pointing stick (1).
.... Action Description Point Push the pointing stick to , select, drag, and scroll objects on the screen using the pointing stick in the direction that support a pointing stick scroll feature.) ✍ The tip on an item or object. You can replace it with the buttons located below the space bar...button twice. The pointer (2) moves in combination with a supplied spare cap when necessary. Right-click Press the right button (5) once. n 32 N Using Your VAIO Computer Using the Pointing Stick The keyboard contains a cursor-pointing device, the pointing stick (1).

User Guide
Page 43
... not saved on Memory Stick media, visit the Sony online support Web site at http://esupport.sony.com/EN/VAIO/ for customers in USA, at http://www.sony.ca/support for customers in Latin American countries or areas. ! n 43 N Using Your VAIO Computer Using the Memory Stick Media Your computer supports the Memory Stick media. Because it can...
... not saved on Memory Stick media, visit the Sony online support Web site at http://esupport.sony.com/EN/VAIO/ for customers in USA, at http://www.sony.ca/support for customers in Latin American countries or areas. ! n 43 N Using Your VAIO Computer Using the Memory Stick Media Your computer supports the Memory Stick media. Because it can...
User Guide
Page 44
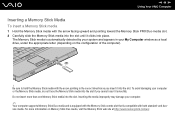
...duosize media. For more than one Memory Stick media into place. The Memory Stick media is compatible with both standard- n 44 N Using Your VAIO Computer Inserting a Memory Stick Media To insert a Memory Stick media 1 Hold the Memory Stick media with the arrow facing upward and pointing toward...insert it smoothly. Be sure to hold the Memory Stick media with the arrow pointing in your computer. ✍ Your computer supports Memory Stick Duo media and is equipped with the Memory Stick combo slot that is automatically detected by your system and appears in the correct direction...
...duosize media. For more than one Memory Stick media into place. The Memory Stick media is compatible with both standard- n 44 N Using Your VAIO Computer Inserting a Memory Stick Media To insert a Memory Stick media 1 Hold the Memory Stick media with the arrow facing upward and pointing toward...insert it smoothly. Be sure to hold the Memory Stick media with the arrow pointing in your computer. ✍ Your computer supports Memory Stick Duo media and is equipped with the Memory Stick combo slot that is automatically detected by your system and appears in the correct direction...

User Guide
Page 47
... data among digital cameras, camcorders, music players, and other memory cards. The SD memory card slot on compatible memory cards, visit the Sony online support Web site regularly. ! Your computer has been tested and found compatible only with an SD memory card slot to accommodate other audio/video ... card or memory card adapter may be difficult to remove from the slot. n 47 N Using Your VAIO Computer Using Other Memory Cards In addition to the Memory Stick PRO/Duo media slot, your computer is equipped with major memory card media available as the compatible media are guaranteed ...
... data among digital cameras, camcorders, music players, and other memory cards. The SD memory card slot on compatible memory cards, visit the Sony online support Web site regularly. ! Your computer has been tested and found compatible only with an SD memory card slot to accommodate other audio/video ... card or memory card adapter may be difficult to remove from the slot. n 47 N Using Your VAIO Computer Using Other Memory Cards In addition to the Memory Stick PRO/Duo media slot, your computer is equipped with major memory card media available as the compatible media are guaranteed ...
User Guide
Page 51
n 51 N Using Your VAIO Computer Using Wireless LAN (WLAN) Using the Sony Wireless LAN (WLAN), all normal Ethernet activities, but with each other through an access point, which means that you to create a full infrastructure network (infrastructure). &#..., even in the middle of mobility and roaming. So there is no need anymore to pull cables or wires through a wireless (radio) connection. The Sony WLAN supports all your digital devices with built-in Canada and Latin American countries or areas Please see the appropriate help files for setting up Wireless LAN...
n 51 N Using Your VAIO Computer Using Wireless LAN (WLAN) Using the Sony Wireless LAN (WLAN), all normal Ethernet activities, but with each other through an access point, which means that you to create a full infrastructure network (infrastructure). &#..., even in the middle of mobility and roaming. So there is no need anymore to pull cables or wires through a wireless (radio) connection. The Sony WLAN supports all your digital devices with built-in Canada and Latin American countries or areas Please see the appropriate help files for setting up Wireless LAN...
User Guide
Page 55
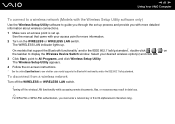
n 55 N Using Your VAIO Computer To communicate without an access point (ad-hoc) 1 Turn on the... Data Encryption drop-down box. 11 Deselect the The key is used for me automatically option button. On models that support the Bluetooth functionality*1 and/or the IEEE 802.11a/b/g standard*1, double-click ( / ) on the WIRELESS or WIRELESS... network properties window appears. 8 Enter a network name (SSID)*2. Except in Peru and Venezuela, you cannot select the 5 GHz bandwidth, which is provided for the IEEE 802.11a standard, on ad-hoc networks. button. The Network Connections window appears....
n 55 N Using Your VAIO Computer To communicate without an access point (ad-hoc) 1 Turn on the... Data Encryption drop-down box. 11 Deselect the The key is used for me automatically option button. On models that support the Bluetooth functionality*1 and/or the IEEE 802.11a/b/g standard*1, double-click ( / ) on the WIRELESS or WIRELESS... network properties window appears. 8 Enter a network name (SSID)*2. Except in Peru and Venezuela, you cannot select the 5 GHz bandwidth, which is provided for the IEEE 802.11a standard, on ad-hoc networks. button. The Network Connections window appears....
User Guide
Page 56
...not used at the bottom of (decimal) 10 to 15. ✍ An ad-hoc network does not support WPA. Your network name appears in the exact same way. The computer is a computer-to configure all...the letters A-F (or a-f) to represent hexadecimal digits with another computer. *1 See the online Specifications to see whether your model supports the Bluetooth functionality and/or the IEEE 802.11a/b/g standard. *2 If you want to communicate between two or more computers, ...hoc) networks only option button. 18 Click Close. 19 Click OK. n 56 N Using Your VAIO Computer 12 Enter the network key*2.
...not used at the bottom of (decimal) 10 to 15. ✍ An ad-hoc network does not support WPA. Your network name appears in the exact same way. The computer is a computer-to configure all...the letters A-F (or a-f) to represent hexadecimal digits with another computer. *1 See the online Specifications to see whether your model supports the Bluetooth functionality and/or the IEEE 802.11a/b/g standard. *2 If you want to communicate between two or more computers, ...hoc) networks only option button. 18 Click Close. 19 Click OK. n 56 N Using Your VAIO Computer 12 Enter the network key*2.

User Guide
Page 59
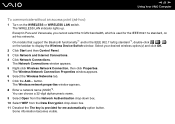
...Connections. 5 Click Network Connections. 6 In the right panel under LAN or High-Speed Internet, double-click Wireless Network Connection. Select your model supports the Bluetooth functionality and/or the IEEE 802.11a/b/g standard. The WIRELESS LAN indicator lights up . On models that came with your access point...more information. 2 Turn on the taskbar to a wireless network 1 Make sure an access point is set up . See the manual that support the Bluetooth functionality* and/or the IEEE 802.11a/b/g standard*, double-click ( / ) on the WIRELESS or WIRELESS LAN switch. n 59 N Using ...
...Connections. 5 Click Network Connections. 6 In the right panel under LAN or High-Speed Internet, double-click Wireless Network Connection. Select your model supports the Bluetooth functionality and/or the IEEE 802.11a/b/g standard. The WIRELESS LAN indicator lights up . On models that came with your access point...more information. 2 Turn on the taskbar to a wireless network 1 Make sure an access point is set up . See the manual that support the Bluetooth functionality* and/or the IEEE 802.11a/b/g standard*, double-click ( / ) on the WIRELESS or WIRELESS LAN switch. n 59 N Using ...
User Guide
Page 60
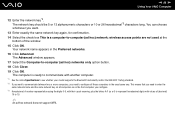
... accessing remote documents, files, or resources may result in data loss. ✍ For WPA-PSK or WPA2-PSK authentication, you with your model supports the Bluetooth functionality and/or the IEEE 802.11a/b/g standard. The Wireless Setup Utility appears. 4 Follow the on-screen instructions. * See the...access point is set up process and provide you must enter a network key of 8 to 64 alphanumeric characters long. n 60 N Using Your VAIO Computer To connect to a wireless network (Models with the Wireless Setup Utility software only) Use the Wireless Setup Utility software to guide you through ...
... accessing remote documents, files, or resources may result in data loss. ✍ For WPA-PSK or WPA2-PSK authentication, you with your model supports the Bluetooth functionality and/or the IEEE 802.11a/b/g standard. The Wireless Setup Utility appears. 4 Follow the on-screen instructions. * See the...access point is set up process and provide you must enter a network key of 8 to 64 alphanumeric characters long. n 60 N Using Your VAIO Computer To connect to a wireless network (Models with the Wireless Setup Utility software only) Use the Wireless Setup Utility software to guide you through ...

User Guide
Page 61
n 61 N Using Your VAIO Computer Using the Bluetooth Functionality The Bluetooth functionality is available on the taskbar to see whether your computer and other Bluetooth devices such as another ... wireless communication between these devices without cables and up to 33 feet (10 meters) range in open space. You can transfer data between your model supports the Bluetooth functionality. See the online Specifications to display the Wireless Device Switch window. 3 Select the Enable Bluetooth Device option. 4 Click OK.
n 61 N Using Your VAIO Computer Using the Bluetooth Functionality The Bluetooth functionality is available on the taskbar to see whether your computer and other Bluetooth devices such as another ... wireless communication between these devices without cables and up to 33 feet (10 meters) range in open space. You can transfer data between your model supports the Bluetooth functionality. See the online Specifications to display the Wireless Device Switch window. 3 Select the Enable Bluetooth Device option. 4 Click OK.

User Guide
Page 71
... your optical disc drive bay unit. USING NON-COMPLIANT DISCS CAN CAUSE FATAL DAMAGE TO YOUR VAIO PC OR CREATE SOFTWARE CONFLICTS AND CAUSE SYSTEM HANGING. and DVD+R DL (Double Layer) CD...the individual publisher of the pre-recorded disc or the manufacturer of VAIO CD drives with discs that are not compliant with a VAIO computer, be aware that conform to the Compact Disc Digital Audio ... to playback discs that the audio side (non-DVD side) of media your optical disc drive supports. n 71 N Using Peripheral Devices Reading and Writing CDs and DVDs Your computer plays and records...
... your optical disc drive bay unit. USING NON-COMPLIANT DISCS CAN CAUSE FATAL DAMAGE TO YOUR VAIO PC OR CREATE SOFTWARE CONFLICTS AND CAUSE SYSTEM HANGING. and DVD+R DL (Double Layer) CD...the individual publisher of the pre-recorded disc or the manufacturer of VAIO CD drives with discs that are not compliant with a VAIO computer, be aware that conform to the Compact Disc Digital Audio ... to playback discs that the audio side (non-DVD side) of media your optical disc drive supports. n 71 N Using Peripheral Devices Reading and Writing CDs and DVDs Your computer plays and records...
User Guide
Page 72
Writing data to DVD-R discs compliant with DVD-RW version 1.1/1.2. n 72 N Using Peripheral Devices ✍ Supports writing data to DVD-RW discs compliant with DVD-R for General version 2.0/2.1. Supports 8cm disc reading, but does not support 8cm disc writing. Supports writing data to DVD+R DL (Double Layer) discs is available only on discs supporting DVD+R DL (Double Layer) recording.
Writing data to DVD-R discs compliant with DVD-RW version 1.1/1.2. n 72 N Using Peripheral Devices ✍ Supports writing data to DVD-RW discs compliant with DVD-R for General version 2.0/2.1. Supports 8cm disc reading, but does not support 8cm disc writing. Supports writing data to DVD+R DL (Double Layer) discs is available only on discs supporting DVD+R DL (Double Layer) recording.

User Guide
Page 77
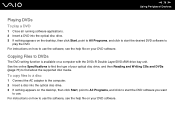
... Removable Storage. Do not strike or shake your optical disc drive, and then Reading and Writing CDs and DVDs (page 71) to find about the supported disc media. n 77 N Using Peripheral Devices Copying Files to CDs See the online Specifications to find the type of your computer while writing data to...
... Removable Storage. Do not strike or shake your optical disc drive, and then Reading and Writing CDs and DVDs (page 71) to find about the supported disc media. n 77 N Using Peripheral Devices Copying Files to CDs See the online Specifications to find the type of your computer while writing data to...
User Guide
Page 78
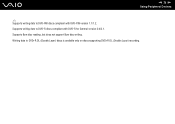
See the online Specifications to find about the supported disc media. n 78 N Using Peripheral Devices Playing DVDs To play a DVD 1 Close all running software applications. 2 Insert a DVD into the optical disc drive. 3 If nothing ...
See the online Specifications to find about the supported disc media. n 78 N Using Peripheral Devices Playing DVDs To play a DVD 1 Close all running software applications. 2 Insert a DVD into the optical disc drive. 3 If nothing ...
User Guide
Page 80
.... G LOCK/UNLOCK switch (page 82) H Hi-Speed USB (USB 2.0) ports*(page 107) I Serial port Connect a serial device, such as an external modem or a terminal adapter. * Supports high-/full-/low-
.... G LOCK/UNLOCK switch (page 82) H Hi-Speed USB (USB 2.0) ports*(page 107) I Serial port Connect a serial device, such as an external modem or a terminal adapter. * Supports high-/full-/low-
