

User Guide
Page 4
n4 N Precautions ...124 On Handling the LCD Screen ...125 On Using the Power Source ...126 On Handling Your Computer...127 On Using the Built-in MOTION EYE Camera...129 On Handling Floppy Disks ......
n4 N Precautions ...124 On Handling the LCD Screen ...125 On Using the Power Source ...126 On Handling Your Computer...127 On Using the Built-in MOTION EYE Camera...129 On Handling Floppy Disks ......

User Guide
Page 6
External views illustrated in audio, video, computing, and communications to the on your computer. n6 N Before Use Before Use Congratulations on -screen User Guide. Sony has combined leading-edge technology in this Sony VAIO® computer, and welcome to provide state-of your purchase of this manual may look slightly different from those of -the-art personal computing experience. !
External views illustrated in audio, video, computing, and communications to the on your computer. n6 N Before Use Before Use Congratulations on -screen User Guide. Sony has combined leading-edge technology in this Sony VAIO® computer, and welcome to provide state-of your purchase of this manual may look slightly different from those of -the-art personal computing experience. !

User Guide
Page 8
n8 N Before Use ❑ VAIO Recovery Center User Guide - To access this on-screen guide: 1 Click Start and Help and Support. 2 Click Manuals & Specifications. 3 Click VAIO Recovery Center User Guide. Provides information about restoring individual software programs, software drivers, and drive partition(s) or your entire hard disk drive to the original factory installed settings.
n8 N Before Use ❑ VAIO Recovery Center User Guide - To access this on-screen guide: 1 Click Start and Help and Support. 2 Click Manuals & Specifications. 3 Click VAIO Recovery Center User Guide. Provides information about restoring individual software programs, software drivers, and drive partition(s) or your entire hard disk drive to the original factory installed settings.

User Guide
Page 9
...perform the task for you or show you accomplish a task. Choose from Microsoft and Sony. ❑ VAIO Sites Contains links to other VAIO documents, and system and software information for your VAIO computer. To access Help and Support, click Start and Help and Support. ❑ ... useful. ❑ VAIO Tutorials Sony provides guided help tutorials that help in the form of VAIO tutorials, an escalation page containing support and contact information, and various links to VAIO online support Web sites. ❑ Backup & Recovery Find information on -screen User Guide, warranty information...
...perform the task for you or show you accomplish a task. Choose from Microsoft and Sony. ❑ VAIO Sites Contains links to other VAIO documents, and system and software information for your VAIO computer. To access Help and Support, click Start and Help and Support. ❑ ... useful. ❑ VAIO Tutorials Sony provides guided help tutorials that help in the form of VAIO tutorials, an escalation page containing support and contact information, and various links to VAIO online support Web sites. ❑ Backup & Recovery Find information on -screen User Guide, warranty information...

User Guide
Page 12
... brightness level of the computer's display - You can reduce eye strain and muscle fatigue by adjusting the tilt of the monitor. Make sure the display screen is at a comfortable viewing distance. Use the display's tilting feature to your comfort and work efficiency. ❑ Positioning an external display -
... brightness level of the computer's display - You can reduce eye strain and muscle fatigue by adjusting the tilt of the monitor. Make sure the display screen is at a comfortable viewing distance. Use the display's tilting feature to your comfort and work efficiency. ❑ Positioning an external display -

User Guide
Page 14
... on the following pages. Front A Built-in microphone (monaural) B Built-in MOTION EYE camera indicator (page 20) C Built-in MOTION EYE camera (page 34) D LCD screen (page 125) E Num lock indicator (page 20) F Caps lock indicator (page 20) G Scroll lock indicator (page 20) H Power button I Keyboard (page 30) J Touch pad (page...
... on the following pages. Front A Built-in microphone (monaural) B Built-in MOTION EYE camera indicator (page 20) C Built-in MOTION EYE camera (page 34) D LCD screen (page 125) E Num lock indicator (page 20) F Caps lock indicator (page 20) G Scroll lock indicator (page 20) H Power button I Keyboard (page 30) J Touch pad (page...

User Guide
Page 23
... 1 Turn off the computer and close the LCD screen lid. 2 Slide the battery lock switch (1) inward. 3 Slide the battery pack into the battery compartment until it uses power from the AC outlet. ! Using the Battery Pack The battery pack supplied with genuine Sony batteries. This computer is not fully charged at the...
... 1 Turn off the computer and close the LCD screen lid. 2 Slide the battery lock switch (1) inward. 3 Slide the battery pack into the battery compartment until it uses power from the AC outlet. ! Using the Battery Pack The battery pack supplied with genuine Sony batteries. This computer is not fully charged at the...

User Guide
Page 27
You may lose data if you remove the battery pack while your computer is on and not connected to the AC adapter or if you remove the battery pack while the computer is in Sleep mode. n 27 N Getting Started Removing the Battery Pack ! To remove the battery pack 1 Turn off the computer and close the LCD screen lid. 2 Slide the battery lock switch (1) inward. 3 Slide and hold the battery RELEASE latch (2) and slide the battery pack away from the computer.
You may lose data if you remove the battery pack while your computer is on and not connected to the AC adapter or if you remove the battery pack while the computer is in Sleep mode. n 27 N Getting Started Removing the Battery Pack ! To remove the battery pack 1 Turn off the computer and close the LCD screen lid. 2 Slide the battery lock switch (1) inward. 3 Slide and hold the battery RELEASE latch (2) and slide the battery pack away from the computer.

User Guide
Page 30
... intensity, press Fn+F5 and then m or To increase lighting intensity, press Fn+F6 and then M or ,, or keep pressing Fn+F6. n 30 N Using Your VAIO Computer Using the Keyboard Your keyboard is very similar to a desktop computer keyboard, but has additional keys that perform model-specific tasks. Combinations/Feature Fn...
... intensity, press Fn+F5 and then m or To increase lighting intensity, press Fn+F6 and then M or ,, or keep pressing Fn+F6. n 30 N Using Your VAIO Computer Using the Keyboard Your keyboard is very similar to a desktop computer keyboard, but has additional keys that perform model-specific tasks. Combinations/Feature Fn...

User Guide
Page 31
...Slide your finger along the bottom edge to scroll horizontally (the scroll function is available only with VAIO Control Center (page 107) to place the pointer (2) on the touch pad (1) to launch VAIO Control Center. Once launched, select the topic on the touch pad while pressing the left button. ...). ✍ You can point to, select, drag, and scroll objects on the screen using the mouse. Press the right button (4) once. Slide your finger on an item or object. n 31 N Using Your VAIO Computer Action Description Point Click Slide your finger on the pointing device and see the ...
...Slide your finger along the bottom edge to scroll horizontally (the scroll function is available only with VAIO Control Center (page 107) to place the pointer (2) on the touch pad (1) to launch VAIO Control Center. Once launched, select the topic on the touch pad while pressing the left button. ...). ✍ You can point to, select, drag, and scroll objects on the screen using the mouse. Press the right button (4) once. Slide your finger on an item or object. n 31 N Using Your VAIO Computer Action Description Point Click Slide your finger on the pointing device and see the ...

User Guide
Page 42
... may damage the optical disc drive. ❑ Do not strike or shake your computer while writing data to a disc. ❑ Deactivate the screen saver and exit anti-virus software before you burned with your software. ❑ Only use the Roxio Easy Media Creator software to add more data... disc. ❑ Do not use the same disc burning software to add data to a disc. n 42 N Using Your VAIO Computer Notes on writing data to a disc ❑ Use only Sony recommended software, which is at least 50% charged. ❑ Make sure you use memory-resident utility software while writing data...
... may damage the optical disc drive. ❑ Do not strike or shake your computer while writing data to a disc. ❑ Deactivate the screen saver and exit anti-virus software before you burned with your software. ❑ Only use the Roxio Easy Media Creator software to add more data... disc. ❑ Do not use the same disc burning software to add data to a disc. n 42 N Using Your VAIO Computer Notes on writing data to a disc ❑ Use only Sony recommended software, which is at least 50% charged. ❑ Make sure you use memory-resident utility software while writing data...

User Guide
Page 44
Copying Files to CDs To copy files to a disc. 1 Insert a disc into the optical disc drive. 2 If nothing appears on -screen instructions until the empty disc folder appears. 2 Open the folder that contains the file(s) you want to copy and drag them to the empty disc ..., then click Start, All Programs, and the desired CD software to play an audio CD 1 Insert a disc into the optical disc drive. n 44 N Using Your VAIO Computer Playing CDs To play the CD. If the Audio CD window appears, click to select an option.
Copying Files to CDs To copy files to a disc. 1 Insert a disc into the optical disc drive. 2 If nothing appears on -screen instructions until the empty disc folder appears. 2 Open the folder that contains the file(s) you want to copy and drag them to the empty disc ..., then click Start, All Programs, and the desired CD software to play an audio CD 1 Insert a disc into the optical disc drive. n 44 N Using Your VAIO Computer Playing CDs To play the CD. If the Audio CD window appears, click to select an option.
User Guide
Page 59
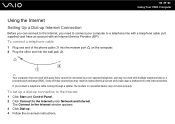
... Plug one end of these connections may result in excess electrical current and could cause a malfunction in the internal modem. n 59 N Using Your VAIO Computer Using the Internet Setting Up a Dial-up Internet Connection Before you can connect to the Internet, you connect a telephone cable coming through a splitter...and Control Panel. 2 Click Connect to a coin-operated telephone, and may not work properly. Some of the phone cable (1) into the modem port on -screen instructions. To set up a dial-up . 4 Follow the on the computer. 2 Plug the other end into the wall jack (2). ✍ Your ...
... Plug one end of these connections may result in excess electrical current and could cause a malfunction in the internal modem. n 59 N Using Your VAIO Computer Using the Internet Setting Up a Dial-up Internet Connection Before you can connect to the Internet, you connect a telephone cable coming through a splitter...and Control Panel. 2 Click Connect to a coin-operated telephone, and may not work properly. Some of the phone cable (1) into the modem port on -screen instructions. To set up a dial-up . 4 Follow the on the computer. 2 Plug the other end into the wall jack (2). ✍ Your ...

User Guide
Page 63
The Set up a connection or network on ad-hoc networks. n 63 N Using Your VAIO Computer To communicate without an access point (ad-hoc) ! The IEEE 802.11n draft standard, using the 2.4 or 5 GHz bandwidth, is used for the IEEE .... 8 Follow the on the WIRELESS or WIRELESS LAN switch. You cannot select the 5 GHz bandwidth, which is not available on ad-hoc networks. 1 Turn on -screen instructions. ✍ See the online specifications to see whether your model supports the Bluetooth functionality, the IEEE 802.11a/b/g standard, and/or the IEEE 802...
The Set up a connection or network on ad-hoc networks. n 63 N Using Your VAIO Computer To communicate without an access point (ad-hoc) ! The IEEE 802.11n draft standard, using the 2.4 or 5 GHz bandwidth, is used for the IEEE .... 8 Follow the on the WIRELESS or WIRELESS LAN switch. You cannot select the 5 GHz bandwidth, which is not available on ad-hoc networks. 1 Turn on -screen instructions. ✍ See the online specifications to see whether your model supports the Bluetooth functionality, the IEEE 802.11a/b/g standard, and/or the IEEE 802...
User Guide
Page 72
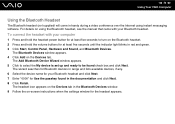
.... 2 Press and hold the headset power button for Use the passkey found check box and click Next. The headset icon appears on -screen instructions when the settings window for at least five seconds until the indicator light blinks in the Bluetooth Devices window. 9 Follow the on...during a video conference over the Internet using the Bluetooth headset, see the manual that came with your Bluetooth headset. n 72 N Using Your VAIO Computer Using the Bluetooth Headset The Bluetooth headset (not supplied) will come in the documentation and click Next. 8 Click Finish. The Bluetooth Devices...
.... 2 Press and hold the headset power button for Use the passkey found check box and click Next. The headset icon appears on -screen instructions when the settings window for at least five seconds until the indicator light blinks in the Bluetooth Devices window. 9 Follow the on...during a video conference over the Internet using the Bluetooth headset, see the manual that came with your Bluetooth headset. n 72 N Using Your VAIO Computer Using the Bluetooth Headset The Bluetooth headset (not supplied) will come in the documentation and click Next. 8 Click Finish. The Bluetooth Devices...
User Guide
Page 80
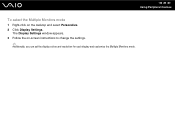
... which display to be able to display the same contents on your external display or projector. The Display Settings window appears. 3 Follow the on-screen instructions to change the settings. ✍ You may not be used as the primary monitor when an external display (desktop monitor, etc.) is ...connected to work on your computer screen and the external display at the same time, depending on the type of your computer screen and the external display or projector at the same time, see Using the Multiple Monitors Function (...
... which display to be able to display the same contents on your external display or projector. The Display Settings window appears. 3 Follow the on-screen instructions to change the settings. ✍ You may not be used as the primary monitor when an external display (desktop monitor, etc.) is ...connected to work on your computer screen and the external display at the same time, depending on the type of your computer screen and the external display or projector at the same time, see Using the Multiple Monitors Function (...

User Guide
Page 81
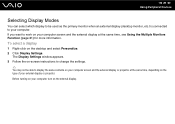
..., such as a single desktop. n 81 N Using Peripheral Devices Using the Multiple Monitors Function The Multiple Monitors function allows you to distribute portions of your computer screen and the external display can move the cursor from one display to the other . ✍ Your external display may not work properly. Set fewer colors...
..., such as a single desktop. n 81 N Using Peripheral Devices Using the Multiple Monitors Function The Multiple Monitors function allows you to distribute portions of your computer screen and the external display can move the cursor from one display to the other . ✍ Your external display may not work properly. Set fewer colors...
User Guide
Page 82
n 82 N Using Peripheral Devices To select the Multiple Monitors mode 1 Right-click on -screen instructions to change the settings. ✍ Additionally, you can set the display colors and resolution for each display and customize the Multiple Monitors mode. The Display Settings window appears. 3 Follow the on the desktop and select Personalize. 2 Click Display Settings.
n 82 N Using Peripheral Devices To select the Multiple Monitors mode 1 Right-click on -screen instructions to change the settings. ✍ Additionally, you can set the display colors and resolution for each display and customize the Multiple Monitors mode. The Display Settings window appears. 3 Follow the on the desktop and select Personalize. 2 Click Display Settings.
User Guide
Page 92
... Password The power-on password is provided for users with administrator rights on the computer to change all the setup options in the BIOS setup screen, as well as starting the computer. Write down your password and keep it , a password reset fee will be sent in conjunction with.... If you forget the power-on password and need assistance to reset it safe and private from unauthorized access. n 92 N Customizing Your VAIO Computer Setting the Password Use one of the BIOS functions to set the user password, you can substitute fingerprint authentication for password entry when turning...
... Password The power-on password is provided for users with administrator rights on the computer to change all the setup options in the BIOS setup screen, as well as starting the computer. Write down your password and keep it , a password reset fee will be sent in conjunction with.... If you forget the power-on password and need assistance to reset it safe and private from unauthorized access. n 92 N Customizing Your VAIO Computer Setting the Password Use one of the BIOS functions to set the user password, you can substitute fingerprint authentication for password entry when turning...

User Guide
Page 93
... To add the power-on password (machine password) 1 Turn on the computer. 2 Press the F2 key when the VAIO logo appears. Press the space bar to change the setting from Disabled to Enabled. 6 Press the < or , key to display the Security tab, select Set ...Machine Password, and then press the Enter key. 4 On the password entry screen, enter the password twice and press the Enter key. The BIOS setup screen appears. If not, restart the computer and press the F2 key several times when the VAIO logo appears. 3 Press the < or , key to select Security to select...
... To add the power-on password (machine password) 1 Turn on the computer. 2 Press the F2 key when the VAIO logo appears. Press the space bar to change the setting from Disabled to Enabled. 6 Press the < or , key to display the Security tab, select Set ...Machine Password, and then press the Enter key. 4 On the password entry screen, enter the password twice and press the Enter key. The BIOS setup screen appears. If not, restart the computer and press the F2 key several times when the VAIO logo appears. 3 Press the < or , key to select Security to select...

