
VAIO User Guide
Page 2
nN 2 Contents Before Use ...6 Documentation ...6 Ergonomic Considerations ...8 Getting Started ...10 Locating Controls and Ports...11 About the Indicator Lights ...24 Connecting a Power Source ...25 Using the Battery Pack...26 Shutting Down Your Computer Safely ...33 Using Your VAIO Computer ...34 Using the Keyboard...35 Using the Touch Pad...37 Using Special-function Buttons ...38 Using the Optical Disc Drive ...40 Using the TV Function (on Selected Models Only) ...47 Using PC Cards ...48 Using the Memory Stick Media ...52 Using the Internet...56 Using Wireless LAN (WLAN) ...57
nN 2 Contents Before Use ...6 Documentation ...6 Ergonomic Considerations ...8 Getting Started ...10 Locating Controls and Ports...11 About the Indicator Lights ...24 Connecting a Power Source ...25 Using the Battery Pack...26 Shutting Down Your Computer Safely ...33 Using Your VAIO Computer ...34 Using the Keyboard...35 Using the Touch Pad...37 Using Special-function Buttons ...38 Using the Optical Disc Drive ...40 Using the TV Function (on Selected Models Only) ...47 Using PC Cards ...48 Using the Memory Stick Media ...52 Using the Internet...56 Using Wireless LAN (WLAN) ...57

VAIO User Guide
Page 3
......116 Connecting a Printer ...119 Connecting an i.LINK Device ...121 Connecting to a Network (LAN) ...123 Customizing Your VAIO Computer ...125 Setting the Password ...126 Setting Up Your Computer with VAIO Control Center...131 Using the Power Saving Modes ...133 Managing Power with VAIO Power Management ...138 Upgrading Your VAIO Computer...142 Adding and Removing Memory...143
......116 Connecting a Printer ...119 Connecting an i.LINK Device ...121 Connecting to a Network (LAN) ...123 Customizing Your VAIO Computer ...125 Setting the Password ...126 Setting Up Your Computer with VAIO Control Center...131 Using the Power Saving Modes ...133 Managing Power with VAIO Power Management ...138 Upgrading Your VAIO Computer...142 Adding and Removing Memory...143

VAIO User Guide
Page 4
nN 4 Precautions ...157 On Handling the LCD Screen...158 On Using the Power Source...159 On Handling Your Computer...160 On Handling Floppy Disks...162 On Handling Discs ...163 On Using the Battery Pack...164 On Using Headphones...165 On Handling Memory Stick Media...165 On Handling the Hard Disk ...166 Troubleshooting ...167 Computer ...168 System Security ...178 Battery ...180 Internet ...182 Networking ...184 CDs and DVDs...186 Display ...189 Printing ...192 Microphone ...193 Mouse ...194 Speakers ...195 Touch Pad...196 Keyboard ...198
nN 4 Precautions ...157 On Handling the LCD Screen...158 On Using the Power Source...159 On Handling Your Computer...160 On Handling Floppy Disks...162 On Handling Discs ...163 On Using the Battery Pack...164 On Using Headphones...165 On Handling Memory Stick Media...165 On Handling the Hard Disk ...166 Troubleshooting ...167 Computer ...168 System Security ...178 Battery ...180 Internet ...182 Networking ...184 CDs and DVDs...186 Display ...189 Printing ...192 Microphone ...193 Mouse ...194 Speakers ...195 Touch Pad...196 Keyboard ...198
VAIO User Guide
Page 12
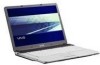
VGN-A700 Series models Front nN 12 Getting Started A Mute button/indicator (page 38) B Volume buttons (page 38) C Brightness button (page 38) D Magnify screen button (page ... 35) H Touch pad (page 37) I Power indicator (page 24) J Battery indicator (page 24) K Hard disk drive indicator (page 24) L Optical disc drive indicator (page 24) M Memory Stick media slot* (page 52) N Memory Stick media indicator (page 24) O WIRELESS switch (page 57) P WIRELESS LAN indicator (page 24) * Your computer supports...
VGN-A700 Series models Front nN 12 Getting Started A Mute button/indicator (page 38) B Volume buttons (page 38) C Brightness button (page 38) D Magnify screen button (page ... 35) H Touch pad (page 37) I Power indicator (page 24) J Battery indicator (page 24) K Hard disk drive indicator (page 24) L Optical disc drive indicator (page 24) M Memory Stick media slot* (page 52) N Memory Stick media indicator (page 24) O WIRELESS switch (page 57) P WIRELESS LAN indicator (page 24) * Your computer supports...

VAIO User Guide
Page 18
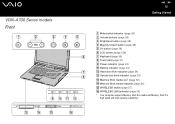
VGN-FS600 Series models Front nN 18 Getting Started A LCD screen (page 158) B Speakers C Keyboard (page 35) D Touch pad (page 37) E Power indicator (page 24) F Battery indicator (page 24) G Hard disk drive indicator (page 24) H Memory Stick media indicator (page 24) I WLAN (Wireless LAN) switch (on selected models only) (page 57) J WIRELESS LAN indicator (on selected models only) (page 24) K Headphones jack (page 91) L Microphone jack (page 115)
VGN-FS600 Series models Front nN 18 Getting Started A LCD screen (page 158) B Speakers C Keyboard (page 35) D Touch pad (page 37) E Power indicator (page 24) F Battery indicator (page 24) G Hard disk drive indicator (page 24) H Memory Stick media indicator (page 24) I WLAN (Wireless LAN) switch (on selected models only) (page 57) J WIRELESS LAN indicator (on selected models only) (page 24) K Headphones jack (page 91) L Microphone jack (page 115)
VAIO User Guide
Page 24
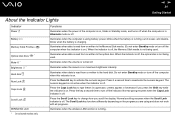
... Caps Lock indicator is running out of the computer is not being used . nN 24 Getting Started About the Indicator Lights Indicator Power 1 Battery e Memory Stick Pro/Duo Optical disc drive * Mute % * Brightness 8 * Hard disk Num Lock Caps Lock Scroll Lock WIRELESS LAN * On selected models only...Scroll Lock key functions differently depending on , blinks in Standby mode, and turns off when the computer is in Hibernate mode or off , the Memory Stick media is on . Press the key a second time to the optical disc. Letters appear in uppercase. Illuminates when data is read from...
... Caps Lock indicator is running out of the computer is not being used . nN 24 Getting Started About the Indicator Lights Indicator Power 1 Battery e Memory Stick Pro/Duo Optical disc drive * Mute % * Brightness 8 * Hard disk Num Lock Caps Lock Scroll Lock WIRELESS LAN * On selected models only...Scroll Lock key functions differently depending on , blinks in Standby mode, and turns off when the computer is in Hibernate mode or off , the Memory Stick media is on . Press the key a second time to the optical disc. Letters appear in uppercase. Illuminates when data is read from...

VAIO User Guide
Page 34
Using Your VAIO Computer This section describes how to get the most out of using your VAIO computer. ❑ Using the Keyboard (page 35) ❑ Using the Touch Pad (page 37) ❑ Using Special-function Buttons (page 38) ❑ Using the Optical Disc Drive (page 40) ❑ Using the TV Function (on Selected Models Only) (page 47) ❑ Using PC Cards (page 48) ❑ Using the Memory Stick Media (page 52) ❑ Using the Internet (page 56) ❑ Using Wireless LAN (WLAN) (page 57) nN 34 Using Your VAIO Computer
Using Your VAIO Computer This section describes how to get the most out of using your VAIO computer. ❑ Using the Keyboard (page 35) ❑ Using the Touch Pad (page 37) ❑ Using Special-function Buttons (page 38) ❑ Using the Optical Disc Drive (page 40) ❑ Using the TV Function (on Selected Models Only) (page 47) ❑ Using PC Cards (page 48) ❑ Using the Memory Stick Media (page 52) ❑ Using the Internet (page 56) ❑ Using Wireless LAN (WLAN) (page 57) nN 34 Using Your VAIO Computer

VAIO User Guide
Page 42
...; Some DVD players and computer's DVD drives may not be able to play DVDs created by the VAIO Zone software. ✍ Ultra-speed CD-RW is 2.4x speed, it . To complete this may... modes while using the pre-installed software and while using your software. ❑ Only use memory-resident utility software while writing data to such discs. Supports writing to DVD-RW discs compliant with... your software application to DVD+R DL (Double Layer) discs is supported on VGN-A700 Series models but does not support 8cm disc writing. See the online Specifications sheet for...
...; Some DVD players and computer's DVD drives may not be able to play DVDs created by the VAIO Zone software. ✍ Ultra-speed CD-RW is 2.4x speed, it . To complete this may... modes while using the pre-installed software and while using your software. ❑ Only use memory-resident utility software while writing data to such discs. Supports writing to DVD-RW discs compliant with... your software application to DVD+R DL (Double Layer) discs is supported on VGN-A700 Series models but does not support 8cm disc writing. See the online Specifications sheet for...

VAIO User Guide
Page 43
.... ❑ Some discs recorded at 20 or 24 bits may produce noise while playing. You can play DVDs using the optical disc drive and the VAIO Zone software. Reconfiguring your computer has Wireless LAN and Wireless LAN is playing a DVD. ❑ Region code indicators are playing a DVD (video or audio) ... may cause the computer to malfunction. ❑ Deactivate the screen saver and exit anti-virus software before playing a DVD movie. ❑ Do not use memory-resident utility software to indicate in which region and on what type of player you can play the disc. nN 43 Using Your...
.... ❑ Some discs recorded at 20 or 24 bits may produce noise while playing. You can play DVDs using the optical disc drive and the VAIO Zone software. Reconfiguring your computer has Wireless LAN and Wireless LAN is playing a DVD. ❑ Region code indicators are playing a DVD (video or audio) ... may cause the computer to malfunction. ❑ Deactivate the screen saver and exit anti-virus software before playing a DVD movie. ❑ Do not use memory-resident utility software to indicate in which region and on what type of player you can play the disc. nN 43 Using Your...
VAIO User Guide
Page 52
...compatible products, such as digital cameras, mobile phones and other devices. For the latest information on the Memory Stick media. Write-protecting a Memory Stick Media Some versions of Memory Stick media do not have an erasure prevention switch. When the erasure prevention switch is a compact, ... Memory Stick media, visit the Sony online support Web site at http://www.sony.com/pcsupport for customers in USA and Canada, or at http://kdb.sony-latin.com/ for external data storage. nN 52 Using Your VAIO Computer Using the Memory Stick Media Your VAIO computer supports the Memory ...
...compatible products, such as digital cameras, mobile phones and other devices. For the latest information on the Memory Stick media. Write-protecting a Memory Stick Media Some versions of Memory Stick media do not have an erasure prevention switch. When the erasure prevention switch is a compact, ... Memory Stick media, visit the Sony online support Web site at http://www.sony.com/pcsupport for customers in USA and Canada, or at http://kdb.sony-latin.com/ for external data storage. nN 52 Using Your VAIO Computer Using the Memory Stick Media Your VAIO computer supports the Memory ...
VAIO User Guide
Page 53
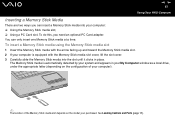
... is automatically detected by your system and appears in place. nN 53 Using Your VAIO Computer Inserting a Memory Stick Media There are two ways you need an optional PC Card adapter. You can insert a Memory Stick media into the slot until it clicks in your My Computer window as a... local drive, under the appropriate letter (depending on the configuration of your computer). ✍ The location of the Memory Stick media slot depends on the model your computer: ❑ Using the Memory Stick media slot; ❑ Using a PC Card slot. See Locating Controls and Ports (page 11). To do...
... is automatically detected by your system and appears in place. nN 53 Using Your VAIO Computer Inserting a Memory Stick Media There are two ways you need an optional PC Card adapter. You can insert a Memory Stick media into the slot until it clicks in your My Computer window as a... local drive, under the appropriate letter (depending on the configuration of your computer). ✍ The location of the Memory Stick media slot depends on the model your computer: ❑ Using the Memory Stick media slot; ❑ Using a PC Card slot. See Locating Controls and Ports (page 11). To do...

VAIO User Guide
Page 54
...the contents stored on the Memory Stick media. For more than one Memory Stick media into the slot if it into the slot. nN 54 Using Your VAIO Computer ! To avoid damaging the computer or the Memory Stick media, do not force the Memory Stick media into the Memory Stick media slot. Viewing ...the Contents Depending on Memory Stick Duo media, visit the Memory Stick web site at http://www.memorystick.com/...
...the contents stored on the Memory Stick media. For more than one Memory Stick media into the slot if it into the slot. nN 54 Using Your VAIO Computer ! To avoid damaging the computer or the Memory Stick media, do not force the Memory Stick media into the Memory Stick media slot. Viewing ...the Contents Depending on Memory Stick Duo media, visit the Memory Stick web site at http://www.memorystick.com/...
VAIO User Guide
Page 55
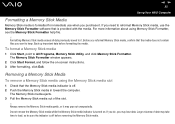
... media indicator is turned on -screen instructions. 3 After formatting, click Exit. nN 55 Using Your VAIO Computer Formatting a Memory Stick Media Memory Stick media is formatted for immediate use the Memory Stick Formatter software that the media does not contain files you may take time to load, so be sure the indicator is off...
... media indicator is turned on -screen instructions. 3 After formatting, click Exit. nN 55 Using Your VAIO Computer Formatting a Memory Stick Media Memory Stick media is formatted for immediate use the Memory Stick Formatter software that the media does not contain files you may take time to load, so be sure the indicator is off...

VAIO User Guide
Page 122
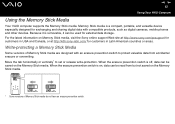
... may need to be connected differently. You cannot access the pictures stored on the digital video camera recorder. 2 Launch the DVgate Plus software. ✍ On Sony digital video cameras, ports labeled DV Out, DV In/Out or i.LINK are i.LINK-compatible. nN 122 Using Peripheral Devices Connecting a Digital Video Camera Recorder... 1 Plug one end of the i.LINK cable (1) into the i.LINK port (2) on the computer and the other end into the DV In/Out ports (3) on a Memory Stick media when using an i.LINK connection. The Sony digital video camera recorder shown here is an example;
... may need to be connected differently. You cannot access the pictures stored on the digital video camera recorder. 2 Launch the DVgate Plus software. ✍ On Sony digital video cameras, ports labeled DV Out, DV In/Out or i.LINK are i.LINK-compatible. nN 122 Using Peripheral Devices Connecting a Digital Video Camera Recorder... 1 Plug one end of the i.LINK cable (1) into the i.LINK port (2) on the computer and the other end into the DV In/Out ports (3) on a Memory Stick media when using an i.LINK connection. The Sony digital video camera recorder shown here is an example;
VAIO User Guide
Page 142
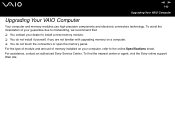
nN 142 Upgrading Your VAIO Computer Upgrading Your VAIO Computer Your computer and memory modules use high precision components and electronic connectors technology. For the type of module and amount of your guarantee due to mishandling, we recommend that: &#... a computer. ❑ You do not install it yourself, if you are not familiar with upgrading memory on your computer, refer to install a new memory module. ❑ You do not touch the connectors or open the memory panel. For assistance, contact an authorized Sony Service Center. To find the nearest center or agent, visit the...
nN 142 Upgrading Your VAIO Computer Upgrading Your VAIO Computer Your computer and memory modules use high precision components and electronic connectors technology. For the type of module and amount of your guarantee due to mishandling, we recommend that: &#... a computer. ❑ You do not install it yourself, if you are not familiar with upgrading memory on your computer, refer to install a new memory module. ❑ You do not touch the connectors or open the memory panel. For assistance, contact an authorized Sony Service Center. To find the nearest center or agent, visit the...

VAIO User Guide
Page 143
...open the computer. Notes on the configuration of memory modules may result in personal injury or equipment damage. ❑ Electrostatic Discharge (ESD) can damage electronic components. nN 143 Upgrading Your VAIO Computer Adding and Removing Memory If you want to expand the functionality of ...your computer, you can increase the memory by your computer or Windows becomes unstable, contact your sales dealer or ...
...open the computer. Notes on the configuration of memory modules may result in personal injury or equipment damage. ❑ Electrostatic Discharge (ESD) can damage electronic components. nN 143 Upgrading Your VAIO Computer Adding and Removing Memory If you want to expand the functionality of ...your computer, you can increase the memory by your computer or Windows becomes unstable, contact your sales dealer or ...

VAIO User Guide
Page 144
... shielded ❑ Ambient temperature of the components and circuit boards inside your computer. nN 144 Upgrading Your VAIO Computer ❑ Introducing any liquids or any foreign substances or objects into the memory slots, or other internal components of the computer, will result in damage to the computer and any repair... costs will not be covered by the warranty. ❑ Do not place the memory module in places subject to your hands and fingers, do not touch the edges of more than 95°F (35°C) or less than...
... shielded ❑ Ambient temperature of the components and circuit boards inside your computer. nN 144 Upgrading Your VAIO Computer ❑ Introducing any liquids or any foreign substances or objects into the memory slots, or other internal components of the computer, will result in damage to the computer and any repair... costs will not be covered by the warranty. ❑ Do not place the memory module in places subject to your hands and fingers, do not touch the edges of more than 95°F (35°C) or less than...

VAIO User Guide
Page 145
nN 145 Upgrading Your VAIO Computer Removing and Installing a Memory Module VGN-A700 Series models To change or add a memory module to the memory module slot on the bottom of the computer 1 Shut down your computer and disconnect all peripheral devices. 2 Unplug the computer and remove the battery. 3 Wait until the computer cools down. 4 Unscrew the central screw on the bottom of the computer and remove the memory module compartment cover. 5 Touch a metal object (such as the connector panel on the back of the computer) to discharge static electricity.
nN 145 Upgrading Your VAIO Computer Removing and Installing a Memory Module VGN-A700 Series models To change or add a memory module to the memory module slot on the bottom of the computer 1 Shut down your computer and disconnect all peripheral devices. 2 Unplug the computer and remove the battery. 3 Wait until the computer cools down. 4 Unscrew the central screw on the bottom of the computer and remove the memory module compartment cover. 5 Touch a metal object (such as the connector panel on the back of the computer) to discharge static electricity.

VAIO User Guide
Page 146
6 Remove the memory module: ❑ Pull the tabs in the direction of the arrows (1). nN 146 Upgrading Your VAIO Computer ❑ Make sure that the memory module tilts up and then pull it out in the direction of the arrow (2). 7 Remove the new memory module from its packaging. The memory module is released.
6 Remove the memory module: ❑ Pull the tabs in the direction of the arrows (1). nN 146 Upgrading Your VAIO Computer ❑ Make sure that the memory module tilts up and then pull it out in the direction of the arrow (2). 7 Remove the new memory module from its packaging. The memory module is released.
VAIO User Guide
Page 147
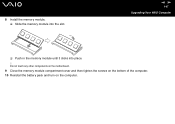
Do not touch any other components on the motherboard. 9 Close the memory module compartment cover and then tighten the screws on the bottom of the computer. 10 Reinstall the battery pack and turn on the computer. 8 Install the memory module. ❑ Slide the memory module into place. ! nN 147 Upgrading Your VAIO Computer ❑ Push in the memory module until it clicks into the slot.
Do not touch any other components on the motherboard. 9 Close the memory module compartment cover and then tighten the screws on the bottom of the computer. 10 Reinstall the battery pack and turn on the computer. 8 Install the memory module. ❑ Slide the memory module into place. ! nN 147 Upgrading Your VAIO Computer ❑ Push in the memory module until it clicks into the slot.


