
VAIO User Guide
Page 2
nN 2 Contents Before Use ...6 Documentation ...6 Ergonomic Considerations ...8 Getting Started ...10 Locating Controls and Ports...11 About the Indicator Lights ...24 Connecting a Power Source ...25 Using the Battery Pack...26 Shutting Down Your Computer Safely ...33 Using Your VAIO Computer ...34 Using the Keyboard...35 Using the Touch Pad...37 Using Special-function Buttons ...38 Using the Optical Disc Drive ...40 Using the TV Function (on Selected Models Only) ...47 Using PC Cards ...48 Using the Memory Stick Media ...52 Using the Internet...56 Using Wireless LAN (WLAN) ...57
nN 2 Contents Before Use ...6 Documentation ...6 Ergonomic Considerations ...8 Getting Started ...10 Locating Controls and Ports...11 About the Indicator Lights ...24 Connecting a Power Source ...25 Using the Battery Pack...26 Shutting Down Your Computer Safely ...33 Using Your VAIO Computer ...34 Using the Keyboard...35 Using the Touch Pad...37 Using Special-function Buttons ...38 Using the Optical Disc Drive ...40 Using the TV Function (on Selected Models Only) ...47 Using PC Cards ...48 Using the Memory Stick Media ...52 Using the Internet...56 Using Wireless LAN (WLAN) ...57

VAIO User Guide
Page 4
nN 4 Precautions ...157 On Handling the LCD Screen...158 On Using the Power Source...159 On Handling Your Computer...160 On Handling Floppy Disks...162 On Handling Discs ...163 On Using the Battery Pack...164 On Using Headphones...165 On Handling Memory Stick Media...165 On Handling the Hard Disk ...166 Troubleshooting ...167 Computer ...168 System Security ...178 Battery ...180 Internet ...182 Networking ...184 CDs and DVDs...186 Display ...189 Printing ...192 Microphone ...193 Mouse ...194 Speakers ...195 Touch Pad...196 Keyboard ...198
nN 4 Precautions ...157 On Handling the LCD Screen...158 On Using the Power Source...159 On Handling Your Computer...160 On Handling Floppy Disks...162 On Handling Discs ...163 On Using the Battery Pack...164 On Using Headphones...165 On Handling Memory Stick Media...165 On Handling the Hard Disk ...166 Troubleshooting ...167 Computer ...168 System Security ...178 Battery ...180 Internet ...182 Networking ...184 CDs and DVDs...186 Display ...189 Printing ...192 Microphone ...193 Mouse ...194 Speakers ...195 Touch Pad...196 Keyboard ...198

VAIO User Guide
Page 10
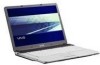
Getting Started This section describes how to get started with using your VAIO computer. ❑ Locating Controls and Ports (page 11) ❑ About the Indicator Lights (page 24) ❑ Connecting a Power Source (page 25) ❑ Using the Battery Pack (page 26) ❑ Shutting Down Your Computer Safely (page 33) nN 10 Getting Started
Getting Started This section describes how to get started with using your VAIO computer. ❑ Locating Controls and Ports (page 11) ❑ About the Indicator Lights (page 24) ❑ Connecting a Power Source (page 25) ❑ Using the Battery Pack (page 26) ❑ Shutting Down Your Computer Safely (page 33) nN 10 Getting Started
VAIO User Guide
Page 12
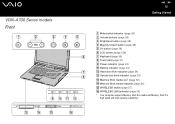
VGN-A700 Series models Front nN 12 Getting Started A Mute button/indicator (page 38) B Volume buttons (page 38) C Brightness button (page 38) D Magnify screen button (page 38) E S1 button (page 38) F LCD screen (page 158) G Keyboard (page 35) H Touch pad (page 37) I Power indicator (page 24) J Battery indicator (page 24) K Hard disk drive...
VGN-A700 Series models Front nN 12 Getting Started A Mute button/indicator (page 38) B Volume buttons (page 38) C Brightness button (page 38) D Magnify screen button (page 38) E S1 button (page 38) F LCD screen (page 158) G Keyboard (page 35) H Touch pad (page 37) I Power indicator (page 24) J Battery indicator (page 24) K Hard disk drive...

VAIO User Guide
Page 17
Bottom nN 17 Getting Started A AV station/port replicator connector (page 66) B Air vents C LOCK/UNLOCK switch (page 26) D RELEASE switch (page 26) E Battery bay (page 26) F CONNECT button* (page 87) * On selected models with wireless mouse functionality.
Bottom nN 17 Getting Started A AV station/port replicator connector (page 66) B Air vents C LOCK/UNLOCK switch (page 26) D RELEASE switch (page 26) E Battery bay (page 26) F CONNECT button* (page 87) * On selected models with wireless mouse functionality.

VAIO User Guide
Page 18
VGN-FS600 Series models Front nN 18 Getting Started A LCD screen (page 158) B Speakers C Keyboard (page 35) D Touch pad (page 37) E Power indicator (page 24) F Battery indicator (page 24) G Hard disk drive indicator (page 24) H Memory Stick media indicator (page 24) I WLAN (Wireless LAN) switch (on selected models only) (page 57) J WIRELESS LAN indicator (on selected models only) (page 24) K Headphones jack (page 91) L Microphone jack (page 115)
VGN-FS600 Series models Front nN 18 Getting Started A LCD screen (page 158) B Speakers C Keyboard (page 35) D Touch pad (page 37) E Power indicator (page 24) F Battery indicator (page 24) G Hard disk drive indicator (page 24) H Memory Stick media indicator (page 24) I WLAN (Wireless LAN) switch (on selected models only) (page 57) J WIRELESS LAN indicator (on selected models only) (page 24) K Headphones jack (page 91) L Microphone jack (page 115)

VAIO User Guide
Page 20
Back A Air vent B Battery connector (page 26) nN 20 Getting Started
Back A Air vent B Battery connector (page 26) nN 20 Getting Started
VAIO User Guide
Page 24
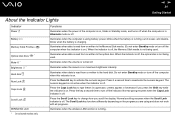
... not being used . Press the Scroll Lock key to the optical disc. Functions Illuminates when the power of power, and doubleblinks when the battery is running out of the computer is on .) When the indicator is off, the Memory Stick media is read from or written to type... is on the program you scroll the display. Illuminates when data is read from or written to change how you are using battery power, blinks when the battery is running . The Scroll Lock key functions differently depending on maximum brightness intensity. nN 24 Getting Started About the Indicator Lights...
... not being used . Press the Scroll Lock key to the optical disc. Functions Illuminates when the power of power, and doubleblinks when the battery is running out of the computer is on .) When the indicator is off, the Memory Stick media is read from or written to type... is on the program you scroll the display. Illuminates when data is read from or written to change how you are using battery power, blinks when the battery is running . The Scroll Lock key functions differently depending on maximum brightness intensity. nN 24 Getting Started About the Indicator Lights...

VAIO User Guide
Page 25
... the DC In plug varies depending on the computer. nN 25 Getting Started ! Using the AC Adapter To use either an AC adapter or a rechargeable battery pack as a power source. To disconnect your computer only with the supplied AC adapter. If you the time of time, put your computer into the...
... the DC In plug varies depending on the computer. nN 25 Getting Started ! Using the AC Adapter To use either an AC adapter or a rechargeable battery pack as a power source. To disconnect your computer only with the supplied AC adapter. If you the time of time, put your computer into the...
VAIO User Guide
Page 26
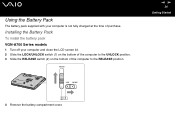
Installing the Battery Pack To install the battery pack VGN-A700 Series models 1 Turn off your computer is not fully charged at the time of the computer to the RELEASE position. nN 26 Getting Started 4 Remove the battery compartment cover. Using the Battery Pack The battery pack supplied with your computer and close the LCD screen lid. 2 Slide the LOCK/UNLOCK switch (1) on the bottom of the computer to the UNLOCK position. 3 Slide the RELEASE switch (2) on the bottom of purchase.
Installing the Battery Pack To install the battery pack VGN-A700 Series models 1 Turn off your computer is not fully charged at the time of the computer to the RELEASE position. nN 26 Getting Started 4 Remove the battery compartment cover. Using the Battery Pack The battery pack supplied with your computer and close the LCD screen lid. 2 Slide the LOCK/UNLOCK switch (1) on the bottom of the computer to the UNLOCK position. 3 Slide the RELEASE switch (2) on the bottom of purchase.

VAIO User Guide
Page 27
5 Slide the battery in the battery compartment cover. nN 27 Getting Started 6 Turn over the battery attached to the battery compartment cover. 7 Insert the tab on the battery compartment cover into the notch, and push the battery down into the compartment until it clicks into place. 8 Slide the LOCK/UNLOCK switch to the LOCK position to secure the battery on the computer.
5 Slide the battery in the battery compartment cover. nN 27 Getting Started 6 Turn over the battery attached to the battery compartment cover. 7 Insert the tab on the battery compartment cover into the notch, and push the battery down into the compartment until it clicks into place. 8 Slide the LOCK/UNLOCK switch to the LOCK position to secure the battery on the computer.

VAIO User Guide
Page 28
nN 28 Getting Started 4 Slide the lock switch (1) to the LOCK position to secure the battery on the computer. ✍ When the computer is designed to operate only with genuine Sony batteries. This computer is directly connected to AC power and has a battery pack installed, it clicks into the battery compartment until it uses power from the AC outlet. ! VGN-FS600 Series models 1 Turn off your computer and close the LCD screen lid. 2 Slide the lock switch (1) to the UNLOCK position. 3 Slide the battery into place.
nN 28 Getting Started 4 Slide the lock switch (1) to the LOCK position to secure the battery on the computer. ✍ When the computer is designed to operate only with genuine Sony batteries. This computer is directly connected to AC power and has a battery pack installed, it clicks into the battery compartment until it uses power from the AC outlet. ! VGN-FS600 Series models 1 Turn off your computer and close the LCD screen lid. 2 Slide the lock switch (1) to the UNLOCK position. 3 Slide the battery into place.

VAIO User Guide
Page 29
The battery is using battery power. The computer automatically charges the battery (the battery indicator light flashes in a double blink pattern as the battery charges). The computer is running out of purchase. Battery indicator light status On Blinks Double blinks Off Meaning The computer is not fully charged at the time of power. To charge the battery pack 1 Install the battery pack. 2 Connect the AC adapter to the computer. nN 29 Getting Started Charging the Battery Pack The battery pack supplied with your computer is using AC power. The battery is charging.
The battery is using battery power. The computer automatically charges the battery (the battery indicator light flashes in a double blink pattern as the battery charges). The computer is running out of purchase. Battery indicator light status On Blinks Double blinks Off Meaning The computer is not fully charged at the time of power. To charge the battery pack 1 Install the battery pack. 2 Connect the AC adapter to the computer. nN 29 Getting Started Charging the Battery Pack The battery pack supplied with your computer is using AC power. The battery is charging.

VAIO User Guide
Page 30
...management mode, such as a power source. To avoid loss of data when using the computer. Going back to charge while you are using battery power, you should save your data frequently. The battery pack continues to the previous work state is impossible. To avoid loss of data, you use the...falls below 10%, you will lose any time. nN 30 Getting Started ✍ When the battery is running out of power, both the battery and power indicator lights start flashing. If the battery wears out when your computer enters Standby mode, you should save your computer may not enter ...
...management mode, such as a power source. To avoid loss of data when using the computer. Going back to charge while you are using battery power, you should save your data frequently. The battery pack continues to the previous work state is impossible. To avoid loss of data, you use the...falls below 10%, you will lose any time. nN 30 Getting Started ✍ When the battery is running out of power, both the battery and power indicator lights start flashing. If the battery wears out when your computer enters Standby mode, you should save your computer may not enter ...

VAIO User Guide
Page 31
... to remove the battery compartment cover. 5 Open the tabs on the battery compartment cover to release the battery and remove it from the battery compartment cover. 6 Insert the two tabs on the bottom of the computer to the UNLOCK position. 3 Slide the RELEASE switch (2) on the battery compartment cover diagonally ...into the notches and push the cover into the compartment until it clicks into place. Removing the Battery Pack To remove the battery pack VGN-A700 Series models 1 Turn off your computer and close the LCD screen lid. 2 Slide the LOCK/UNLOCK switch (1) on the bottom...
... to remove the battery compartment cover. 5 Open the tabs on the battery compartment cover to release the battery and remove it from the battery compartment cover. 6 Insert the two tabs on the bottom of the computer to the UNLOCK position. 3 Slide the RELEASE switch (2) on the battery compartment cover diagonally ...into the notches and push the cover into the compartment until it clicks into place. Removing the Battery Pack To remove the battery pack VGN-A700 Series models 1 Turn off your computer and close the LCD screen lid. 2 Slide the LOCK/UNLOCK switch (1) on the bottom...

VAIO User Guide
Page 32
nN 32 Getting Started ✍ You may lose data if you remove the battery pack while the computer is on and not connected to the UNLOCK position. 3 Slide and hold the release latch (2) and slide the battery away from the computer. VGN-FS600 Series models 1 Turn off your computer and close the LCD screen lid. 2 Slide the lock switch (1) to the AC adapter or if you remove the battery while the computer is in Standby mode.
nN 32 Getting Started ✍ You may lose data if you remove the battery pack while the computer is on and not connected to the UNLOCK position. 3 Slide and hold the release latch (2) and slide the battery away from the computer. VGN-FS600 Series models 1 Turn off your computer and close the LCD screen lid. 2 Slide the lock switch (1) to the AC adapter or if you remove the battery while the computer is in Standby mode.

VAIO User Guide
Page 42
... anti-virus software before writing data onto a disc. ❑ Do not use memory-resident utility software while writing data to play DVDs created by the VAIO Zone software. ✍ Ultra-speed CD-RW is at least 50 percent charged. ❑ Some DVD players and computer's DVD drives may take a... ❑ Do not switch power modes while using the pre-installed software and while using your battery is supported on VGN-A700 Series models but does not support 8cm disc writing. nN 42 Using Your VAIO Computer Notes on writing data onto a disc ❑ To make sure you exit and close ...
... anti-virus software before writing data onto a disc. ❑ Do not use memory-resident utility software while writing data to play DVDs created by the VAIO Zone software. ✍ Ultra-speed CD-RW is at least 50 percent charged. ❑ Some DVD players and computer's DVD drives may take a... ❑ Do not switch power modes while using the pre-installed software and while using your battery is supported on VGN-A700 Series models but does not support 8cm disc writing. nN 42 Using Your VAIO Computer Notes on writing data onto a disc ❑ To make sure you exit and close ...
VAIO User Guide
Page 87
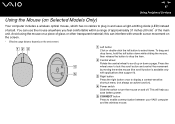
... of glass or other transparent material; Avoid using the mouse on a piece of the main unit. this can use the mouse anywhere you save battery power. nN 87 Using Peripheral Devices Using the Mouse (on Selected Models Only) Your computer includes a wireless optical mouse, which has no cables ... the item. Press the wheel once to scroll up or down while sliding the mouse, then release the button to enable communication between your VAIO computer and the wireless mouse. You can interfere with applications that support it). B Central wheel Rotate the central wheel to lock the scroll...
... of glass or other transparent material; Avoid using the mouse on a piece of the main unit. this can use the mouse anywhere you save battery power. nN 87 Using Peripheral Devices Using the Mouse (on Selected Models Only) Your computer includes a wireless optical mouse, which has no cables ... the item. Press the wheel once to scroll up or down while sliding the mouse, then release the button to enable communication between your VAIO computer and the wireless mouse. You can interfere with applications that support it). B Central wheel Rotate the central wheel to lock the scroll...
VAIO User Guide
Page 88
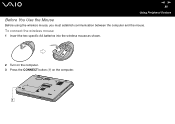
To connect the wireless mouse 1 Insert the two specific AA batteries into the wireless mouse as shown. 2 Turn on the computer. 3 Press the CONNECT button (1) on the computer. nN 88 Using Peripheral Devices Before You Use the Mouse Before using the wireless mouse, you must establish communication between the computer and the mouse.
To connect the wireless mouse 1 Insert the two specific AA batteries into the wireless mouse as shown. 2 Turn on the computer. 3 Press the CONNECT button (1) on the computer. nN 88 Using Peripheral Devices Before You Use the Mouse Before using the wireless mouse, you must establish communication between the computer and the mouse.
VAIO User Guide
Page 89
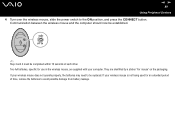
...sticker "For mouse" on the packaging. They are supplied with your wireless mouse does not operate properly, the batteries may need to be completed within 10 seconds of time, remove the batteries to the ON position, and press the CONNECT button. nN 89 Using Peripheral Devices 4 Turn over the ...wireless mouse, slide the power switch to avoid possible damage from battery leakage. Two AA batteries, specific for an extended period of each other...
...sticker "For mouse" on the packaging. They are supplied with your wireless mouse does not operate properly, the batteries may need to be completed within 10 seconds of time, remove the batteries to the ON position, and press the CONNECT button. nN 89 Using Peripheral Devices 4 Turn over the ...wireless mouse, slide the power switch to avoid possible damage from battery leakage. Two AA batteries, specific for an extended period of each other...


