User Guide
Page 9
n9 N Before Use ❑ Viewing angle of the display as well. ❑ Lighting - Choose a location where windows and lights do not create glare and reflection on the display. Adjust the brightness setting of the computer's display - You can reduce eye strain and ...
n9 N Before Use ❑ Viewing angle of the display as well. ❑ Lighting - Choose a location where windows and lights do not create glare and reflection on the display. Adjust the brightness setting of the computer's display - You can reduce eye strain and ...
User Guide
Page 24
The power indicator light turns off any prompts warning you to save documents or to consider other users and wait for the computer to shut down your computer properly, as described below. n 24 N Getting Started Shutting Down Your Computer Safely To avoid losing unsaved data, be sure to turn off automatically. The Turn off computer window appears. 3 Click Turn Off. 4 Respond to any peripherals connected to the computer. 2 Click Start and then Turn Off Computer. To shut down your computer 1 Turn off .
The power indicator light turns off any prompts warning you to save documents or to consider other users and wait for the computer to shut down your computer properly, as described below. n 24 N Getting Started Shutting Down Your Computer Safely To avoid losing unsaved data, be sure to turn off automatically. The Turn off computer window appears. 3 Click Turn Off. 4 Respond to any peripherals connected to the computer. 2 Click Start and then Turn Off Computer. To shut down your computer 1 Turn off .
User Guide
Page 27
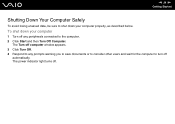
To decrease volume, press Fn+F3 and then m or To increase volume, press Fn+F4 and then M or ,, or keep pressing Fn+F4. Adjusts the built-in speakers and the headphones. n 27 N Using Your VAIO Computer Combinations and Functions with the Fn Key ✍ Some functions are not available until Windows is launched. Combinations/Feature Fn + % (F2): speaker switch Fn + 2 (F3/F4): speaker volume Fn + 8 (F5/F6): brightness control Fn + /T (F7): switch to the external display Fn + (F10): zoom Functions Turns on and off the built-in speaker volume.
To decrease volume, press Fn+F3 and then m or To increase volume, press Fn+F4 and then M or ,, or keep pressing Fn+F4. Adjusts the built-in speakers and the headphones. n 27 N Using Your VAIO Computer Combinations and Functions with the Fn Key ✍ Some functions are not available until Windows is launched. Combinations/Feature Fn + % (F2): speaker switch Fn + 2 (F3/F4): speaker volume Fn + 8 (F5/F6): brightness control Fn + /T (F7): switch to the external display Fn + (F10): zoom Functions Turns on and off the built-in speaker volume.
User Guide
Page 37
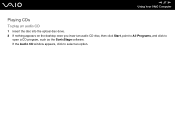
If the Audio CD window appears, click to open a CD program, such as the SonicStage software. n 37 N Using Your VAIO Computer Playing CDs To play an audio CD 1 Insert the disc into the optical disc drive. 2 If nothing appears on the desktop once you insert an audio CD disc, then click Start, point to All Programs, and click to select an option.
If the Audio CD window appears, click to open a CD program, such as the SonicStage software. n 37 N Using Your VAIO Computer Playing CDs To play an audio CD 1 Insert the disc into the optical disc drive. 2 If nothing appears on the desktop once you insert an audio CD disc, then click Start, point to All Programs, and click to select an option.

User Guide
Page 38
...determine which type of CD your system's hardware configuration. n 38 N Using Your VAIO Computer Copying Files to a CD-RW or CD-R ! If the CD Drive window appears, click Take no action. 2 Open Windows Explorer by pressing the Windows key and the E key simultaneously. 3 In the Folders panel on the left,...optical disc drive icon in the CD Writing Wizard. * The read/write drive letter designation may vary, depending on This Computer panel. 4 Close Windows Explorer. 5 Click Start and then My Computer. 6 Click the optical disc drive icon under Devices with the file(s) or folder(s) you want to...
...determine which type of CD your system's hardware configuration. n 38 N Using Your VAIO Computer Copying Files to a CD-RW or CD-R ! If the CD Drive window appears, click Take no action. 2 Open Windows Explorer by pressing the Windows key and the E key simultaneously. 3 In the Folders panel on the left,...optical disc drive icon in the CD Writing Wizard. * The read/write drive letter designation may vary, depending on This Computer panel. 4 Close Windows Explorer. 5 Click Start and then My Computer. 6 Click the optical disc drive icon under Devices with the file(s) or folder(s) you want to...

User Guide
Page 42
...If an "!" It may not function properly if you continually switch to Normal mode from Standby mode or Hibernate mode. n 42 N Using Your VAIO Computer ✍ Some devices may damage the connector pins. While the card is not recognized. Do not carry the computer while touching the head of...the computer enters Hibernate mode. If you have difficulty inserting a PC Card, check that you are inserting the PC Card in the System Properties window, remove the software driver and then reinstall it. See the manual supplied with your system to your system is inserted, the computer may not...
...If an "!" It may not function properly if you continually switch to Normal mode from Standby mode or Hibernate mode. n 42 N Using Your VAIO Computer ✍ Some devices may damage the connector pins. While the card is not recognized. Do not carry the computer while touching the head of...the computer enters Hibernate mode. If you have difficulty inserting a PC Card, check that you are inserting the PC Card in the System Properties window, remove the software driver and then reinstall it. See the manual supplied with your system to your system is inserted, the computer may not...
User Guide
Page 43
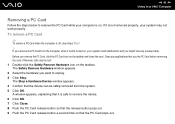
... still turned on, your computer is on. Before you remove the PC Card, click the PC Card icon on the taskbar. The Stop a Hardware Device window appears. 4 Confirm that the device can be lost. 1 Double-click the Safely Remove Hardware icon on the taskbar and close the card. n 43 N ...Using Your VAIO Computer Removing a PC Card Follow the steps below to remove the PC Card while your system could malfunction and you might lose any applications that ...
... still turned on, your computer is on. Before you remove the PC Card, click the PC Card icon on the taskbar. The Stop a Hardware Device window appears. 4 Confirm that the device can be lost. 1 Double-click the Safely Remove Hardware icon on the taskbar and close the card. n 43 N ...Using Your VAIO Computer Removing a PC Card Follow the steps below to remove the PC Card while your system could malfunction and you might lose any applications that ...
User Guide
Page 46
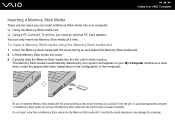
..., you need an optional PC Card adapter. Inserting the media improperly may damage the computer. You can insert a Memory Stick media into your My Computer window as you insert it does not insert smoothly. To do not force the Memory Stick media into the slot if it into the slot. n 46... N Using Your VAIO Computer Inserting a Memory Stick Media There are two ways you can only insert one Memory Stick media into the Memory Stick media slot. Do not...
..., you need an optional PC Card adapter. Inserting the media improperly may damage the computer. You can insert a Memory Stick media into your My Computer window as you insert it does not insert smoothly. To do not force the Memory Stick media into the slot if it into the slot. n 46... N Using Your VAIO Computer Inserting a Memory Stick Media There are two ways you can only insert one Memory Stick media into the Memory Stick media slot. Do not...
User Guide
Page 47
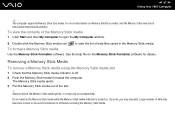
..., you may pop out unexpectedly. To view the contents of the Memory Stick media 1 Click Start and then My Computer to open the My Computer window. 2 Double-click the Memory Stick media icon to load, so be sure the indicator is off . 2 Push the Memory Stick media in the Memory Stick... data may take time to view the list of the slot. ! For more information on the Memory Stick Formatter software for details. n 47 N Using Your VAIO Computer ✍ The computer supports Memory Stick Duo media.
..., you may pop out unexpectedly. To view the contents of the Memory Stick media 1 Click Start and then My Computer to open the My Computer window. 2 Double-click the Memory Stick media icon to load, so be sure the indicator is off . 2 Push the Memory Stick media in the Memory Stick... data may take time to view the list of the slot. ! For more information on the Memory Stick Formatter software for details. n 47 N Using Your VAIO Computer ✍ The computer supports Memory Stick Duo media.
User Guide
Page 48
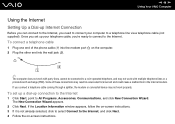
... a coin-operated telephone, and may result in excess electrical current and could cause a malfunction in the internal modem. If the Location Information window appears, follow the on -screen instructions. To set up your computer to the Internet. The New Connection Wizard appears. 2 Click Next....1 Plug one end of these connections may not work with multiple telephone lines or a private branch exchange (PBX). n 48 N Using Your VAIO Computer Using the Internet Setting Up a Dial-up Internet Connection Before you can connect to the Internet, you need to connect your telephone cable,...
... a coin-operated telephone, and may result in excess electrical current and could cause a malfunction in the internal modem. If the Location Information window appears, follow the on -screen instructions. To set up your computer to the Internet. The New Connection Wizard appears. 2 Click Next....1 Plug one end of these connections may not work with multiple telephone lines or a private branch exchange (PBX). n 48 N Using Your VAIO Computer Using the Internet Setting Up a Dial-up Internet Connection Before you can connect to the Internet, you need to connect your telephone cable,...
User Guide
Page 51
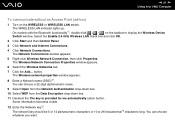
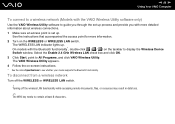
... indicator lights up. The Wireless Network Connection Properties window appears. 6 Select the Wireless Networks tab. 7 Click the Add... You can choose whatever you want. Some information becomes visible. 12 Enter the Network key*2. Select the Enable 2.4 GHz Wireless LAN check box and click OK. 2 ...down box. 11 Deselect the The key is provided for me automatically option button. The Wireless network properties window appears. 8 Enter a Network name (SSID)*2. n 51 N Using Your VAIO Computer To communicate without an Access Point (ad-hoc) 1 Turn on the taskbar to display the Wireless...
... indicator lights up. The Wireless Network Connection Properties window appears. 6 Select the Wireless Networks tab. 7 Click the Add... You can choose whatever you want. Some information becomes visible. 12 Enter the Network key*2. Select the Enable 2.4 GHz Wireless LAN check box and click OK. 2 ...down box. 11 Deselect the The key is provided for me automatically option button. The Wireless network properties window appears. 8 Enter a Network name (SSID)*2. n 51 N Using Your VAIO Computer To communicate without an Access Point (ad-hoc) 1 Turn on the taskbar to display the Wireless...
User Guide
Page 52
... computers, you need to enter the same Network name and the same Network key on all these computers the exact same way. n 52 N Using Your VAIO Computer 13 Enter exactly the same Network key again, for confirmation. 14 Select the check box This is ready to communicate with values of the... screen. 15 Click OK. The Advanced window appears. 17 Select the Computer-to 15. ✍ An ad-hoc network does not support WPA. This means that you need to -computer (ad hoc...
... computers, you need to enter the same Network name and the same Network key on all these computers the exact same way. n 52 N Using Your VAIO Computer 13 Enter exactly the same Network key again, for confirmation. 14 Select the check box This is ready to communicate with values of the... screen. 15 Click OK. The Advanced window appears. 17 Select the Computer-to 15. ✍ An ad-hoc network does not support WPA. This means that you need to -computer (ad hoc...

User Guide
Page 53
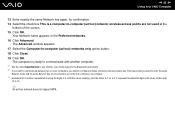
n 53 N Using Your VAIO Computer To disconnect from a computer-to select Any available network (access point preferred), and click Close. 8 Click OK. 9 Click Close. 10 Turn off the WIRELESS or WIRELESS LAN switch. The Advanced window appears. 7 Click to -computer (ad-hoc)...Internet Connections. 3 Click Network Connections. The Wireless Network Connection Properties window appears. 6 On the Wireless Networks tab, click Advanced. The Wireless Network Connection Status window appears. 5 Click Properties. The Network Connections window appears. 4 In the right panel under LAN or High-Speed ...
n 53 N Using Your VAIO Computer To disconnect from a computer-to select Any available network (access point preferred), and click Close. 8 Click OK. 9 Click Close. 10 Turn off the WIRELESS or WIRELESS LAN switch. The Advanced window appears. 7 Click to -computer (ad-hoc)...Internet Connections. 3 Click Network Connections. The Wireless Network Connection Properties window appears. 6 On the Wireless Networks tab, click Advanced. The Wireless Network Connection Status window appears. 5 Click Properties. The Network Connections window appears. 4 In the right panel under LAN or High-Speed ...
User Guide
Page 55
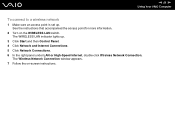
See the instructions that accompanied the access point for more information. 2 Turn on -screen instructions. The Wireless Network Connection window appears. 7 Follow the on the WIRELESS LAN switch. The WIRELESS LAN indicator lights up . n 55 N Using Your VAIO Computer To connect to a wireless network 1 Make sure an access point is set up . 3 Click Start and then Control Panel. 4 Click Network and Internet Connections. 5 Click Network Connections. 6 In the right panel under LAN or High-Speed Internet, double-click Wireless Network Connection.
See the instructions that accompanied the access point for more information. 2 Turn on -screen instructions. The Wireless Network Connection window appears. 7 Follow the on the WIRELESS LAN switch. The WIRELESS LAN indicator lights up . n 55 N Using Your VAIO Computer To connect to a wireless network 1 Make sure an access point is set up . 3 Click Start and then Control Panel. 4 Click Network and Internet Connections. 5 Click Network Connections. 6 In the right panel under LAN or High-Speed Internet, double-click Wireless Network Connection.
User Guide
Page 56
...information about wireless connections. 1 Make sure an access point is set up. The VAIO Wireless Utility appears. 4 Follow the on-screen instructions. * See the online Specifications to display the Wireless Device Switch window. The WIRELESS LAN indicator lights up. To disconnect from a wireless network Turn off... in data loss. ✍ The WPA key needs to contain at least 8 characters. Select the Enable 2.4 GHz Wireless LAN check box and click OK. 3 Click Start, point to All Programs, and click VAIO Wireless Utility. Turning off the WIRELESS or WIRELESS LAN switch. ! n 56 N Using Your...
...information about wireless connections. 1 Make sure an access point is set up. The VAIO Wireless Utility appears. 4 Follow the on-screen instructions. * See the online Specifications to display the Wireless Device Switch window. The WIRELESS LAN indicator lights up. To disconnect from a wireless network Turn off... in data loss. ✍ The WPA key needs to contain at least 8 characters. Select the Enable 2.4 GHz Wireless LAN check box and click OK. 3 Click Start, point to All Programs, and click VAIO Wireless Utility. Turning off the WIRELESS or WIRELESS LAN switch. ! n 56 N Using Your...
User Guide
Page 79
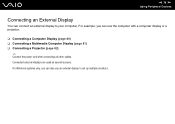
For example, you can also use the computer with a computer display or a projector. ❑ Connecting a Computer Display (page 80) ❑ Connecting a Multimedia Computer Display (page 81) ❑ Connecting a Projector (page 82) ✍ Connect the power cord after connecting all other cables. Connected external displays are used as second screens. On Windows systems only, you can use an external display to your computer. n 79 N Using Peripheral Devices Connecting an External Display You can connect an external display to set up multiple monitors.
For example, you can also use the computer with a computer display or a projector. ❑ Connecting a Computer Display (page 80) ❑ Connecting a Multimedia Computer Display (page 81) ❑ Connecting a Projector (page 82) ✍ Connect the power cord after connecting all other cables. Connected external displays are used as second screens. On Windows systems only, you can use an external display to your computer. n 79 N Using Peripheral Devices Connecting an External Display You can connect an external display to set up multiple monitors.
User Guide
Page 85
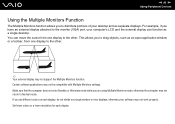
... may not return to the other . ✍ Your external display may not support the Multiple Monitors function. You can function as an open application window or a toolbar, from one display to Normal mode. otherwise your computer's LCD and the external display can move the cursor from one single... window on two displays; Make sure that the computer does not enter Standby or Hibernate mode while you have an external display attached to the ...
... may not return to the other . ✍ Your external display may not support the Multiple Monitors function. You can function as an open application window or a toolbar, from one display to Normal mode. otherwise your computer's LCD and the external display can move the cursor from one single... window on two displays; Make sure that the computer does not enter Standby or Hibernate mode while you have an external display attached to the ...

User Guide
Page 86
To change the primary and secondary device settings, use the Primary Device and Secondary Device drop-down lists under Multiple Display. 4 Click OK. If the Monitor Settings window appears, click OK. Models with the Intel video controller 1 Right-click on the desktop to display the context menu. 2 Point to Graphics Options and click Graphics Properties. 3 Select Extended Desktop from the Display Devices menu. To find which video controller your model includes, see the online Specifications. n 86 N Using Peripheral Devices To select the Multiple Monitors mode !
To change the primary and secondary device settings, use the Primary Device and Secondary Device drop-down lists under Multiple Display. 4 Click OK. If the Monitor Settings window appears, click OK. Models with the Intel video controller 1 Right-click on the desktop to display the context menu. 2 Point to Graphics Options and click Graphics Properties. 3 Select Extended Desktop from the Display Devices menu. To find which video controller your model includes, see the online Specifications. n 86 N Using Peripheral Devices To select the Multiple Monitors mode !
User Guide
Page 91
.... n 91 N Using Peripheral Devices Disconnecting a USB floppy disk drive You can unplug the USB cable directly from the computer. The Safely Remove Hardware window appears. 3 Select the floppy disk drive you can disconnect a USB floppy disk drive when the computer is in a power saving mode (Standby or ... computer to malfunction. Disconnecting the drive when the computer is on the taskbar. If the computer is off . The Stop a Hardware device window appears. 5 Make sure the floppy disk drive is now safe to unplug. 4 Click Stop. A message appears stating it is selected, and click OK...
.... n 91 N Using Peripheral Devices Disconnecting a USB floppy disk drive You can unplug the USB cable directly from the computer. The Safely Remove Hardware window appears. 3 Select the floppy disk drive you can disconnect a USB floppy disk drive when the computer is in a power saving mode (Standby or ... computer to malfunction. Disconnecting the drive when the computer is on the taskbar. If the computer is off . The Stop a Hardware device window appears. 5 Make sure the floppy disk drive is now safe to unplug. 4 Click Stop. A message appears stating it is selected, and click OK...
User Guide
Page 92
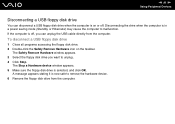
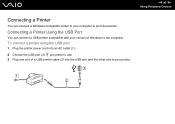
To connect a printer using the USB port 1 Plug the printer power cord into an AC outlet (1). 2 Choose the USB port (3) you prefer to use. 3 Plug one end of Windows to the computer. n 92 N Using Peripheral Devices Connecting a Printer You can connect a USB printer compatible with your printer. Connecting a Printer Using the USB Port You can connect a Windows-compatible printer to your computer to your version of a USB printer cable (2) into the USB port and the other end to print documents.
To connect a printer using the USB port 1 Plug the printer power cord into an AC outlet (1). 2 Choose the USB port (3) you prefer to use. 3 Plug one end of Windows to the computer. n 92 N Using Peripheral Devices Connecting a Printer You can connect a USB printer compatible with your printer. Connecting a Printer Using the USB Port You can connect a Windows-compatible printer to your computer to your version of a USB printer cable (2) into the USB port and the other end to print documents.


