

User Guide
Page 6
.... Sony has combined leading-edge technology in the supplied manuals including this manual may find differences in this User Guide is intended for users of -the-art personal computing experience. ! External views illustrated in the information when your purchase of this Sony VAIO®...; computer, and welcome to provide state-of the VAIO computers with the 64-bit operating system. Information in audio, video, computing, and communications to the...
.... Sony has combined leading-edge technology in the supplied manuals including this manual may find differences in this User Guide is intended for users of -the-art personal computing experience. ! External views illustrated in the information when your purchase of this Sony VAIO®...; computer, and welcome to provide state-of the VAIO computers with the 64-bit operating system. Information in audio, video, computing, and communications to the...
User Guide
Page 11
Choose a location where windows and lights do not cause glare and reflection on the display. Proper lighting adds to find the best position. When using an external display, set ...
Choose a location where windows and lights do not cause glare and reflection on the display. Proper lighting adds to find the best position. When using an external display, set ...

User Guide
Page 33
... button to display the setup window. To change the default software options in the VAIO Launcher. To do so, press and hold the button or launch and navigate through the VAIO Control Center to display the setup window. * On models with the VAIO Control Center for selecting the ...desired software. n 33 N Using Your VAIO Computer Using Special-function Buttons Your computer is equipped with special buttons...
... button to display the setup window. To change the default software options in the VAIO Launcher. To do so, press and hold the button or launch and navigate through the VAIO Control Center to display the setup window. * On models with the VAIO Control Center for selecting the ...desired software. n 33 N Using Your VAIO Computer Using Special-function Buttons Your computer is equipped with special buttons...

User Guide
Page 34
Note that launching or exiting your desired application. ! The viewer window may show some noise, for example horizontal streaks, if you to capture still images and movies with the appropriate software. This is using the camera, ... the built-in MOTION EYE camera, respectively. ✍ The built-in MOTION EYE camera. n 34 N Using Your VAIO Computer Using the Built-in MOTION EYE Camera Your computer is equipped with the Microsoft Windows Movie Maker software. You cannot operate the built-in MOTION EYE camera with a built-in MOTION EYE camera...
Note that launching or exiting your desired application. ! The viewer window may show some noise, for example horizontal streaks, if you to capture still images and movies with the appropriate software. This is using the camera, ... the built-in MOTION EYE camera, respectively. ✍ The built-in MOTION EYE camera. n 34 N Using Your VAIO Computer Using the Built-in MOTION EYE Camera Your computer is equipped with the Microsoft Windows Movie Maker software. You cannot operate the built-in MOTION EYE camera with a built-in MOTION EYE camera...

User Guide
Page 35
The current image in the viewfinder is captured and its thumbnail image is added as a thumbnail in the left pane of the main window. ✍ When capturing an image in a dark place, click the WebCam Settings icon after step 2 and select the low light or low... the displayed image. The WebCam Companion 2 provides many more information. See the help file included with the software for more features. n 35 N Using Your VAIO Computer Capturing Still Images To capture a still image 1 Click Start, All Programs, ArcSoft WebCam Companion 2, and WebCam Companion 2 to launch the WebCam Companion 2....
The current image in the viewfinder is captured and its thumbnail image is added as a thumbnail in the left pane of the main window. ✍ When capturing an image in a dark place, click the WebCam Settings icon after step 2 and select the low light or low... the displayed image. The WebCam Companion 2 provides many more information. See the help file included with the software for more features. n 35 N Using Your VAIO Computer Capturing Still Images To capture a still image 1 Click Start, All Programs, ArcSoft WebCam Companion 2, and WebCam Companion 2 to launch the WebCam Companion 2....

User Guide
Page 36
n 36 N Using Your VAIO Computer Capturing Movies To capture a movie 1 Click Start, All Programs, ArcSoft WebCam Companion 2, and WebCam Companion 2 to stop movie recording. The first scene of the captured movie is added as a thumbnail in the left pane of the main window. ✍ When capturing a movie..., click the Record Video button once again to launch the WebCam Companion 2. 2 Click the Record icon in the main window. 3 Frame your subject in the properties window. See the help file included with the software for more features. The WebCam Companion 2 provides many more information.
n 36 N Using Your VAIO Computer Capturing Movies To capture a movie 1 Click Start, All Programs, ArcSoft WebCam Companion 2, and WebCam Companion 2 to stop movie recording. The first scene of the captured movie is added as a thumbnail in the left pane of the main window. ✍ When capturing a movie..., click the Record Video button once again to launch the WebCam Companion 2. 2 Click the Record icon in the main window. 3 Frame your subject in the properties window. See the help file included with the software for more features. The WebCam Companion 2 provides many more information.
User Guide
Page 44
n 44 N Using Your VAIO Computer Playing CDs To play the CD. Copying Files to CDs To copy files to a disc 1 Insert a recordable disc into the optical disc drive. 2 If ... and drag them to the empty disc folder. 3 Close the disc folder. If the Audio CD window appears, click to play an audio CD 1 Insert a disc into the optical disc drive. If the AutoPlay window appears, click Burn files to disc and follow the on the desktop, click Start, All Programs, and...
n 44 N Using Your VAIO Computer Playing CDs To play the CD. Copying Files to CDs To copy files to a disc 1 Insert a recordable disc into the optical disc drive. 2 If ... and drag them to the empty disc folder. 3 Close the disc folder. If the Audio CD window appears, click to play an audio CD 1 Insert a disc into the optical disc drive. If the AutoPlay window appears, click Burn files to disc and follow the on the desktop, click Start, All Programs, and...
User Guide
Page 53
...; The formatting process will be completed more quickly if you select Quick Format in the factory default setting and is designed to open the Computer window. 3 Right-click the Memory Stick icon and select Format. 4 Click Restore device defaults. ! Be sure to use . Formatting the Memory Stick erases the ...not remove the Memory Stick from the File system drop-down list as it clicks into place. 2 Click Start and Computer to open the Computer window. 2 Double-click the Memory Stick icon to reformat the media with your valuable data. To format a Memory Stick The Memory Stick has been ...
...; The formatting process will be completed more quickly if you select Quick Format in the factory default setting and is designed to open the Computer window. 3 Right-click the Memory Stick icon and select Format. 4 Click Restore device defaults. ! Be sure to use . Formatting the Memory Stick erases the ...not remove the Memory Stick from the File system drop-down list as it clicks into place. 2 Click Start and Computer to open the Computer window. 2 Double-click the Memory Stick icon to reformat the media with your valuable data. To format a Memory Stick The Memory Stick has been ...

User Guide
Page 60
n 60 N Using Your VAIO Computer ✍ Your computer does not work properly. If you connect a telephone cable coming through a splitter, the modem or connected device may not work with ... branch exchange (PBX). Some of the phone cable (1) into the modem port 2 Plug the other end into the wall jack (2). The Connect to the Internet window appears. 3 Click Dial-up connection to the Internet under Network and Internet. on -screen instructions. To set up a dial-up . 4 Follow the on the computer...
n 60 N Using Your VAIO Computer ✍ Your computer does not work properly. If you connect a telephone cable coming through a splitter, the modem or connected device may not work with ... branch exchange (PBX). Some of the phone cable (1) into the modem port 2 Plug the other end into the wall jack (2). The Connect to the Internet window appears. 3 Click Dial-up connection to the Internet under Network and Internet. on -screen instructions. To set up a dial-up . 4 Follow the on the computer...
User Guide
Page 62
...connection. A WLAN is not available on ad-hoc networks. For setting up the wireless LAN function. The IEEE 802.11n draft standard, using Windows Help and Support. The WLAN supports all your digital devices with the built-in which allows you move from one place to create a full ...the wireless LAN function, you can connect to turn on the WIRELESS switch before starting the wireless LAN function. n 62 N Using Your VAIO Computer Using the Wireless LAN (WLAN) Using the Wireless LAN (WLAN), all normal Ethernet connectivity, but with a limited number of computers (ad-...
...connection. A WLAN is not available on ad-hoc networks. For setting up the wireless LAN function. The IEEE 802.11n draft standard, using Windows Help and Support. The WLAN supports all your digital devices with the built-in which allows you move from one place to create a full ...the wireless LAN function, you can connect to turn on the WIRELESS switch before starting the wireless LAN function. n 62 N Using Your VAIO Computer Using the Wireless LAN (WLAN) Using the Wireless LAN (WLAN), all normal Ethernet connectivity, but with a limited number of computers (ad-...

User Guide
Page 65
...cables at a range of up to turn on selected models only. To open area. Be sure to 33 feet (10 meters) in an open Windows Help and Support, click Start and Help and Support. ! To use the Bluetooth function To use the Bluetooth function, you first need to find out... as another computer or a mobile phone. See the online specifications to set up and using the Bluetooth function, search for Bluetooth information using Windows Help and Support. You can transfer data between your model supports the Bluetooth function. For setting up the Bluetooth function. n 65 N Using Your...
...cables at a range of up to turn on selected models only. To open area. Be sure to 33 feet (10 meters) in an open Windows Help and Support, click Start and Help and Support. ! To use the Bluetooth function To use the Bluetooth function, you first need to find out... as another computer or a mobile phone. See the online specifications to set up and using the Bluetooth function, search for Bluetooth information using Windows Help and Support. You can transfer data between your model supports the Bluetooth function. For setting up the Bluetooth function. n 65 N Using Your...
User Guide
Page 69
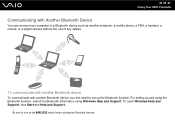
n 69 N Using Your VAIO Computer Communicating with another computer, a mobile phone, a PDA, a headset, a mouse, or a digital camera without the use of any cables. To open Windows Help and Support, click Start and Help and Support. ! For setting up the Bluetooth function. To communicate with another Bluetooth device To communicate with Another ... turn on the WIRELESS switch before starting the Bluetooth function. Be sure to set up and using the Bluetooth function, search for Bluetooth information using Windows Help and Support.
n 69 N Using Your VAIO Computer Communicating with another computer, a mobile phone, a PDA, a headset, a mouse, or a digital camera without the use of any cables. To open Windows Help and Support, click Start and Help and Support. ! For setting up the Bluetooth function. To communicate with another Bluetooth device To communicate with Another ... turn on the WIRELESS switch before starting the Bluetooth function. Be sure to set up and using the Bluetooth function, search for Bluetooth information using Windows Help and Support.
User Guide
Page 81
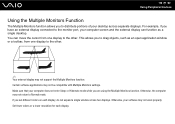
... the cursor from one display to the other . ✍ Your external display may not work properly. You can function as an open application window or a toolbar, from one display to the other . This allows you to drag objects, such as a single desktop. Make sure that ...displays. If you set different colors on each display. Set fewer colors or a lower resolution for each display, do not expand a single window across separate displays. n 81 N Using Peripheral Devices Using the Multiple Monitors Function The Multiple Monitors function allows you to distribute portions of your...
... the cursor from one display to the other . ✍ Your external display may not work properly. You can function as an open application window or a toolbar, from one display to the other . This allows you to drag objects, such as a single desktop. Make sure that ...displays. If you set different colors on each display. Set fewer colors or a lower resolution for each display, do not expand a single window across separate displays. n 81 N Using Peripheral Devices Using the Multiple Monitors Function The Multiple Monitors function allows you to distribute portions of your...

User Guide
Page 82
... desktop and select Personalize. 2 Click Display Settings. 3 Follow the on the S1 button, see the online specifications. For details on -screen instructions to display the window for each display and customize the Multiple Monitors function. To find out which video controller your model includes, see Using Special-function Buttons (page 33...
... desktop and select Personalize. 2 Click Display Settings. 3 Follow the on the S1 button, see the online specifications. For details on -screen instructions to display the window for each display and customize the Multiple Monitors function. To find out which video controller your model includes, see Using Special-function Buttons (page 33...

User Guide
Page 83
... screen resolution under Appearance and Personalization. 3 Right-click the number 2 monitor and select Attached. 4 Click OK. To change the S1 button assignment to display the window for each display and customize the Multiple Monitors function. n 83 N Using Peripheral Devices Models with the S1 button. At the confirmation prompt, click Yes. ✍...
... screen resolution under Appearance and Personalization. 3 Right-click the number 2 monitor and select Attached. 4 Click OK. To change the S1 button assignment to display the window for each display and customize the Multiple Monitors function. n 83 N Using Peripheral Devices Models with the S1 button. At the confirmation prompt, click Yes. ✍...
User Guide
Page 88
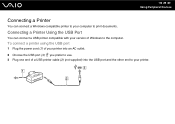
To connect a printer using the USB port 1 Plug the power cord (1) of your printer into an AC outlet. 2 Choose the USB port (3) you prefer to use. 3 Plug one end of Windows to the computer. n 88 N Using Peripheral Devices Connecting a Printer You can connect a USB printer compatible with your version of a USB printer cable (2) (not supplied) into the USB port and the other end to your computer to print documents. Connecting a Printer Using the USB Port You can connect a Windows-compatible printer to your printer.
To connect a printer using the USB port 1 Plug the power cord (1) of your printer into an AC outlet. 2 Choose the USB port (3) you prefer to use. 3 Plug one end of Windows to the computer. n 88 N Using Peripheral Devices Connecting a Printer You can connect a USB printer compatible with your version of a USB printer cable (2) (not supplied) into the USB port and the other end to your computer to print documents. Connecting a Printer Using the USB Port You can connect a Windows-compatible printer to your printer.

User Guide
Page 103
...Right-click the power status icon on the taskbar and select Power Options. 2 Select your desired power plan in the Power Options window. n 103 N Customizing Your VAIO Computer Managing Power with the software for each item. 4 Click OK. Change the Sleep mode and display settings as needed. ...2 If you can enhance the Windows power management functions to suit your power status. The VAIO Power Management function is a software application developed exclusively for running on AC or battery power to ensure better...
...Right-click the power status icon on the taskbar and select Power Options. 2 Select your desired power plan in the Power Options window. n 103 N Customizing Your VAIO Computer Managing Power with the software for each item. 4 Click OK. Change the Sleep mode and display settings as needed. ...2 If you can enhance the Windows power management functions to suit your power status. The VAIO Power Management function is a software application developed exclusively for running on AC or battery power to ensure better...

User Guide
Page 106
...removing memory modules. ❑ Be careful when changing memory. Install the memory module only at an ESD workstation. n 106 N Upgrading Your VAIO Computer Adding and Removing Memory If you want to expand the functionality of your computer, you can increase the amount of memory by the ...computer or the Windows operating system becomes unstable, contact the sales dealer or the manufacturer of your memory module. ❑ Electrostatic discharge (ESD) can damage memory...
...removing memory modules. ❑ Be careful when changing memory. Install the memory module only at an ESD workstation. n 106 N Upgrading Your VAIO Computer Adding and Removing Memory If you want to expand the functionality of your computer, you can increase the amount of memory by the ...computer or the Windows operating system becomes unstable, contact the sales dealer or the manufacturer of your memory module. ❑ Electrostatic discharge (ESD) can damage memory...
User Guide
Page 113
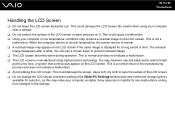
...time. This is a normal result of the LCD screen. ❑ Do not change the LCD screen orientation setting in the Tablet PC Settings window even when there are change options available for any malfunctions arising from changes to normal. ❑ A residual image may appear on it. ...dry cloth to prevent residual images. ❑ The LCD screen becomes warm during operation. You may produce a residual image on the LCD screen. Sony assumes no liability for selection, as this may make your computer in low temperature conditions may , however, see tiny black points and/or bright ...
...time. This is a normal result of the LCD screen. ❑ Do not change the LCD screen orientation setting in the Tablet PC Settings window even when there are change options available for any malfunctions arising from changes to normal. ❑ A residual image may appear on it. ...dry cloth to prevent residual images. ❑ The LCD screen becomes warm during operation. You may produce a residual image on the LCD screen. Sony assumes no liability for selection, as this may make your computer in low temperature conditions may , however, see tiny black points and/or bright ...
User Guide
Page 125
n 125 N Precautions Updating Your Computer Be sure to download the updates. Your computer must be connected to the Internet to install the latest updates on your computer with the following software applications so that the computer can run more efficiently. ❑ Windows Update Click Start, All Programs, and Windows Update and then follow the on-screen instructions. ❑ VAIO Update 4 Click Start, All Programs, VAIO Update 4, and VAIO Update Options and then follow the on-screen instructions. !
n 125 N Precautions Updating Your Computer Be sure to download the updates. Your computer must be connected to the Internet to install the latest updates on your computer with the following software applications so that the computer can run more efficiently. ❑ Windows Update Click Start, All Programs, and Windows Update and then follow the on-screen instructions. ❑ VAIO Update 4 Click Start, All Programs, VAIO Update 4, and VAIO Update Options and then follow the on-screen instructions. !


