
User Guide
Page 8
... categories to articles, the VAIO technology page, specifications, and system and software information. ❑ Troubleshoot my VAIO Maintain and troubleshoot your VAIO computer with VAIO Care, system restore, backup and recovery, and contact Sony support. To access this on-screen guide: 1 Click Start and Help and Support. 2 Click Use my VAIO. 3 Click VAIO Recovery Center User Guide. Provides...
... categories to articles, the VAIO technology page, specifications, and system and software information. ❑ Troubleshoot my VAIO Maintain and troubleshoot your VAIO computer with VAIO Care, system restore, backup and recovery, and contact Sony support. To access this on-screen guide: 1 Click Start and Help and Support. 2 Click Use my VAIO. 3 Click VAIO Recovery Center User Guide. Provides...

User Guide
Page 11
...VAIO computer. ! Before starting your computer for example, a printer, an external hard disk drive, a scanner, and so on) at a time, following the manufacturers' instructions. ❑ Locating Controls and Ports (page 12) ❑ About the Indicator Lights (page 18) ❑ Connecting a Power Source (page... 20) ❑ Using the Battery Pack (page 21) ❑ Shutting Down Your Computer Safely (page 29) Upon completion, connect one device (for...
...VAIO computer. ! Before starting your computer for example, a printer, an external hard disk drive, a scanner, and so on) at a time, following the manufacturers' instructions. ❑ Locating Controls and Ports (page 12) ❑ About the Indicator Lights (page 18) ❑ Connecting a Power Source (page... 20) ❑ Using the Battery Pack (page 21) ❑ Shutting Down Your Computer Safely (page 29) Upon completion, connect one device (for...

User Guide
Page 12
Locating Controls and Ports Take a moment to identify the controls and ports shown on the following pages. Front A Muting (S1) button (page 34) B AV MODE button (page 34) C Num lock indicator (page 18) D Caps lock indicator (page 18) E Scroll lock indicator (page 18) F Power button G LCD screen (page 105) H Built-in speakers (stereo) I Keyboard (page 31) J Touch pad (page 33) n 12 N Getting Started
Locating Controls and Ports Take a moment to identify the controls and ports shown on the following pages. Front A Muting (S1) button (page 34) B AV MODE button (page 34) C Num lock indicator (page 18) D Caps lock indicator (page 18) E Scroll lock indicator (page 18) F Power button G LCD screen (page 105) H Built-in speakers (stereo) I Keyboard (page 31) J Touch pad (page 33) n 12 N Getting Started

User Guide
Page 13
and Duo-size Memory Stick. n 13 N Getting Started A Built-in MOTION EYE camera*1 (page 35) B Built-in MOTION EYE camera indicator*1 (page 18) C Built-in microphone (monaural)*1 D WIRELESS switch (page 63) E WIRELESS indicator (page 18) F SD memory card slot (page 57) G SD memory card indicator (page 18) H Power indicator (page 18) I Charge indicator (page 18) J Hard disk drive/Optical disc drive indicator (page 18) K Memory Stick indicator (page 18) L Memory Stick slot*2 (page 51) *1 On selected models only. *2 Your computer supports both standard-
and Duo-size Memory Stick. n 13 N Getting Started A Built-in MOTION EYE camera*1 (page 35) B Built-in MOTION EYE camera indicator*1 (page 18) C Built-in microphone (monaural)*1 D WIRELESS switch (page 63) E WIRELESS indicator (page 18) F SD memory card slot (page 57) G SD memory card indicator (page 18) H Power indicator (page 18) I Charge indicator (page 18) J Hard disk drive/Optical disc drive indicator (page 18) K Memory Stick indicator (page 18) L Memory Stick slot*2 (page 51) *1 On selected models only. *2 Your computer supports both standard-
User Guide
Page 15
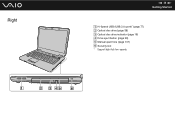
speeds. Right n 15 N Getting Started A Hi-Speed USB (USB 2.0) ports* (page 77) B Optical disc drive (page 38) C Optical disc drive indicator (page 18) D Drive eject button (page 38) E Manual eject hole (page 137) F Security slot * Support high-/full-/low-
speeds. Right n 15 N Getting Started A Hi-Speed USB (USB 2.0) ports* (page 77) B Optical disc drive (page 38) C Optical disc drive indicator (page 18) D Drive eject button (page 38) E Manual eject hole (page 137) F Security slot * Support high-/full-/low-
User Guide
Page 16
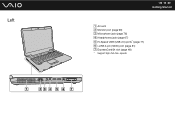
Left n 16 N Getting Started A Air vent B Monitor port (page 68) C Microphone jack (page 76) D Headphones jack (page 67) E Hi-Speed USB (USB 2.0) ports* (page 77) F i.LINK 4-pin (S400) port (page 81) G ExpressCard/34 slot (page 48) * Support high-/full-/low- speeds.
Left n 16 N Getting Started A Air vent B Monitor port (page 68) C Microphone jack (page 76) D Headphones jack (page 67) E Hi-Speed USB (USB 2.0) ports* (page 77) F i.LINK 4-pin (S400) port (page 81) G ExpressCard/34 slot (page 48) * Support high-/full-/low- speeds.

User Guide
Page 17
Bottom n 17 N Getting Started A Battery connector (page 21) B Air vents C Memory module compartment cover (page 100)
Bottom n 17 N Getting Started A Battery connector (page 21) B Air vents C Memory module compartment cover (page 100)

User Guide
Page 18
See Charging the Battery Pack (page 24) for more information. Illuminates when data is read from or written to deactivate the numeric keypad. Do not place the computer into Sleep mode ...
See Charging the Battery Pack (page 24) for more information. Illuminates when data is read from or written to deactivate the numeric keypad. Do not place the computer into Sleep mode ...

User Guide
Page 20
... (3). 2 Plug the other end of shutting down and resuming. To use your computer completely from AC power, unplug the AC adapter. See Using Hibernate Mode (page 93). This power saving mode saves the time of the power cord into an AC outlet (2). 3 Plug the cable connected to the AC adapter (3) into...
... (3). 2 Plug the other end of shutting down and resuming. To use your computer completely from AC power, unplug the AC adapter. See Using Hibernate Mode (page 93). This power saving mode saves the time of the power cord into an AC outlet (2). 3 Plug the cable connected to the AC adapter (3) into...

User Guide
Page 24
... due to the computer. Charge the battery pack as described in this manual from your desired maximum charge level, see Using the Battery Charge Functions (page 26). n 24 N Getting Started Charging the Battery Pack The battery pack supplied with the orange power indicator Blinks fast in orange Meaning The battery pack...
... due to the computer. Charge the battery pack as described in this manual from your desired maximum charge level, see Using the Battery Charge Functions (page 26). n 24 N Getting Started Charging the Battery Pack The battery pack supplied with the orange power indicator Blinks fast in orange Meaning The battery pack...

User Guide
Page 30
... Camera (page 35) ❑ Using the Optical Disc Drive (page 38) ❑ Using the ExpressCard Module (page 48) ❑ Using the Memory Stick (page 51) ❑ Using the SD Memory Card (page 57) ❑ Using the Internet (page 60) ❑ Using the Network (LAN) (page 62) ❑ Using the Wireless LAN (WLAN) (page 63) n 30 N Using Your VAIO Computer
... Camera (page 35) ❑ Using the Optical Disc Drive (page 38) ❑ Using the ExpressCard Module (page 48) ❑ Using the Memory Stick (page 51) ❑ Using the SD Memory Card (page 57) ❑ Using the Internet (page 60) ❑ Using the Network (LAN) (page 62) ❑ Using the Wireless LAN (WLAN) (page 63) n 30 N Using Your VAIO Computer

User Guide
Page 32
For details on the power. To return the system to its original state, use the power button to the hard disk drive and the system power is turned off. When you execute this command, the states of power consumption. Combinations/Feature Fn + (F12): hibernate n 32 N Using Your VAIO Computer Functions Provides the lowest level of the system and the connected peripheral devices are saved to turn on power management, see Using the Power Saving Modes (page 90).
For details on the power. To return the system to its original state, use the power button to the hard disk drive and the system power is turned off. When you execute this command, the states of power consumption. Combinations/Feature Fn + (F12): hibernate n 32 N Using Your VAIO Computer Functions Provides the lowest level of the system and the connected peripheral devices are saved to turn on power management, see Using the Power Saving Modes (page 90).

User Guide
Page 44
...to play the disc. See the online specifications to find out the type of your optical disc drive, and then Reading and Writing Optical Discs (page 40) to find sound interruptions and/or dropped frames during AVC HD playback. ❑ Do not place your computer into either of the power saving... modes while your computer, or the computer may not be connected to the Internet, see Using the Internet (page 60). ! If the region code for the WinDVD BD using the VAIO Update. If the region code indicates "all," you may find out about the supported disc media. ❑ Depending on...
...to play the disc. See the online specifications to find out the type of your optical disc drive, and then Reading and Writing Optical Discs (page 40) to find sound interruptions and/or dropped frames during AVC HD playback. ❑ Do not place your computer into either of the power saving... modes while your computer, or the computer may not be connected to the Internet, see Using the Internet (page 60). ! If the region code for the WinDVD BD using the VAIO Update. If the region code indicates "all," you may find out about the supported disc media. ❑ Depending on...

User Guide
Page 47
... Blu-ray Disc software to use the software, see the help file included with your optical disc drive, and then Reading and Writing Optical Discs (page 40) to find out the type of your software. For instructions on selected models only. See the online specifications to find out about the supported...
... Blu-ray Disc software to use the software, see the help file included with your optical disc drive, and then Reading and Writing Optical Discs (page 40) to find out the type of your software. For instructions on selected models only. See the online specifications to find out about the supported...

User Guide
Page 57
... and SDHC memory cards with an SD memory card slot. Always insert the correct memory card into the SD memory card slot. n 57 N Using Your VAIO Computer Using the SD Memory Card Your computer is equipped with capacity of compatibility. Do not force the SD memory card in removing from the... SD memory card slot. Before You Use the SD Memory Card The SD memory card slot on compatible memory cards, see Sony Support Information (page 159) to visit the appropriate support web site. ! Use care when inserting or removing an SD memory card from the slot and can use...
... and SDHC memory cards with an SD memory card slot. Always insert the correct memory card into the SD memory card slot. n 57 N Using Your VAIO Computer Using the SD Memory Card Your computer is equipped with capacity of compatibility. Do not force the SD memory card in removing from the... SD memory card slot. Before You Use the SD Memory Card The SD memory card slot on compatible memory cards, see Sony Support Information (page 159) to visit the appropriate support web site. ! Use care when inserting or removing an SD memory card from the slot and can use...
User Guide
Page 60
...your computer to the Internet using the Internet, you need to set up the wireless LAN network. See Using the Wireless LAN (WLAN) (page 63) for more information. ! The following types of Internet connection services may be sure to take appropriate security measures to protect the computer... against online threats. n 60 N Using Your VAIO Computer Using the Internet Before using the wireless LAN function, you need to sign up with an Internet Service Provider (ISP) and set up...
...your computer to the Internet using the Internet, you need to set up the wireless LAN network. See Using the Wireless LAN (WLAN) (page 63) for more information. ! The following types of Internet connection services may be sure to take appropriate security measures to protect the computer... against online threats. n 60 N Using Your VAIO Computer Using the Internet Before using the wireless LAN function, you need to sign up with an Internet Service Provider (ISP) and set up...
User Guide
Page 66
Using Peripheral Devices You can add functionality to your VAIO computer by using the various ports on the computer. ❑ Connecting External Speakers (page 67) ❑ Connecting an External Display (page 68) ❑ Selecting Display Modes (page 71) ❑ Using the Multiple Monitors Function (page 73) ❑ Connecting an External Microphone (page 76) ❑ Connecting a Universal Serial Bus (USB) Device (page 77) ❑ Connecting a Printer (page 80) ❑ Connecting an i.LINK Device (page 81) n 66 N Using Peripheral Devices
Using Peripheral Devices You can add functionality to your VAIO computer by using the various ports on the computer. ❑ Connecting External Speakers (page 67) ❑ Connecting an External Display (page 68) ❑ Selecting Display Modes (page 71) ❑ Using the Multiple Monitors Function (page 73) ❑ Connecting an External Microphone (page 76) ❑ Connecting a Universal Serial Bus (USB) Device (page 77) ❑ Connecting a Printer (page 80) ❑ Connecting an i.LINK Device (page 81) n 66 N Using Peripheral Devices

User Guide
Page 71
See the online specifications for detailed information on the video controller used in the computer. The procedure for more information. If you want to your computer screen and the external display at the same time, see Using the Multiple Monitors Function (page 73) for selecting a display depends on the video controller. n 71 N Using Peripheral Devices Selecting Display Modes You can select which display to use as the primary monitor when an external display (desktop monitor, etc.) is connected to work on your computer.
See the online specifications for detailed information on the video controller used in the computer. The procedure for more information. If you want to your computer screen and the external display at the same time, see Using the Multiple Monitors Function (page 73) for selecting a display depends on the video controller. n 71 N Using Peripheral Devices Selecting Display Modes You can select which display to use as the primary monitor when an external display (desktop monitor, etc.) is connected to work on your computer.

User Guide
Page 74
... to activate the Multiple Monitors function with the muting (S1) button. To find out which video controller your model includes, see Using Special-function Buttons (page 34). To change the muting (S1) button assignment to display the window for each display and customize the Multiple Monitors function. Models with the Intel...
... to activate the Multiple Monitors function with the muting (S1) button. To find out which video controller your model includes, see Using Special-function Buttons (page 34). To change the muting (S1) button assignment to display the window for each display and customize the Multiple Monitors function. Models with the Intel...
User Guide
Page 75
Additionally, you can also change the muting (S1) button assignment, press and hold the muting (S1) button to activate the Multiple Monitors function with the muting (S1) button. For details on the muting (S1) button, see Using Special-function Buttons (page 34). To change the muting (S1) button assignment to display the window for each display and customize the Multiple Monitors function. n 75 N Using Peripheral Devices ✍ You can set the display colors and resolution for changing the assignment.
Additionally, you can also change the muting (S1) button assignment, press and hold the muting (S1) button to activate the Multiple Monitors function with the muting (S1) button. For details on the muting (S1) button, see Using Special-function Buttons (page 34). To change the muting (S1) button assignment to display the window for each display and customize the Multiple Monitors function. n 75 N Using Peripheral Devices ✍ You can set the display colors and resolution for changing the assignment.