
User Guide
Page 9
... at eye level or slightly lower when you are sitting in front of the display to your display that help reduce glare. Choose a location where windows and lights do not create glare and reflection on the display. Proper lighting adds to the proper position. n9 N Before Use ❑ Viewing angle of...
... at eye level or slightly lower when you are sitting in front of the display to your display that help reduce glare. Choose a location where windows and lights do not create glare and reflection on the display. Proper lighting adds to the proper position. n9 N Before Use ❑ Viewing angle of...

User Guide
Page 25
n 25 N Getting Started Shutting Down Your Computer Safely To avoid losing unsaved data, be sure to shut down your computer properly, as described below. The Turn off computer window appears. 3 Click Turn Off. 4 Respond to any peripherals connected to turn off automatically. The power indicator light turns off any prompts warning you to save documents or to consider other users and wait for the computer to the computer. 2 Click Start and then Turn Off Computer. To shut down your computer 1 Turn off .
n 25 N Getting Started Shutting Down Your Computer Safely To avoid losing unsaved data, be sure to shut down your computer properly, as described below. The Turn off computer window appears. 3 Click Turn Off. 4 Respond to any peripherals connected to turn off automatically. The power indicator light turns off any prompts warning you to save documents or to consider other users and wait for the computer to the computer. 2 Click Start and then Turn Off Computer. To shut down your computer 1 Turn off .
User Guide
Page 27
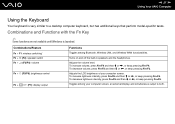
.... Turns on and off the built-in speakers and the headphones. Combinations and Functions with the Fn Key ✍ Some functions are not available until Windows is very similar to a desktop computer keyboard, but has additional keys that perform model-specific tasks. n 27 N Using Your...
.... Turns on and off the built-in speakers and the headphones. Combinations and Functions with the Fn Key ✍ Some functions are not available until Windows is very similar to a desktop computer keyboard, but has additional keys that perform model-specific tasks. n 27 N Using Your...
User Guide
Page 28
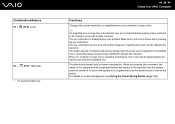
...selected models only. Make sure to turn on power management, see Using the Power Saving Modes (page 136). The location and size of software windows may not work with a higher resolution. When your computer's screen view. ✍ The magnified view is not as clear as the standard... may change when the screen view is magnified or the standard view is implemented by changing the resolution. n 28 N Using Your VAIO Computer Functions Changes the screen resolution to magnify/restore your computer's screen view is disabled during video playback. When you execute this key...
...selected models only. Make sure to turn on power management, see Using the Power Saving Modes (page 136). The location and size of software windows may not work with a higher resolution. When your computer's screen view. ✍ The magnified view is not as clear as the standard... may change when the screen view is magnified or the standard view is implemented by changing the resolution. n 28 N Using Your VAIO Computer Functions Changes the screen resolution to magnify/restore your computer's screen view is disabled during video playback. When you execute this key...
User Guide
Page 30
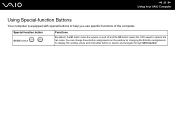
You can change these button assignments on and off and the S2 button lowers the CPU speed to help you use specific functions of the computer. To display this window, press and hold either button or launch and navigate through VAIO Central. n 30 N Using Your VAIO Computer Using Special-function Buttons Your computer is equipped with special buttons to reduce the fan noise. Special-function button S1/S2 buttons Functions By default, the S1 button turns the volume on the window for changing the S button assignments.
You can change these button assignments on and off and the S2 button lowers the CPU speed to help you use specific functions of the computer. To display this window, press and hold either button or launch and navigate through VAIO Central. n 30 N Using Your VAIO Computer Using Special-function Buttons Your computer is equipped with special buttons to reduce the fan noise. Special-function button S1/S2 buttons Functions By default, the S1 button turns the volume on the window for changing the S button assignments.
User Guide
Page 31
... such software. See the online Specifications to instant messaging software and video editing software, for example Windows Messenger and Windows MovieMaker. The viewer window may be shared by more than one software application. If another software application is ready for a... video conference using the software. ✍ The built-in MOTION EYE camera cannot be equipped with the built-in MOTION EYE camera. n 31 N Using Your VAIO...
... such software. See the online Specifications to instant messaging software and video editing software, for example Windows Messenger and Windows MovieMaker. The viewer window may be shared by more than one software application. If another software application is ready for a... video conference using the software. ✍ The built-in MOTION EYE camera cannot be equipped with the built-in MOTION EYE camera. n 31 N Using Your VAIO...

User Guide
Page 39
n 39 N Using Your VAIO Computer Playing CDs To play an audio CD 1 Insert a disc into the optical disc drive. 2 If nothing appears on the desktop, then click Start, point to All Programs, and click to select an option. If the Audio CD window appears, click to open a CD program, such as the SonicStage software.
n 39 N Using Your VAIO Computer Playing CDs To play an audio CD 1 Insert a disc into the optical disc drive. 2 If nothing appears on the desktop, then click Start, point to All Programs, and click to select an option. If the Audio CD window appears, click to open a CD program, such as the SonicStage software.
User Guide
Page 40
n 40 N Using Your VAIO Computer Copying Files to CDs See the online Specifications to find about the supported disc media. A new window appears with Removable Storage. Do not strike or shake the computer ... copy files to a disc. 1 Insert a blank disc into the optical disc drive. If the CD Drive window appears, click Take no action and then click OK. 2 Right-click Start and then click Explore. 3 In...(s) or folder(s), point to Send To, and then click the optical disc drive* name. 4 Close the window. 5 Click Start and then My Computer. 6 Click the optical disc drive icon under Files Ready to Be...
n 40 N Using Your VAIO Computer Copying Files to CDs See the online Specifications to find about the supported disc media. A new window appears with Removable Storage. Do not strike or shake the computer ... copy files to a disc. 1 Insert a blank disc into the optical disc drive. If the CD Drive window appears, click Take no action and then click OK. 2 Right-click Start and then click Explore. 3 In...(s) or folder(s), point to Send To, and then click the optical disc drive* name. 4 Close the window. 5 Click Start and then My Computer. 6 Click the optical disc drive icon under Files Ready to Be...
User Guide
Page 43
... a PC Card into the slot. ✍ Some devices may damage the connector pins. n 43 N Using Your VAIO Computer ! It may not function properly if you are inserting the PC Card in the System Properties window, remove the software driver and then reinstall it. Restarting will restore the original state of the computer...
... a PC Card into the slot. ✍ Some devices may damage the connector pins. n 43 N Using Your VAIO Computer ! It may not function properly if you are inserting the PC Card in the System Properties window, remove the software driver and then reinstall it. Restarting will restore the original state of the computer...

User Guide
Page 44
n 44 N Using Your VAIO Computer Removing a PC Card Follow the steps below to remove the PC Card while your system may not work properly. If it is not removed properly, your computer is on the taskbar. The Safely Remove Hardware window appears. 2 Select the hardware you want to 6.... 1 Double-click the Safely Remove Hardware icon on . A window appears, explaining that it back in. The Stop a Hardware Device window appears. 4 Confirm that the PC Card pops out. 9 ...
n 44 N Using Your VAIO Computer Removing a PC Card Follow the steps below to remove the PC Card while your system may not work properly. If it is not removed properly, your computer is on the taskbar. The Safely Remove Hardware window appears. 2 Select the hardware you want to 6.... 1 Double-click the Safely Remove Hardware icon on . A window appears, explaining that it back in. The Stop a Hardware Device window appears. 4 Confirm that the PC Card pops out. 9 ...

User Guide
Page 48
... 6. 1 Double-click the Safely Remove Hardware icon on . The Stop a Hardware Device window appears. 4 Confirm that it is not removed properly, your computer is on the taskbar. n 48 N Using Your VAIO Computer Removing an ExpressCard Media Follow the steps below to remove the ExpressCard media while your ...system may not work properly. If it out of the slot. A window appears, explaining that the device can be safely removed from...
... 6. 1 Double-click the Safely Remove Hardware icon on . The Stop a Hardware Device window appears. 4 Confirm that it is not removed properly, your computer is on the taskbar. n 48 N Using Your VAIO Computer Removing an ExpressCard Media Follow the steps below to remove the ExpressCard media while your ...system may not work properly. If it out of the slot. A window appears, explaining that the device can be safely removed from...

User Guide
Page 50
...ExpressCard/34 slot. See Using the ExpressCard Media (page 45) and Using Other Memory Cards (page 53) for more information. n 50 N Using Your VAIO Computer Inserting a Memory Stick Media There are two ways you need the supplied memory card adapter. To insert a Memory Stick media using the Memory Stick...toward the Memory Stick Duo/PRO Duo media slot. 2 Carefully slide the Memory Stick media into the slot until it clicks into your My Computer window as a local drive, under the appropriate letter (depending on the configuration of the computer). To do this, you can insert a Memory Stick ...
...ExpressCard/34 slot. See Using the ExpressCard Media (page 45) and Using Other Memory Cards (page 53) for more information. n 50 N Using Your VAIO Computer Inserting a Memory Stick Media There are two ways you need the supplied memory card adapter. To insert a Memory Stick media using the Memory Stick...toward the Memory Stick Duo/PRO Duo media slot. 2 Carefully slide the Memory Stick media into the slot until it clicks into your My Computer window as a local drive, under the appropriate letter (depending on the configuration of the computer). To do this, you can insert a Memory Stick ...

User Guide
Page 51
... if you insert it smoothly. To view the contents of the Memory Stick media 1 Click Start and then My Computer to open the My Computer window. 2 Double-click the Memory Stick media icon to hold the Memory Stick media with the duo-size media. To format a Memory Stick media Use the... for details. To avoid damaging the computer or the Memory Stick media, do not force the Memory Stick media into the slot. n 51 N Using Your VAIO Computer !
... if you insert it smoothly. To view the contents of the Memory Stick media 1 Click Start and then My Computer to open the My Computer window. 2 Double-click the Memory Stick media icon to hold the Memory Stick media with the duo-size media. To format a Memory Stick media Use the... for details. To avoid damaging the computer or the Memory Stick media, do not force the Memory Stick media into the slot. n 51 N Using Your VAIO Computer !

User Guide
Page 56
n 56 N Using Your VAIO Computer Using the Internet Setting Up a Dial-up Internet Connection Before you can connect to the Internet, you need to connect your telephone cable connection, ... into the modem port on -screen instructions. To connect a telephone cable 1 Plug one end of these connections may not work properly. If the Location Information window appears, follow the on-screen instructions. 3 If it is not already selected, click to select Connect to a coin-operated telephone, and may result in excess...
n 56 N Using Your VAIO Computer Using the Internet Setting Up a Dial-up Internet Connection Before you can connect to the Internet, you need to connect your telephone cable connection, ... into the modem port on -screen instructions. To connect a telephone cable 1 Plug one end of these connections may not work properly. If the Location Information window appears, follow the on-screen instructions. 3 If it is not already selected, click to select Connect to a coin-operated telephone, and may result in excess...
User Guide
Page 60
...then click Properties. The Wireless network properties window appears. 8 Enter a network name (SSID)*2. n 60 N Using Your VAIO Computer To communicate without an access point (ad-hoc) 1 Turn on the taskbar to display the Wireless Device Switch window. On models that support the Bluetooth ...bandwidth, which is provided for the IEEE 802.11a standard, on ad-hoc networks. Some information becomes visible. The Wireless Network Connection Properties window appears. 6 Select the Wireless Networks tab. 7 Click the Add... Select your desired wireless option(s) and click OK. 2 Click Start...
...then click Properties. The Wireless network properties window appears. 8 Enter a network name (SSID)*2. n 60 N Using Your VAIO Computer To communicate without an access point (ad-hoc) 1 Turn on the taskbar to display the Wireless Device Switch window. On models that support the Bluetooth ...bandwidth, which is provided for the IEEE 802.11a standard, on ad-hoc networks. Some information becomes visible. The Wireless Network Connection Properties window appears. 6 Select the Wireless Networks tab. 7 Click the Add... Select your desired wireless option(s) and click OK. 2 Click Start...

User Guide
Page 61
.... *3 Hexadecimal: A number representation using the digits 0-9, with their usual meaning, plus the letters A-F (or a-f) to -computer (ad hoc) network; The Advanced window appears. 17 Select the Computer-to 15. ✍ An ad-hoc network does not support WPA. Your network name appears in the exact same way.... The computer is a computer-to represent hexadecimal digits with values of the window. 15 Click OK. wireless access points are not used at the bottom of (decimal) 10 to -computer (ad hoc) networks only option ...
.... *3 Hexadecimal: A number representation using the digits 0-9, with their usual meaning, plus the letters A-F (or a-f) to -computer (ad hoc) network; The Advanced window appears. 17 Select the Computer-to 15. ✍ An ad-hoc network does not support WPA. Your network name appears in the exact same way.... The computer is a computer-to represent hexadecimal digits with values of the window. 15 Click OK. wireless access points are not used at the bottom of (decimal) 10 to -computer (ad hoc) networks only option ...

User Guide
Page 62
... Wireless Network Connection. 5 Click Properties. The Advanced window appears. 7 Click to -computer (ad-hoc) network 1 Click Start and then Control Panel. 2 Click Network and Internet Connections. 3 Click Network Connections. n 62 N Using Your VAIO Computer To disconnect from a computer-to select Any ...available network (access point preferred), and click Close. 8 Click OK. 9 Close the Network Connections window. 10 Turn off the WIRELESS or WIRELESS LAN switch. The Wireless...
... Wireless Network Connection. 5 Click Properties. The Advanced window appears. 7 Click to -computer (ad-hoc) network 1 Click Start and then Control Panel. 2 Click Network and Internet Connections. 3 Click Network Connections. n 62 N Using Your VAIO Computer To disconnect from a computer-to select Any ...available network (access point preferred), and click Close. 8 Click OK. 9 Close the Network Connections window. 10 Turn off the WIRELESS or WIRELESS LAN switch. The Wireless...
User Guide
Page 64
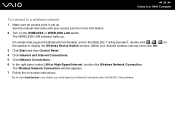
...On models that came with your access point for more information. 2 Turn on the WIRELESS or WIRELESS LAN switch. The Wireless Network Connection window appears. 7 Follow the on the taskbar to a wireless network 1 Make sure an access point is set up . n 64 N Using Your... VAIO Computer To connect to display the Wireless Device Switch window. See the manual that support the Bluetooth functionality* and/or the IEEE 802.11a/b/g standard*, double-click ( / ) on -screen instructions....
...On models that came with your access point for more information. 2 Turn on the WIRELESS or WIRELESS LAN switch. The Wireless Network Connection window appears. 7 Follow the on the taskbar to a wireless network 1 Make sure an access point is set up . n 64 N Using Your... VAIO Computer To connect to display the Wireless Device Switch window. See the manual that support the Bluetooth functionality* and/or the IEEE 802.11a/b/g standard*, double-click ( / ) on -screen instructions....
User Guide
Page 65
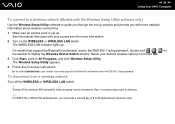
n 65 N Using Your VAIO Computer To connect to a wireless network (Models with the Wireless Setup Utility software only) Use the Wireless Setup Utility software to guide you through the ... the manual that support the Bluetooth functionality* and/or the IEEE 802.11a/b/g standard*, double-click ( / ) on the taskbar to display the Wireless Device Switch window. To disconnect from a wireless network Turn off the wireless LAN functionality while accessing remote documents, files, or resources may result in data loss. ✍ For...
n 65 N Using Your VAIO Computer To connect to a wireless network (Models with the Wireless Setup Utility software only) Use the Wireless Setup Utility software to guide you through the ... the manual that support the Bluetooth functionality* and/or the IEEE 802.11a/b/g standard*, double-click ( / ) on the taskbar to display the Wireless Device Switch window. To disconnect from a wireless network Turn off the wireless LAN functionality while accessing remote documents, files, or resources may result in data loss. ✍ For...

User Guide
Page 66
... your computer and other Bluetooth devices such as another computer or a mobile phone. n 66 N Using Your VAIO Computer Using the Bluetooth Functionality The Bluetooth functionality is available on the taskbar to display the Wireless Device Switch window. 3 Select the Enable Bluetooth Device option. 4 Click OK. See the online Specifications to see the...
... your computer and other Bluetooth devices such as another computer or a mobile phone. n 66 N Using Your VAIO Computer Using the Bluetooth Functionality The Bluetooth functionality is available on the taskbar to display the Wireless Device Switch window. 3 Select the Enable Bluetooth Device option. 4 Click OK. See the online Specifications to see the...


